Sgraffito pottery is really quite simple to make. However, it can be extremely satisfying and lovely to look at. Like most techniques in pottery, there are several ways of approaching sgraffito. When I became interested in it my first question was how do you make sgraffito pottery? These are three of the sgraffito techniques I have learned about…
Making sgraffito pottery involves scratching through a top decorative layer to expose the underlying clay body. The decorative layer can be underglaze, slip, or engobe. Often the underglaze, slip, or engobe is applied to leather hard clay before being incised. However, the sgraffito technique can be used on bisqueware too.
Check out my video on sgraffito techniques.

How Do You Make Sgraffito Pottery?
Usually, sgraffito is made using underglaze, slip, or engobe. In this article, I will look at sgraffito with underglaze and slip. I will also look at using the sgraffito technique on bisque pottery.
Sgraffito Technique 1
The first technique I will look at is sgraffito with underglaze.
How to Make Sgraffito Pottery with Underglaze
Here is a simple step-by-step guide looking at how do you make sgraffito pottery with underglaze:
Step 1: Make Your Pottery!
You can use sgraffito on most shapes of pottery, including bowls, cups, vases, and tiles. However, whatever shape you choose you need to prepare your surface so that it is smooth. A bit of undulation on an otherwise smooth surface is okay. But sgraffito won’t look great on an already textured surface.
So, the first step is to make your pottery, using whichever technique you like. You can hand build or throw on the wheel. Or if you are making a tile, you can roll out and shape your tile. Whichever way you choose, be sure to clean up the surface with a rib tool.

Step 2: Leave the Clay to go Leather Hard
Leather hard clay is basically clay that has dried out somewhat, but still has a bit of moisture in it. Because it has moisture, it is still relatively strong, so it is less likely to break than bone dry clay. And although it is not workable anymore, you can still carve into it or trim it.
Catching the clay at the right point when it is leather hard can be tricky when making sgraffito. If it is too soft, the clay will deform and bulge when you carve it. So, the resulting incised surface won’t be level or smooth. But if it’s too dry, your underglaze can flake and crack. And it’s hard work on the hands and wrists.
How Dry is Leather Hard Clay?
This is how I gauge it; if I pick up the pottery, does it feel firm and solid? If the answer is yes, then I know it’s not too soft. When I gently press my thumbnail into the underside, can I make a mark in the clay easily? If the answer is yes, then it’s not too dry.
Another thing that I have noticed is that underglaze can dry the clay out. This seems to go against logic. But I’ve noticed that I can paint underglaze on relatively soft leather hard clay. Then if I leave it overnight, boom, the next day, it’s really quite hard. Even if I have kept it well covered.
I haven’t been able to find an explanation for this. However, I’ve concluded that although the underglaze contains water, it also draws moisture out of the clay. My thinking is that the particles in the underglaze absorb moisture and speed up the drying.
I’m not sure if this is scientifically true. However, it’s the conclusion I’ve drawn. Either way, it’s something to be aware of if you are doing sgraffito with underglaze. Just don’t leave it too long between applying the underglaze and beginning to incise your pottery.
Step 3: Applying The Underglaze
Once your clay is leather hard, apply your underglaze. I like to use a mop brush, as you can apply a generous amount easily. Mayco underglaze is really nice. You can do this in whatever way you like. There are a number of ways to apply underglaze, including painting, dipping, spraying, or pouring.
A nice effect is to create a gradient with different colors. Or using a block color can create a very dramatic effect. I like using block colors because sgraffito designs are quite busy, and I don’t want to battle with the designs.
Another tip to applying underglaze is that you can apply different layers of color. Then when you scratch through the underglaze you can vary the pressure you apply. If you incise lightly, you will carve through to a lower layer of underglaze exposing a different color.
Or if you apply more pressure as you carve, you will expose the underlying clay body. This will create a variation in texture and color in your sgraffito pottery.
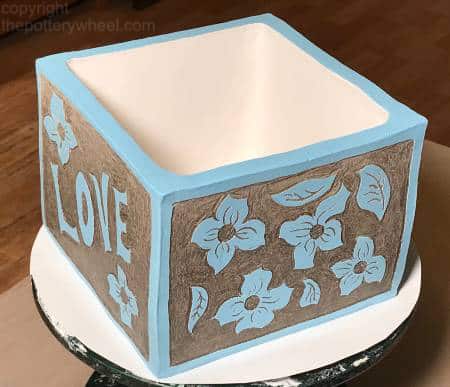
In this piece, I used grey stoneware called school buff. I like this clay for hand-building because it has a bit of sand in it and is quite plastic. Because it has sand in it, it’s not nice to throw, as it tends to rasp the hands. But it’s good for hand-building and sculpture because it supports itself well.
However, because it’s a grey color, I decided to apply white underglaze first as a base. This was so that the blue didn’t have to fight the color of the clay body to stand out.
How Many Layers of Underglaze to Apply?
Generally, you are advised to apply 2-3 layers of underglaze to pottery. However, when you are applying it to leather hard clay you need to apply more.
This is because leather hard clay is less absorbent than bisque or bone dry clay. So, you need to apply between 5 and 7 layers to build up enough color and opacity.
I applied 3 layers of white underglaze and 2 layers of turquoise. Make sure each layer is dry between applications. And once you have applied sufficient layers, you can begin to start your sgraffito design.
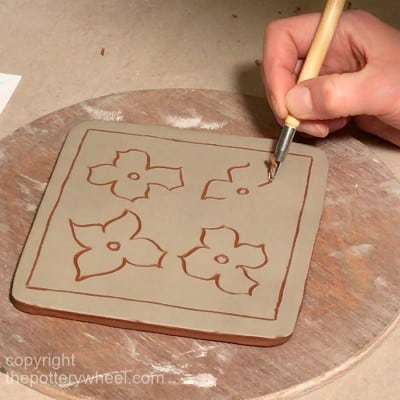
Step 4: Drawing Your Sgraffito Design
Although you don’t have to, it can be helpful to sketch out your design first on paper. This gives you a chance to envisage your design before committing it to your pottery.
You can then use this paper design as a reference. If your design is complex, it can be helpful to transfer it onto your piece using tracing paper. To do this, you can first sketch your design onto paper, then copy it onto tracing paper.
Then, you can hold your tracing paper up to the pottery, and draw around the design. If you press firmly around the design with a pencil, you leave an indentation in the clay. The indentation is an outline of your design, which you can use as a guide when carving. You can either trace onto the clay before you apply underglaze or afterward.
If you trace directly onto the clay, it will be softer and easier to leave an outline on. However, when you apply the underglaze on top, you will lose a bit of the detail of the design.
If you trace onto the underglaze, you will have to press a little harder. This is because the underglaze will harden the surface a little.
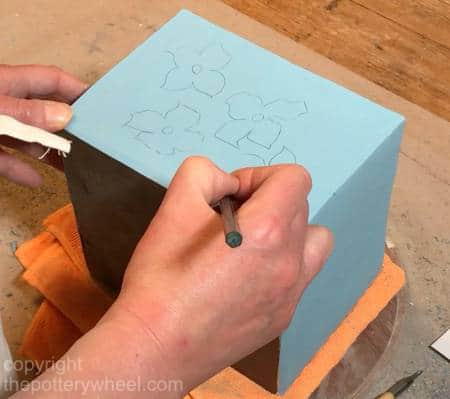
Alternatively, you can skip the tracing process and simply draw your design freehand onto the underglaze. I’d recommend using a light pencil, like HB, rather than a dark one. Although the pencil will burn off when your pottery is fired, it can be distracting to have heavy pencil marks.
Once you are happy with your design, you can start carving….
Step 5: Choosing Your Sgraffito Tools
Basically, you can use anything you like that is sharp to score into your clay. And, the tool that potters prefer for sgraffito is quite individual.
I’d encourage you not to get too hung up on getting ‘the right’ tools, and use what feels good. One of my favorite tools is a piece of dowel that I carved into a pencil shape. Alternatively, a good old pencil is also a handy, inexpensive choice.
That being said, it is helpful to have a range of shapes and sizes to score with. Different designs will benefit from different incising techniques. So, it’s good to build up a little collection of tools that you like to use.
Some of the pottery tools that are often used for sgraffito are:
- Mini ribbon tools
- Clean up tools – these are generally used by sculptors. But they are great for sgraffito
- Stylus tool
- A needle tool is handy, though I find it too thin to be useful often in sgraffito
- Mop brush
The size of the tool that you use will depend on how fine the detail of your design is. And, how much underglaze/clay you want to remove at one time.
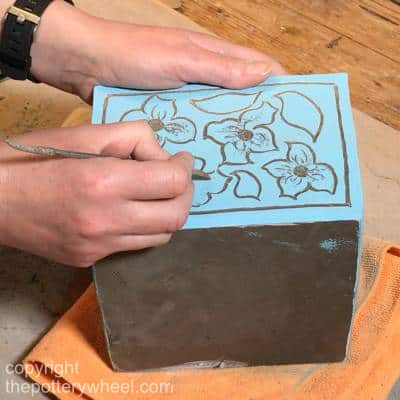
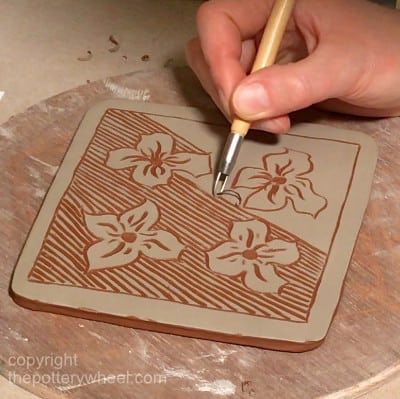
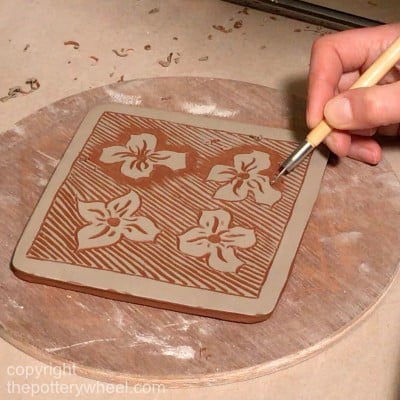
Step 6: Sgraffito Carving
Although this is the most exciting bit of sgraffito, it is also the simplest to describe. Sgraffito feels like drawing on clay to me, and your style of drawing is very personal. However, there are a few tips that it is helpful to know:
I start by incising the outline of my design. This involves pressing the tool down through the underglaze and scratching it off to reveal the clay underneath.
Usually, I create the initial outline with a tiny loop tool that is designed specifically for sgraffito.
Keep a soft brush handy to dust off the loose pieces of underglaze and clay that will come up.
Once you have created the outline, you can scratch out the rest of your design as you like.
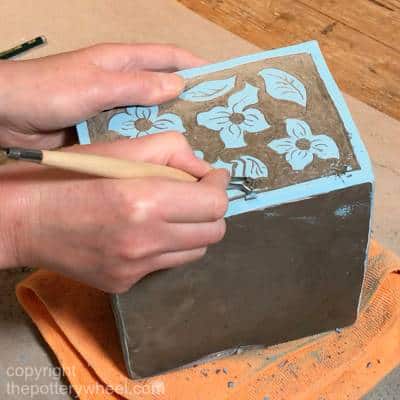
How much clay you take away is a matter of preference. Sometimes it is nice to remove as little clay as you can and have a relatively smooth surface. Other times it will suit a piece to score a bit deeper and create more texture. You vary the depth by varying the amount of pressure you put on the tool.
One great tip is that the more of the clay that shows through, the more your design will pop. A relatively dense area of clay, next to a patch of underglaze will create a lovely contrast.
Try to be relatively careful when handling your pottery as the underglaze is fragile.
Step 6: Finishing Up
Once you have finished your design, you can touch up any little patches of underglaze that have been damaged.
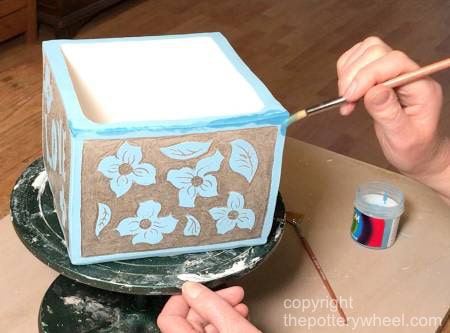
It’s also a good idea to check that there are no sharp little raised areas on your sgraffito surface. If there are, you can carefully remove them or press them back.
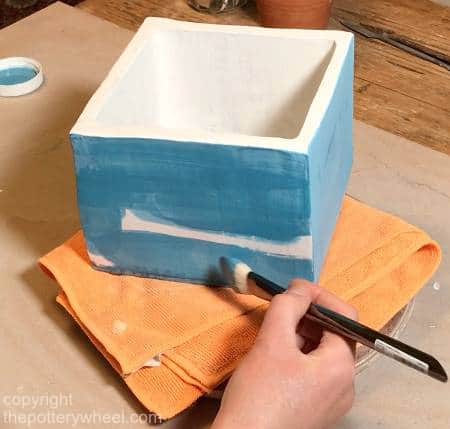
Let your piece become bone dry and then bisque fire it. Again, after the bisque fire, you can touch up any underglaze that needs a bit of a boost. Then apply a clear glaze before glaze firing.
Sgraffito Technique 2
The second technique I will look at is making sgraffito with clay slip.
How to Make Sgraffito Pottery with Slip
You can also use slip with sgraffito instead of underglaze. What I like about slip is that it gives a softer look. I don’t mean that the sgraffito lines are softer, they can be as precise as they are with underglaze. What I mean is that the overall look of sgraffito slip looks a bit more velvety and organic to me.
With that, here is a step-by-step account of how to make sgraffito pottery with slip…
When to Apply the Slip
Slip tends to flake off bone dry clay, so, I let the clay become leather hard. I would say it’s best to leave the clay until it is mid-leather hard. If you wait until it’s too dry, the wetness of the slip will be too much for the clay. Equally, if it’s too wet, the slip will take forever to dry enough to scratch.
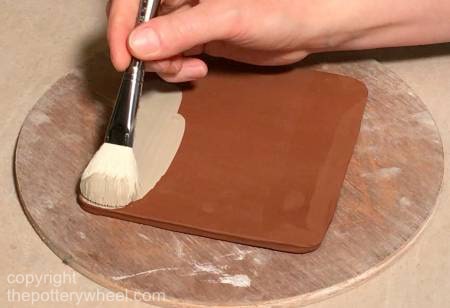
How to Apply the Slip
I generally then paint the slip onto the clay often with a mop brush. However, depending on the design of your pottery, you can pour or dip the piece in slip too.
If the clay is very dry leather hard, the slip will dry out quickly. You need to scratch it before the slip dries out too much. If it gets too dry it will flake when you incise it. However, if the clay has enough moisture in it, you have a little more time to work.
When to Start Your Sgraffito Carving
Keep testing the surface of the slip gently with a clean dry finger, to see if it is touch dry. You need to catch the slip when it is touch dry. But not so dry that it will flake off when you scratch. This is a bit of a knack and you will learn to gauge it through trial and error.
It’s not possible to give a precise waiting time as it depends on a few factors. Some of these factors are how humid your work environment is, and how wet your leather hard clay is.
Remember though that once your piece is too dry, you have passed the point of no return! It’s best to keep checking regularly. If it’s too soft, you can leave it longer to dry out. But if it’s too dry, then your sgraffito may not look great.
Incising your Sgraffito Slip
The techniques for actually carving your sgraffito slip are similar to the ones outlined above when using underglaze. You can use the same tools and the same aesthetic considerations apply too.
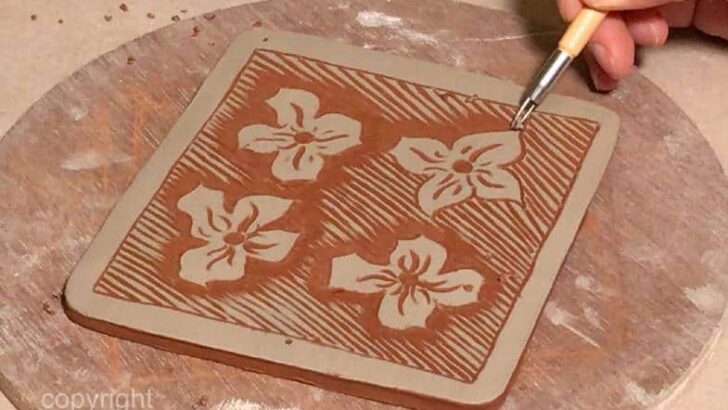
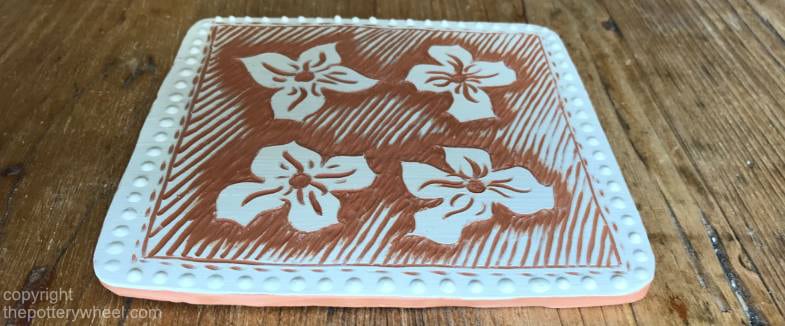
In this piece, I used a nice smooth white decorating slip on a lovely rich red terracotta. I think the contrasting colors work really well.
Just for good measure, I did a bit of slip trailing on the edge of the piece too. Probably gilding the lily, but sometimes it’s hard to know when to stop!

Sgraffito Technique 3
The third and last technique I will look at is making sgraffito with bisque pottery.
How to Make Sgraffito Pottery with Bisqueware
Sgraffito usually involves carving up a bit of the underlying clay as well as the decorative underglaze or slip. So, a common question is whether you can do sgraffito on bisque clay.
Well, the answer is yes, you can. It feels different from making sgraffito with leather hard clay, but it can be very effective.
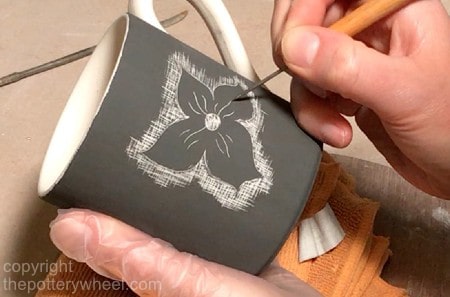
Sgraffito on Bisqueware
Slip consists largely of unfired clay particles suspended in water. For this reason, it’s really not a good idea to apply it to bisque fired clay. Unless it is incredibly thin, it will simply shrink and flake off.
For that reason, if you are doing sgraffito on bisque pottery, you will need to use underglaze. Underglaze is designed to be suitable for application to greenware and bisqueware.
When you are using the sgraffito technique on bisqueware, it feels quite different from using greenware. The difference is that when you are using greenware, you are usually removing at least some of the clay too. By contrast, when using bisque pottery, the tool will be scraping against hard bisque. All that you are scratching away is underglaze.
Tips for Making Sgraffito on Bisque Pottery
- Apply your underglaze to your bisqueware. Let it dry between each coat. This should be quick as the liquid in the underglaze will be absorbed very fast by the bisqueware.
- It can be a nice effect to use different colors of underglaze for different layers. That way, if you vary the pressure when you are incising the underglaze, you will reveal different underlying colors.
- You can use the technique of applying different colored layers when doing sgraffito on leather hard clay too. However, I find that this is more successful on bisqueware. This is probably because I find it easier to vary the pressure when scratching into the hard, bisque surface.
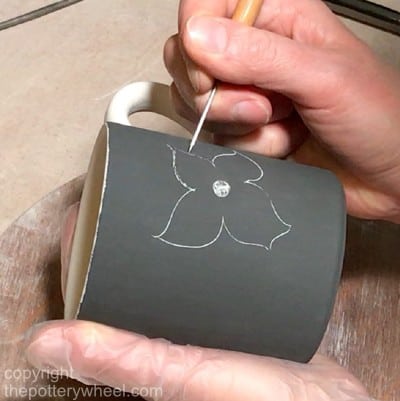
Sketching and Scoring Your Design on Your Pottery
If you are feeling brave, or you are great at drawing, you can start your design by scratching an outline. But once the line is etched in, it is there to stay. So, you may want to sketch out your design on the underglaze with a pencil first.
As with the above techniques, it is easiest to scratch out the basic outline of your design shape first. Then, work on the finer details of the design to give it some shape and movement.
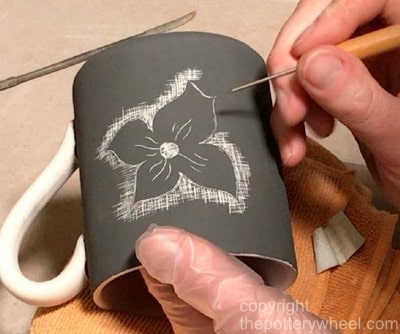
A common sgraffito technique is to create shading by scoring parallel lines into the underglaze. You can vary the tone of the color by altering how close together the lines are. This is a very old technique for varying shade and tone in etched prints too.
You can also use cross-hatching to create depth and movement in your sgraffito too.
The good thing about sgraffito on bisqueware is that once you have finished you can glaze fire immediately. Simply apply a clear glaze to your work, being careful not to smudge the underglaze. Then glaze fire.
Final Thoughts
So, if you’ve been wondering how do you make sgraffito pottery, the answer is that it is a simple technique. However, just because a technique is simple, does not necessarily mean it is unskilled. And it can be an extremely tactile, lovely-looking technique.