Wrist pain among potters is quite a common problem. Wheel-throwing pottery can put pressure on your wrist and cause pain, or make existing wrist pain worse. Luckily there are some things you can do to reduce the strain on your wrists and keep you throwing comfortably.
You can learn how to make pottery without wrist pain by adjusting your technique. The main culprits for wrist pain are centering, throwing, wedging, and carrying clay. Changing the way you do these key tasks can help prevent the odd twinge from becoming a longer-term issue.
Disclaimer I’m not a medical professional, this article is information not advice. If you have pain when you are making pottery, talk to a doctor to get a clear picture of what the cause might be and to get professional advice.
The reason I’m interested in finding solutions to wrist pain from pottery is that I have had carpal tunnel in both my wrists. And, as a cherry on the cake, I broke my wrist about a year ago and had to find ways to adapt my technique whilst it healed.
It’s worth remembering that what works for one person may not work for another. Finding ways to make pottery and avoid wrist pain may take a bit of experimentation.
Causes of Wrist Pain When Making Pottery
Wrist pain can come from different problems and is common among potters (source). Wrist pain can be caused by several things when you are making pottery. Some of the more common problems associated with wrist pain in potters are:
- Carpal Tunnel
- Tendonitis
- Arthritis
The activities that often make wrist pain worse when making pottery are:
- Wheel throwing (particularly centering)
- Wedging
- Lifting and carrying in the studio
Let’s look at each of these areas in turn and consider what adjustments you can make that might help.
Throwing Pottery Without Wrist Pain
The time when you are applying most pressure to the clay is when you are centering. It’s when you are centering that wrist pain can be most apparent. However, it can affect all aspects of throwing.
When you are throwing, your arms, wrists, and hands can get into some awkward positions. Here are 9 solutions that you might want to try out to address your wrist pain.
1) Check the Angle of Your Wrist
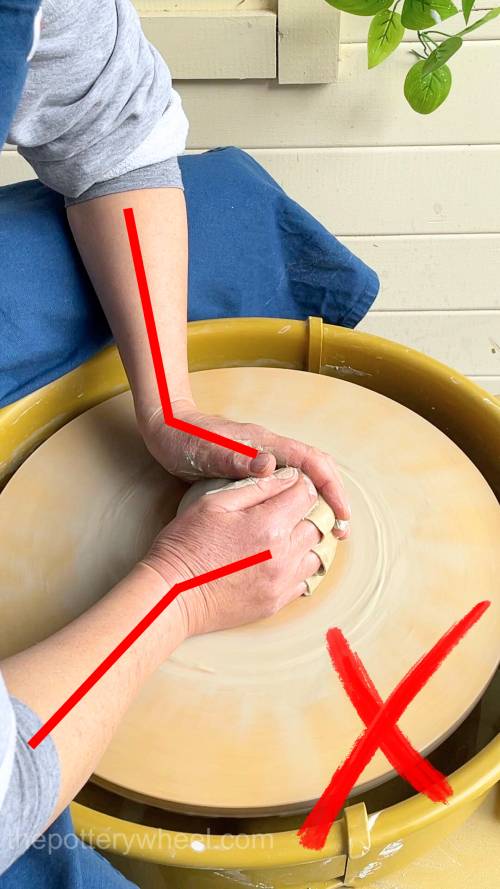
Next time you are throwing, take a look at your wrists while you are at work. Are your hands bent quite far backward? If you find that your wrists are bent back at a 90-degree angle, it can cause hyperextension. This means that you are pushing your wrists past their comfortable limits.
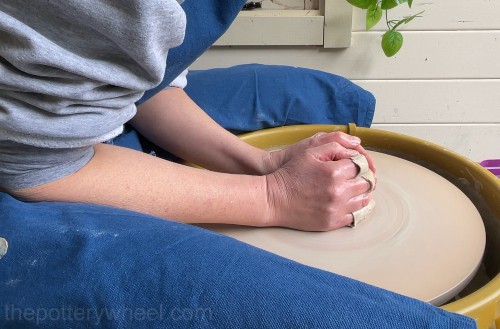
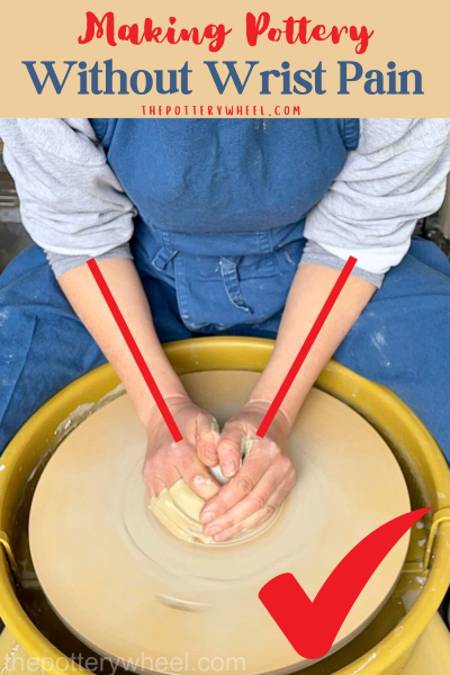
One cause of this is that your arm position isn’t supporting your wrist. When you are centering your clay, it’s important to anchor your elbows so that you can use your upper body strength to center the clay too.
When I’m centering I like to have my elbows tucked into my body at my hip joint. The elbows then brace against the sides of the body to form a solid axis. This helps to get the clay under control.
But also, when my elbows are tucked in at the hip, the line between my arm and my hand is more neutral, and my wrist isn’t bent too much.
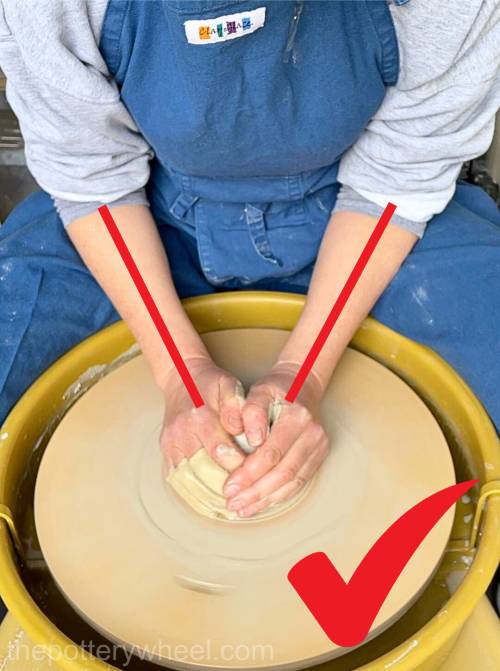
Different potters like to brace their elbows at different points on their legs when they are centering. But whatever position you choose to anchor your elbow, experiment with finding a position that gives your wrist as neutral an angle as possible.
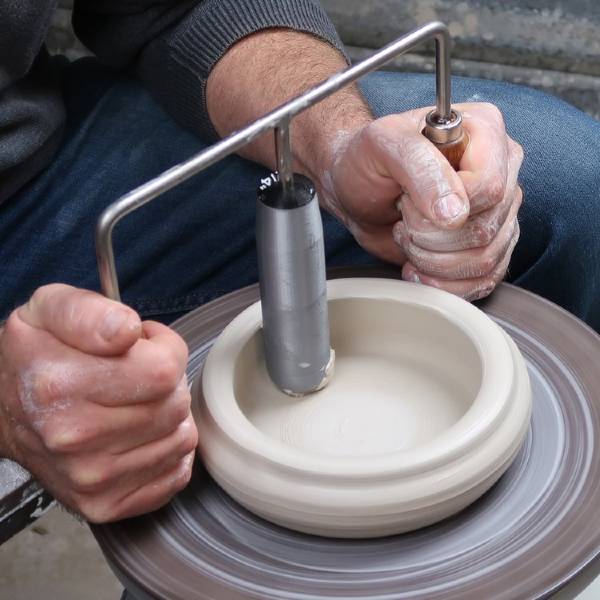
2) Try a Centering Tool
You might want to try using a centering tool. There are a few centering tools on the market. One tool that potters rave about is the Strong Arm Centering /Opening Tool.
The Strong Arm Tool
The Strong Arm consists of two wooden arms that swing over your wheel head. These arms are attached to a mounting bracket that is fixed to your pottery wheel or the wall.
The arms have two attachments, one is a bit like a paddle that you can press up against the clay to center the clay. The other is like a probe that you can press down into the centered clay to open the clay up.
I don’t own a Strong Arm, but when I broke my wrist, a lot of people contacted me telling me that they had bought one because of wrist and arm pain. The reports were great, and I think it has enabled a lot of people to carry on making pottery when otherwise they might have had to stop.
The Bottom Setter Tool
Another great pottery tool that can help relieve the pressure on your hands and wrist is a handheld opening tool.
There are a few of these tools on the market, one example is the Bottom Setter Tool by Justin’s Makery. They have three prongs on them, the two on the outside are designed to be held in your hands. The central prong is designed to be pressed into your centered clay.
You pull the handles towards yourself to open up the clay. The central prong is a little shorter than the handles you are pulling towards yourself. This ensures that you are creating an even base on the bottom of your pots.
The good thing about a pottery opening tool like this is that you avoid putting pressure on your wrists as you are opening the clay.
3) Wheel Height
Another thing to consider is the height of your wheel. Ideally, you want the splashpan and wheelhead to be sitting between your thighs, with your arms forming a straight line from your hip to your hand.
If your wheel is not at the right height for you, your wrists are more likely to be in an awkward position. They will be bending up or down to accommodate the height difference.
If your wheel is too low, there are simple ways to adjust this. You can buy leg extensions that are specifically made for certain wheel models.
Or you can keep it simple and raise your wheel with bed risers, or cinder blocks. Bed risers are relatively cheap and come in different heights. So, you can adjust your wheel to the height that is most comfortable for your wrists. You can read more about finding the right height for your pottery wheel in my article here.
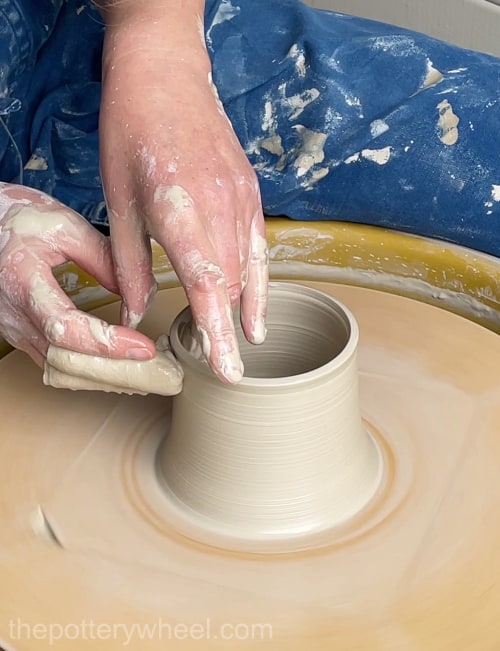
4) Hand Position
As well as the angle of your wrist when centering, consider how you are using your hands. The part of your hand you use to press on the clay makes a difference. Are you pressing the clay with the part of your hand between the middle of your palm and your knuckles? If so, then you may well be pushing your wrist too far back.
It is recommended that you use the heel of your palm to press into the clay when centering.
Some potters use the mound at the base of their thumb to put pressure on the clay when they are centering. This can involve awkwardly angling your wrist. One recommendation is to use the heel of your whole hand, rather than the base of the thumb. That way you spread the pressure more evenly throughout your hand.

5) Are You Pushing or Pulling as You Center?
Because of the strain that pushing has on your left wrist, some potters recommend a technique that involves pulling the clay as you center. The idea is that you put force on the clay by pulling it towards yourself rather than pushing it away. Cupping your hand and pulling the clay in, puts less strain on the wrist.
A version of this method is to use your right hand to pull the clay into your left hand. In this method, your left hand is at 7-9 o’clock on the wheel. And your right hand is pulling the clay into your left hand. The idea is that most of the force is coming from the cupped right hand.
6) Experiment With New Throwing Techniques
You may have a particular way of throwing pots, that you use again and again. Repetition can be problematic for wrists. Consider whether there is an aspect of your technique connected to the pain. Think about ways you can adapt your style to put less pressure on your wrists.
7) Work on Smaller Pieces
Whilst your wrists are giving you pain, work on smaller projects until your hands feel stronger. Larger pieces involve stretching your hands and bending your wrists more than smaller pieces.
8) Change Your Schedule
You can reduce the strain that you are putting on your wrists by mixing up your routine. Rather than working at the same thing for long stretches, break up your schedule.
One suggestion is to wedge as you go along. Rather than wedging a whole batch of clay and then spending hours throwing that batch. Throw a few pieces, then wedge some more. This may help you avoid the injuries associated with repetition.
Alternatively, you could alternate throwing at the wheel with hand-building some pieces.
It’s also a good idea to take breaks and do some stretches. Talk to a physiotherapist and get some advice about what stretches it would help to do when you are taking a break.
9) Change Your Clay (Or Soften it Off)
One thing that can help improve wrist pain from pottery is to use soft clay. You need to use less pressure with your hands, wrists, and arms if the clay is on the softer side.
I like using reclaimed clay because, as long as it’s been wedged well and doesn’t have any air bubbles, it’s normally nice and soft. Here is how I reclaim my clay.
But fresh clay from the bag is nice to use too. Even when clay has been sitting sealed in a plastic bag, it can harden over time. If I’m using new clay from the bag, I check it at least a few hours before I use it.
If it feels too firm, I slice it into the weight that I want it to be. For example, if I’m throwing a large mug, I slice off 1.3lb (600g) of clay. I then wrap each slice in a damp cloth. These slices are then stacked together and wrapped up in a plastic bag. Over a few hours, the clay will soften off and be much easier to use.
When you remove it from the damp bag, you will need to wedge it to make sure that the moisture is evenly spread through each portion of clay.
Wedging Pottery Clay Without Wrist Pain
Wedging clay is essential to remove air bubbles from the clay and give the clay an even consistency. But it can be tough on the wrists. Here are a few ways to wedge without making your wrists suffer too much.
Stack and Slam Wedging
This technique is also known as wire wedging or slap wedging. It involves cutting your clay into two pieces with wire and stacking them on top of each other. The stack of clay is then slammed or dropped onto your work surface.
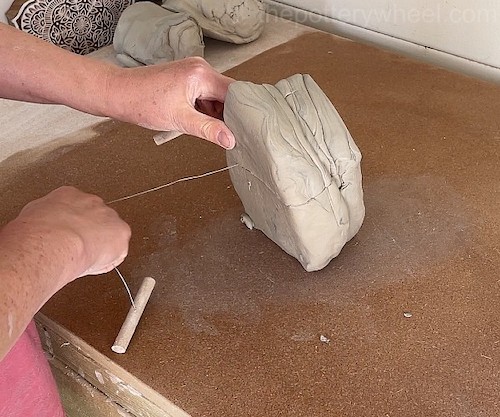
You repeat this process with the clay being sliced in two, stacked, and slammed on the table. Repeating this about 30 times is normally enough to thoroughly mix and wedge the clay.
It’s a good way to wedge your clay without putting too much strain on your wrists. You can read my step-by-step guide to wire wedging here. It has images and a video that you can follow along with.
Unusual Ways to Wedge Clay
You can experiment with ways of wedging clay that work for you. I’ve heard of some potters who put clay scraps in a plastic bag with water and throw the bag against the floor.
In some regions, it’s common practice to wedge clay with the feet. I know it sounds unusual, but if you have a lot of wild clay to process, then it’s probably the most efficient way to do it.
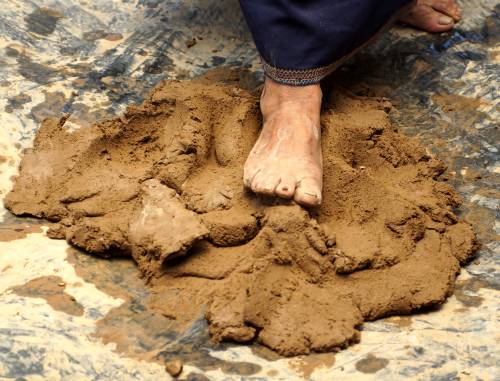
Years ago, pottery factories employed workers called ‘treaders’ who trod on the clay with their feet to prepare it for the production process.
Other Wedging Tips to Avoid Wrist Pain
Changing your wedging technique isn’t the only way to prevent wrist pain. Other adjustments can make a difference. Here are 3 other suggestions:
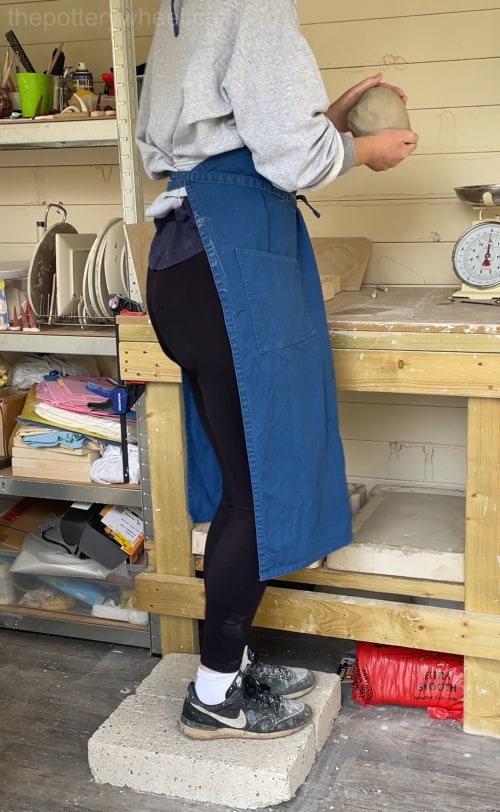
1) Check the Height of Your Wedging Table
Is your wedging table at the right height? You can use the following rule of thumb to find out. Stand next to your table and let your hands hang by your side. The table is the right height if your fingertips are just about touching the surface.
With the table at this height, you can use your body weight when you are wedging. This will spare your wrists.
If your table is too high, it can be easier to stand on something that raises you up off the ground a bit. I stand on a couple of concrete blocks when I’m wedging. This gives me a bit of extra height, without having to shorten the legs of my wedging table.
2) Outsource Your Wedging Chores!
A creative solution to the wedging problem is to pay someone else to do it for you. Do you have a local college with willing students who want to earn a little extra cash? Do you have a teenager in the house?
3) Invest In A Pugmill
Another way to make pottery without wrist pain is to get a pugmill. A pugmill is a machine that helps mix and blend clay until it has a homogenous body. Some pugmills are specifically designed to be de-airing too, so you don’t get bubbles in the clay.
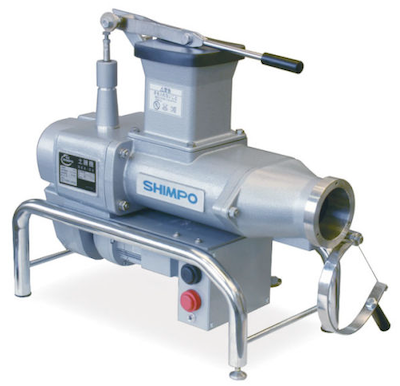
Nidec Shimpo Pug Mill – View on Blick
Pugmills are expensive, but you may be lucky and find a company that is willing to rent one to you.
Lifting and Carrying Clay
The last aspect of pottery that can contribute to wrist pain is the sheer act of lugging heavy clay around. Lifting and carrying clay throughout the day can take its toll.
One suggestion to minimize the amount of lifting you do is to get a lifting dolly like this for your studio. This doesn’t have to be a heavy industrial dolly. It just needs to be one that will take the weight of your clay. You still have to get the clay onto the dolly, but it will reduce the strain you put on your wrists moving it about.
Final Thoughts
My experience is that once you have issues with your wrists, there is no quick or easy solution. However, you can gradually learn to make pottery without wrist pain if you are thoughtful about the way you work.
Being willing to try new ways of doing things that put less strain on your wrists is a good start. Sometimes this can involve learning new habits. However, it is worth it in the end, if it means you can carry on with something that you love.


