This is how I make square-based teapots using a printable slab pottery teapot. If you would like to make the teapot, you can get a copy of the template here:
Get The Template Here
You can get a copy of this template (and my other slab pottery templates) from my online shop here…
Here are some tools that will be useful if you want to make this pottery project. You don’t have to buy all of these, as you may be able to substitute some of them with objects that you find in your home. But a list of tools is handy if you are building up your pottery tool collection.
You Will Need:
- Clay
- A wide rolling pin
- Fabric to roll the clay on
- Roller guides
- Clay knife
- Flexible chopping board
- Platter tool
- Rubber pottery rib
- Clay scoring tool
- Clay hole cutter
- Serrated rib tool
- Wooden modelling tool
- Chamois leather
- Banding wheel
- Wooden pottery bat
- Craft Foam
How to Make a Square-Based Teapot Using Slab Pottery
Here is the process broken down into simple steps with illustrative pictures.
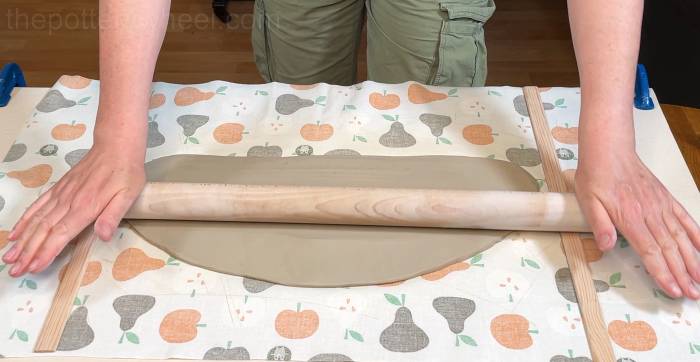
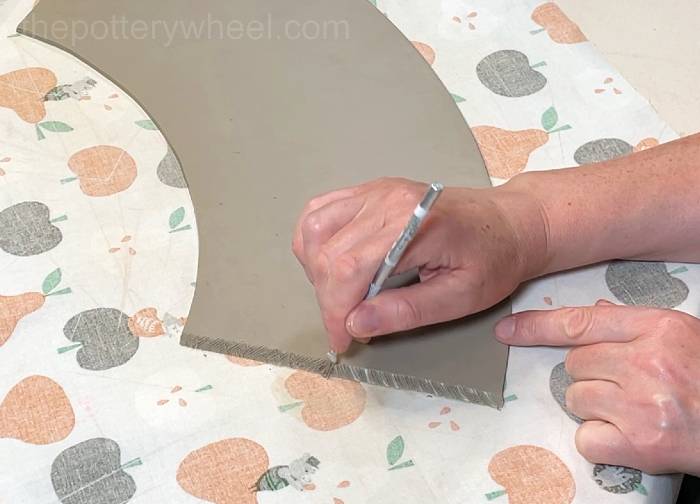
Step 1 – Rolling a Clay Slab and Using The Template
Roll a large slab of clay. If you are new to slab building, you can get some tips on rolling an even slab of clay here.
I like to use 3mm roller guides. However, you can use wider roller guides if you prefer to work with thicker slabs. The roller guides are the wooden sticks on either side of the slab. They help you get a slab with an even thickness.
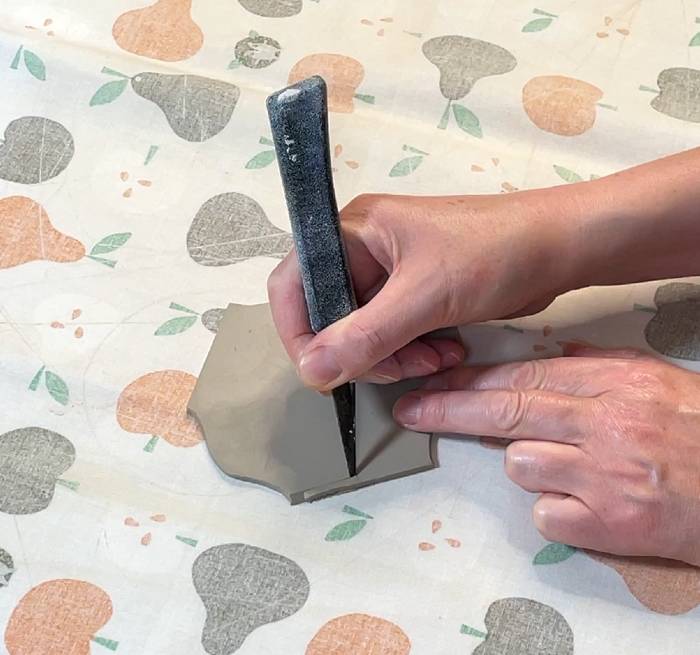
Put each of the pieces of the template onto the clay slab, cut around them, and peel the template away.
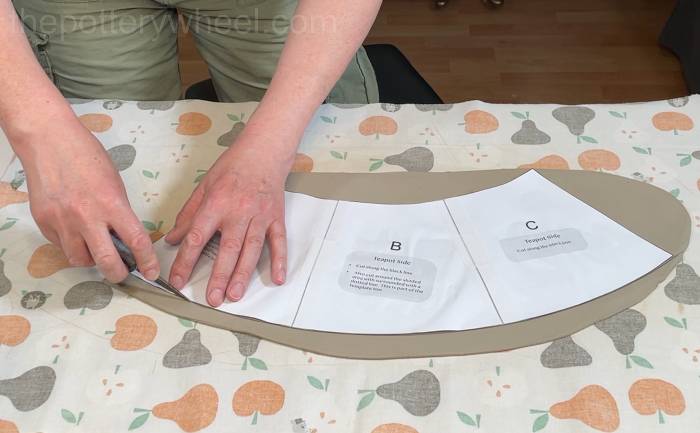

At this point, the clay is quite soft and fresh. You will need to leave the cut slabs for a while to firm up. I put the cut clay slabs on a piece of paper and sandwich them between two wooden boards so that they stiffen up a bit and stay flat.
Step 2 – Preparing The Slab
Ideally, the clay slab is soft enough to bend a bit but not so soft that it flops about and loses its shape when you pick it up.
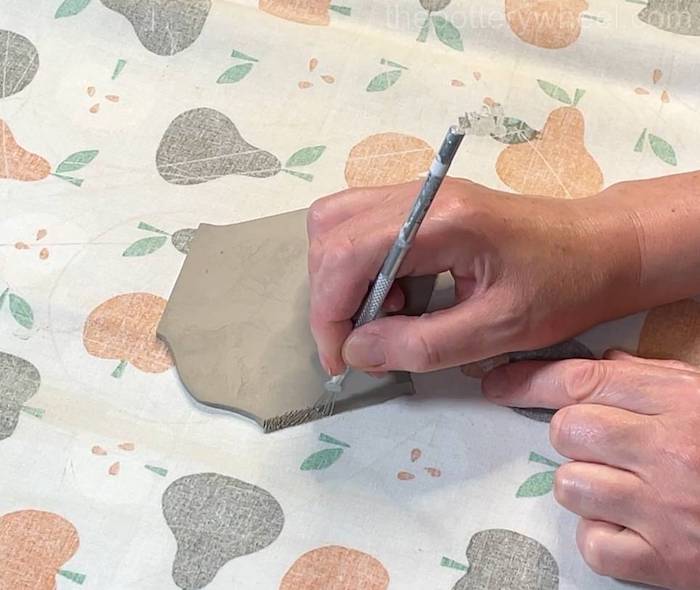
When it has reached this level of firmness, bevel both of the long straight edges on the large slab. This will be the main wall of the teapot. To bevel the edges, I hold a clay knife at a 45-degree angle and draw it down the edge of the slab slowly, cutting the edge at an angle.

Important Remember to turn the slab over before you bevel the second edge, otherwise the two edges won’t overlap when you try to join them.
Once you have beveled both edges, score into the edges using a clay scoring tool.
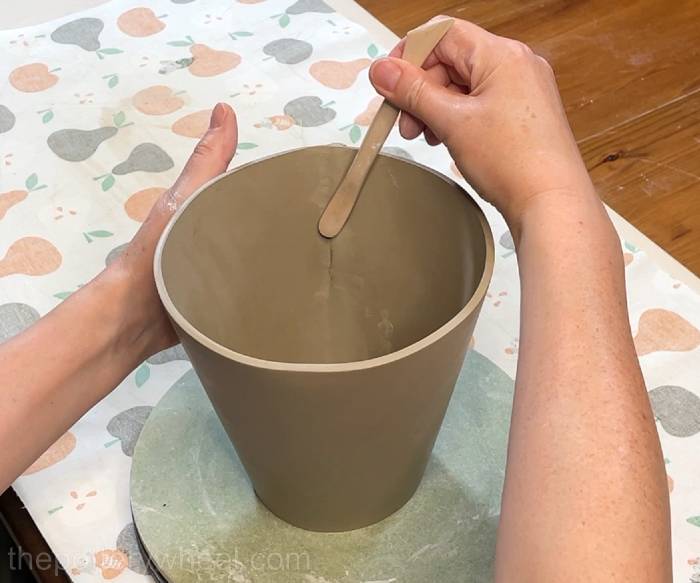
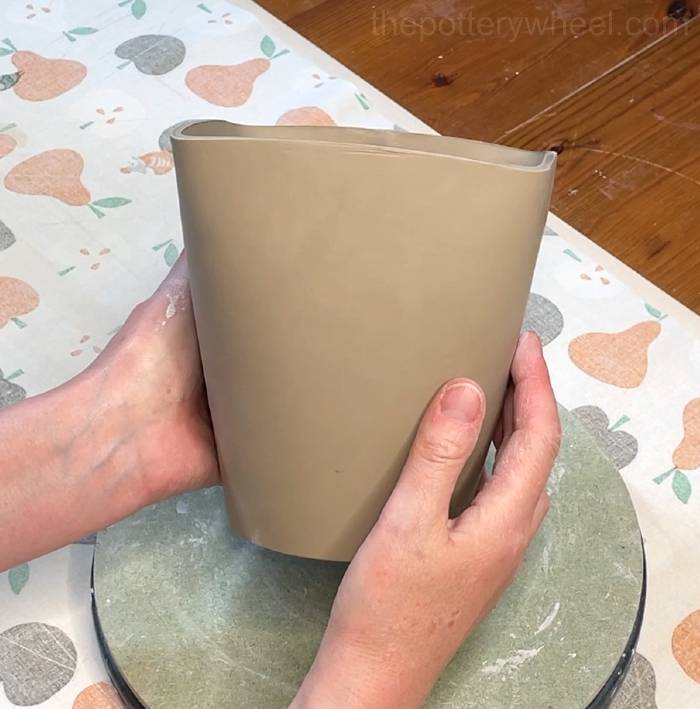
Step 3 – Beginning to Assemble the Teapot
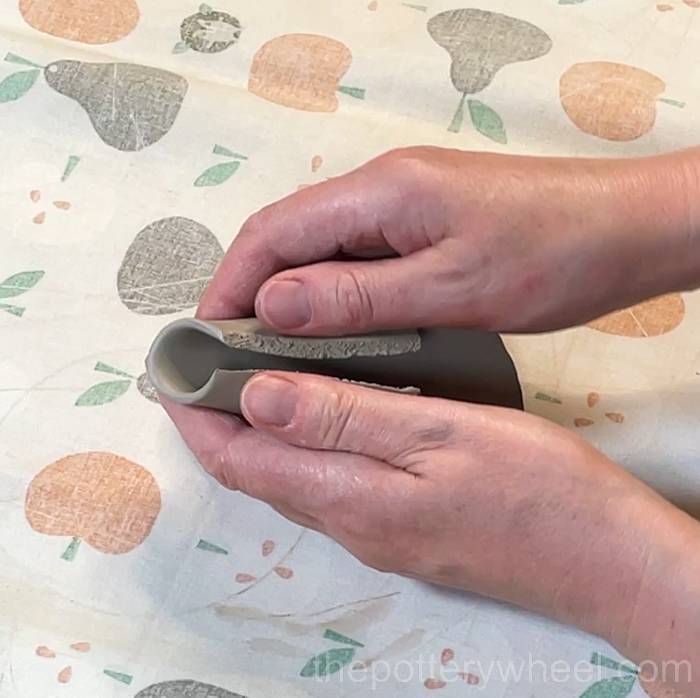
Lift the slab up and curve it around so that it’s sitting on its longest rim. Apply some clay slip to both scored edges and press the edges together to form a join.
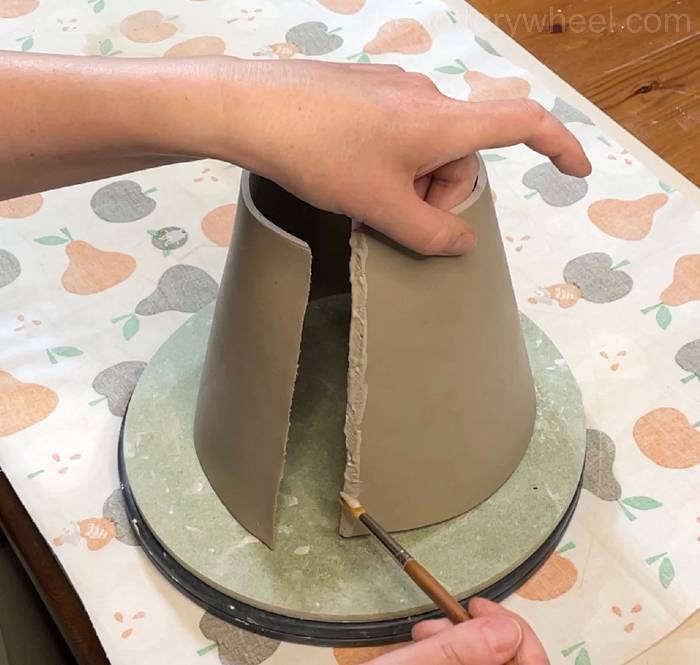
Remember to put your hand on the inside of the joint to support it on the other side as you press the edges together.
When they are securely joined, you can wipe away the excess slip with your finger. Then run a rubber rib down the edge several times to smooth the join and compress the edges together.
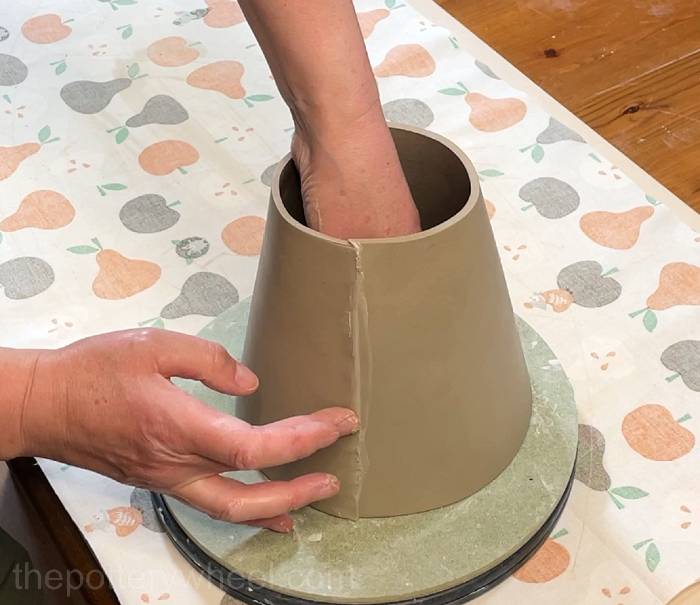
Turn the clay cone over so that it’s resting on the narrower end. Use a wooden modelling tool to blend the join on the inside too.
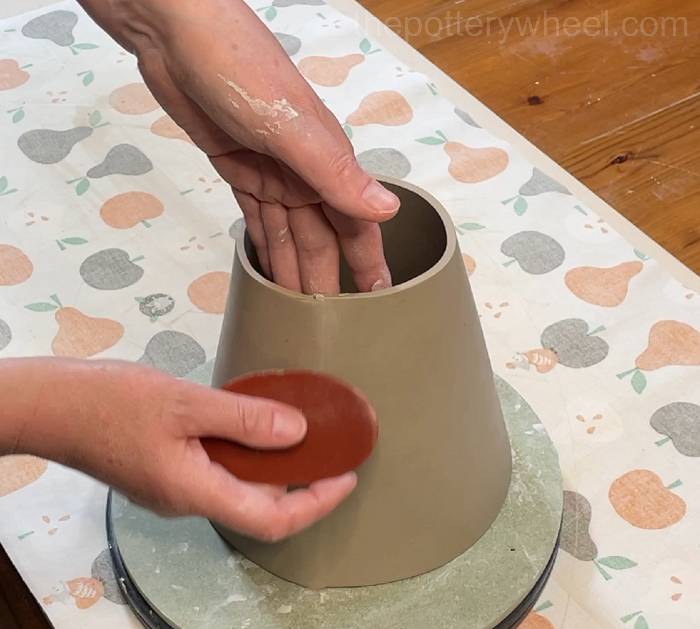
The wooden modelling tool will leave some marks in the clay. You can smooth these away with the round edge of a platter tool, a rubber rib, or even the edge of an old desert spoon.
Turn the clay cone over and blend the inside edge at the narrow end of the clay cone too.
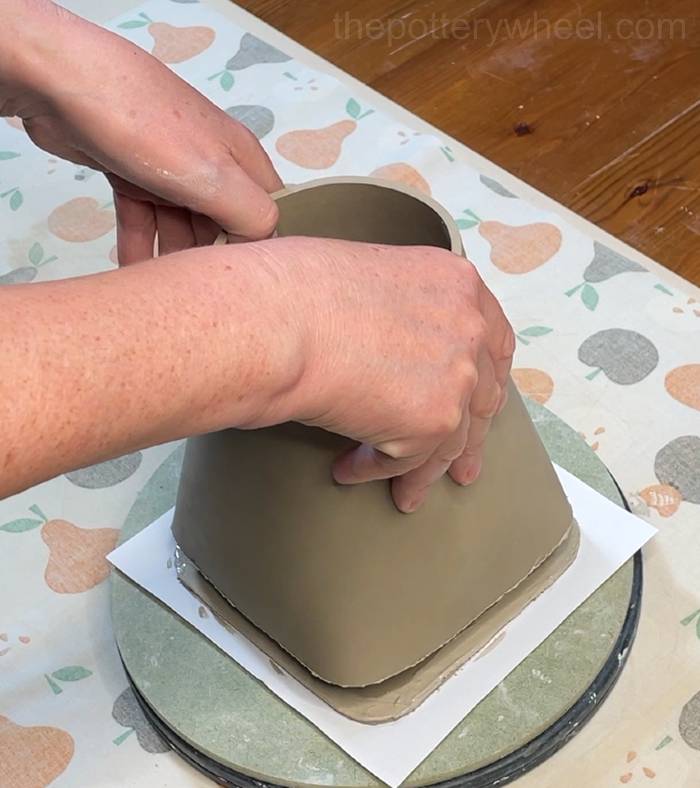
Step 4 – Creating The Square-Shape For The Teapot
Use the template guide in the pack labelled template D. Lower the wide end of the clay cone over template D.
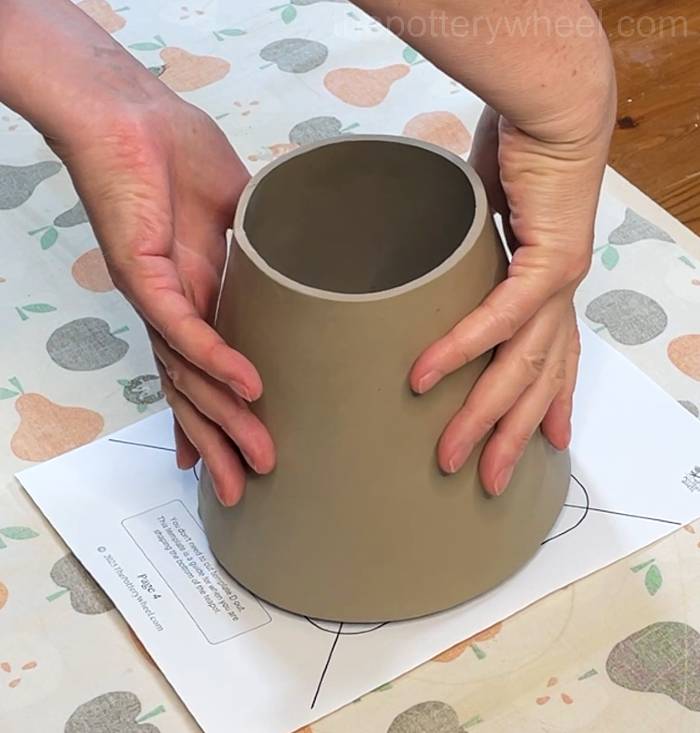
Line the clay cone up so that the middle of the cross on template D is in the middle of the clay cone.

Squeeze the clay slab so that it makes a corner. You can use the square shape on template D as a guide for the corners.
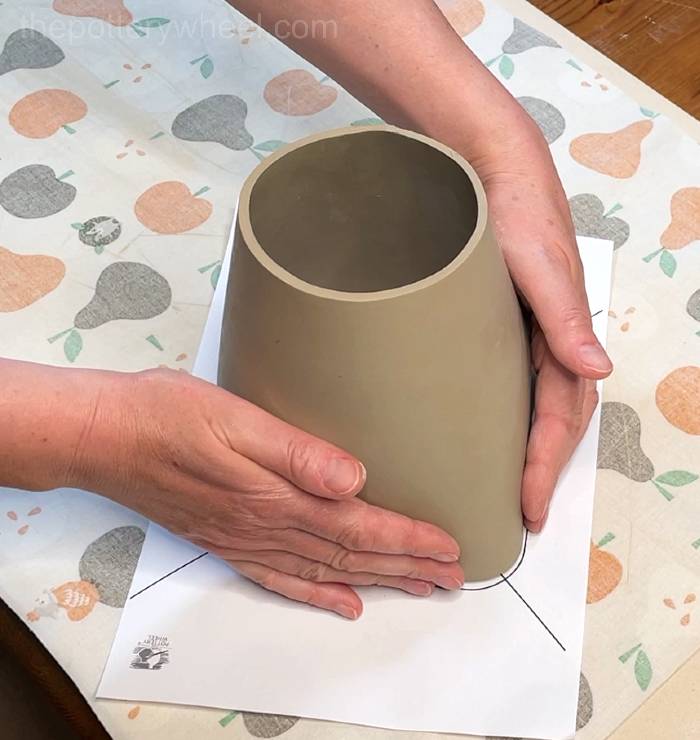
The square shape on the template will be slightly bigger than the square base that is formed by the clay cone. This is deliberate; it’s designed that way so that you can see the outline of the square on the paper as you shape the base of the clay.
One way to give the edges a nice, straight shape is to tap them gently with a ruler or the straight side of a platter tool.
When you are happy with the square shape, leave the clay to firm up a little more in that shape. You don’t want it to dry out too much, but it needs to be firm enough to handle.
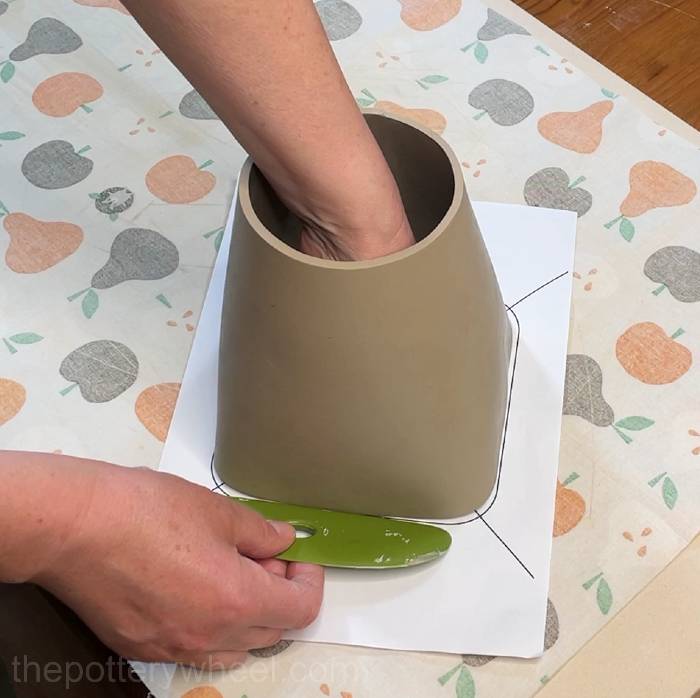
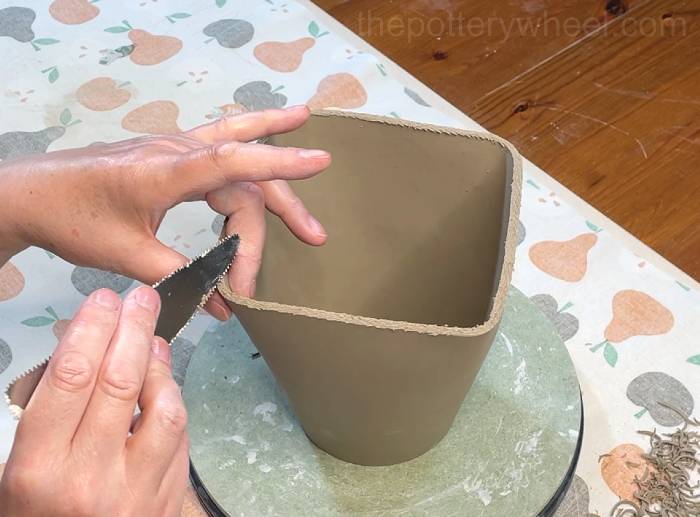
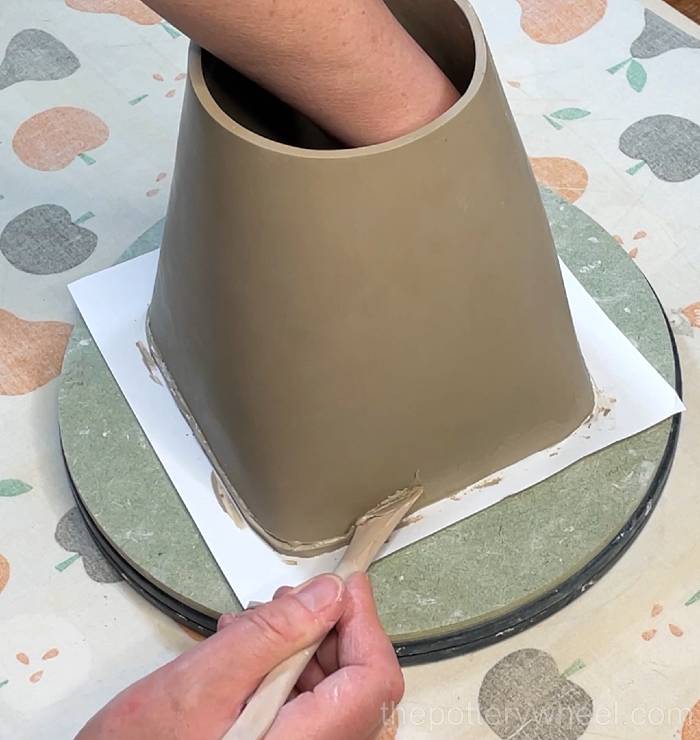
Step 5 – Preparing To Add The Bottom To The Square-Based Teapot
At this point, the bottom edges of the square-based teapot will have a bit of a curve. This is because it’s been made from an arc of clay.
It’s easier to add the bottom to the teapot if you remove the curves on the bottom edge. Use a clay shredder to remove the curve and create a straight edge.
Then score into the bottom edge of the teapot with a serrated rib or a clay scoring tool.
Also, score around the edge of the square slab that you cut out earlier. This is the slab made by template I.

Add some slip to both of the scored surfaces.
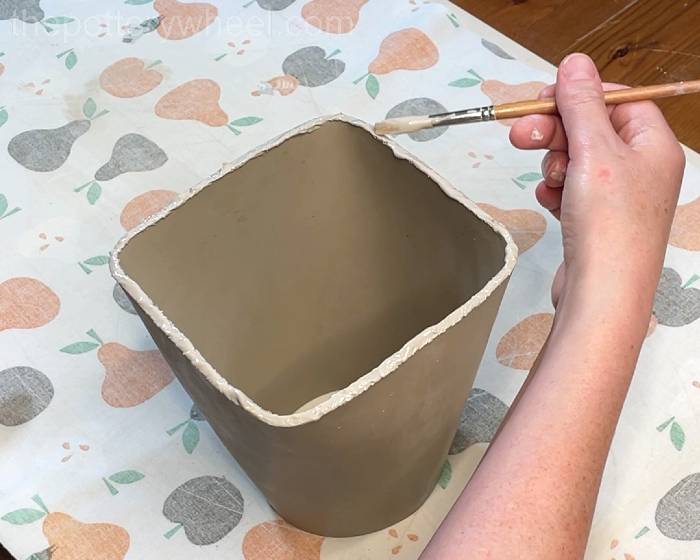
Then lower the body of the teapot onto the base, being careful to line it up well. When the slip is still wet, you can wiggle to teapot a bit to make sure that the edges line up well.
Ideally, you need the square base to be about 1 or 2mm wider than the bottom edge of the body of the teapot. This gives you a bit of extra clay to blend the base onto the bottom edge.
Step 6 – Attaching The Base To The Teapot
Use a wooden modeling tool to blend the square base onto the bottom edge of the teapot. As mentioned above, the base should be just a few millimeters wider than the bottom edge. This will give you enough extra clay to blend the base on.
Turn the teapot over and rest it on its narrower end. Use your wooden tool to tidy up the bottom edge of the teapot.

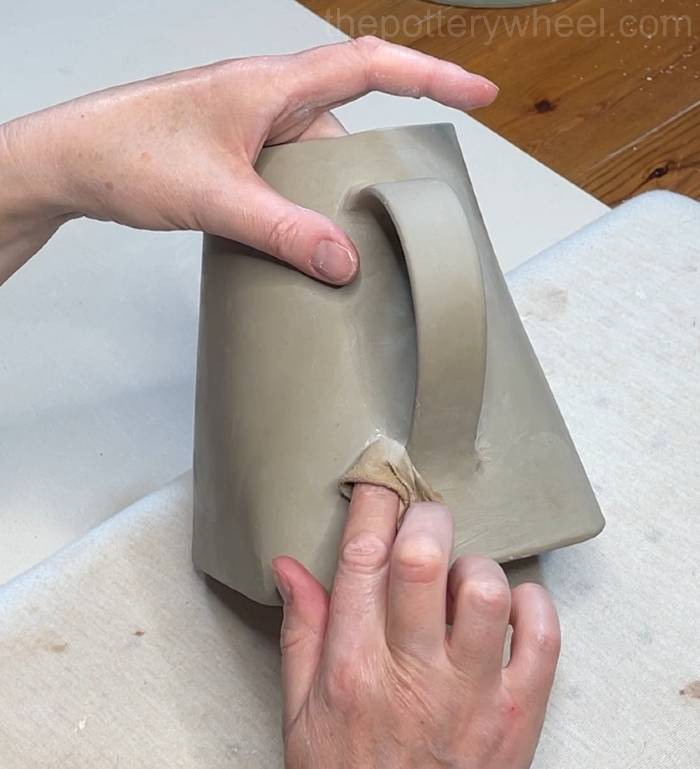
Once you have scraped away some of the excess clay from the bottom edge, you can wipe away the marks left behind by the modeling tool with a damp piece of chamois leather.
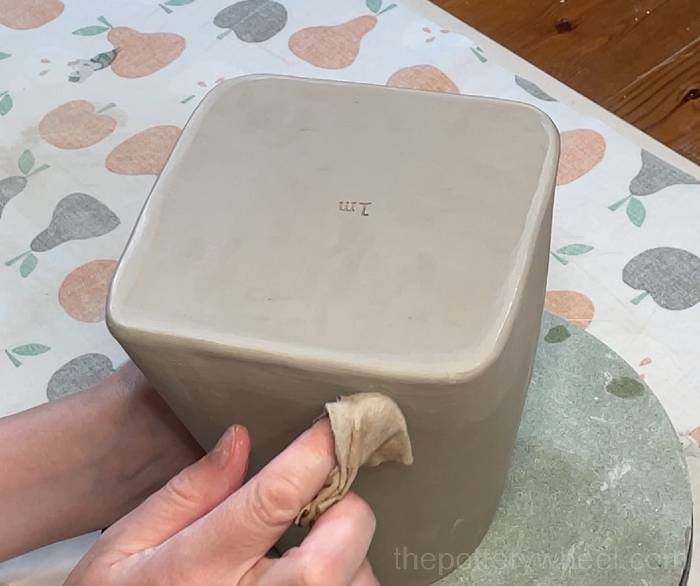
Turn the teapot the right way up, and use the chamois leather to soften the edges of the top rim too.

Step 7 – Making The Teapot Spout
The teapot is made out of the slab from template E. Bevel both of the straight edges of the spout slab.
Remember to bevel one side and then turn the slab over before you bevel the other side. This ensures that the bevelled edges overlap.
Once you’ve bevelled the edges, score into the bevelled edges with your clay scoring tool.
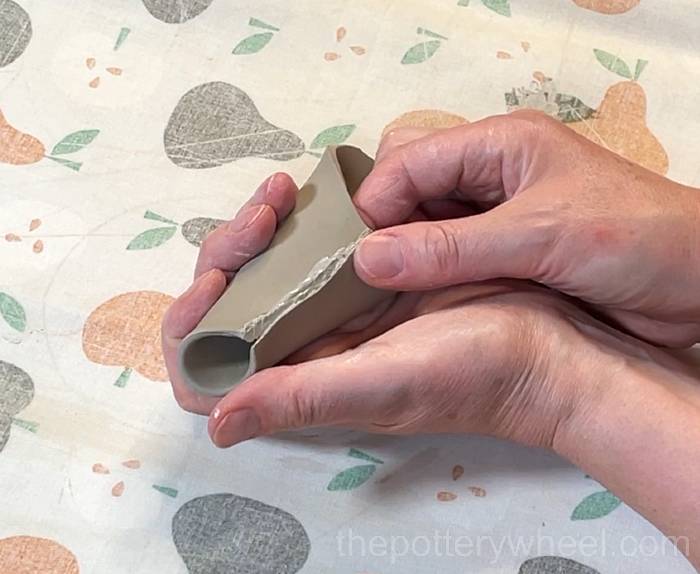
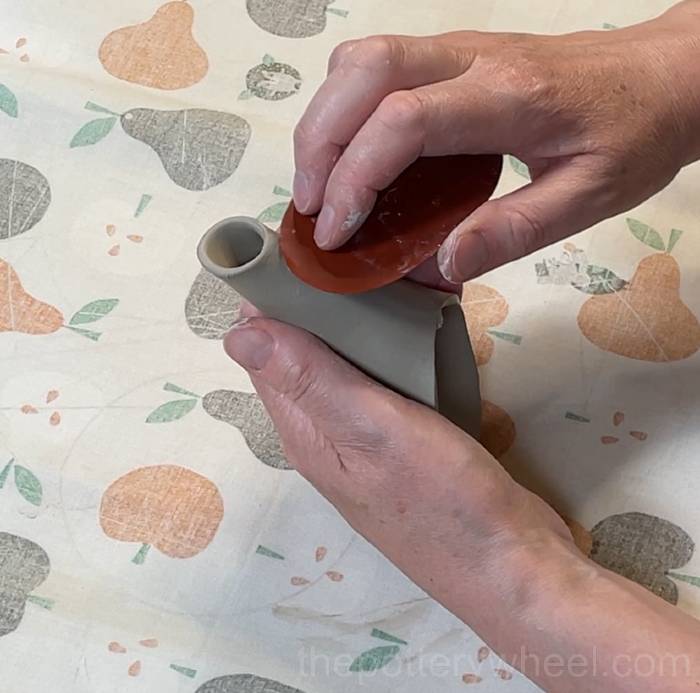
After you have scored the edges, gently start to curve the clay into a spout shape. It’s a good idea to do this gradually. If you bend the clay quickly, you might find that the clay cracks.
If you bend it gradually and work the clay, it will curve around well. Curve it until the two scored edges are lined up.
Apply slip to both of the scored edges.
Overlap the two edges and press them together.
Once the edges are joined, you can tidy up the join with a soft rubber pottery rib.
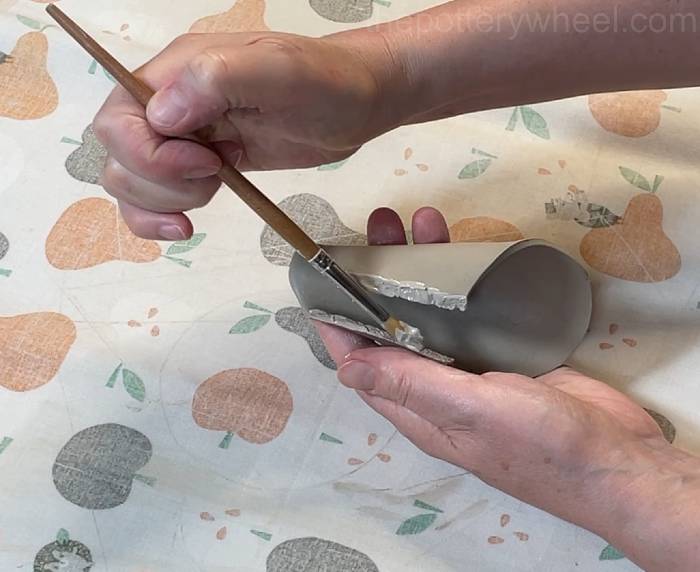
You might find that a few small cracks have appeared on the outside surface of the spout when you curved the clay around. Be sure to blend these little cracks away with a wet fingertip. If you don’t get rid of them now, they can open up and get larger when the clay dries or is fired.

Lastly, use a wooden tool to blend the join on the inside of the spout.
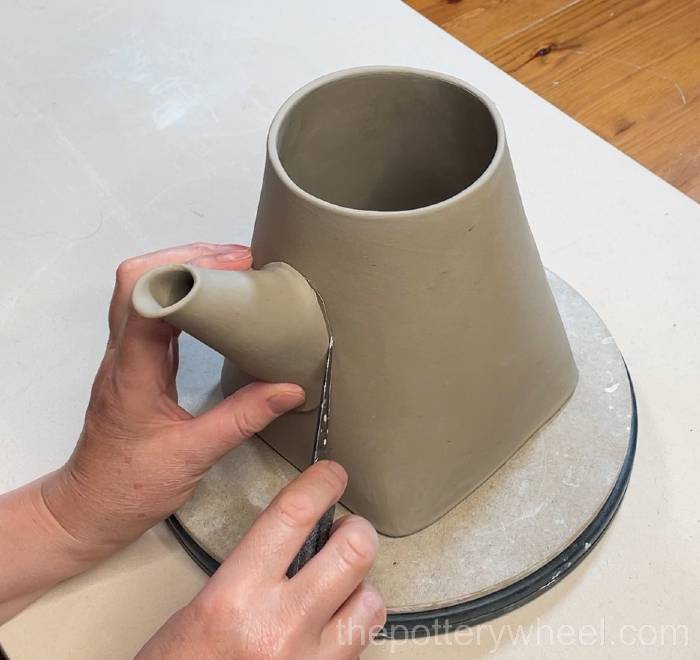
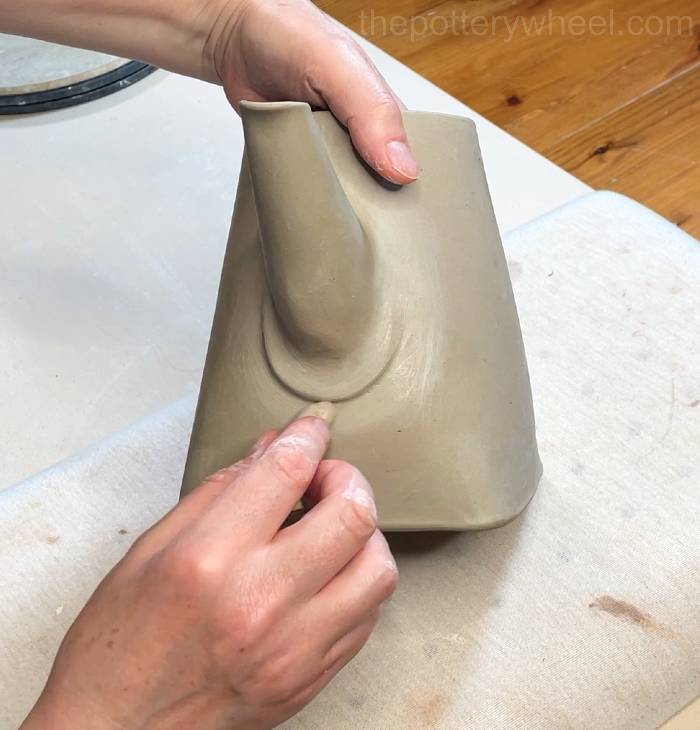
Step 8 – Attaching The Spout To The Square-Based Teapot
Hold the spout against the side of the teapot and decide where you want it to be attached. It’s important that the opening of the spout is level or almost level with the top of the teapot. If the spout opening is too low, when you fill the teapot with tea, it will overflow.
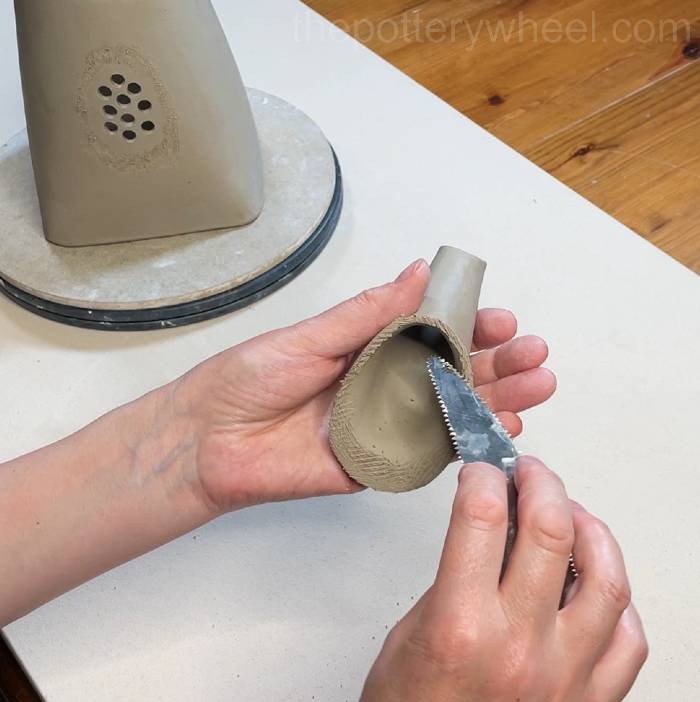
Mark around the spout with your clay knife to indicate where it is going to be attached.
Make some holes where the spout is going to be attached using a clay hole cutter.
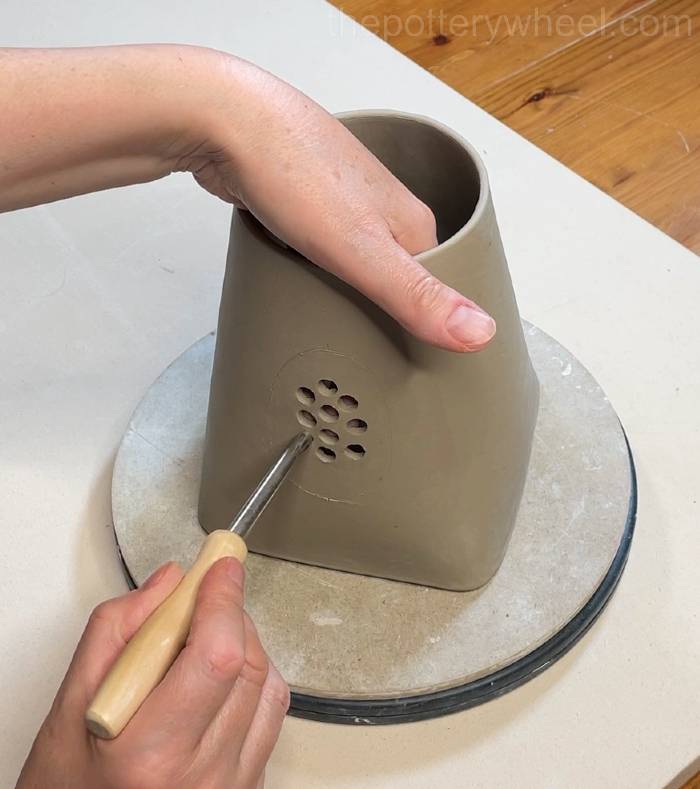
Score around the bottom edge of the spout, and also around the line on the teapot where you are going to attach the spout.
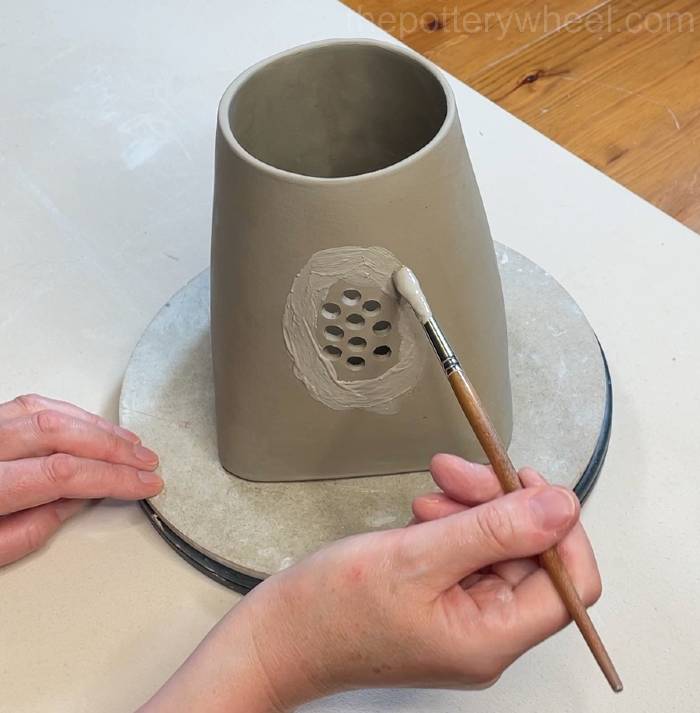
Apply slip to the scored teapot and the edge of the spout.
Position the spout into place and then gently press it on so that it attaches securely to the side of the teapot.
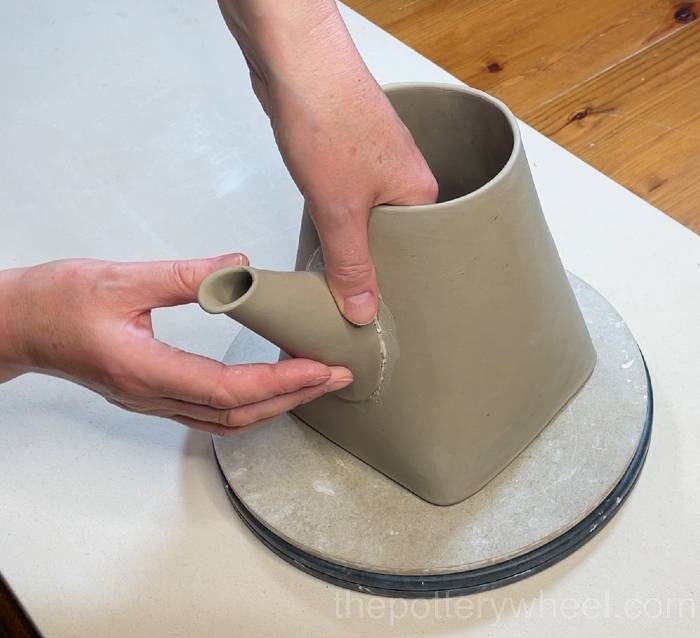
Wrap a small thin coil of clay around the spout at the point where it meets the teapot. You can wrap a coil all the way around the spout if you like. I often just add the coil to the top half of the join to avoid adding extra bulk to the teapot.
Blend the clay coil into the join using your modelling tool.
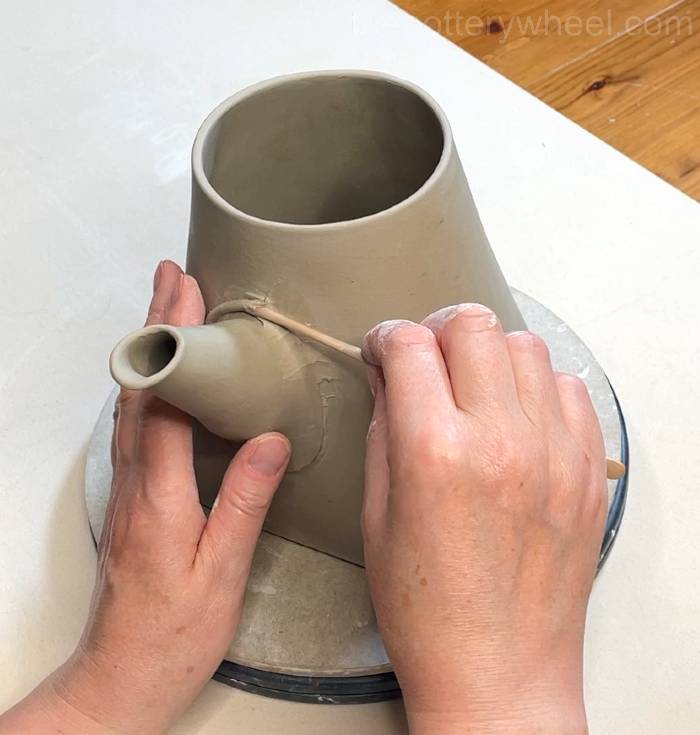
If you add a coil to the top half of the spout only, you can still blend the spout on all the way around, using some of the clay from the spout itself.
Wipe away any marks left behind by the wooden tool using a damp chamois leather.
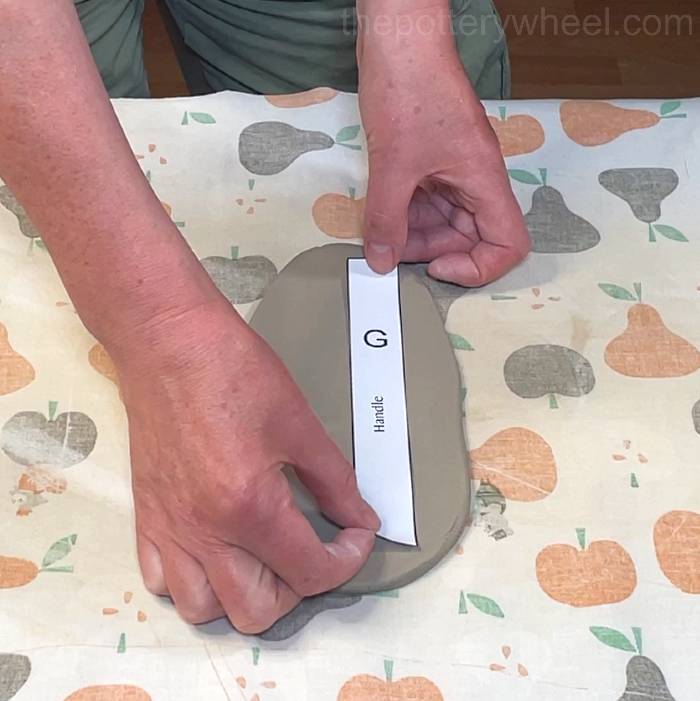
Step 9 – Preparing The Handle For The Teapot
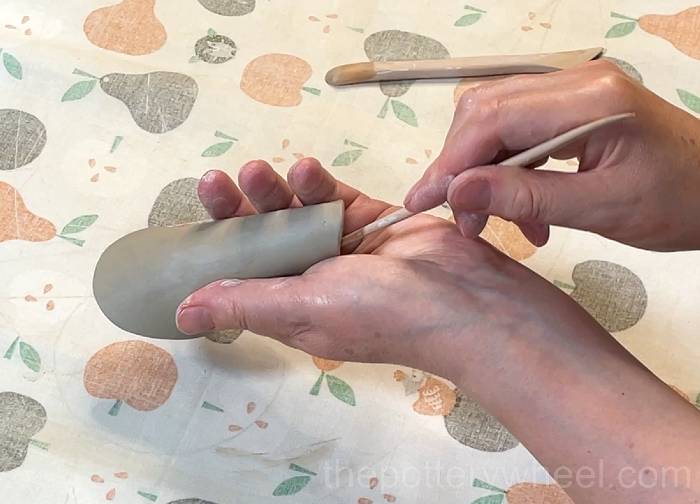
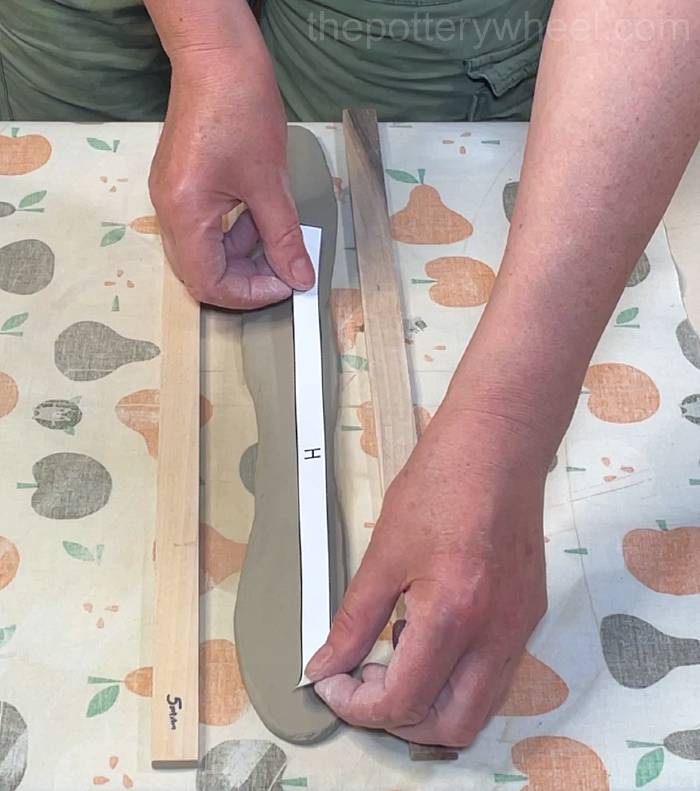
Cut the handle for the teapot using template G. I usually wait until I’ve made the teapot before I make the handle, because the handle can dry out quickly.
I roll a clay slab using 6mm roller guides, because I find a slightly thicker handle is more comfortable to hold.
Curve the handle round into the shape that you want it to be, and put it on a wooden board. Allow the handle to firm up until it’s soft leather hard.
When the handle is firm enough to handle, you can trim it to length. The template is designed to be the right length, but if you want it to be shorter, you can trim a bit of clay of either or both ends.
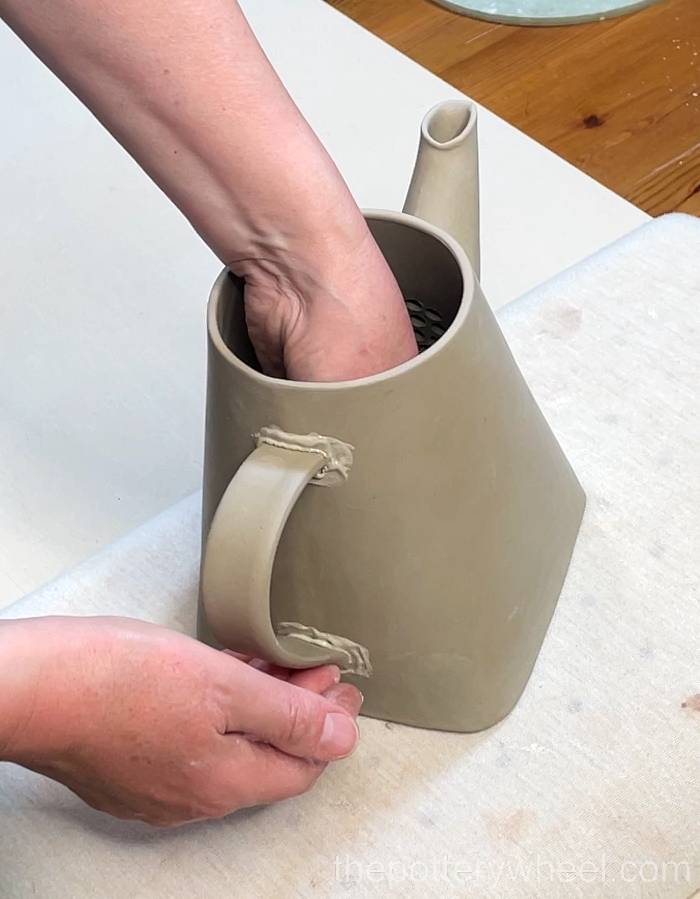
Score the ends of the handle and the two points on the teapot where you want the handle to be attached.
Add clay slip to each of the scored surfaces.
Press the handle into position. Be sure to put your free hand on the inside of the teapot to support the side of the teapot as you press the handle into position.
Wrap a small coil of clay around the point at which the handle meets the teapot. Press the coil gently into the join and then blend it in with your modelling tool.
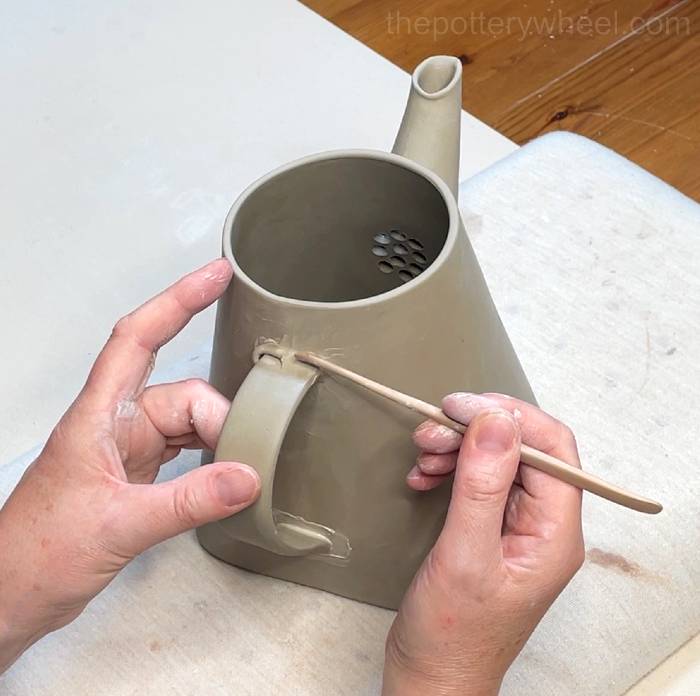
Repeat this process with both ends of the handle, adding a coil to the other join too. Then wipe away the marks left behind by the wooden tool with a damp chamois leather.
Step 10 – Preparing The Lid For The Square-Based Teapot
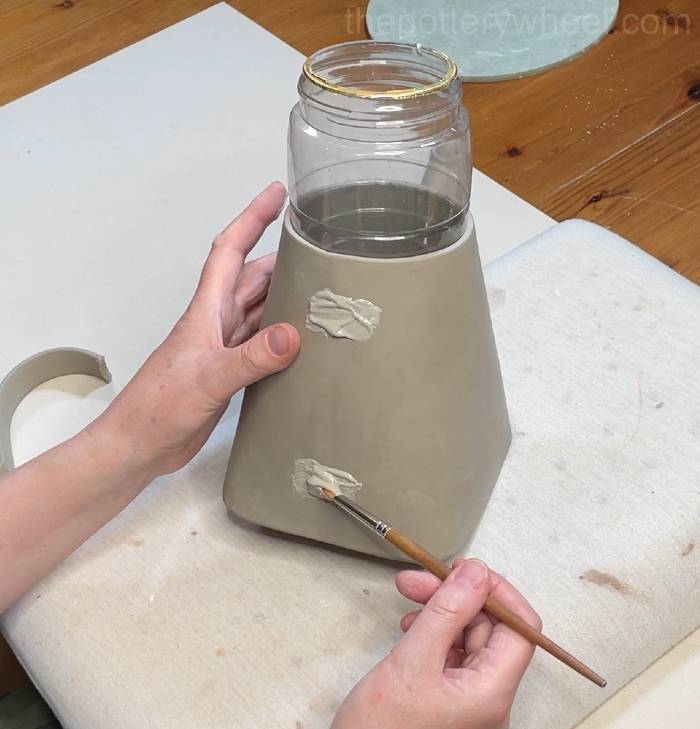
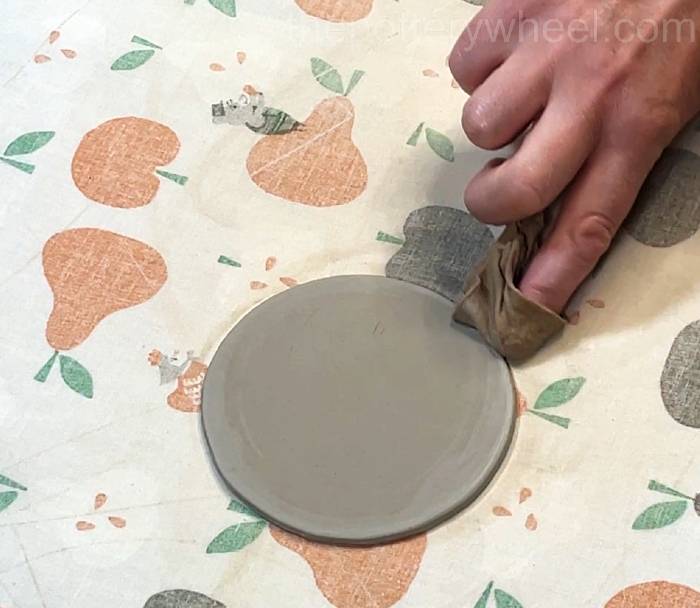
The lid is the circular slab that is made from template F. Firstly, wipe around the edges on both sides of the lid to make them round.
Place the lid on the rim of the teapot and gently press it down so that it forms a curve going into the teapot.
Note – You don’t have to curve the lid, the lid can also be flat if you prefer. Like this one:
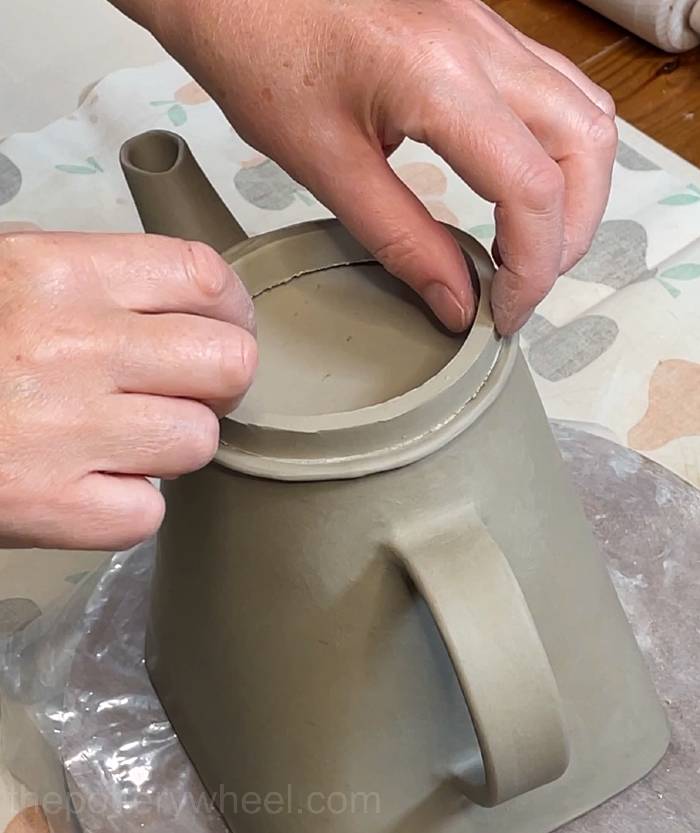
Step 11 – Making Rim For The Lid
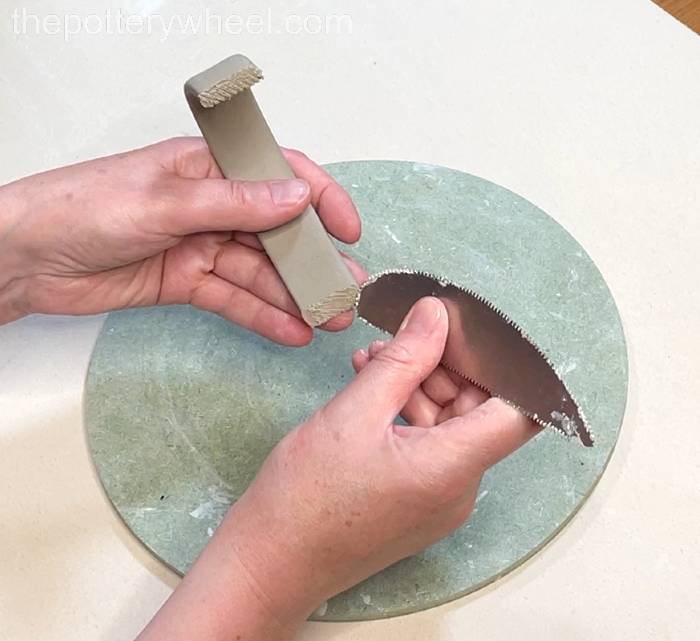
Cut out a strip of clay using template H. I normally roll a slab of clay with 5mm roller guides for the rim.
Bevel both ends of the rim, remembering to turn it over before you bevel the second side.
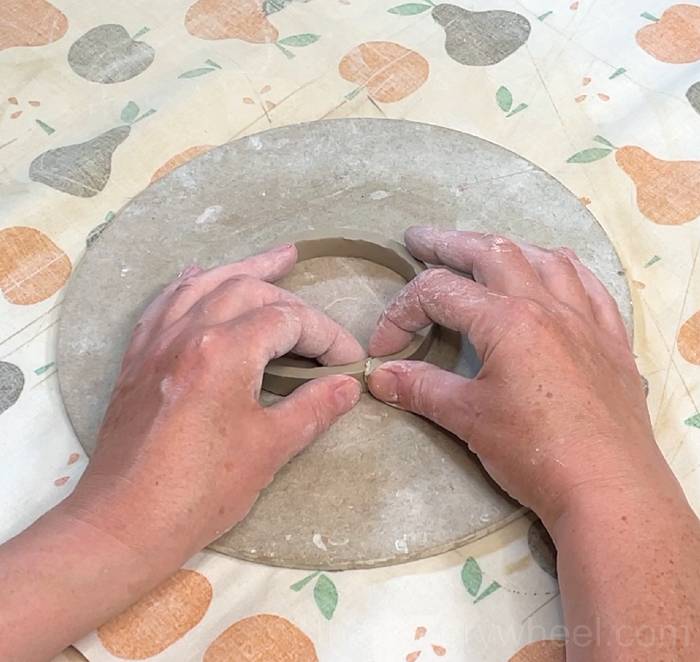
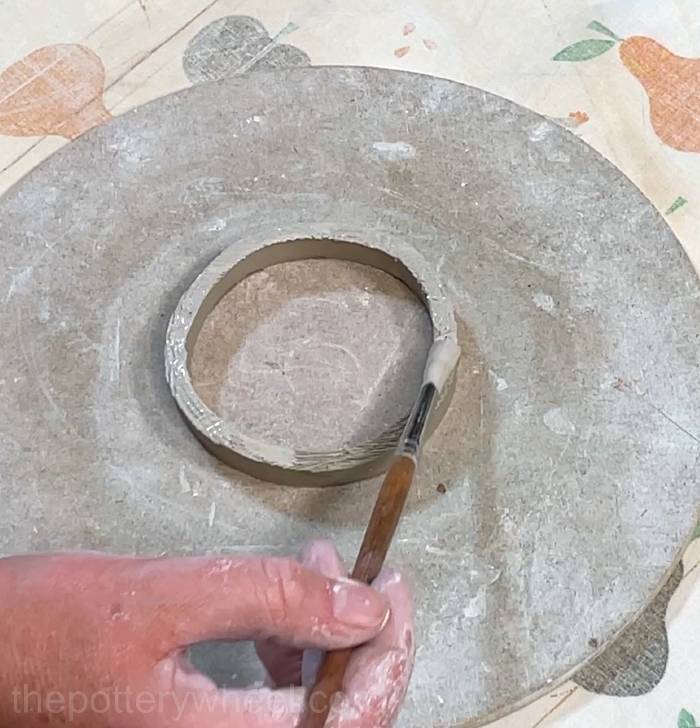
Curve the rim around. Score both ends and apply some slip, then blend the two ends of the rim together to create a ring of clay.

The side of the lid that is facing upwards on the teapot at the moment is actually going to be the underside of the lid. Score around the edge of the lid.
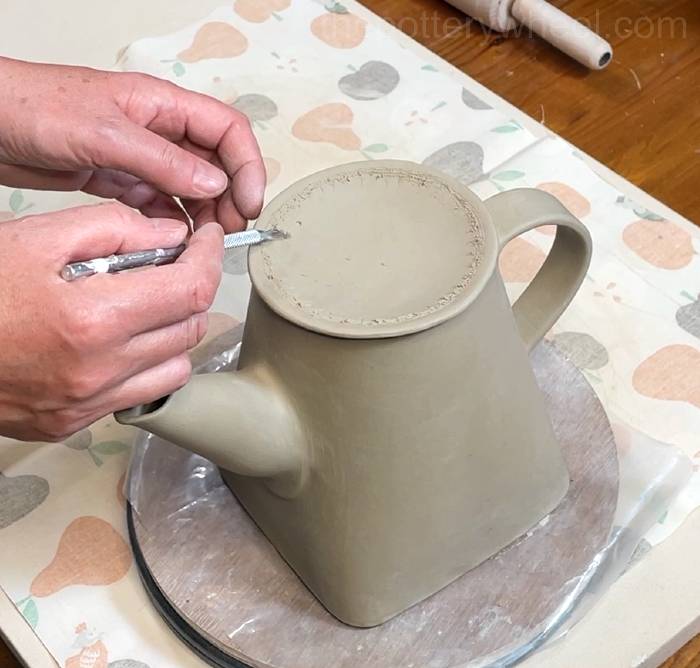
Note: I score quite close to the edge of the rim. As a rule of thumb, I want the rim to be about 5mm away from the edge of the rim. This is because my walls are 3mm thick and the rim is about 1.5mm wider than the teapot opening.
If the rim isn’t close enough to the edge of the lid, it won’t be a close enough fit, and the lid will slide around on the teapot.
It’s better to make the rim a bit too tight to start with. Because if it doesn’t fit the teapot opening, you can always trim a bit of clay away until it fits well. But it’s much less easy to add clay if the rim is too loose.
Score the underside of the clay rim too. Apply slip to the scored lid and the scored rim.
Attaching the Rim to the Lid
Lower the rim into position on the lid and press it down gently into place.
Using a wooden tool, blend the edge of the rim onto the lid. I blend it on the outside of the joint first.
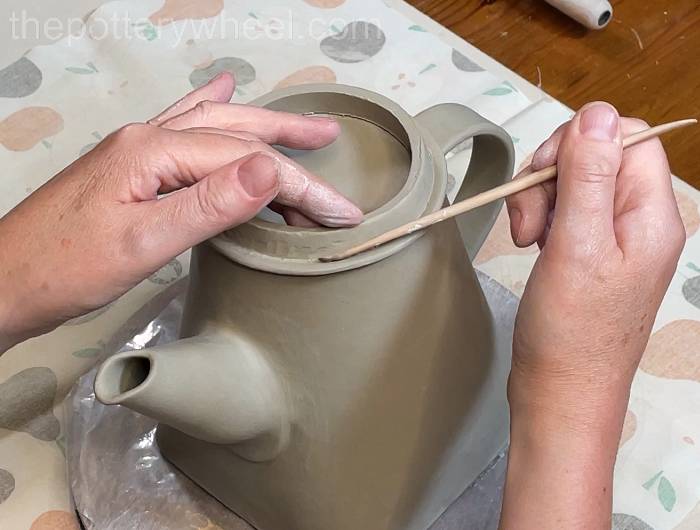
Then I blend it on the inside of the joint.
Once it is blended in, I wipe the join with a damp chamois leather to get rid of the marks from the modelling tool and to make a smooth finish.
An Alternative Approach
Another way to add the rim is to support the lid on some fabric. Rather than leaving the lid in position on the rim of the teapot, you can wrap some fabric into a supportive donut shape and put the lid on the fabric. Like this:

This approach has one advantage. If you rest the lid on the teapot opening when you add the rim, you can get a slight impression of the teapot opening on the other side of the lid. This is easy enough to smooth away once the rim is added. Like this:
But if you don’t want to have to smooth the lid, you can support it with some fabric or a soft cushion while you are adding the rim.
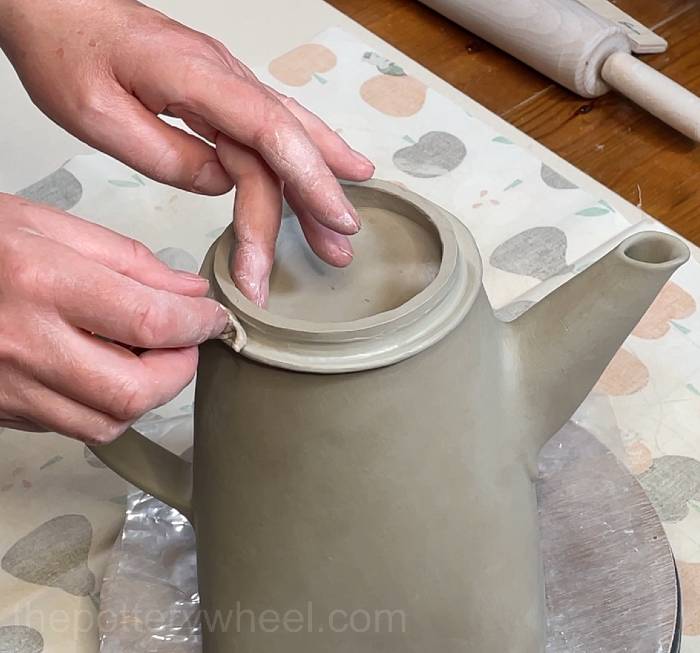
Step 12 – Fitting The Lid
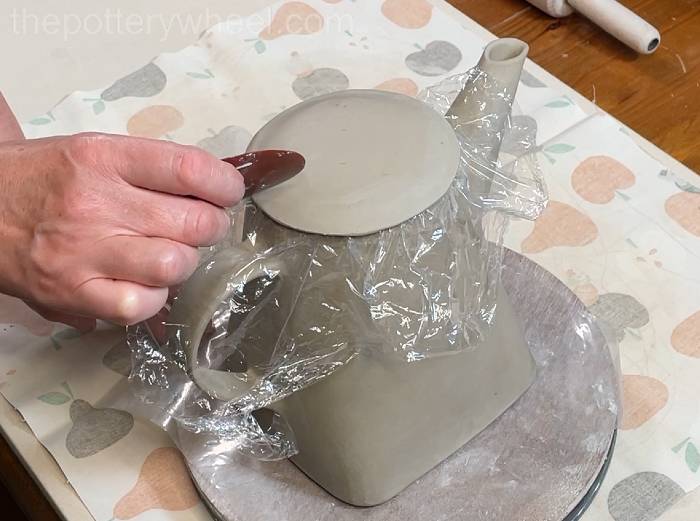
The next thing to do is to check to see if the lid fits well. Put some cellophane over the teapot opening to stop the lid from getting stuck in it.
Lower the lid into position.
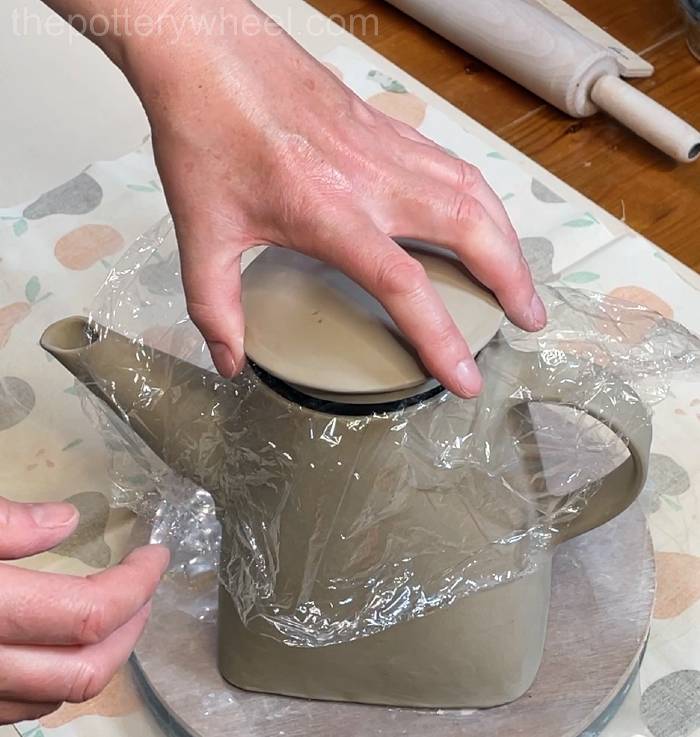
The rim may be too tight for the lid to sit in position. If that’s the case, you can lift the lid out again and slice a bit of clay from the rim at the point where it is sticking.
If the lid fits well, then it’s time to make the knob for the lid.
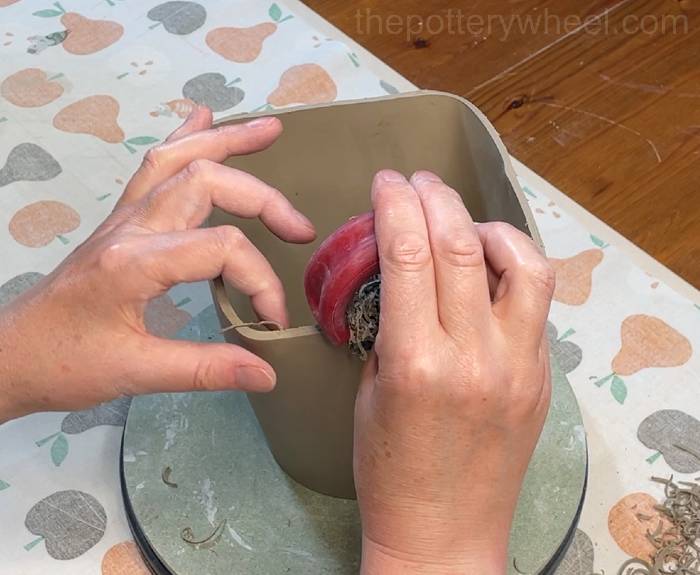
Step 13 – Making The Knob For The Lid
You can make the knob for the lid in any shape that you like. I like these simple pear-shaped knobs. I roll a ball of clay into a circle, and then taper one end to give it a pear shape.
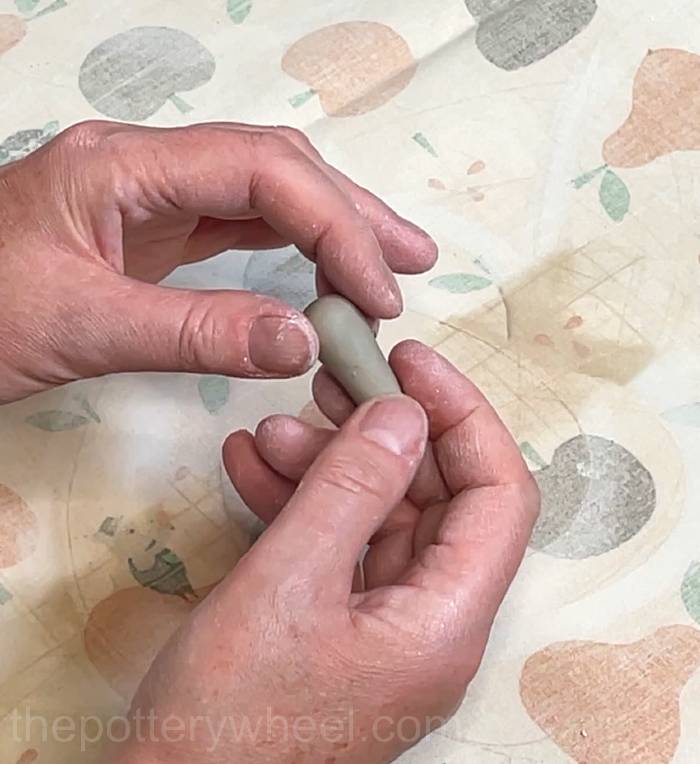
Score the bottom end of the knob and the point on the lid where you will attach the knob. Apply some slip to both scored surfaces and then press the knob gently into position.

You can tidy up any slip that squeezes out from the side with a soft brush.
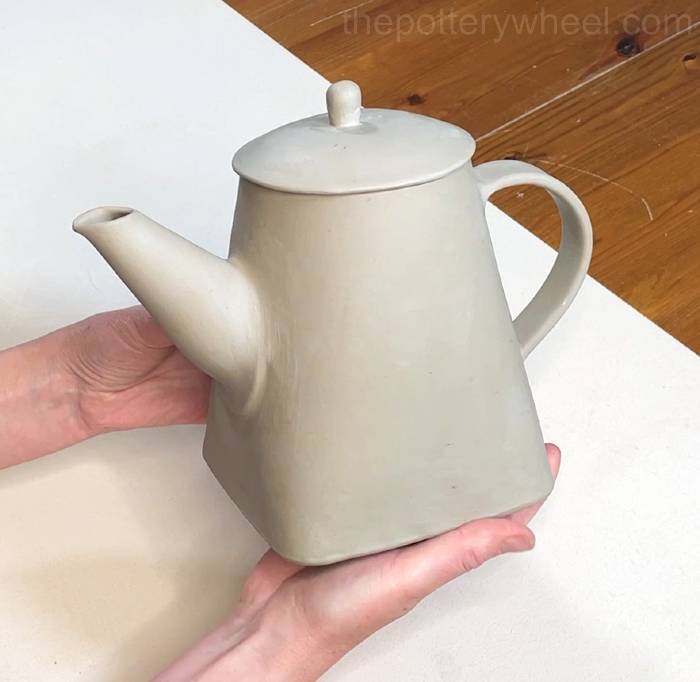
The teapot is then ready to be dried and fired.
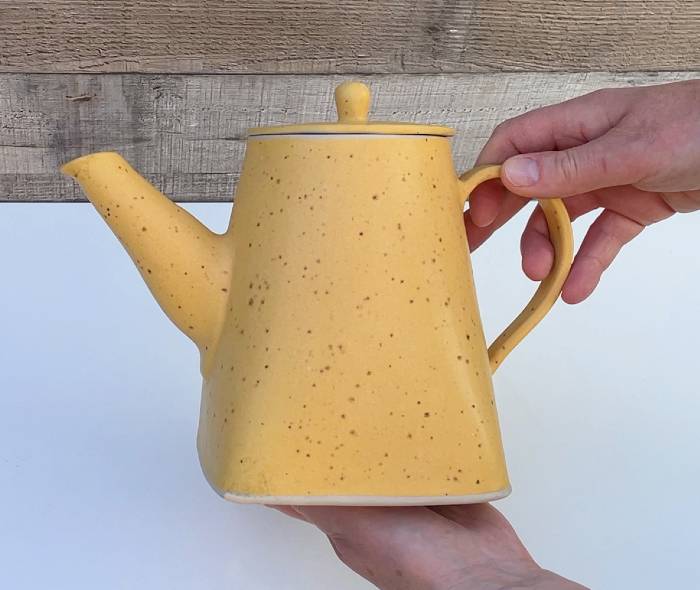
Here is the finished greenware teapot:
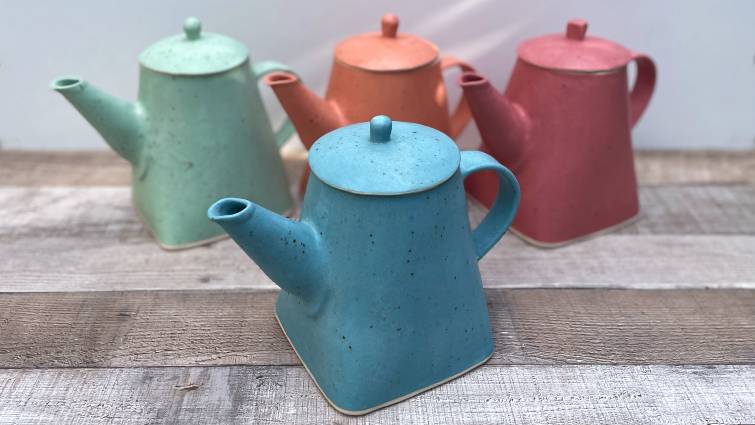
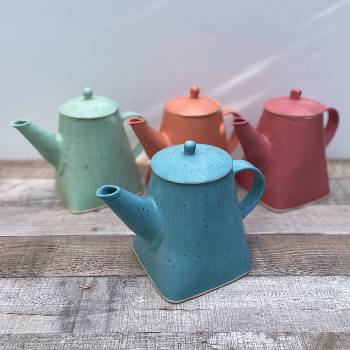
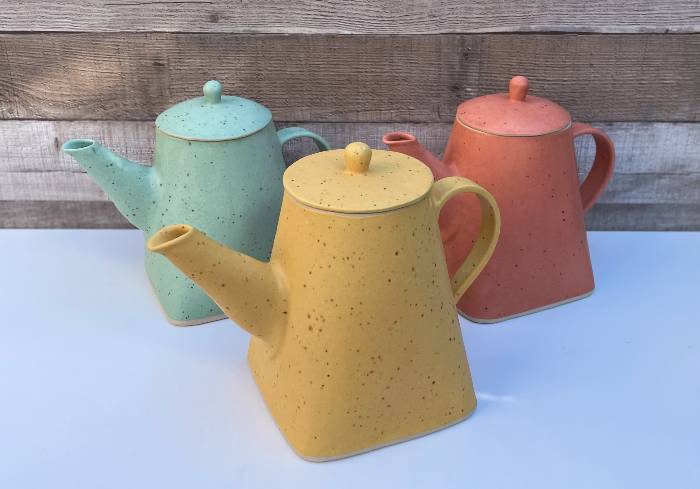
And here is a selection of the square based teapots once they have been glazed and fired.
If you’d like to give this teapot a try, you can get a copy of the template in my online store here…
Get The Template Here
You can get a copy of this template (and my other slab pottery templates) from my online shop here…


Leave a Reply