Your cart is currently empty!
Burnishing Clay – 3 Ways of Burnishing Pottery to Perfection
Published:
Last Updated:
Affiliate Disclaimer
As an affiliate, we may earn a commission from qualifying purchases. We get commissions for purchases made through links on this website from Amazon and other third parties.
Burnishing clay is a technique that gives pottery a smooth soft sheen without using a ceramic glaze. It involves rubbing the clay with a hard object, like a smooth pebble or the back of a spoon. The rubbing action compresses down the surface particles of clay, aligning the clay platelets. This creates a reflective surface.
Burnishing is often described as being a low tech, low fire way of finishing pottery. It is low tech because unlike using glaze, which uses chemistry, burnishing clay relies on effort and patience. And, if it is fired at higher temperatures, burnished clay loses its shine. Burnished pottery needs to be fired below 1832F (1000C).
As such, burnishing is often used as a way of preparing pottery for pit firing, saggar firing, or raku. All of which involve firing at lower temperatures.
Burnishing is an ancient tradition that evolved before glazes had been developed. It was used as a way of decorating ware, but also making pottery a little more water-resistant. Whilst burnishing does create a moisture repellent surface, especially if waxed, it is not watertight. As such, burnished pottery is largely decorative and can’t be used as functional ware.
Table of Contents
show
Ways of Burnishing Clay
There are various different ways of burnishing clay. And potters tend to adapt the technique to find what suits their style and the clay they are using. However, there are broadly 3 different ways of burnishing clay. We will have a look at each of those approaches, how they are done, and consider their pros and cons.
If you would like to go straight to one particular burnishing technique, click on the relevant link here:
One of the key differences in these approaches is when you choose to burnish. One question is whether you should burnish clay when it’s leather hard or bone dry? Let’s have a look at these two different approaches…
Burnishing Leather Hard Clay
Clay can be burnished when it is leather hard. It’s best to burnish clay that is on the stiffer side of leather hard. Leather hard clay goes through stages as it dries out, and in the early stages, it is still relatively soft. This is the point at which you might trim your pottery.
However, at a later stage, the clay still contains moisture and can be worked. But it is harder and can be handled with some pressure without being damaged.
When clay is leather hard, the particles of clay can still be compressed relatively easily. Because the clay is softer than bone dry clay, the particles will flatten and align more easily. In addition to this, any grog in the clay will be pressed into the clay. And finer particles are brought to the surface.
The burnishing technique involves rubbing the clay with a smooth hard object. Potters use a variety of objects to burnish, these can include the following:
- A smooth round stone
- The back of a metal spoon
- Large marbles
- Jewelry burnishing tools
I’ve even heard of potters using a small light bulb to burnish their pottery. I’m not sure I’d want to do this, in case the bulb broke. Nevertheless, the main thing is that the item you are using is easy to hold and very smooth.
The pottery you are burnishing will only become as smooth as the object you are using to burnish with. And any nicks or uneven bumps in the burnishing object will damage the clay surface.
Palm stones are a good size to hold for burnishing clay.

The Burnishing Technique
Burnishing clay works best on pots that have a smooth surface. If the surface of the pottery is too lumpy, as you burnish, the recessed areas of clay will remain unburnished. This is because the burnishing stone won’t compress the clay in the areas that it can’t reach. The result is that you will end up with a patchy finish, with dull unburnished areas on your pottery.
The best way to avoid this is to clean up the surface of your pottery before you start. One way to do this is to scrape the clay surface with a metal rib. Once the clay is as smooth as you can get it with the rib, you can start to burnish.
Different potters find different burnishing actions more or less easy. There is no right or wrong way of rubbing the clay. You need to experiment and find which action feels comfortable for you, and which gives you the finish you like.
Some potters rub back and forth over small sections. Others use a circular motion and other potters recommend using longer strokes. I prefer to use a shorter back-and-forth action. I find it less tiring and easier to build up a bit of speed. Whichever method you choose, it’s important to change the direction of your stroke. If you continue rubbing in one direction you can get lines and ridges in the clay.
You need to burnish with enough pressure to compress the clay, but without damaging the pot. As you rub, the burnished areas of the pot will darken a little. This is because moisture is being drawn to the surface. The darkening helps you know which areas you have burnished already.
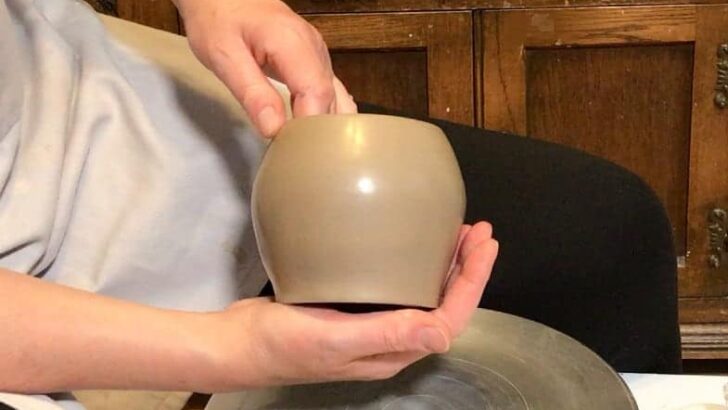
Burnishing Clay on the Wheel
You can burnish clay holding it in your lap or on a cushion. However, it’s also possible to burnish pottery on the wheel. The easiest way to do this is after you have trimmed your pottery.
After trimming, run a metal rib over the surface of the pot as the wheel turns. This will remove any circular marks left in the clay from your trimming tools. Then hold your burnishing stone or metal spoon against the pot as it rotates on the wheel.
The action of burnishing on the wheel is similar to that of trimming. Namely, you start at the foot and gradually move the stone over the entire surface of the pot.
This way of burnishing is quicker and less labor-intensive than burnishing in your lap.
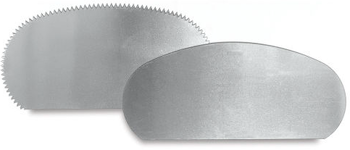
Kemper Steel Scraper – View on Blick
Repeating the Process
Although burnishing leather hard clay can be easier than burnishing when it’s dry, the clay does shrink as it dries. Even stiff leather hard clay will shrink a little as it becomes bone dry. As the clay shrinks the burnished surface loses some of its shine. The reason for this is that the smooth surface wrinkles up at a microscopic level as the clay shrinks. The wrinkles remove the reflective shine.
As a result, you will probably have to burnish again once it has dried out. If you’ve burnished the clay when it was leather hard, you will already have given the clay a smooth surface. So, although the clay has lost some of its shine, burnishing it again when it’s dry will be easier. This stage in the burnishing process takes less time than the first one.
Burnishing clay when it is completely dry will scratch the pottery surface. If you are burnishing dry clay you need to use some source of moisture.
One way to do this is to add a little water with a sponge. Water will be absorbed quickly into the bone dry surface. Therefore, most potters will add a little at a time with a sponge and burnish that area.
Then dampen the next section a little with a sponge and move on to the next section. When the dampened section is burnished, the water creates a little bit of slip on the surface. This slip is then compressed down into the clay, filling in gaps between clay particles. As such, a high sheen can be created.
The process of dampening and burnishing can be done a couple of times to create the most reflective surface.
Burnishing Bone Dry Clay
Because leather hard clay shrinks and loses its shine, some potters don’t bother with this step. Instead, they choose to burnish clay only once it has become bone dry. So, let’s have a look at the steps involved in burnishing clay when it’s bone dry.
Sanding
One of the benefits of burnishing bone dry clay is that you can sand dry clay. This can be very helpful to give you a nice smooth surface before you burnish. Sanding can also help you get a nice rounded shape to the rim of your pot. Rims can be hard to burnish, but it’s easier to do if the rim is round and smooth.
There is a knack for sanding greenware pottery. If you’d like to know more about it, check out this article. If you have areas that need a lot of sanding, use higher grit sandpaper to start off with.
A drywall sanding screen is good because it has a mesh like structure with little holes in it. The dry clay particles fall through the holes as you sand, rather than creating an abrasive grit.
Once you have removed the larger areas that need sanding, you can follow up with a fine grade sandpaper. Something like a 320 grit sandpaper would work.


It’s worth mentioning that it’s very easy to scratch and damage greenware pottery if you are sanding it. I even find 320 grit can be a bit too much sometimes. A good alternative is to use an old green scrubby that you might use in a kitchen. When these are older and have been well used, they become soft and floppy. So, when they are old, they make a nice flexible sanding tool for bone dry clay.
Sanding bone dry clay creates a lot of dust, which you should not inhale. So, it’s best to sand outside wearing a respirator mask. Once you have sanded the pot, remove lingering dust with a soft brush.
Using Oil or Water?
If you are burnishing dry clay, you need to use some sort of lubricant. Without anything to dampen the clay a little, you will simply be pushing clay dust around the pottery surface.
The intention is to compress the finer clay particles into the surface. To do this you will need to add some sort of lubricating agent. Using a lubricant will also help to get rid of small scratch marks that might have been made during sanding.
Some potters use water, others use oil and others use a combination of both. Different potters have their own recommendations about how to burnish dry clay. The approach that I have found most successful, and efficient is as follows:
- Use a slightly damp sponge to wipe away any dust on the surface of the pot left behind from sanding.
- Apply a little oil to an area on the pot with your fingertip.
- Blend the oil into the clay using a slightly dampened brush.
- Once the oil has soaked into the clay, rub the oiled area back and forth in varying directions.
- Buff the burnished surface with a soft cloth now and again.
- When you are happy with the sheen on that section, repeat the process with an adjacent section.
- Start this process at the rim of the pot, which is the trickiest part to burnish.
- Work your way around the pot in a spiral until you have reached the foot of the pot.
Because the lubricant only dampens the surface of the clay, as it dries, the clay surface doesn’t crinkle up. As such, you don’t encounter the same problem of losing the burnished sheen as the lubricated surface dries out.
What Oil to Use when Burnishing Clay
You can use a wide range of oils when burnishing clay. Here are some suggestions that you can try out before you decide which finish you like best.
- Vegetable oil
- Mineral oil
- Baby oil
- Solid cooking oils like lard or vegetable shortening
Burnishing Clay using Terra Sigillata
Terra sigillata is a very refined clay slip. It is made out of only the smallest and finest clay particles of a particular clay body. It can then be used to decorate pottery. When it is painted onto the clay surface and polished terra sigillata gives a very high sheen. The reason for this is that all the larger rougher particles of clay have been removed. So, the burnished terra sigillata (or terra sig) creates a highly reflective surface.
Making Terra Sigillata
It is possible to buy terra sigillata from a very small number of outlets. However, most potters will make their own. There are various ways of making terra sigillata. Although it can seem a bit daunting, it’s actually quite simple to make. If you want to know about how to make terra sigillata check out this article.
Check out my YouTube channel, for a full step-by-step video on how to make terra sigillata.
Applying Terra Sigillata
There is no way around it, burnishing clay is time-consuming. By contrast, creating a burnished surface with terra sigillata is really quite quick.
Some potters use terra sigillata on leather hard clay. However, like burnishing leather hard clay, when the clay dries out, the surface of the terra sig will crinkle up. The crinkles are happening at a microscopic level, so it won’t look wrinkly. However, the glossy surface will be compromised. As a result, it’s better to apply terra sigillata to bone dry clay.
If your pottery surface is not smooth and even, sand it down before applying the terra sig. Follow the guidelines for sanding greenware outlined above or in this article.
Once you have sanded your pottery, wipe any excess dust off the pot using a slightly damp sponge.
You can then paint the terra sigillata onto the pot using a mop brush. Some potters hold the pot in their hand and rotate the pot manually whilst painting on the terra sig. Others position it on the potter’s wheel or on a banding wheel and turn it whilst applying the terra sig.
I prefer to use a potter’s wheel or banding wheel rather than holding the pot. The reason for this is that when you apply terra sigillata, it’s important to avoid drips drying on the pot. If the terra sigillata drips when you are painting it on, it’s easier to catch the drip on a wheel.
I find this a bit more awkward if I’m holding the pot. But this is really a matter of personal preference. See what works best for you.
How to Burnish Clay with Terra Sigillata
Once you have applied the terra sigillata, leave it until it is touch dry. Then you can polish it up. There are different ways of polishing terra sigillata. Some potters simply use the tips of their fingers, others will use a polishing mitt or a fine sponge.
Another way to polish terra sigillata is to rub it with a plastic grocery bag. You can either bunch the bag up in your hand and use it like a duster. Or you can stretch it over your thumb or finger and rub the clay surface with your covered thumb.
Again, you can polish the terra sigillata by holding the pot and rubbing it. Or you can put it on the wheel and let the pot turn beneath your polishing surface. Either way, buffing up a surface that is coated with terra sig is quite speedy.
Some potters will apply a few layers of terra sigillata and polish it up between layers. This can build up a deep rich shine.
General Tips on Burnishing Clay
- Smooth plain surfaces are easier to burnish than textured surfaces or very complex shapes.
- After burnishing don’t touch the surface as fingerprints will leave a mark that won’t disappear.
- Some potters start at the foot of the pot and work their way towards the rim. Others will start at the rim and work their way to the foot. Either way, it helps to work your way around the pot in a spiral. This helps to ensure that all areas of the pot are burnished in an equal amount.
- Potters vary in the precise temperature they bisque fire burnished pottery. Some will bisque to cone 015 which is 1479F (804C).
Others fire at the lower temperature of cone 018, which is 1323F (717C).
Regardless of individual differences, the consensus is that burnished clay shouldn’t be fired above cone 06, which is 1830F (999C). The reason for this is that firing above cone 06 will ruin the burnished finish.
Burnishing clay is a meticulous art that creates a beautiful finish unrivaled by other ceramic surfaces. For some inspiration, check out the work of Magdalene Odundo.

Kathykpham / CC BY-SA
Final Thoughts
Burnishing clay does take time and patience. However, there are few finishes that can compete from an aesthetic point of view with a beautifully burnished surface. If you use low fire techniques such as saggar, pit, barrel, or raku firing, learning to burnish is a must. Even if you just want to try out an alternative to glazing, you can’t do much better than burnishing clay.