The beauty of firing clay is that each method is different from the next. Firing methods range from high-tech digitally controlled and monitored kilns to homemade brick kilns packed with sawdust and leaves.
This article will give an easy-to-understand account of 7 of the most common methods of firing clay. The methods covered are electric, gas, wood-burning, soda firing, raku, sawdust, and lastly pit firing. Each method involves different techniques, producing very different types of ware.
Disclaimer – This article is informational, and is not advice about how to fire pottery. Firing pottery can be dangerous. Please see my full disclaimer.
A Simple Outline of Oxidation and Reduction When Clay Firing
Different types of firing will often be referred to as using either oxidation or reduction processes. Here is a simple outline of what these two different terms mean.
Oxidation When Firing Clay:
Oxidation firing is when there is a good supply of oxygen in the kiln. When a kiln heats up to a high enough temperature, compounds and molecules in the glaze and clay break off.
The oxygen molecules then attach to the pottery and interact with the remaining glaze and clay surface.
Oxygen has high electronegativity (source). This means that oxygen strongly attracts electrons from other substances (source). During a firing, the oxygen attracts electrons from the glaze and clay. This causes them to oxidize.
Reduction When Firing Clay:
In reduction firing, the amount of free oxygen in the kiln is restricted. As a result, gases such as carbon, hydrogen, and CO build up.
These gases leach out oxygen from the metallic oxides in the clay and glazes. The oxides then take on a reduced and concentrated form. This can affect the color and texture of the oxides.
Oxidation and reduction are different processes. Therefore, the same glaze can look very different depending on whether it’s fired in oxidation or reduction.
Some potters will use a combination of oxidation and reduction during one firing. This enables them to create particular finishes on their pottery. They do this by controlling the amount of oxygen in the kiln.
You can read more about the difference between oxidation and reduction here if you want to know more.
Different Ways to Fire Pottery
Method 1: Electric Kilns
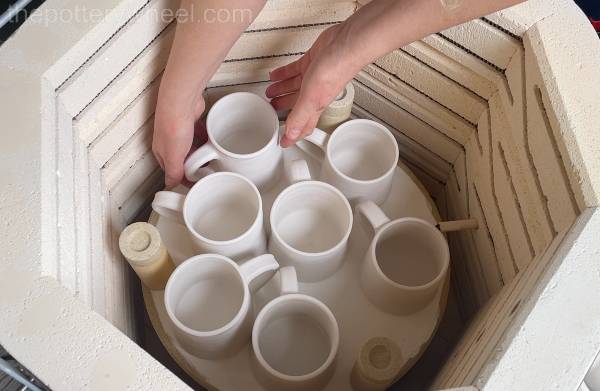
Today, most potters use electric kilns. They can be cheap to buy and because most have digital control panels, they are simple to use.
But not everybody likes to use electric kilns. This is because you can’t use them for reduction firing in the way that you can in fuel-burning kilns.
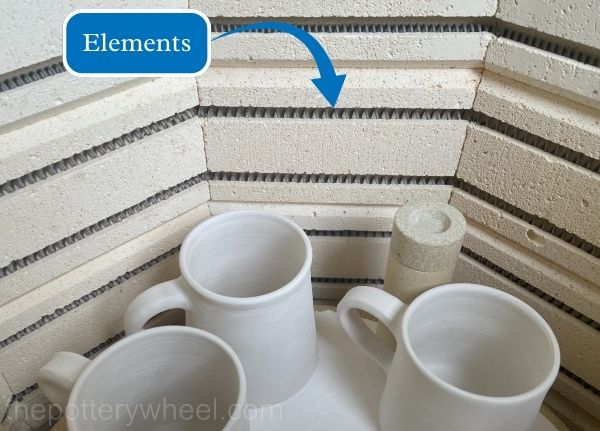
Electric kilns are boxes with doors, that are lined with insulating bricks. These bricks are porous and soft. They have a texture a bit like a soft-feeling cinder block. Electric kilns are normally either top-loading or front-loading.
The surface of the insulating bricks is etched with channels that run around the whole of the kiln. Metal coils run in the grooves. High electrical currents are passed through the metal coils, which are heating elements.
With older electric kilns, the firing schedule had to be managed manually by a potter or technician. However, most modern kilns have digital control panels. This means that the schedule can be pre-programmed and the kiln can be left to its own devices firing the clay.
Electric kilns are simple to use and generally reliable. However, the electrical elements used to heat them impose some limitations on the kiln’s use.
Some Limitations of Electric Kilns
- Electric kilns are often used for lower and mid-firing ware. This is because the heating elements tend to wear out and break in the high firing range.
- Also, the electric elements do not like the fumes and gases created in a reduction firing. Therefore, electric kilns usually work with an oxidizing atmosphere.
There is some disagreement amongst potters about whether electric kilns create an oxidizing or neutral environment. A neutral environment is one where there is oxygen present, but it is not abundant.
Some argue that gases build up in the kiln, and create less of an oxidizing environment than is intended. However, others argue that if there is some oxygen present, even if it is not abundant, then oxidation will occur. They claim that it is hard to create a genuinely neutral atmosphere in a kiln. - Unlike an electric kiln, fuel-burning kilns can be used for soda firing. In soda firing, a mixture of baking soda and sodium carbonate suspended in liquid is sprayed at pottery during the firing process.
This creates unique effects on finished pieces. However, spraying liquid into an electric kiln is unsafe, so soda-firing is restricted to fuel-burning kilns. We will take a closer look at soda firing in a moment.
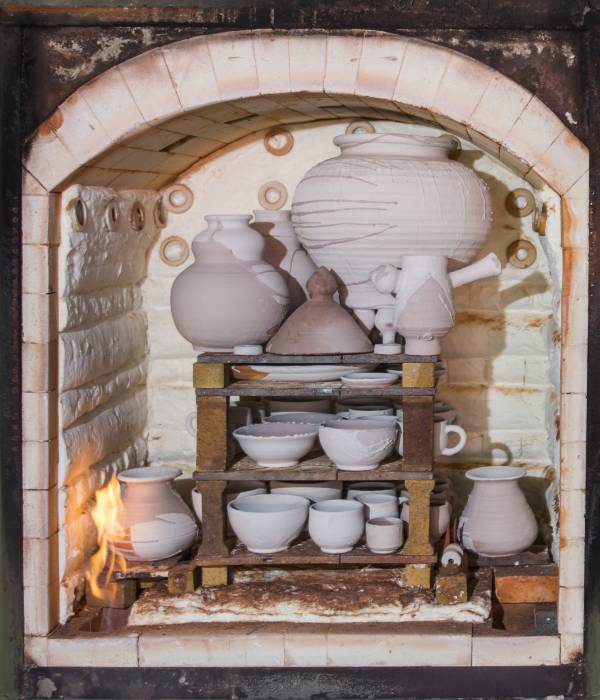
Method 2: Gas Kilns
Gas kilns are not as common today as electric ones. However, you can use gas kilns for reduction firing, and salt or soda firing. These can create dramatic results that can’t be achieved with an electric kiln.
A gas kiln uses combustion to heat the insulated internal cavity. Simply put, combustion means burning something.
In the case of a gas kiln, that something is normally either natural gas or propane. Unlike an electric kiln, which has hot elements, a gas kiln uses flames.
The ratio of fuel to oxygen in a kiln will determine how the flame burns. This, in turn, affects how the clay fires.
A gas kiln can be set so the mix of fuel and air is fuel-lean. If the mixture is lean, the flame will be shorter and cleaner.
If the amount of air is reduced and the mix becomes richer, the flame gets long and produces sooty smoke. In this atmosphere, carbon monoxide is created.
The natural state of carbon is carbon dioxide. To return to this state it draws oxygen out of the glaze and clay. This is the reduction process where textures in the clay and glaze are altered. And colors in the glazes become intensified. Colors in a reduction atmosphere tend to be more rustic, deeper, and organic looking.
Most gas kilns are downdraft kilns. This means that they have a vent at floor level, which acts as an exhaust for fumes. The vent leads to a chimney which is usually at the side of the kiln.
Some gas kilns are updraft. This means the heat and flames are directed to the top of the kiln where there is a vent.
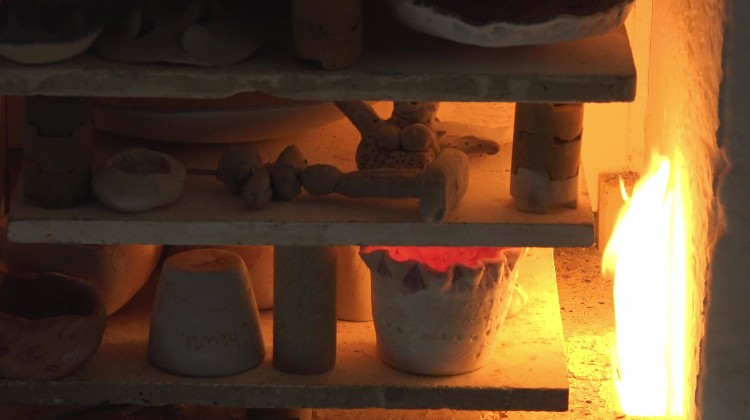
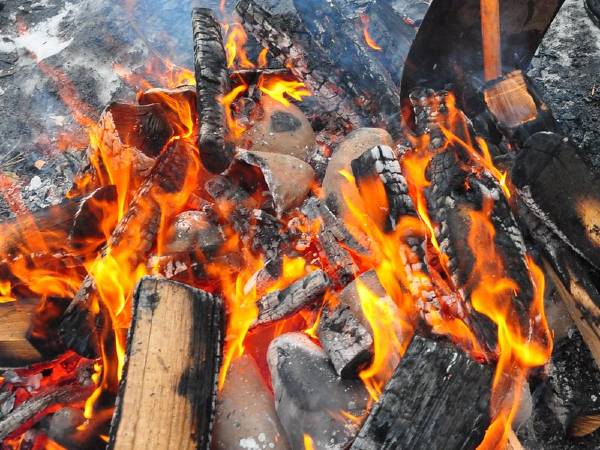
Method 3: Wood Burning Kilns
Wood firing clay is an old practice that involves burning wood to heat the kiln chamber. Because of the simplicity of the materials required, many potters build their own wood-firing kiln. These kilns vary a lot in their appearance.
Some wood-firing kilns look like a small brick igloo. Other wood-firing kilns look like walk-in brick huts or caves.
Wood firing has become more popular recently, with many professional potters feeling passionately committed to it as a process.
It is not an easy option for firing clay. With an electric kiln, you flick a switch, program a digital panel, and get on with your life. By contrast, wood firing takes a lot of time and effort. Firing ceramics can take up to three days in a wood-firing kiln.
And the kiln needs almost continual hard work and attention to keep the fire stoked and at the right temperature. Often as many as 3 people are at work on rotation to maintain the kiln as it is firing clay.
Because of the wild nature of fire, there is often movement during the firing. This can result in pottery breaking and fusing together. So, often a lot of pots are sacrificed during a firing.

Image is cropped. (CC BY-NC 2.0)
Why Choose Wood Firing If It Is Such Hard Work?
Wood-firing potters often embrace this method as an entire attitude toward the creative process. They often value working with natural elements and accepting the chaos and unpredictability of this approach.
Committed wood-firing potters can talk about their art with an almost spiritual attitude. A British potter called Nic Collins talks about the ‘kiln giving me a gift’ (source). He is referring to when a beautiful unique piece is retrieved from amongst other pots that have been sacrificed during a firing.
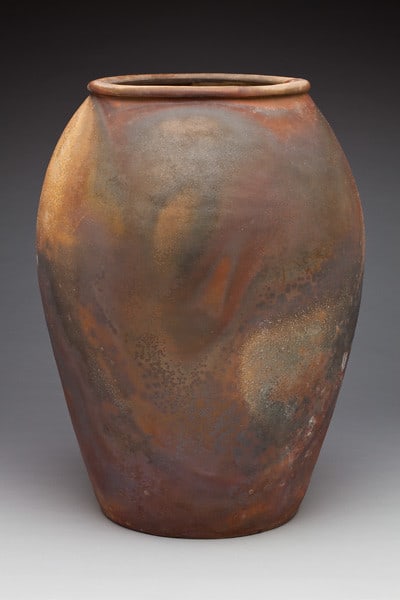
Wood-fired pottery often has a rustic, organic look. Sometimes potters will use glaze. Other times, they rely on the effect of scorching wood ash settling on the pot. And on the effect of chemical reactions in the clay as the flame touches the clay surface.
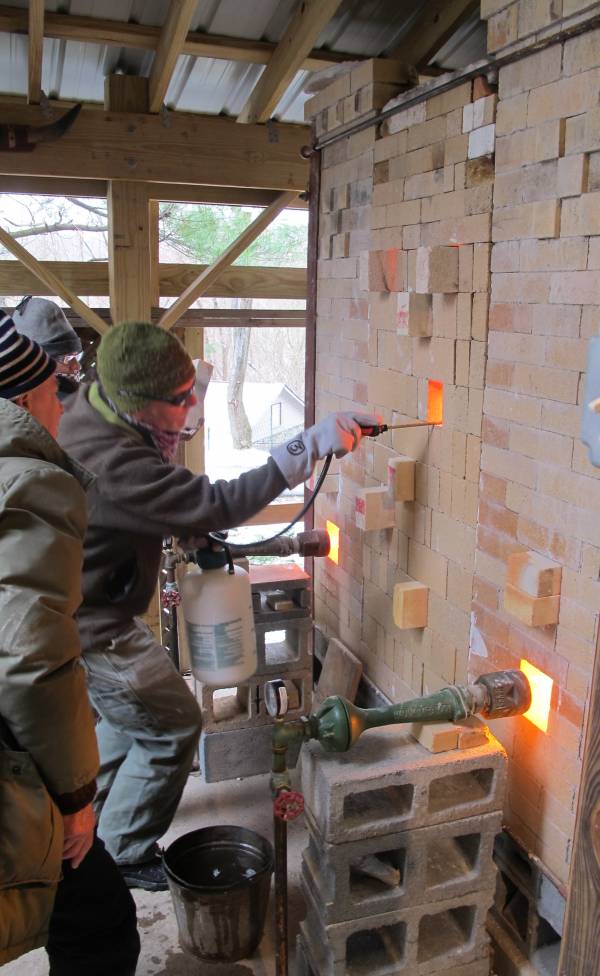
Method 4: Soda Firing Clay
Soda firing involves spraying a mixture that includes baking soda and sodium carbonate into the kiln at around 2350F (1287C).
Sodium carbonate, also known as ‘Soda Ash’, is a raw material in glass. When the soda ash and baking soda hit the high temperature in the kiln, they vaporize and disperse.
The vaporized mixture is carried by the flame throughout the kiln and sticks to the pottery.
Often pieces are left unglazed when firing clay in a soda firing kiln. The soda mix itself interacts with the surface of the clay and creates a glaze of its own.
Bisque ware can be glazed before it is soda-fired. However, the potters need to think about how the glaze will interact with the soda. The soda mix is essentially a glaze and like all glazes, it can react chemically with other glazes.
Whilst the results of soda glazing are unpredictable, you do have some control over how the pieces will turn out.
Soda kilns are often brick constructions. A brick will be removed from the wall to insert the nozzle to spray the mixture.
Because the potter knows approximately where they will spray the mix, they can position the pottery accordingly.
This way they can control which parts of the pottery are sprayed with more of the mixture.
The soda mixture interacts with the silica, alumina, and minerals in the clay. This can create rich colors. The color range is often yellow, red, brown, and gold.
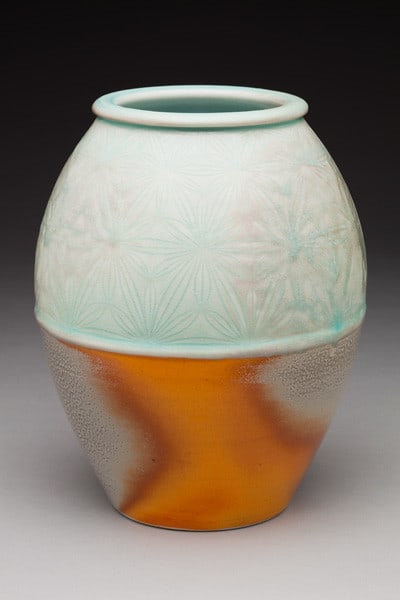
The effect of firing clay in this way depends upon the clay used and any glaze that has been applied. For example, if there is copper present this can create a pink hue to the pottery.
Like wood firing, the overall look of soda firing is often organic and natural-looking.
Method 5: Raku Firing
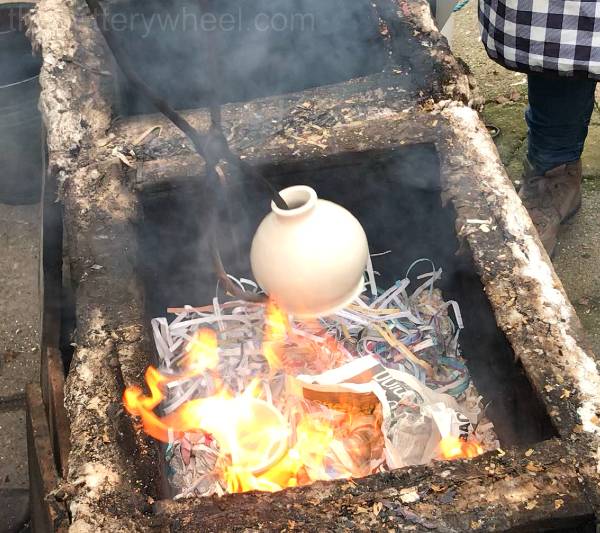
Raku is a very different way of firing clay. It involves removing the pottery from the kiln when it is red hot.
The potter will carefully lift the piece out of the kiln with long tongs. This is then placed in a container that has paper or sawdust in it. The paper combusts when the red-hot pottery is placed on top of it. Here is an in-depth step-by-step guide to the raku firing process.
When the pottery is in its red-hot state, the glaze is still in its melted state. As it cools down quickly, the glaze cracks and creates a crazed effect. The rapid cooling down process is called thermal shock.
When the piece is placed in combustible material, the carbon in the paper or sawdust becomes embedded in the cracks. The black carbon highlights the crazed effect, often creating dark lines on the piece where the glaze has cracked.
What Kind of Kiln Do You Need For Raku Firing?
Raku firing refers to the technique described above, rather than a particular kiln. In theory, you can raku fire with any kind of kiln. However, many kilns are not suitable because the process involves removing the pottery when it is red hot.
If you were to open the door on many large kilns at high temperatures, the heat would be intolerable and dangerous. Similarly, top-loading kilns are not ideal, as you have to lean over the top as it radiates intense heat.
In practice, a smaller front-loading kiln is more suitable. You can buy kilns specifically designed for raku firing. These are often gas kilns.
Alternatively, many potters make their raku kiln out of brick or other simple containers, such as an old metal oil drum. You can read my step-by-step guide on how to make a raku kiln out of a metal trash can here.
Raku is generally a low-fire kiln process. Usually, the pottery is bisque-fired in an electric kiln first. Then special raku glaze is applied to the bisque-fired pots. It is then glaze fired in the raku kiln at temperatures around 1470-1830F (800-1000C).
As such raku ware is normally quite porous. Also, when you are firing clay in this way, the ware undergoes quite a bit of stress through thermal shock.
The combination of porosity and the rigors of raku firing means the fired pottery is fragile and the glazes flake easily. As such, the ware is generally decorative rather than functional and can’t be used for eating or drinking.
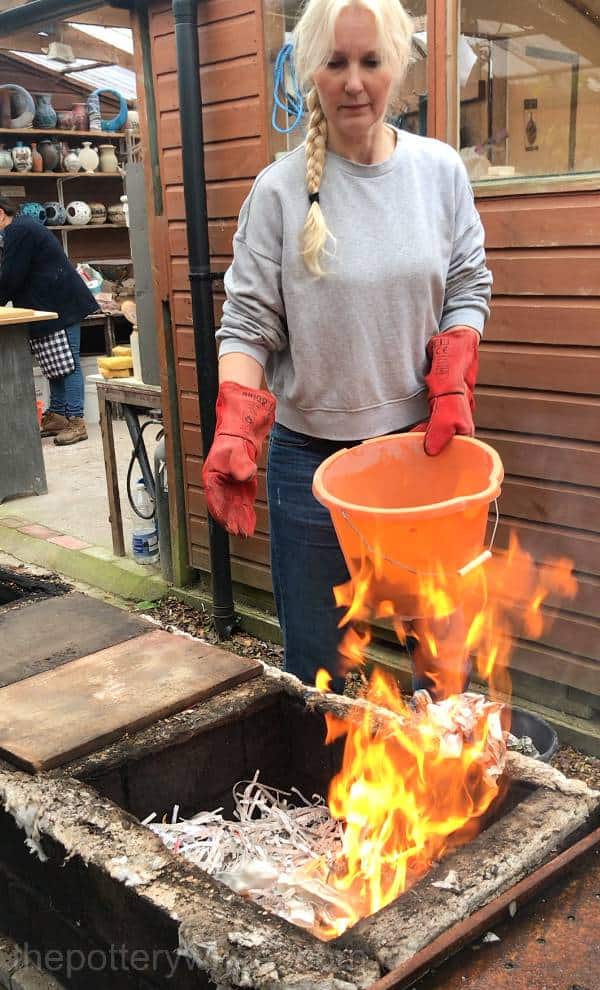
Method 6: Sawdust Firing
Using sawdust for firing clay is possibly the easiest way of building your own kiln. Finding a kiln service locally can be a little tricky sometimes. So building your own might be a fun choice. It uses little space, and simple materials and can be done easily in an outdoor space.
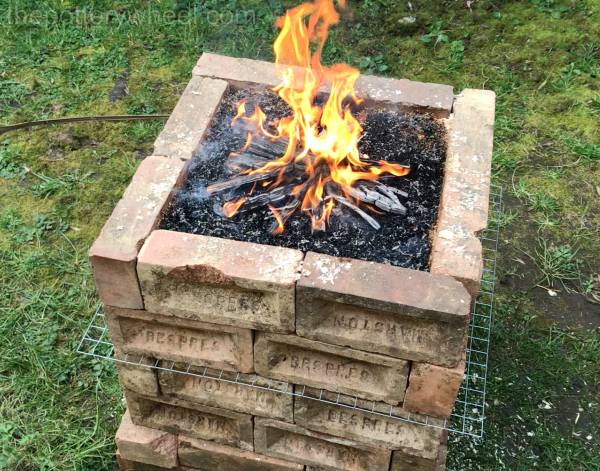
A sawdust kiln can be made from bricks or cinder blocks. These are built up in a square shape directly on the ground. The first layer of bricks is around 2 feet high.
The cavity is then packed with sawdust. Different kinds of sawdust from shavings to dust can be used and will create different effects on the pottery. Hardwood shavings tend to smell strong when they burn, so sometimes softwood is preferable.
The first layer of shavings is around 3-4 inches deep. Then the pottery ware is placed on the sawdust, leaving a gap of a couple of inches between each piece. These are then covered with more sawdust, and the process is repeated until the cavity in the kiln is full.
The kiln can have more than one layer, with each layer being separated by chicken wire. Once the kiln is constructed and full, the sawdust is set alight using newspaper and or kindling. When the flames have died down a little a lid can be put on the top of the bricks.
You can control the rate at which the sawdust burns by opening or closing gaps in the bricks or opening the lid of the kiln a little. It can take surprisingly long for the sawdust to burn and firing clay this way can take up to 36 hours.
You can download a free ebook on how to build and fire a sawdust kiln here…
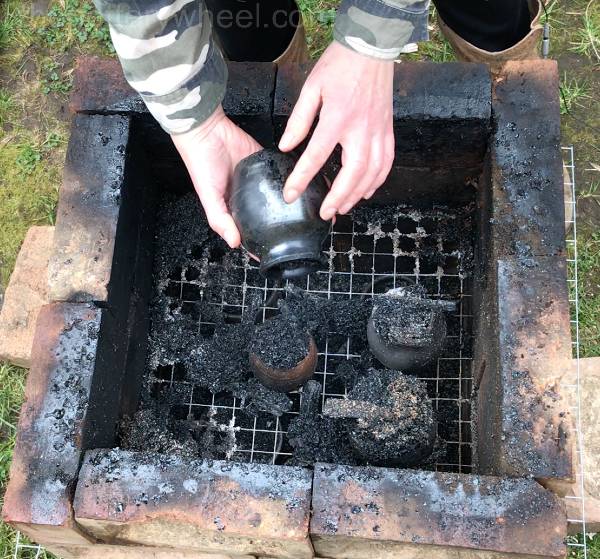
What Does Pottery Look Like After Sawdust Firing?
Clay fired in this way is not normally glazed. Instead, the greenware pieces can be burnished to give a shiny finish before they are fired. Burnishing involves rubbing the ware with a hard surface, such as a teaspoon, to give it a shiny surface. You can read more about different ways to burnish clay here.
Pottery that is fired using this technique has a black or very dark finish. Because this is a low-fire technique, the ware is porous and not suitable for liquid or food. Once the pottery has cooled, it can be finished with a layer of natural wax, giving it a lovely satin sheen.
Method 7: Pit / Barrel Firing
Pit firing is possibly one of the oldest methods of firing clay. It dates from around 800-1066AD. However, potters still use pit firing because of the exquisite-looking effects that can be created.
Pit Firing does not involve a kiln. Instead, a hole is dug in the ground that is deep enough to contain some combustible materials like wood, sawdust, and leaves. The pieces of pottery are nestled in the flammable material before it is set alight.
The bottom of the pit is covered with a layer of combustibles. The pottery is then placed on this layer with space between the pieces. More combustible material is put on top of and around the pottery. You can use anything that burns slowly, including coal or even manure.
The material is then set alight and left to burn. After the fire has reduced to a smolder, it is left for a few hours. Then the pit can be covered with sand or dirt. This will reduce the amount of oxygen available to the fire and create a reduction atmosphere.
The pit fire then needs to be left, probably overnight, until the fire has burnt itself out. The pieces are then carefully removed. Washed and polished with wax.
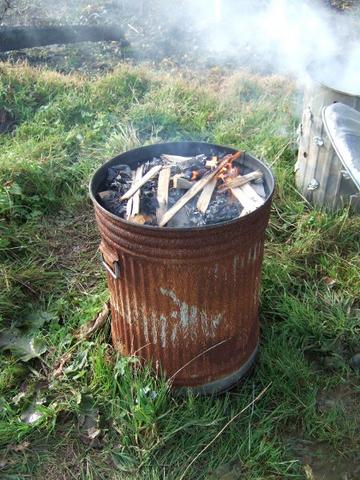
An alternative to pit firing is barrel firing. The principles are the same, except that you use a barrel rather than a pit.
Some potters sprinkle oxide stains on the ware before they light the fire. Others wrap their pottery in organic matter to create beautiful patterns on the fired pots.
This is a low-fire technique, with temperatures usually reaching around 2000F (1093C). However, the temperature is sufficient to turn the greenware into ceramic.
Final Thoughts on Firing Clay
There is something exhilarating about the different effects that you can create with different ways of firing clay. There is a lot to be said for the convenience of an electric kiln.
However, some of the pottery produced by the more traditional, simpler ways of firing is exquisite. Plus, being able to experiment is one of the joys of being a potter.


