One of the things I love about pottery and ceramics is that they are very elemental. With its dramatic mix of earth, fire, air, and water raku firing is one of the grittier approaches to pottery. So, what is raku pottery, and how is it made?
Raku is a low fire process, reaching around 1830F (1000C) at its highest temperature. In raku, pottery is removed from the kiln when red hot. It is cooled rapidly, often in combustible material like sawdust or paper. Raku firing is usually done in a fuel-burning, rather than an electric kiln.
Disclaimer: I hope you love this article and find it helpful. Please remember that the raku process is risky with safety issues that need careful attention. This post is for informational purposes only, and should not be taken as safety advice about raku firing.
Anyone undertaking raku firing should consult with a health and safety expert with appropriate qualifications for independent professional advice.
What is Raku Pottery and Where Does it Originate?
The Raku pottery tradition originated in Japan in the 16th century. In its original Japanese form raku pottery was typically hand-built and used to make tea bowls. These are small semi-porous drinking vessels used in a Japanese tea ceremony.
Over the years, the Raku pottery process has evolved. Raku pottery ware has developed from the humble tea bowl to any kind of pottery you can imagine.
Some modern raku is black and white with a strong crackle effect. Other raku pottery has striking vibrant colors and hues. And other raku pottery is matte black. These are just a few variations in the raku look. I will explore the different looks of raku pottery and how these are achieved a little later.
However, in spite of the different raku effects that can be achieved, there are some aspects of the raku process that remain consistent. Let’s take a look at those now…
Features of the Raku Process
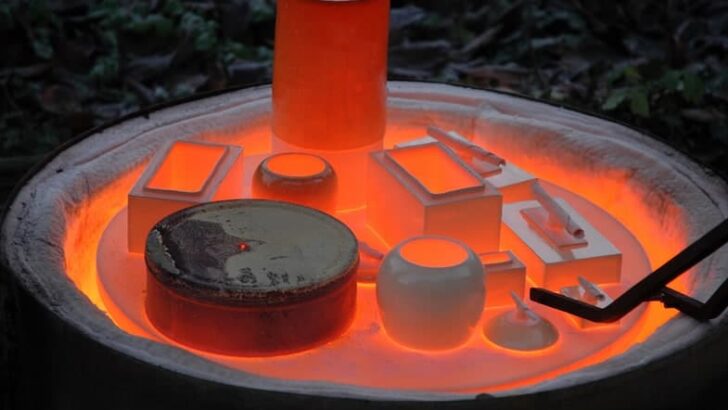
Raku firing is a fast process. The kiln is heated up more quickly than a non-raku firing. And, the pottery is removed from the kiln when it is red hot. After being removed from the kiln it is cooled down quickly too.
Normally during pottery firing, the temperature changes in the kiln are managed carefully and happen gradually. This is a way of protecting the pottery from sudden temperature shifts.
Sudden changes in temperature in the kiln can cause ‘thermal shock’ in the pottery. This refers to the stress that pottery undergoes during rapid temperature changes. It is thermal shock, amongst other things, that contributes to pottery cracking if it cools too quickly.
By contrast, in Raku, the pottery is removed at its highest temperature and deliberately cooled down quickly. It is because of this that pottery is more vulnerable to breaking or exploding during the raku process. There is more collateral damage in a raku firing than in a regular pottery firing.
In the Japanese raku firing, the pottery was removed when hot and traditionally allowed to cool in the open air. However, over the years the raku pottery technique has changed. It gained popularity particularly in the 1950s in America and since then various adaptations have been made to the process.
For example, modern potters have a number of ways of cooling down the red-hot pottery once removed from the kiln. One approach is to plunge the hot ceramics into water. Another is to put the pottery into a barrel or pile of combustible material such as sawdust, straw, or paper.
What is Raku Pottery Used For? – Is Raku Food Safe or Waterproof?
It is widely recognized that whilst beautiful, raku ware is decorative rather than functional.
Is Raku Pottery Waterproof?
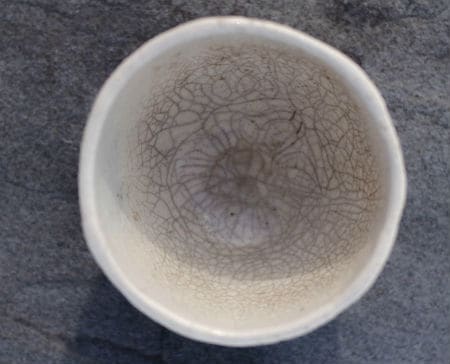
Raku pottery is not waterproof. The reason for this is that the raku firing process is fast and fires to a low temperature.
During firing clay undergoes some huge physical and chemical changes. The kinds of changes that take place depend in part upon the clay used, and the temperature reached.
Raku Pottery and Sintering
At a certain temperature, a process called sintering starts to take place. Sintering is what happens when pottery converts from clay to ceramic.
During sintering, the clay particles become hot enough to start sticking together. They adhere to one another because, in the heat, the surfaces of the particles become more active.
In this state, the active molecules on the surface move about and pass from particle to particle. The result of this swapping of molecules is that the particles begin to bond together.
In addition to the swapping of molecules, the clay particles move closer together and the clay becomes more densely compacted.
Sintering is what happens to clay during a bisque firing. During a bisque firing the clay particles have become bonded together and rigid.
However, bisque is still porous because, although the clay particles are bonded and rigid, there is still space between them. As such, although sintered clay is now ceramic, it is still non-porous and not waterproof.
Raku Pottery and Vitrification
By the time a kiln has reached around 1730F, the clay will have become sintered. Pottery becomes non-porous during a process called vitrification. Vitrification occurs when the clay reaches a high enough temperature for its glass-forming ingredients to start melting.
During vitrification, the liquid glass moves into the space between the clay particles, and the gaps between the particles close. When the temperature of the ceramics cools as the firing comes to an end, the liquid glass solidifies between the particles. This makes the clay non-porous and waterproof.
Vitrification takes place at higher temperatures than are achieved during a raku firing. As such, raku ware is still porous and therefore not waterproof.
There are ways to treat raku pottery surfaces to make them water-resistant if not waterproof. You can read more about these techniques in this article here. However, left to its own devices raku pottery is not waterproof, even when glazed.
Is Raku Pottery Foodsafe?
Raku pottery is not food-safe and cannot be used for dinnerware. In addition to being non-porous, there are a few other reasons why raku pottery is not food safe.
The glaze on raku pottery can be quite fragile and can chip and flake off quite easily. This is because, during low fire glazing, glaze does not bond as completely to the clay body, as it does during a hotter firing.
Although sintered clay is brittle and ceramic, it is not as tough as vitrified pottery. As such, raku is not the toughest of pottery. It chips easily and does not fare well with heavy use.
During a raku firing the pottery undergoes extreme and rapid changes in temperature. For this reason, the surface of raku glaze is often crazed and cracked. This crazing can harbor bacteria and is one of the reasons that raku is not food safe.
Crazing and cracks on pottery glaze also provide exit points from which unhealthy clay body and glaze ingredients can leach.
The leaching of toxins from pottery into food has become an increasing point of concern over the years. And surfaces that are not properly sealed, like raku, are not recommended for dinnerware. So, the answer to the question, what is raku pottery used for, is that it is used for decorative purposes.
There are different types of raku pottery, with their own distinctive appearance. The different looks are achieved by different variables adjusted in the raku process. These variables include the use of different slips, glazes, timings, and reduction techniques.
Before looking at these different variables let’s have a look at some of the general principles behind raku.
What is Raku Pottery – The Nuts and Bolts of How to Make Raku
This short video will give you a brief overview of the raku firing process.
Here are some general facts about the raku approach:
Bisque is Raku Fired, Not Greenware
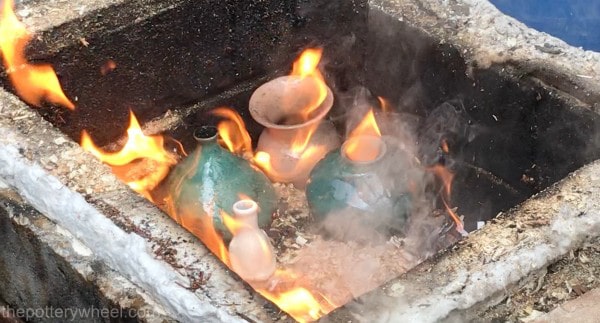
It is bisque pottery rather than greenware that is raku fired. Typically, the greenware is bisque fired to around 1650F (900C). It is then allowed to cool before any slips or glazes are applied. The raku process takes place during the final firing. The glaze fire in a raku process ranges in temperature between 1470-1830F (800-1000C).
Raku is a Speedy Process
A raku firing is a relatively speedy process, usually taking between 1 and 2 hours. By contrast, a standard firing in a gas or electric kiln can take up to 24 hours from start to finish. In raku, the kiln is heated up quickly, to a lower temperature.
The idea is that the pottery is heated to the point where the glaze or surface finish has melted. Once it is melted the pottery is removed carefully from the kiln in its red hot or orange state. It is then cooled down rapidly.
There are Different Ways to Cool Raku Pottery Down
The cooling process in modern western raku processes can vary. Some potters will allow the ceramics to cool down in the open air. This is more in line with the traditional Japanese raku technique. Other potters will submerge the hot ceramics into water to cool it down rapidly.
Allowing the pottery to cool in the air or submerging in water both involve the ‘oxidation’ of the pottery. In an oxidation atmosphere, oxygen interacts with the metals in the clay and glaze and creates a particular finish. Typically, in raku, an oxidation atmosphere will produce blues and greens on the pottery surface.
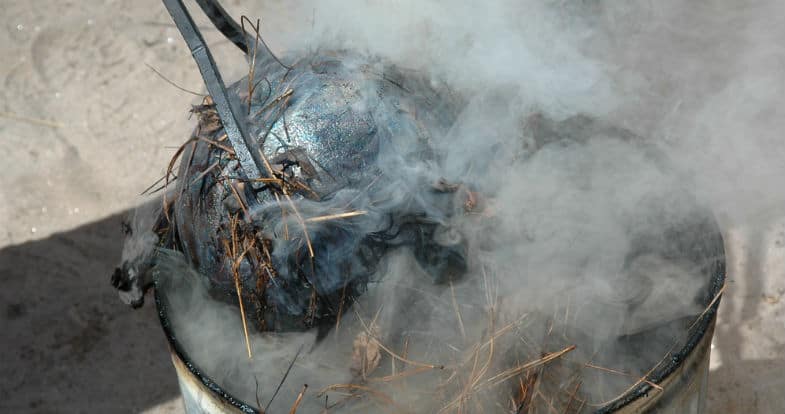
Alternatively, potters will create a ‘reduction’ atmosphere by nestling the hot pottery in combustible materials. Often this is done by putting the pottery in a trash can with materials such as sawdust, paper, or leaves. The reduction atmosphere is then created by covering the burning matter with a lid.
Another technique is to bury the hot raku pottery on a pile of combustible material. Then, place a metal bucket over the top of the smoking burning matter.
More About Reduction in Raku Firing
Normally a reduction atmosphere is created in gas kilns at higher temperatures. However, raku is a low-fire process and the kiln does not reach high enough temperatures to cause reduction.
Instead, the reduction atmosphere is created once the pottery is removed from the kiln. This is done by placing the pottery with combustibles in an enclosed space. As the materials burn, they consume the oxygen in the sealed space. This creates carbon monoxide.
Carbon monoxide wants to return to being carbon dioxide and will seek out oxygen to do so. The result is that carbon monoxide draws oxygen out of clay and glaze in the kiln.
This causes the clay and glaze to become denser and to intensify colors and textures. Often glazes in a raku reduction firing will be orange, red, copper, and gold.
If the container is opened, allowing oxygen back in, this can cause flashes of oxidation-style colors.
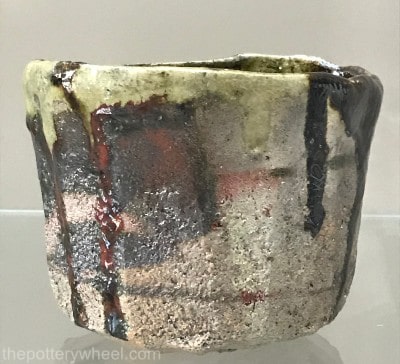
Additionally, glaze and slip that have been applied to the bisque ware may crack during rapid temperature changes. This leaves the underlying clay body exposed in the cracked areas. Carbon circulating in the reduction atmosphere blackens the exposed areas. This can result in the distinctive black crack marks that are associated with raku pottery.

However, these black cracks that are so typical of raku, are by no means the only raku finish. There is a huge diversity in the look of raku pottery. This leads me to the next section.
What is Raku Pottery – Different Types of Modern Raku:
How the pottery is processed after it is removed from the kiln has a significant effect on its appearance. The raku process is notoriously unpredictable. The way your pottery ultimately looks will vary from one firing to the next.
However, there are elements of the process that can be adjusted to create a particular finish. These different finishes are generally thought of as being different styles of raku. For example, potters might use different slips, glazes, and wax resist. They might also adjust the timings of a firing to create a particular finish.
Here are some of the different methods that can be used to create different styles of raku pottery.
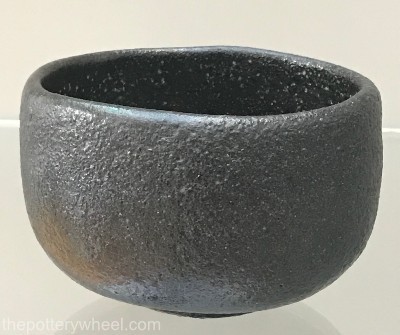
No Glaze
Potters might prefer to raku fire bisque potter without glaze. If the potter is using a reduction chamber after firing, the finished raku piece will often be matte black.
This intense, rustic look is the result of oxygen being drawn out of the clay body during reduction. And also staining of the bare ceramic surface with carbon in the kiln atmosphere.
Glazes
There are lots of commercially produced glazes that are specifically made for raku firing. Like glazes designed for other firing methods, there is a wide range of colors and finishes to suit most tastes.
There are also lots of homemade DIY raku glaze recipes available in pottery circles. These are often shared amongst potters on pottery forums.
However, any glaze can be used for a raku firing, provided it is a low fire glaze. The glaze needs to melt at a low temperature, otherwise, it will be underfired when removed from the kiln. Underfired glaze can look dull and milky. The right temperature range for a raku firing is around cone 010 to 06.
Having said that, there are potters who state that you can use mid or high fire glazes doing raku (source). One suggestion is that you can use a mid or high fire glaze as you would a slip.
The idea is that you paint the high fire glaze on the bisque. Then apply a low fire glaze over the top. As the low fire glaze melts in the raku kiln, it encourages the high fire glaze to melt too. The result is a piece that is a unique combination of the two glazes.
Wax Resist
Wax resist can be used to create patterns and designs on raku. Wax resist is a wax-based solution, which creates a waterproof seal when it dries. The wax resist is painted onto the bisque surface.
This seals the painted areas of pottery and prevents the glaze from sticking to that part of the pot. During a raku firing, the wax melts away and the bare ceramic underneath is exposed. These exposed areas of ceramic become blackened when the pottery is placed in the reduction chamber. The result is a black pattern set against the fired glaze.
Naked Raku (or Slip Resist Raku)
Naked raku is also known as slip resist raku. Like most pottery and ceramic techniques, there is more than one type of naked raku.
It is called ‘naked raku’ because when the process is finished, it has neither slip nor glaze on its surface. What you are left with is a decoration that has been embossed directly onto the ceramic surface.
The general process involves applying a special slip called ‘resist slip’ to bisque pottery. When the ware is fired, the slip shrinks and cracks. Resist slip is formulated so that it adheres to the surface in the kiln and reduction chamber. But that it will flake and wash off once this process is over.
Although the resist slip adheres to the bisque surface, when it dries in the kiln, it shrinks and cracks. The bare underlying clay is exposed between the cracks in the slip. When the pottery is put in a reduction chamber, the carbon from the combustible matter blackens the exposed ceramic.
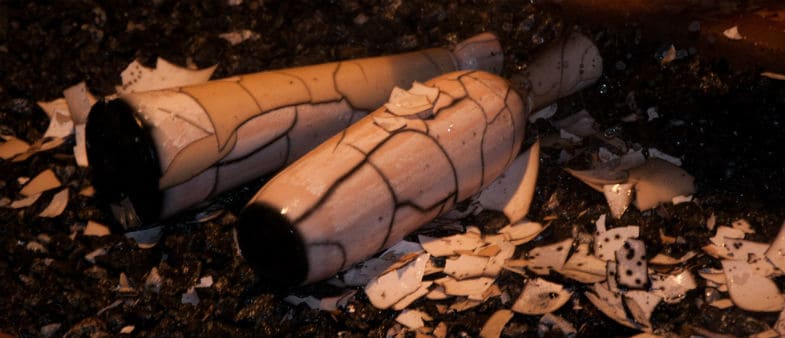
The areas of the pottery covered by the remaining slip, retain their original, often white, color. After the reduction chamber has worked its magic, the remaining slip is removed from the pottery. It is often removed by washing the pottery in a bucket of water.
The resulting pattern is one of white pottery with black crazing. Potters will often use masking tape to cover areas of the pottery that they want to be blackened. The masking tape is stuck to the pot before the slip is applied. Thus, preventing the slip from being applied to specific parts of the pottery.
One-Step and Two-Step Naked Raku Pottery
The above description refers to a ‘one-step method’ of naked raku. In this approach, only resist slip is applied to the pottery before the second firing. This slip tends to be quite thick.
An alternative method involves applying a thinner layer of resist slip and then covering that with a layer of crackle glaze. This is the ‘two-step’ method. The difference with the second method is that the slip acts as a barrier between the glaze and the clay.
During the second firing the glaze crackles. It is these crackle marks that are darkened in the reduction chamber. Afterward, the slip and the glaze are both removed to reveal the black-and-white crackle pattern.
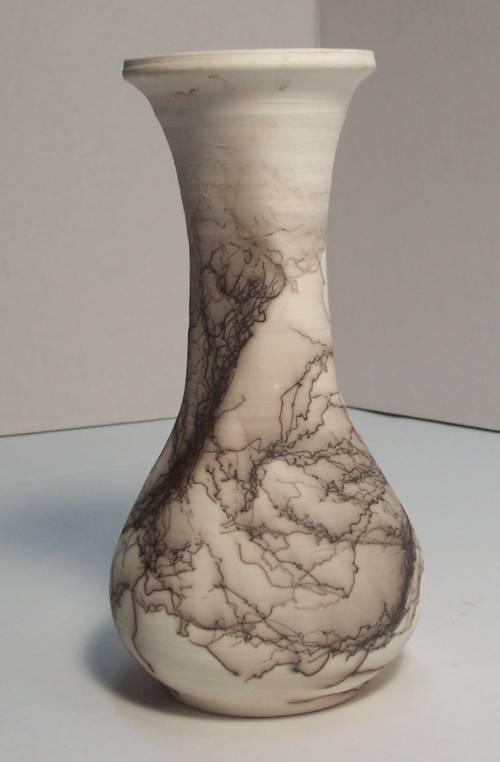
Horse Hair Raku
Involves draping horsehair across the hot ceramics when they have been lifted out of the kiln. Other materials can be used, including dog hair, feathers, or even human hair. Any kind of organic material that has some oil content will work quite well.
This is because the combustible material leaves a mark of carbon and ash, that soaks into the pottery surface.
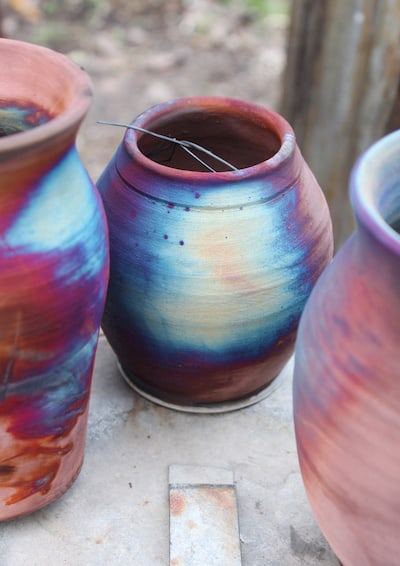
Alcohol Reduction Raku
This is yet another variation of the raku process. When the hot ceramics are removed from the raku kiln, they are sprayed liberally with rubbing alcohol. As the alcohol hits the pottery it burns.
The pottery is then positioned in a reduction chamber. A handy way of doing this is to put the pottery on a bed of sand. A small quantity of combustible material is sprinkled on top. This is just sufficient to create a little smoke.
Then a bucket or large pyrex glass bowl is positioned over the top to create a reduction atmosphere. The bowl is lifted briefly and water is sprayed on the bowl. When the bowl is replaced, reduction resumes the alcohol will create a copper-colored hue on the surface.
If the bowl is lifted up a fraction to let a little oxygen in, this will create flashes of blue and purple. The end result is a beautiful mixture of coppers, blues, purples, and pinks.
That is an overview of just some of the types of raku pottery that can be made. Now, let’s have a look at some of the other practicalities such as the choice of clay and type of kiln.
What is Raku Pottery Made From? The Best Clay For Raku
In theory, any kind of clay can be used for raku firing.
Grogged clay
Because of the extreme temperature changes that occur during raku, grogged clay is often recommended.
Grog is clay that has been fired and ground up into granules and powder. This is then added back into unfired clay.
Grog makes clay stronger and reduces the amount clay shrinks when it dries and is fired. It also, makes clay more refractory, which means that it survives temperature shifts and is less susceptible to thermal shock. For this reason, grogged clay is often recommended as being suitable for raku firing.
However, throwing grogged clay on the potter’s wheel can feel like sandpaper on the hands. It can be quite uncomfortable to use. So, if you are throwing your pots, it’s a good idea to get clay with a finer grog. This won’t be so tough on your hands.
Is Earthenware Good for Raku?
Reason suggests that earthenware would be good for raku. Earthenware is a low fire clay. As raku is a low fire process, common sense would suggest that earthenware would be a good fit.
However, this is not the case. The more mature clay becomes during a firing, the less of an impression carbon will make on its’ color. Because earthenware matures at lower temperatures, this makes it less receptive to the carbon patterns that are intended during raku.
Also, earthenware has a higher iron content than other clay bodies. And iron also resists the coloration associated with carbonization.
Stoneware Clay and Raku
As such, earthenware is not ideal. Generally, potters recommend using a light-colored stoneware. Light-colored clay creates a more striking contrast with the carbonized areas if you are doing naked raku. If you are using another method like alcohol reduction raku, light-colored clay will showcase the color of your raku nicely.
There are commercially produced raku clays that are designed with low shrinkage and to resist thermal shock. However, other clay bodies can work well. One particular white grogged stoneware called T-Material is popular amongst potters for raku. It works well for raku because it is light-colored, and it has low thermal expansion and low shrinkage.
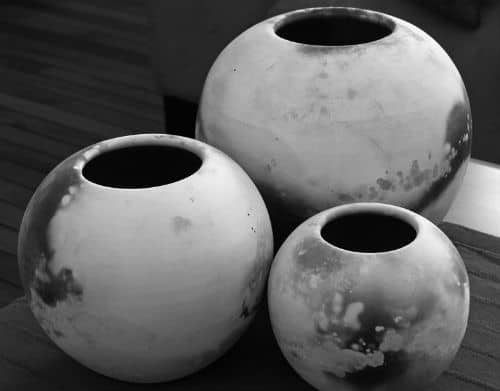
What is the Best Shape for Raku Pottery
The raku method can be used to fire pottery and sculpture. In theory, you can raku fire any shaped ware. However, raku pottery goes through dramatic temperature changes, and the form is put under considerable stress. Therefore, ware that is evenly made and relatively thin tends to survive the process more successfully.
Shapes that do well in a raku firing are round orbs, curved pieces, and vertical sculptures and pots. Bowls and open shapes are at higher risk of cracking. Also, sharp edges, fiddly details, and pottery with varying thicknesses are more likely to crack. This is because the edges of the ware will expand and contract at different rates to the middle areas. This puts the ceramics under more internal structural stress.
Pottery with plainer smoother surfaces tends to look better after a raku fire. Detailed design or texture can compete or interfere with a raku finish.
Naked and horsehair raku look most effective when the pottery has been burnished. The burnishing is done when the pottery is leather-hard before being dried for the bisque fire.
Some potters will apply terra sigillata to their pottery before burnishing. This is a very fine clay slip which when burnished creates a glossy smooth surface.
What is Raku Pottery Fired in? What is The Best Kiln For Raku?
In principle, a raku kiln is any kind of kiln that you use for the raku process. Raku can be done using a gas-fired or electric kiln.
However, there are a couple of reasons why raku firing in an electric kiln is not ideal:
- The raku process is fast. The pottery is loaded into a cold kiln and the kiln is heated rapidly. Heating an electric kiln takes longer than reaching temperature in a gas kiln. This is true, even if you are only taking the kiln up to 1832F (1000C).
- Opening the door on an electric kiln when it is hot can damage the electric elements. The elements can suffer from the extreme drop in temperature.
Nevertheless, some potters do use electric kilns for raku. They simply accept that the process will shorten the life expectancy of their kiln.
Two other important considerations are the size of the kiln and how you are going to remove your pottery.
- Large kilns generate an intolerable amount of intense heat when they are opened. For that reason, a smaller capacity kiln is more suitable for raku.
- Also, a front-loading kiln is preferable. With a top-loading kiln, you have to lean over the top to remove pottery. Whilst this is fine when the kiln has cooled down, it is potentially dangerous when the kiln is hot.
For these reasons, a small, front-loading gas kiln is often the preferred choice.
Commercially made raku kilns are available. Alternatively, it is relatively straightforward to make your own raku kiln. Essentially, making a raku kiln involves creating an insulated chamber. The adventurous DIY potter then introduces heat to the chamber using a source like propane gas.
See the video below of a simple raku kiln construction, if you are feeling bold!

Removing Raku Pottery From the Kiln
Raku firing is very hands-on. It’s not like typical electric firing, where you set the digital display panel and then get on with your life. There are a number of other things to take into consideration. Here are some of the other considerations….
When to Remove Raku Pottery From the Kiln
Raku firing is fast. The actual length of time required for firing depends on a few factors. These include, amongst other things, the type of kiln and glaze you are using. Potters report that raku firing can take anything between 20 minutes and just over an hour.
Often potters will rely on visually gauging if pottery is ready to be removed from the kiln.
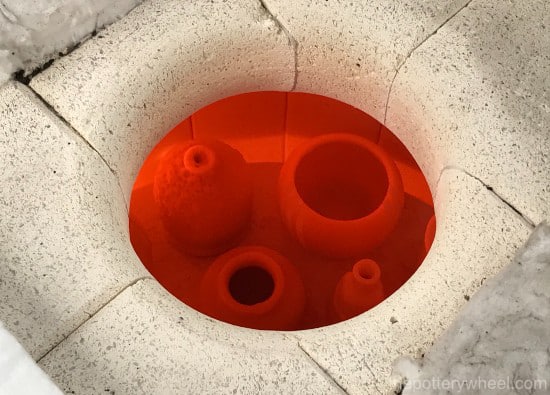
If the ware has been glazed, potters will look to see if the glaze has melted. Usually, when a glaze has melted to maturing it will look wet and shiny.
Glaze will go through different phases as the kiln heats. Generally, the glaze will start to bubble up as the kiln heats. When the glaze has stopped bubbling and the surface looks glassy, the pottery is generally ready to be removed.
However, this does depend on the glaze used. Other glazes will begin to bubble or get a dimpled orange peel look when they mature.
A pyrometer can also be used to confirm if the kiln has reached a hot enough temperature. Pyrometers have probes on them, which can be inserted into the kiln’s spy hole. The probe is attached to a meter which will tell you how hot the kiln is.
Pyrometers are particularly useful if the pottery has not been glazed. It is harder for a potter to tell if unglazed pottery is ready to be removed. However, experienced raku potters will be able to tell from the glow of unglazed pottery if it has reached temperature.
Some potters use witness cones during raku firing. They may, for example, place a self-standing 06 witness cone in the kiln and keep an eye on that.
How to Remove Raku Pottery from the Kiln
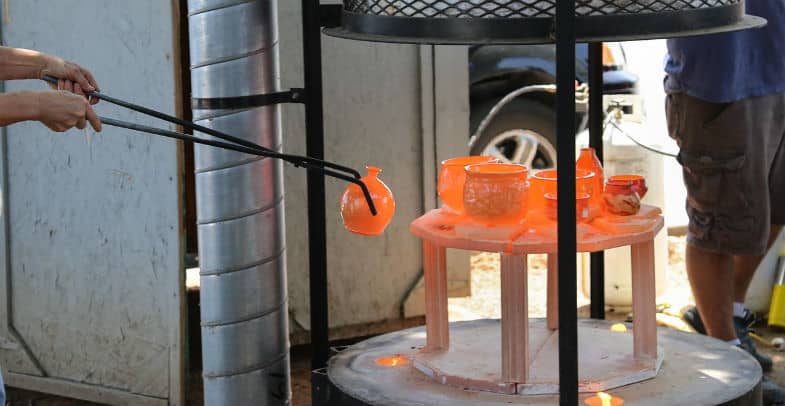
When removing pottery from the raku kiln, you need to think about protecting the pottery and yourself.
Protecting the Pottery
When you are loading the kiln, it’s a good idea to leave quite a bit of space between the pieces. This will give you enough room to get your metal tongs in and lift the pottery easily.
If you are doing naked raku, you need to lift pottery out of the kiln extra carefully. It is important to avoid knocking the slip and/or glaze from the surface. If the slip gets damaged it can ruin the carbonized patterns created in the reduction chamber.
Protecting Yourself
Your safety when practicing raku firing is important. Before reading the information below, please read my disclaimer by clicking here.
There are lots of alarming videos on YouTube of potters making raku in t-shirts and flip-flops. This is neither safe nor advisable. The dangers of raku are not just about burning yourself. There are also issues about the inhalation of smoke and fumes that need to be considered.
Here are some safety precautions taken by potters to protect themselves during the raku process. Please remember that I am not a health and safety professional. This list is not exhaustive and is for informational purposes only. Please consult a qualified health and safety professional for complete advice about being safe when doing raku pottery:
Safety Precautions
- Raku pottery is removed from the kiln using specially designed and produced metal raku tongs.
- Wear a dual-cartridge respirator mask to filter out fumes, gases, and particles.
- Wear a full-face protective face shield
- Or, use an all-in-one combination respirator with a face shield
- Wear heat and flame-resistant gloves that are designed to be used at high temperatures. Be mindful that Kevlar gloves will last for a limited number of firings. Read the safety instructions provided by the supplier and replace them as frequently as recommended.
- Use a higher temperature Kevlar combination fiber mitt handling pottery that is too large to be picked up by tongs.
- Don’t wear sandals. Wear leather boots or strong shoes if possible.
- Wear cotton clothes (not nylon which is highly flammable)
- Always wear long sleeves
- Use a welding jacket
- Have a fire extinguisher nearby
Once you have removed your pottery safety from the kiln, it is time for the fun to start! Now you put your hot ceramics into the combustible material. You may be wondering, what is the best combustible material to use for raku pottery? Well, read on….
Best Combustible Materials for Raku Firing
Here are some suggestions for combustible material that can be used in raku firing:
- Newspaper
- Paper
- Sawdust
- Woodchips
- Dry leaves
- Pine needles
- Straw
- Hay
- Seaweed
- Nutshells
These are suggestions, and really you can use whatever combustible organic material you like. You can experiment to find out which you prefer, and of course, which is readily available to you. Pine needles, for example, may not be an option if you are based in a city.
Potters have different techniques and recommendations for using combustible material. When burning material touches the pottery it will leave a smoking mark. This may be an effect that you like and aim to achieve. In this case, it’s a good idea to ensure your combustible material is small. If your combustible material is in small pieces, a bigger quantity of it nestles against the pottery surface and burns.
However, other potters prefer to minimize the effect of the organic material burning directly against the ceramics. As such, they line the garbage can with newspaper sheets. When the hot pottery is placed in the can, the paper burns, but less of it touches the ceramic surface.
How Long Do You Leave Raku in the Combustion / Reduction Chamber?
The answer to this question varies from potter to potter. Some potters will leave the pottery in the chamber until the flames have died down. Then they lift the still very hot pot out of the chamber and submerge it in water. This is known as quelching.
Other potters take their pottery out of the chamber and allow it to cool on the ground. If this approach is taken, then smaller pots can be removed from the reduction chamber after 5 minutes or so.
It’s a good idea to leave larger pots in the chamber for around 30 minutes. Larger pots are at greater risk of cracking because of big shifts in temperature. Leaving them to settle and cool in the chamber can help avoid this.
Post Reduction Raku Cleaning
Again depending on what raku technique you have used, you may need to clean your pottery. For example, if you have done naked raku, the slip and glaze need to be removed. Similarly, there may be a lot of carbonized combustible material sitting on the surface of your pottery.
Generally, potters will clean their raku pottery up after reduction, by scrubbing it with wire wool or a metal pad. Sometimes slip and glaze will simply flake off with a gentle brush. Other times, you may need to scrub the surface with a wire brush in water.
Final Thoughts
What is raku pottery best known for? It is known as being a dramatic and exciting way of firing clay. Because it involves taking pottery out of the kiln when it is red hot, it can be nerve-wracking. However, the resulting ceramics can be intensely beautiful and the drama of the process continues to keep potters enthralled.


