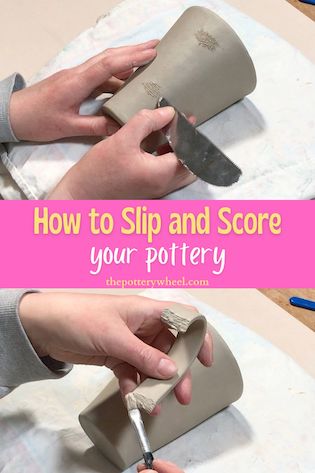
If you have started making pottery, sooner or later you will need to join two pieces of clay together. Maybe you need to attach a handle to a mug or join two slabs of clay. The best way to achieve a secure bond between separate pieces of clay is the ‘slip and score’ method of joining. This article is all about how, when, and why to slip and score your clay.
What is Slip and Score?
Slip and score is sometimes called ‘score and slip’, but they refer to the same process.
‘Scoring’ involves scratching or scoring the surface of the clay. By scoring the clay you create a rough texture that enables two pieces of clay to key into one another.
‘Slipping’ refers to applying liquid clay also known as slip to the scored surface. The liquid clay mixes in with the rough texture of the scored clay and acts as glue to stick the separate pieces together.
In short, slip and score refers to scratching a rough texture into the clay surface. Then slip is applied to the scored surface to act as a bonding agent.
How to Slip and Score Clay
Here are some suggested steps to follow to ensure that you create a firm bond.
Step 1) Allowing Your Clay to Firm Up
Usually, slip and score is used to join together clay that is soft leather hard. Soft leather hard clay is firm enough so that it doesn’t flop about when you pick it up. But it still contains enough moisture that it can be shaped a little without breaking.
It’s easier to get wetter pieces of clay to join together. This is because the water in the clay lets the clay particles in the two pieces mingle together and adhere.
But joining soft wet clay is not always an option. If you are slab building it’s hard to work with slabs of clay when they are very pliable.
If your clay is very fresh and soft, you will need to let it dry out a bit first before you join separate pieces. Imagine trying to attach a very soft pliable handle to a freshly made mug. The handle and the mug would lose their shape as you tried to join them together. This is why it’s best to join soft leather hard clay.
The trouble is that leather hard clay doesn’t contain as much moisture. So, the surfaces that you are trying to join won’t adhere without some assistance. That is why you need to slip and score.
Step 2) Ensure the Two Pieces of Clay Have the Same Moisture Content
When you are joining two pieces of clay it’s important that they are about as dry as one another. If one piece is still quite wet, and the other is dry, the joint will probably crack. This is because the drier clay will suck the moisture out of the wetter clay. Rather than sticking together the drier and wetter clay will pull away from one another.
A related point is that it’s best not to try and join clay that is too dry. If you score and slip very dry clay, the clay will draw all the moisture out of the slip too quickly. As a result, the joint is unlikely to bond firmly.
Step 3) Plan Your Join
The best way to make a nice neat joint is to hold the two pieces together. Line the two pieces of clay up in position, then make a mark on one where the other will be joined.
For example, if you are joining a handle to a mug, hold the handle up next to the mug. Then make a few small marks on the mug where you want the handle to be attached.
Once you have made your marks, you can remove the handle and get ready to score the clay.
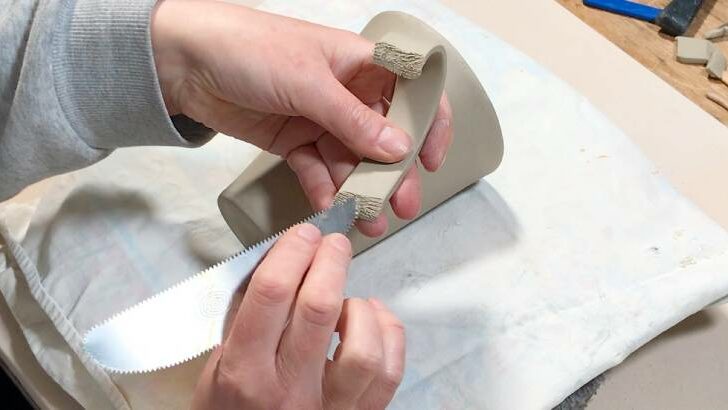
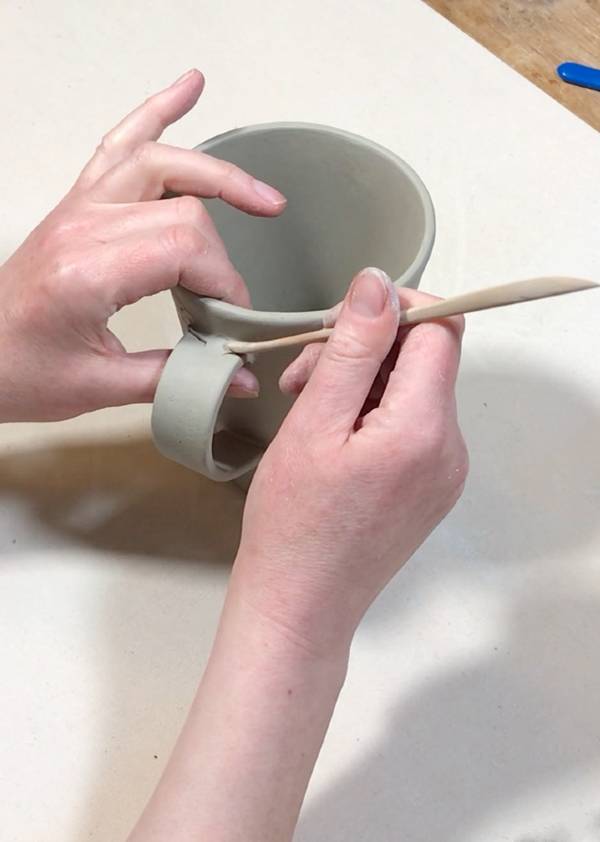
Step 4) Scoring the Clay
Score into the clay using your chosen tool. You can use a pottery tool that is specifically designed to be used for scoring. Here are some good options:
I like using a serrated rib tool like this one…
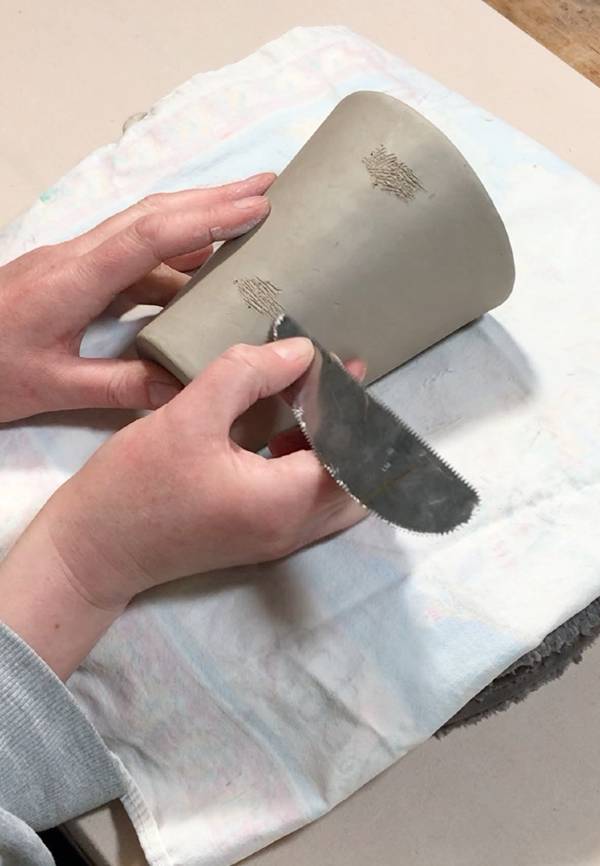
However, if you don’t have access to these tools, you can improvise and use a regular kitchen fork.
Score into the clay where you need to add texture. Remember to score both surfaces that need to be joined.
Step 5) Adding Slip
Slip clay mixed with water to create a liquid consistency. Slips vary in thickness depending on how you want to use them. When you are using slip and score you need a slip that is liquid enough so that you dip your brush into it and paint it onto the scored clay.
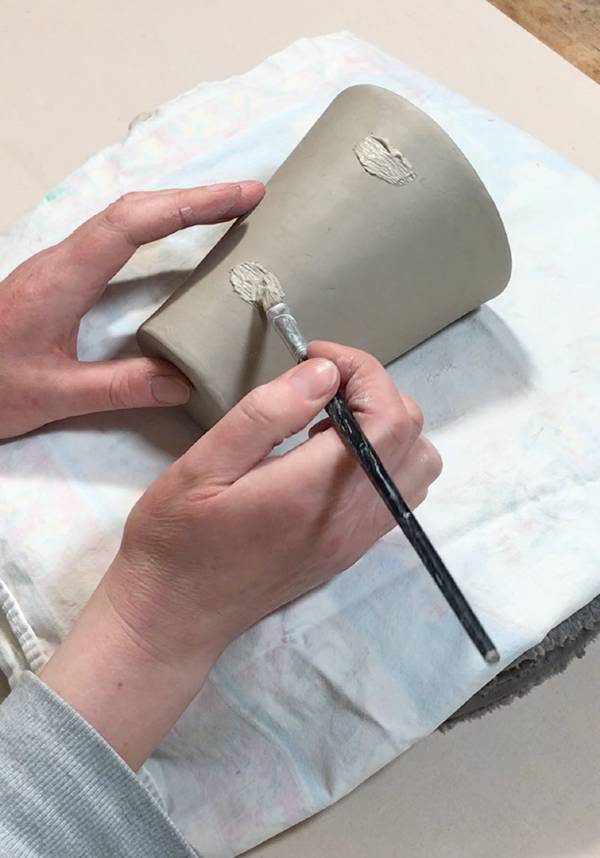
Some potters like to put their joining slip in a squeezable bottle with a nozzle. This allows them to squeeze it neatly onto the scored area. I prefer to use a brush as I find it gives me more control over how much slip I’m adding. Apply the slip to the scored area.
If your scored clay is on the firmer side of leather hard, it may be a good idea to add slip to both scored sides.
However, if your scored clay still contains quite a bit of moisture, then you will most likely get away with adding slip to one of the surfaces to be joined.
Some potters prefer to apply water to the scored surface. When you add water to the scored surface it mingles with the clay to form slip. I sometimes use water to slip and score if the clay surface is still quite fresh.
If you choose to use water it helps to score the clay again after applying the water. This will help to create clay slip on the surfaces before you join them.
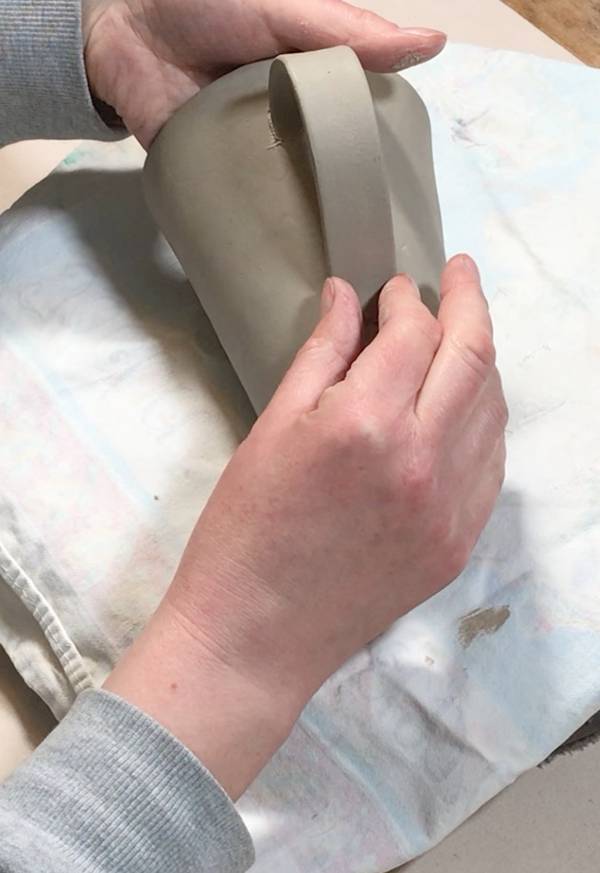
Step 6- Joining Your Clay
Press the two surfaces together that have been scored and slipped. Hold them together firmly for a moment to allow the slip to start bonding them.
You will find that some clay slip will squeeze out of the joint. This can be wiped away with your finger, a brush or a slightly damp sponge or chamois leather.
Alternatively, you can wait until the excess slip firms up and then scrape it away with a clean-up tool.
Step 7 – Securing the Join
The slip and score method should create a firm bond. However, it can be helpful to take some additional measures to reinforce the join. For example, if you are adding a handle to a pitcher or teapot that is going to contain a lot of heavy liquid.
Here are some extra steps that you can take to secure the bond:
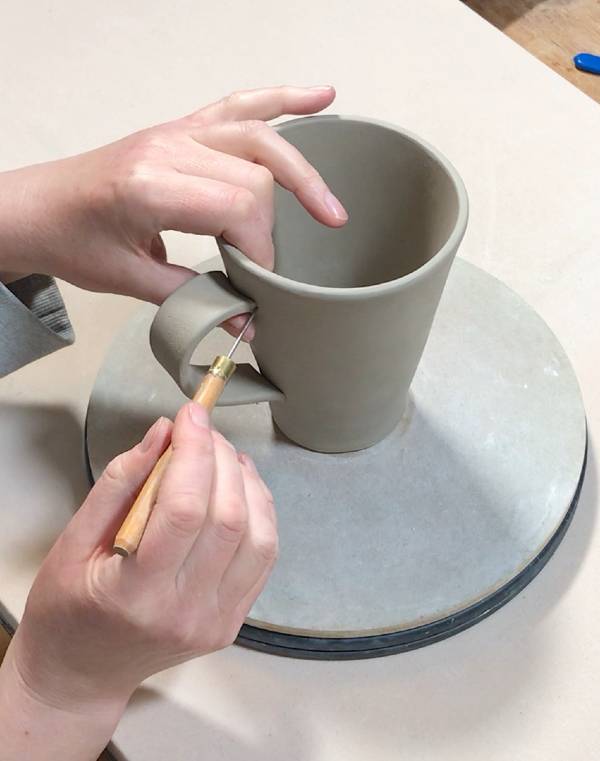
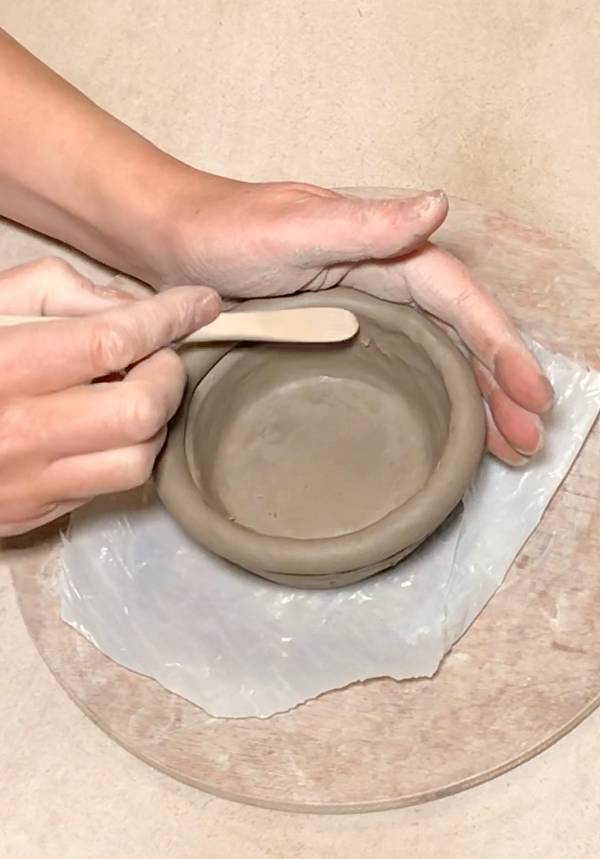
a) Blending the clay – Once the scored surfaces have been pressed together, you can blend the surface of the clay together. You can do this with a modeling tool or your thumb.
It’s worth remembering that adding slip to a join does add bulk to your clay. Blending the clay after joining can help to even this bulk out too.
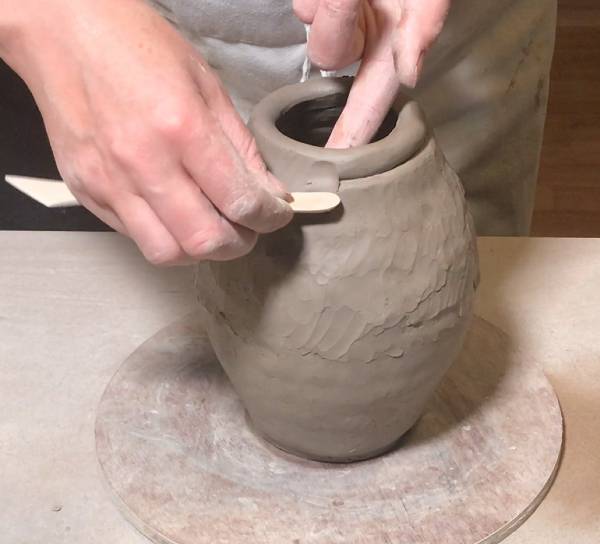
b) Adding a Coil – Another additional step you can take to strengthen the join is to add a small coil of clay. Roll a thin coil of clay and press it onto the point where the two pieces of clay meet.

Then blend the coil in so that the additional clay is spread evenly over the join. If I’m adding a small coil to where a handle meets a mug or pitcher, I use a fine modeling tool.
Step 8 – Supporting the Slipped and Scored Join
Sometimes it can be helpful to support a join for a while immediately after it has been made. An example of this is when you are constructing a large slab-built piece.
Imagine you are building a large slab vase made with multiple slabs. Each slab can be relatively heavy. As such, it can be helpful to support the slab as the surfaces on which you have used slip and score fully bond together. I sometimes use wooden blocks to support slabs as join sets up fully.
Step 9 – Allowing the Clay to Dry Gradually
When you are using slip and score, you are adding wet liquid clay to drier clay. If the slip dries out too quickly the joint can crack. It’s a very good idea to cover up your pottery with a plastic sheet or a carrier back to slow the drying process down.
For example, when I have added handles, I wrap the handle and the join in saran wrap. This stops the handle and the joint from drying out at a much quicker rate than the rest of the piece.
Do You Always Need to Slip and Score Pottery?
If you are working with leather hard clay, then yes, you will have to slip and score the pottery so that it joins firmly.
However, if you are working with fresh soft clay then it’s not always necessary. For example, if you are coil building and your clay is quite plastic and workable, then it may be fine to simply blend the coils together.
Usually, fresh workable clay has enough moisture content in it that it will bond when it is pressed together. That being said, I’d recommend blending at least one side of a coil pot. This will ensure that the coils don’t separate as it dries or when it’s in the kiln.
If you are making a coiled vessel such as a vase, it’s a good idea to blend the coils on the inside of the vase. This makes the inside of the vase easier to glaze and more likely to create a watertight seal.
What Type of Slip to Use
As mentioned above you can use clay slip or water to slip and score. You can read my article on how to make clay slip here. But you can use other bonding agents to attach clay that can have some advantages over water or slip.
Here are some alternatives to simple clay slip.
1) Vinegar
Some potters swear by the bonding properties of vinegar. Vinegar is a flocculant, which means that it encourages the clay particles to stick together. As such, when it’s applied to a join in clay, it can act as an adhesive. Vinegar can be used instead of water on a scored surface. Or, it can be added to clay slip to make it ‘stickier’.
2) Magic Water
There are lots of recipes floating around for magic water. The basic ingredients are soda ash, sodium silicate, and water. Various recipes use different
proportions of these ingredients. However, the original recipe for magic water was devised by Lana Wilson. The ratios that she suggests are:
- 1 Gallon of Water
- 9.5 grams of sodium silicate
- 3 grams of soda ash
Magic water is used to glue clay together instead of water or slip.
Both soda ash and sodium silicate are deflocculants. They have the opposite effect of vinegar. Whilst vinegar makes the clay particles stick together more, soda ash and sodium silicate cause the clay particles to repel one another.
So why would adding a deflocculant to your clay increase the strength of the bond? There are a couple of reasons:
Firstly, sodium silicate hardens when it dries. The magic water penetrates into the scored clay and mingles with the clay particles. The sodium silicate dries faster than the clay and hardens to combine the clay particles in a bonded mass.
Secondly, sodium silicate and soda ash are both fluxes. This means that they lower the temperature at which things they are mixed with melt. Because they act as a flux they encourage the clay particles to mingle with one another.
Thirdly, in addition to the above, sodium silicate contains silica. The silica forms a glassy substance when it’s fired at a high enough temperature. This molten glass hardens when the kiln cools creating a dense bond between the clay particles.
3) Magic Mud or Paper Slip
An alternative type of clay slip is sometimes called magic mud or paper slip. This recipe involves blending paper with the clay slip, to give the slip some extra strength.
There are a few ways to make paper slip, but the method I like is the one used by the potter Martha Grover. Here is the process that she recommends…
- Put a few sheets of toilet paper in a bowl
- Cover the paper with some white vinegar
- Blend the paper and vinegar together
- Add some small pieces of bone-dry clay
- Mix the three ingredients together
- Allow the mixture to sit overnight
After being left to sit overnight, the paper slip is then ready to be used. The vinegar acts as a deflocculant sticking the clay particles together. And the paper fibers give the clay slip an internal structure that binds your pieces together.
Paper fibers in clay are notorious for going moldy. You can also add a few drops of bleach or Milton sterilizing fluid to the slip to stop mold from forming.

Final Thoughts
The slip and score method may not be the fanciest pottery technique that you will learn. However, it is an important skill to get a handle on (pardon the pun!)
Whether you are hand-building your pottery or wheel throwing, at some point you will need to join some pieces of clay. And slip and score is an invaluable asset in your pottery skill arsenal.


