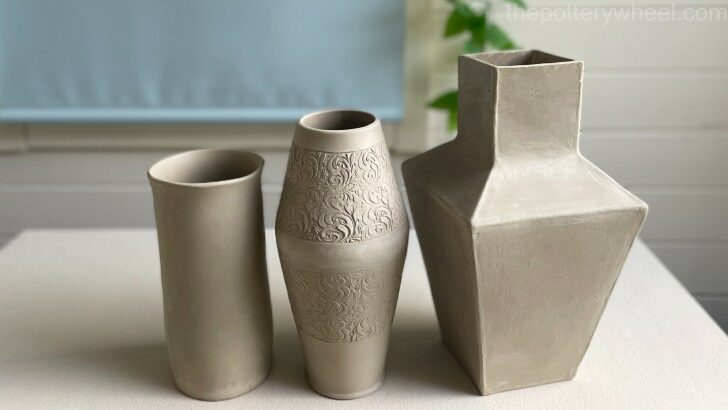
Making a clay vase is a fun project and they can become the centerpiece in a room. These three clay vase ideas are easy to make and can look lovely. Plus, they are made from printable slab templates which makes it easier to produce a well-proportioned piece.
Clay Vase Ideas Using the Slab Technique
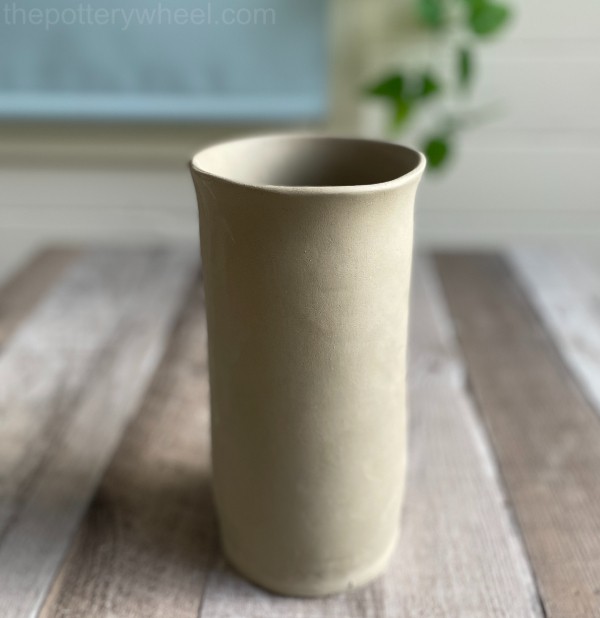
Let’s start off with the easiest way to make a slab vase. This is a simple cylinder vase and once you have mastered this technique, you can adapt it to suit your style.
Clay Vase Idea #1 – The Simple Cylinder
This is the process that I used to make this simple cylinder-shaped clay slab vase…
Making handbuilt vases does not need a lot of equipment, but here are some things that will make the process easier:
You Will Need
- Some plastic or stiff card tubing
- Clay
- Rolling pin
- Roller guides
- Canvas for rolling the clay onto
- Clay knife
- Clay bevelling tool
- Serrated rib
- Rubber rib
- Wooden pottery bat
- Banding wheel
- Chamois leather pieces
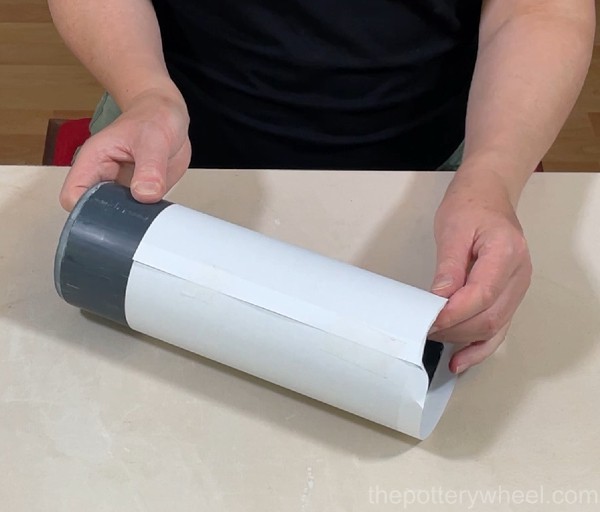
This vase is a simple straight up and down shape. I find the best way to achieve a nice evenly shaped cylinder vase, is to use a piece of tubing as a support.
So, I’d recommend sourcing some tubing to start off with. The tubing can be stiff cardboard or plastic and it needs to be the diameter that you want the vase to be.
I found the tubing in the picture below on Amazon, and I believe it is some wide plastic tubing for underground plumbing. It’s similar to this tubing which is also available.
Step 1 – Preparing the Tube
Cover the tubing with some sheets of paper. This will stop the clay from sticking to the tube and will make it easy to remove the tube later.
Wrap the paper around the tube and stick it down with some tape. I like to use the kind of soft paper tape that you can stick bandages on with. Because it’s got a papery fabric texture, it also doesn’t stick to the clay.
Fold the paper around the base of the tube too, so that the whole of the tube is covered.
Step 2 – Making a Clay Slab
Roll out a slab of clay with my wide rolling pin. The slab needs to be a bit larger than you want the vase to be. The design of this vase is so simple you don’t really need a template. But my plan is to make the vase 4 inches in diameter and 9 inches deep. So, I made the slab long enough to wrap around the tube.
I use roller guides when I’m making my clay slabs. These are the wooden sticks on either side of the clay slab. This helps me to roll slabs that are of an even thickness. The roller guides are 3mm thick, which is about 1/8th of an inch.
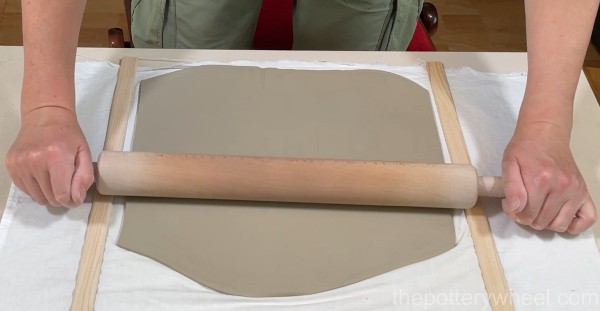
You can read more about how to roll a clay slab here.
I roll the slab out and then put the tube next to the slab so I get an idea of how big I need the slab to be. I then trim the slab down a bit so it’s in a rough rectangular shape.
Using my wooden straight edge, I cut the bottom edge of the slab with my clay knife. I then make a series of marks on the top edge of the slab 9 inches from the base. Once I’ve made these guide marks, I cut the top edge of the vase.

Step 3 – Cutting the Slab to Size
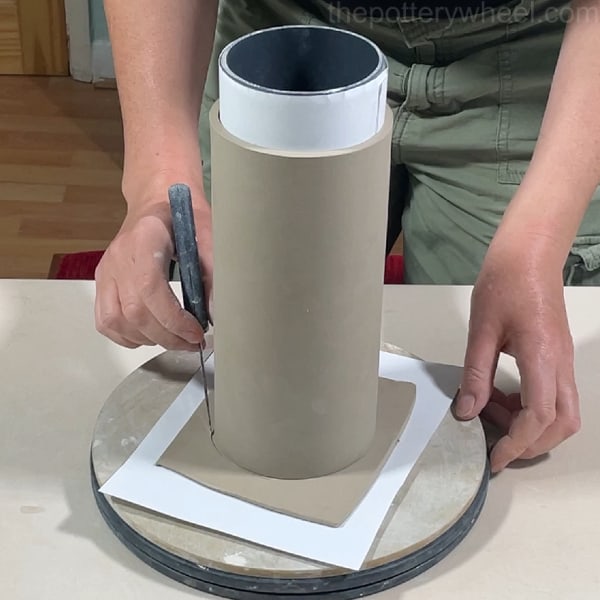
At the moment the slab is at the right height but it’s too wide to fit around the tube. So, I carefully roll the slab around the tube. I use my clay knife to mark where I need to cut the clay so that it’s the right width.
I’m going to bevel the edges of the slab. A bevel is when you cut the edges at a bit of an angle. This will help the slabs join together in a flush surface. I make a diagonal mark on the clay to indicate where I’m going to cut the beveled edge.
I make marks on the top and bottom edge of the clay slab and then unroll it back from the tube. Then I cut the slab to length so I know it’s the right width to fit perfectly around the tube.
Step 4 – Wrapping the Slab Around the Tube
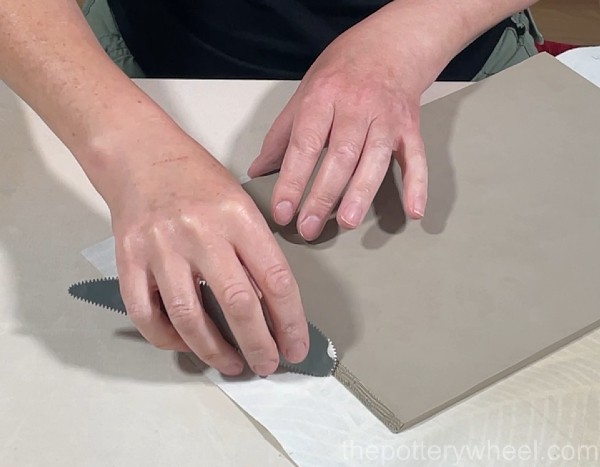
I beveled both edges of the clay using my clay bevelling tool. Bevelling basically means cutting the clay at a 45-degree angle. This helps create a smooth surface when the clay is joined together.
Once the edges have been beveled, I score them with my serrated rib tool.
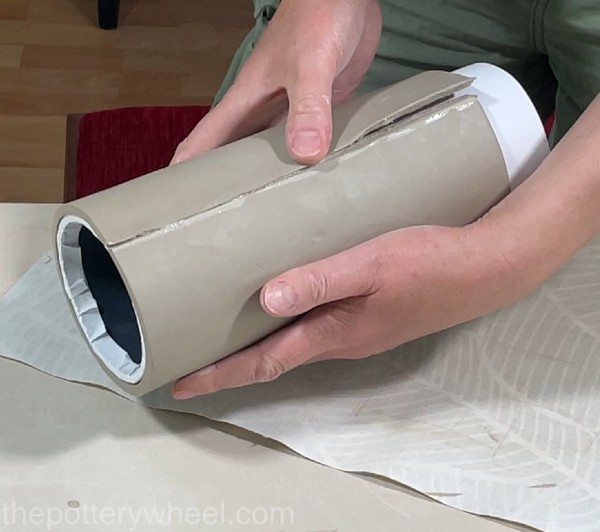
I carefully wrap the clay slab around the tube, making sure that the bottom edge of the slab is aligned with the bottom of the tube.
When the slab is wrapped around the tube, I apply clay slip to the scored edges.
Then I gently press the seams of the clay together so that the clay slab is joined around the tube.
Compress the clay seams together gently but firmly. You can tidy up the surface of the joint with a soft rubber rib.
Step 5 – Making the Base of the Vase
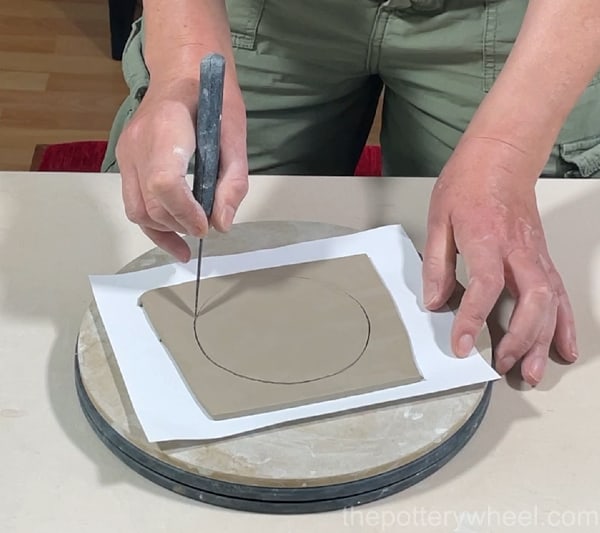
I place an offcut of the slab that I rolled earlier onto a wooden bat. It’s helpful to put some paper on the wooden bat first, so you can lift the slab off easily later on.
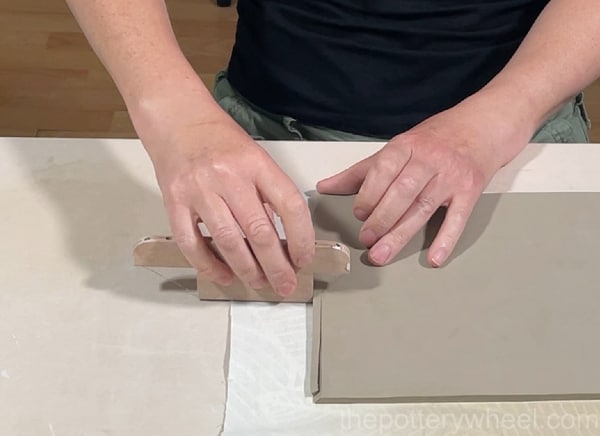
Put the wooden bat onto a banding wheel so you can turn it easily. Place the vase tube onto the clay slab gently. Draw a faint line around the base of the tube.
I find the easiest way to do this is to turn the banding wheel and mark on the clay slab. I mark about 1 or 2mm wider than the actual base of the vase so that the base is just a little bit bigger. This will give you some excess clay to blend the base onto the vase with.
Lift the vase off the base and then cut around the guideline to create a round clay slab.
Step 6 – Attaching the Base
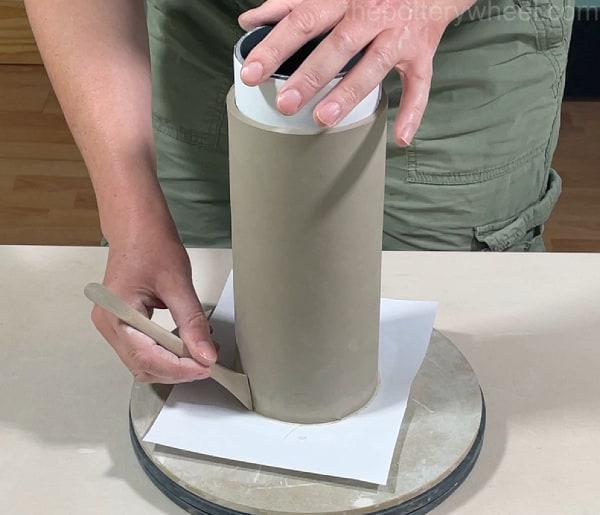
Score the edges of the circular base and also the bottom edge of the vase. Apply some slip to both scored surfaces.
Carefully lower the vase onto the base so the two scored areas meet. Gently wiggle the vase so that it’s in the right position on the base. Then gently press the vase onto the base to make a firm bond.
I blend the base onto the vase using a combination of my fingers and a wooden tool.
Step 7 – Levelling the Rim
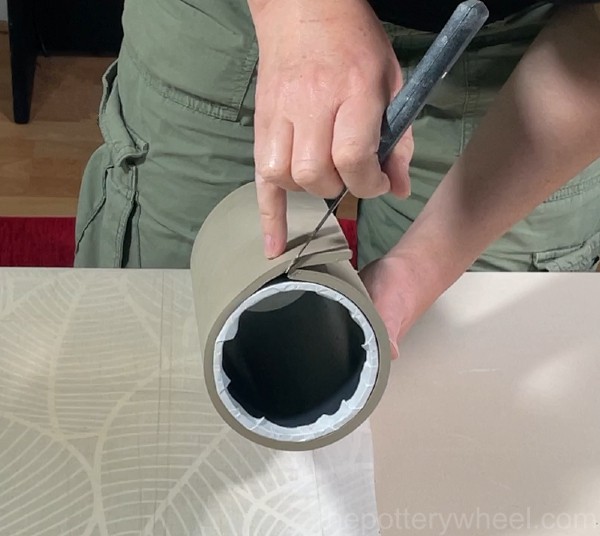
It’s unlikely that the rim of the vase will be completely level at this point. One way to make the top edge level is to support your hand on a ruler or long wooden tool. Hold your clay knife in the supported hand, and rest the clay knife against the top edge of the vase.
Turn the vase so that you are scoring the top edge of the vase a little. Keep turning the vase and gently scoring deeper into the top edge of the slab.
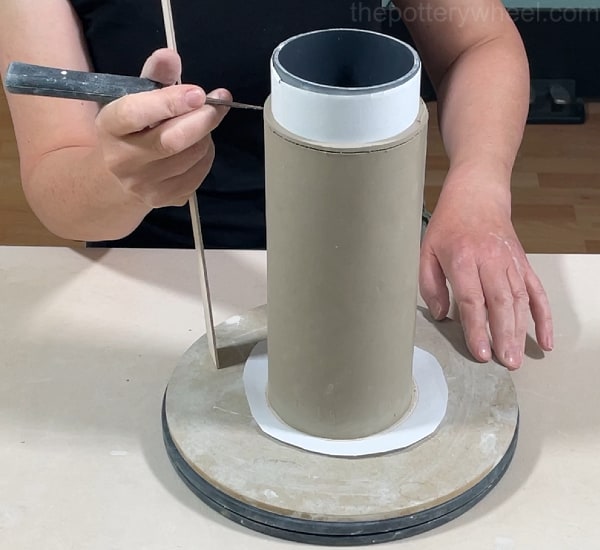
Once you have cut through the clay slab you can lift the trimmed clay ring off the top of the vase. The rim of the vase should now be more level.
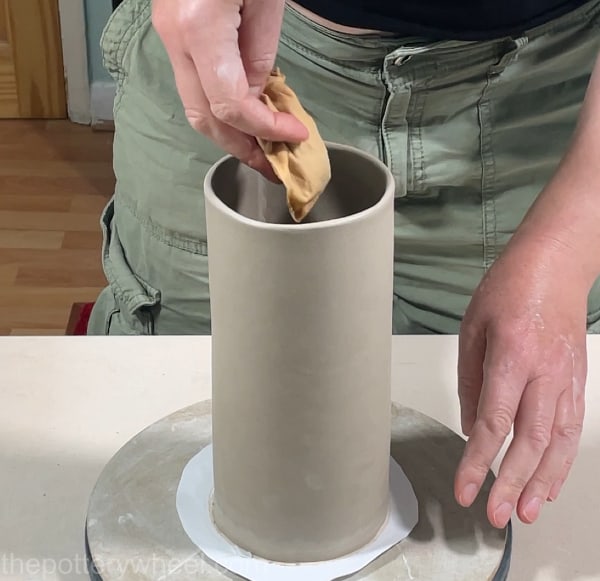
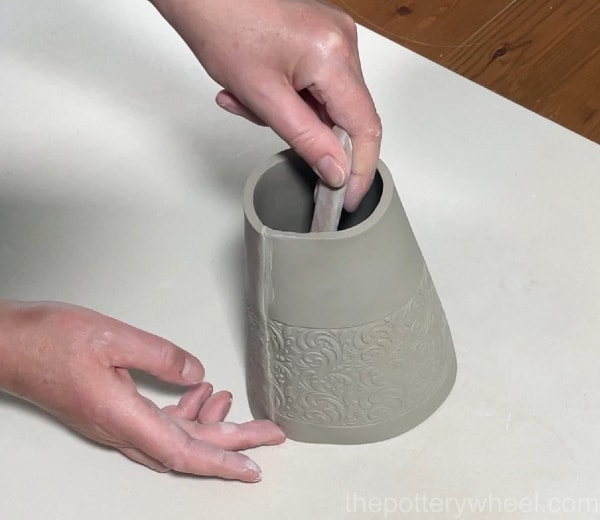
After you have leveled the rim, you can slide the supporting tube out from the inside of the clay vase. The paper will have been left behind in the vase. You can gently pull the paper out of the inside of the vase.
Step 8 – Smoothing the Rim
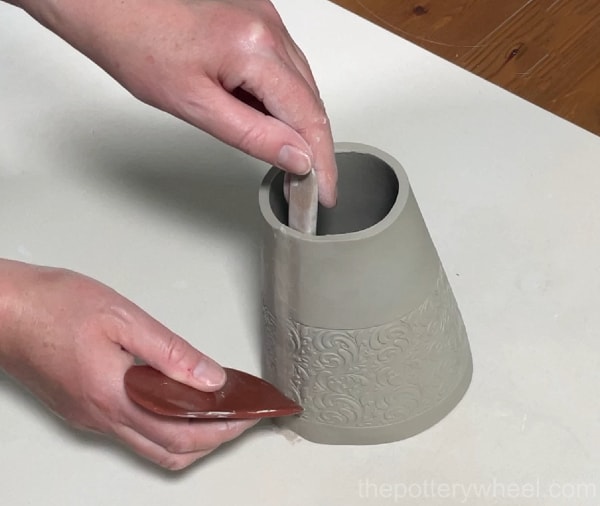
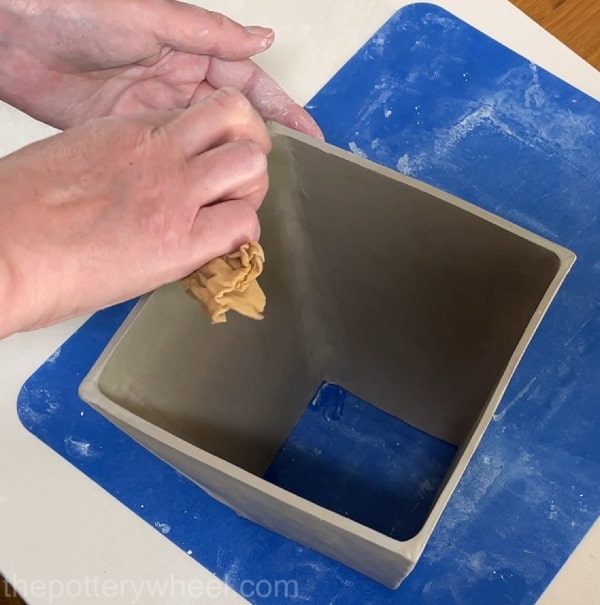
Place a small section of saran wrap over the edge of the rim of the vase. Gently rub the rim of the vase to smooth the edge out.
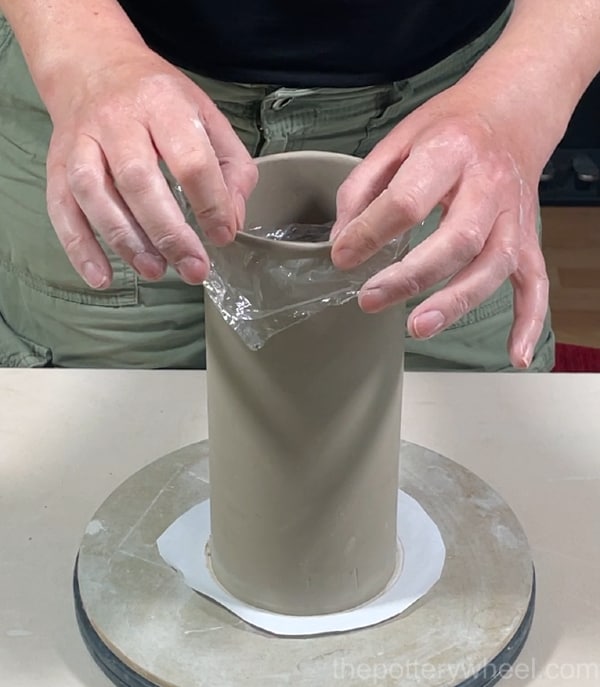
You can also run a damp chamois leather over the rim to remove any small marks in the clay.
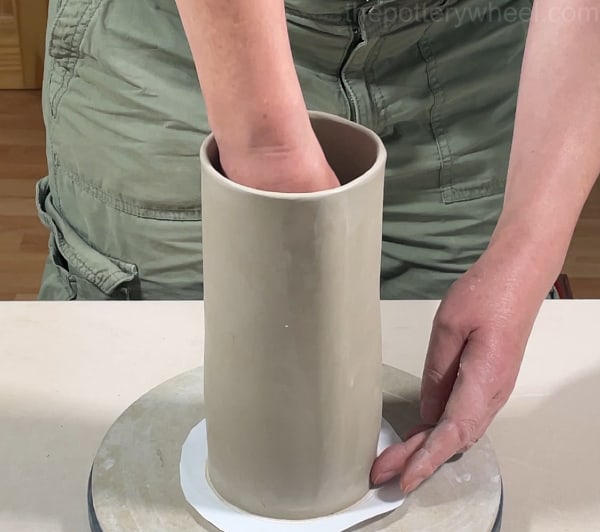
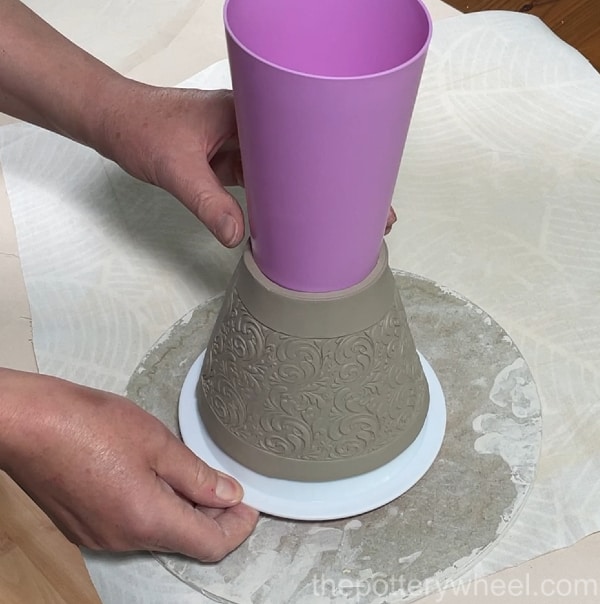
Step 9 – Bellying the Vase
This is an optional extra step. You can leave the vase in a straight cylinder shape if you like. But if you want to add a little bit of a curve to it you can do that too.
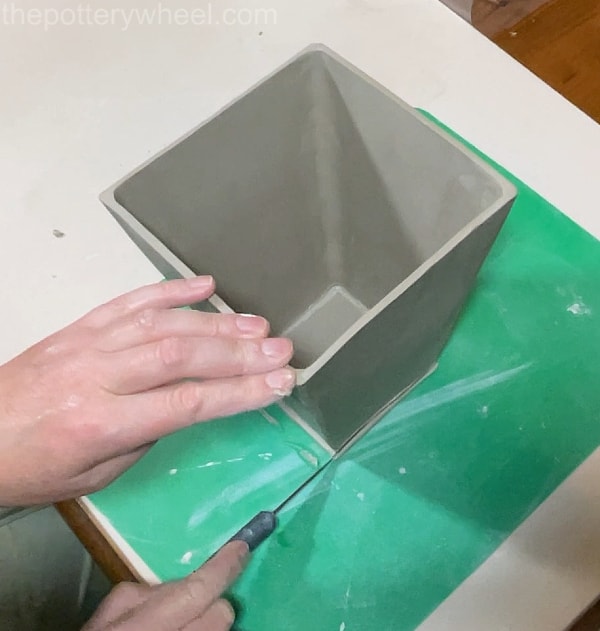
I belly out this vase a little at the base in the following way. Wet a small piece of chamois leather. Squeeze it out so that it’s damp rather than soaking wet. I wrap it around the tips of my fingers and then put my hand into the vase.
I run the chamois leather over the inside surface of the vase and press out gently. This will give the base of the vase a slight curve. Be careful not to press too hard. If you apply too much pressure you can cause the join in the clay to split open.
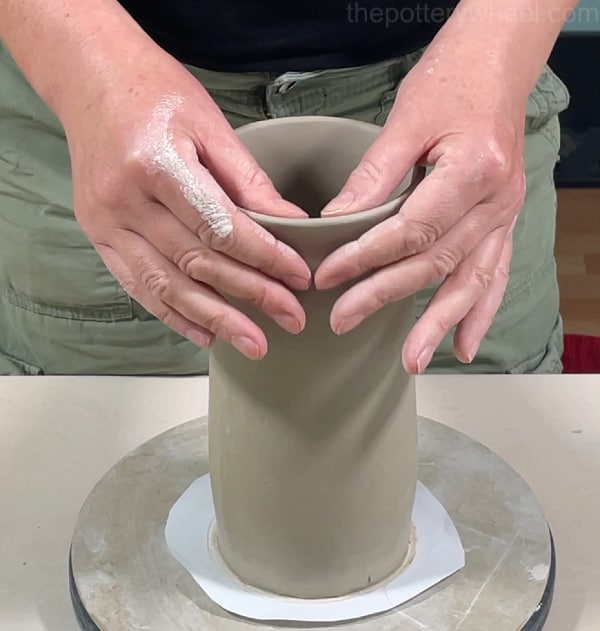
I also curve the top edge of the vase round a little to give that a softer look too.
Wrap the vase in plastic and allow it to dry slowly. This will reduce the chance of the clay cracking or splitting as it dries. Once it’s dry, it’s ready to be bisque-fired and then glazed.
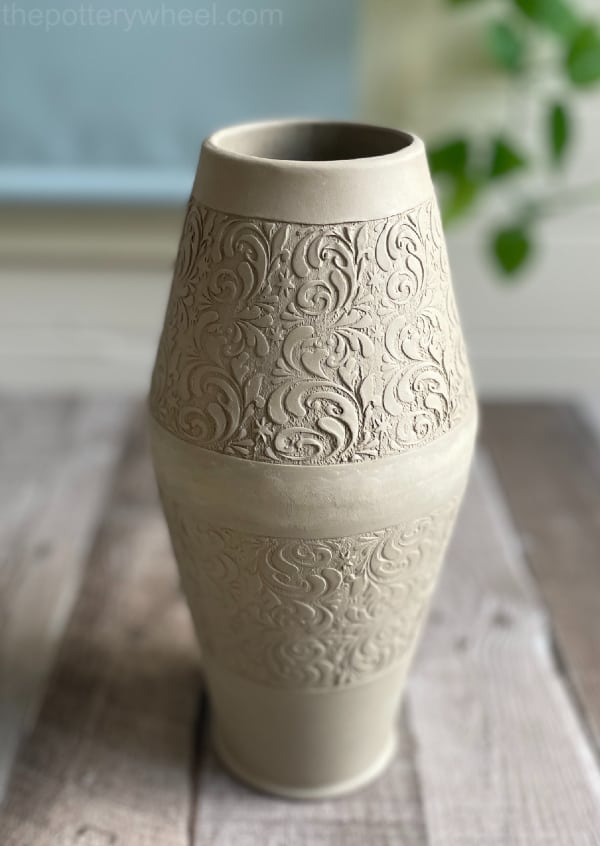
Clay Vase Idea #2 – The Teardrop-Shaped Slab Vase
The second clay vase idea is a teardrop-shaped vase. It’s an elegant shape, and it’s very easy to make.
You Will Need
- Rolling pin
- Roller guides
- Clay knife
- Texture roller
- Clay bevelling tool
- Serrated rib tool
- Wooden pottery bat
- Banding wheel
- Rubber rib tool
- Wooden pottery tools
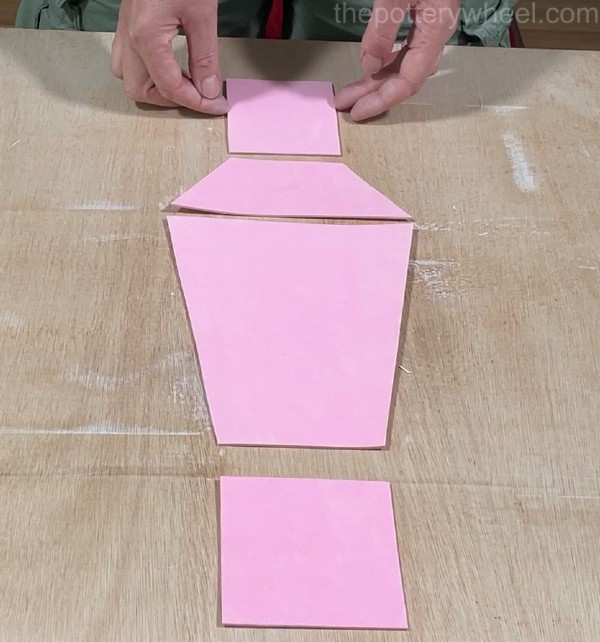
I made this clay vase by joining together two cones of clay together. You can download the template for the two slabs that make the cones here.
Download this FREE teardrop vase template here…
This is what the two conical-shaped templates look like.
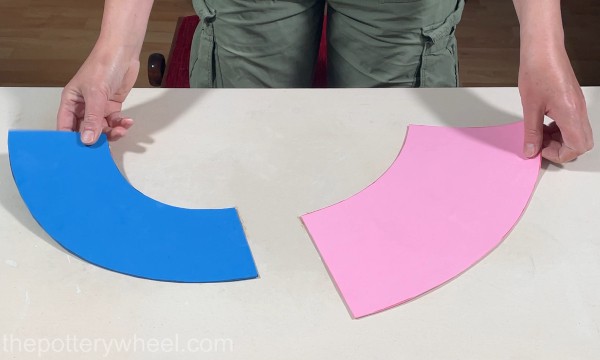
I’ve written a guide on how to make cone-shaped templates. If you want to make a clay vase with your own proportions you can check out my guide here.
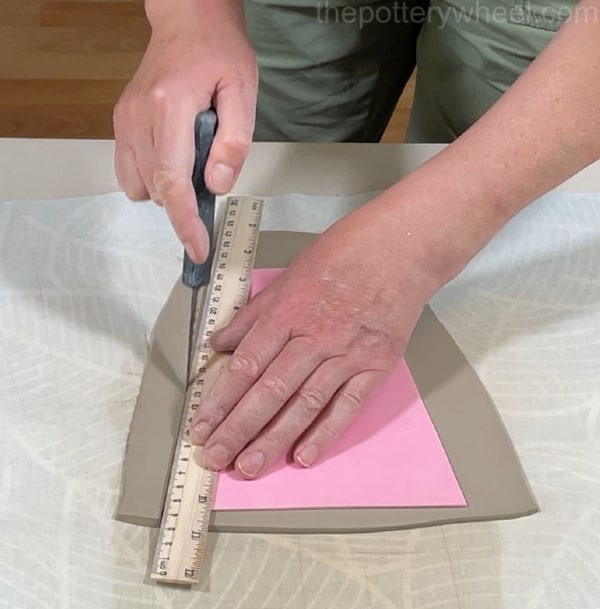
Step 1 – Rolling Out the Slab and Cutting Out the Templates
I roll out a slab of clay using my 3mm thickness guides. I place the larger template on the slab. The larger template is the one for the base of the vase. I cut around the template using my clay knife.
Then I repeat the process for the smaller template which is the shoulder of the vase.

This clay vase will be made from soft slabs of clay. However, the slabs should not be too soft. You need to be able to handle them and bend them without the clay flopping about too much. So, I put the slabs to one side for a couple of hours to allow them to firm up just a little.
Step 2 – Adding Texture to The Slabs
I roll a clay texture roller around the curve of the clay slab to add a pattern to the clay.
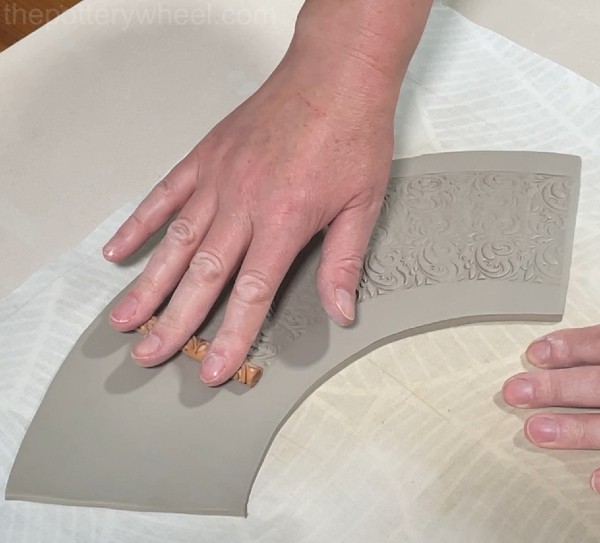
Then I put the template on top of the slab and trim the edges again. Using the texture roller can squash the clay slab a bit and I want to be sure that it’s the right shape before I start assembling the vase.
Step 3 – Preparing the Edges for Joining
I bevel both the edges of the slab and score them with my serrated rib tool. You can read more about how and why we slip and score clay here.
Step 4 – Assembling the Cone
Carefully lift the sides of the clay slab and curve them around so that they are almost touching. Allow the clay slab to rest on the widest edge of the cone. The clay should be firm enough to support its own weight at this point. Paint some slip onto the scored edges of the slab.
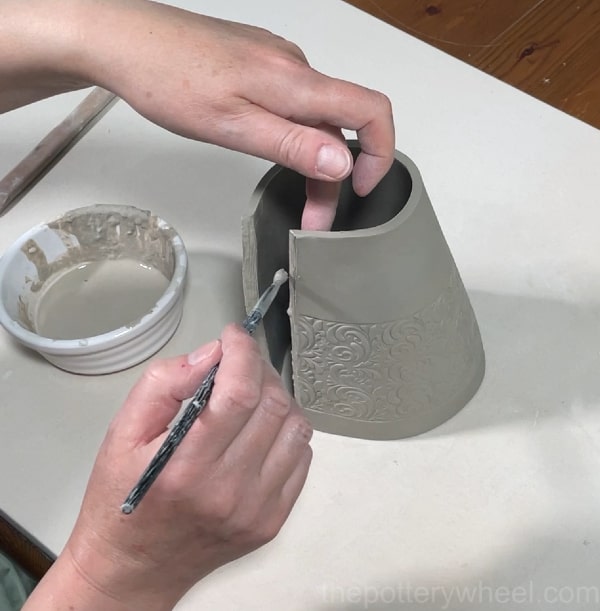
Gently press the slipped edges together to form a seam. You can put a wooden tool down inside the cone to support the inside of the slab. This will allow you to press on the outside of the joint and create a good bond between the edges.
Run a rubber rib tool down the outside of the seam to tidy it up.
Step 5 – Allowing the Clay to ‘Set Up’
Now that the clay cone has been assembled, you need to let it rest for a while so that the seam knits together firmly.
You can slide an old plastic beaker into the narrow end of the cone to make sure that the gap is nice and round.
Also, you can lift the cone onto an old plastic bowl to ensure that the wider end of the cone is round too.
Allow the cone to rest for an hour or so. Clay dries out at different rates in different climates, so keep an eye on your work to make sure it isn’t drying out too much.
Step 6 – Making the Base
Put a small slab of clay on a wooden pottery bat, and place the bat on a banding wheel.
Lower the narrow end of the larger clay cone onto the slab. Draw around the base of the cone with a clay knife. Draw the line about 2mm wider than the base of the vase so that you have a bit of excess clay.
Remove the clay cone, and cut the circle out fully with your clay knife.
Score and slip the edge of the clay circle and the bottom edge of the cone. Then lower the cone into place on the circular clay slab.
Blend the slab onto the base of the clay cone. I wanted this vase to have a slightly visible foot ring, so I didn’t blend the clay in completely. Instead, I ran my finger around the clay slab so that the bottom of the vase attached well to the slab.
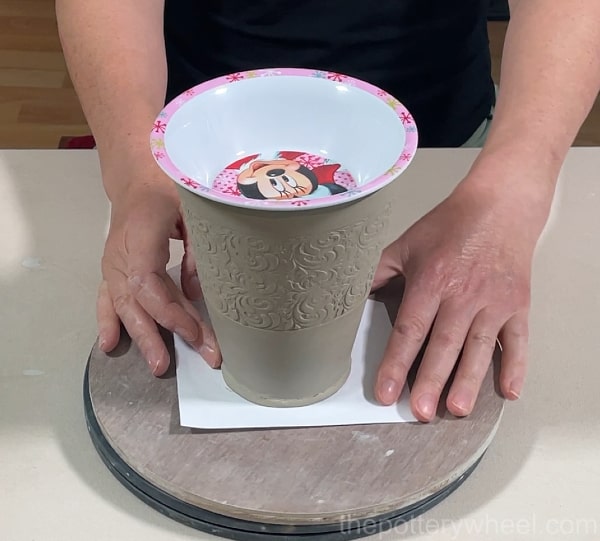
You can see by the ridiculous Minnie mouse bowl, that you don’t always need expensive pottery equipment to get the job done!
Step 7 – Joining the Cones Together
Score the wide rim of both of the cones and apply some slip to both scored edges.
Carefully lower the smaller cone onto the larger base cone so that the edges meet. Be sure that the seams in the cones line up with one another.
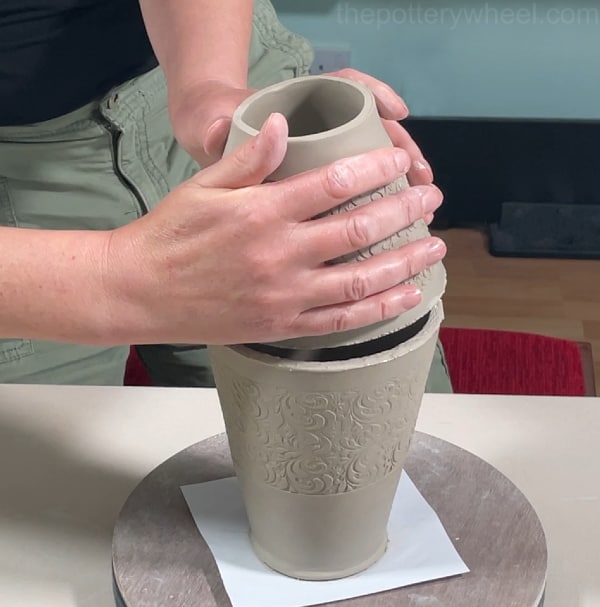
Wiggle the clay a bit so that the edges line up with each other. Then carefully begin to blend the two cones together.
Blending the clay can be tricky at this point, as the neck of the vase is too narrow to get your hand into.
You can put a long wooden tool or a long clay shaping tool in the neck and support the inside seam as you blend the clay on the outside of the vase.
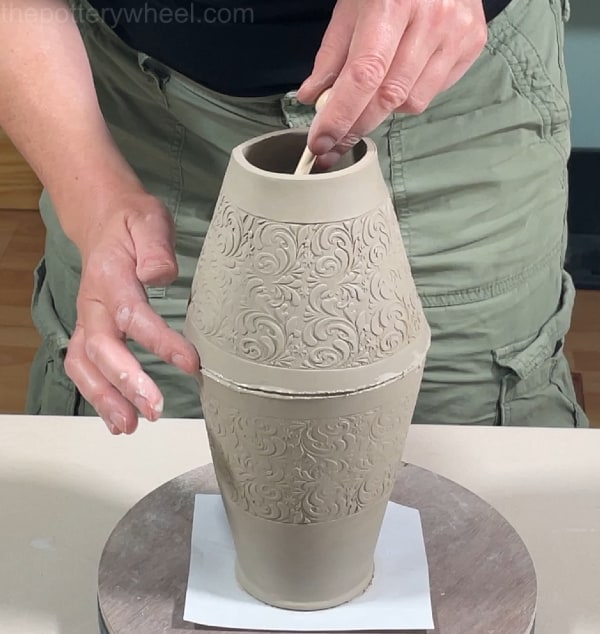
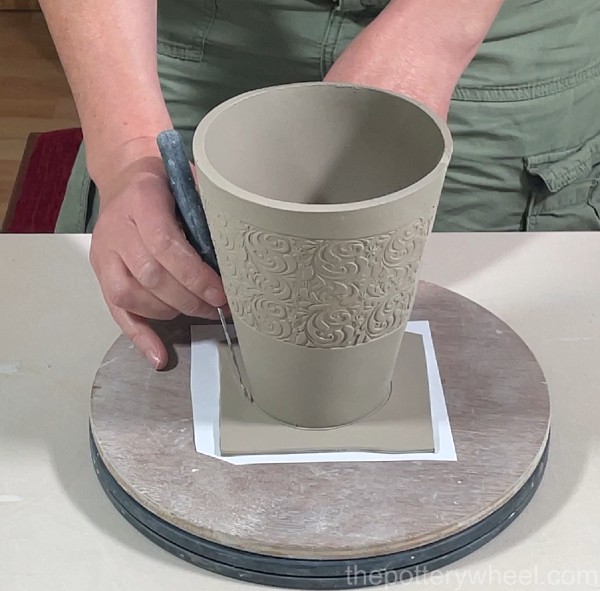
Step 8 – Levelling the Rim
I mentioned earlier that no matter how careful you are in making even clay slabs, the rim of the vase will be just a little bit wonky.
A wonky rim can look nice and organic. But I’m a bit of a stickler for precision, so I tend to level mine off.
I described how you can do this earlier. Simply hold a long wooden tool in your dominant hand. Hold a clay knife in the same hand, and hold this up against the top edge of your vase.
Rotate the vase on the banding wheel and mark where a level line is. Then continue to rotate the vase, gradually cutting deeper into the clay.
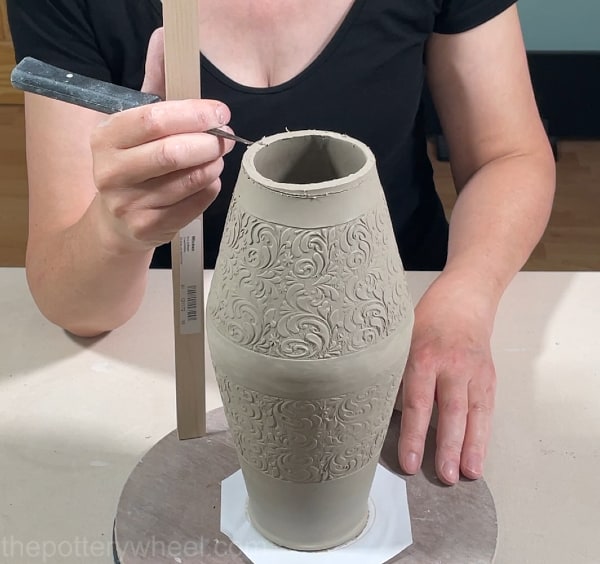
Remove the strip of clay from the top of the vase, to reveal a nice level rim.
Smooth the clay rim using some saran wrap and a damp chamois leather as described in the first clay vase idea. Allow the vase to dry slowly and evenly before firing to avoid cracking.
Clay Vase Idea #3 – Angular Slab Vase
This clay vase idea is probably the most detailed of the three. But don’t be put off because if you follow this step by step it’s actually easy to make.
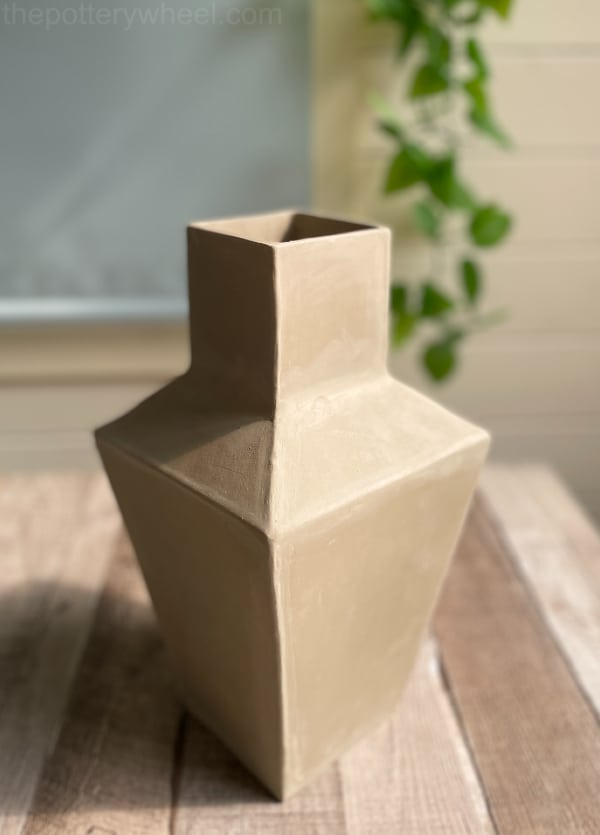
The vase is made from a 4 piece template which looks like this:
Download this FREE angular vase template here…
Remember to check your junk folder after you download it incase it’s gone into there.
You Will Need
- Rolling pin
- Roller guides
- Sheet of plywood x 2
- Clay knife
- Wooden tool
- Stylus tool
- Fine modeling tool
- Wax resist
- Clay beveling tool
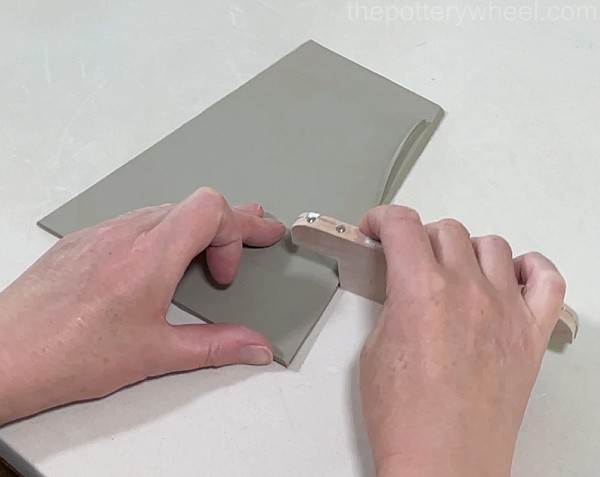
Step 1 – Preparing the Pieces
Although the template is made of 4 pieces, you will need to cut out each of the templates (apart from the base) four times. This is because the clay vase is square, and you need a slab for each side.
If you have a slab roller, you can roll out a giant slab and cut all of the pieces out of that. But, if like me, you are using a rolling pin, you will probably have to roll out a few slabs to cut out all the pieces.
I roll a slab using my 3mm roller guides and start cutting out the clay with my clay knife using the templates.
As I work, I put the pieces of the vase to one side on a plywood board. Put the pieces of the slab onto a piece of paper and then place them on the wareboard. This will stop the slabs from sticking to the plywood.
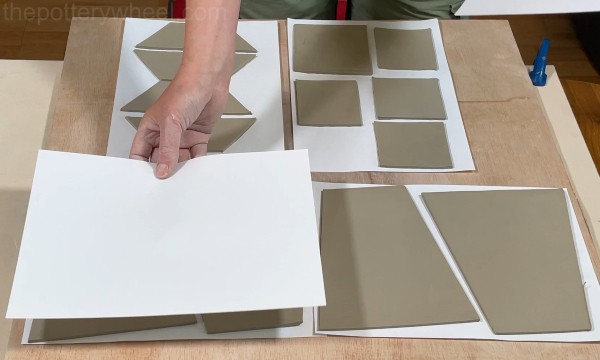
Once I’ve cut out all the pieces, I put another piece of plywood on top of the slabs. The second piece of plywood keeps the clay flat as it firms up. You need the clay to be soft leather hard.
Step 2 – Assembling the Bottom Half of the Clay Vase
You want the slabs to be firm but a little bendy. If the clay is too dry, it won’t join well. But if it’s too soft, it will bend when you are assembling it. Check the clay regularly to ensure it isn’t drying out too much.
When it’s firm but a little bendy, take out the four larger pieces of clay that will make up the base of the vase.
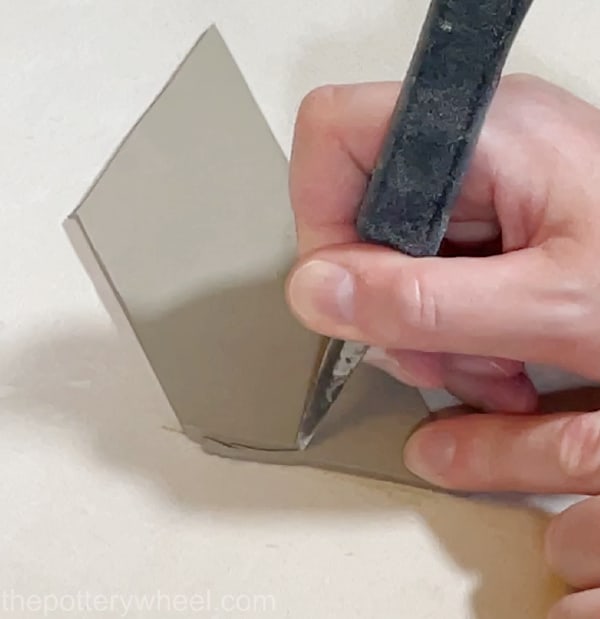
Bevel both of the longer edges on each of the four slabs. Score the beveled edges.
I then joined the first two pieces. To join the slabs, apply some slip to two of the beveled edges. Align the slabs and press the two slipped edges together. Apply some pressure to the joint to make sure that it bonds firmly.
Then run your finger along the outside surface to smooth out the join.
Repeat this process joining all four of the bottom slabs.
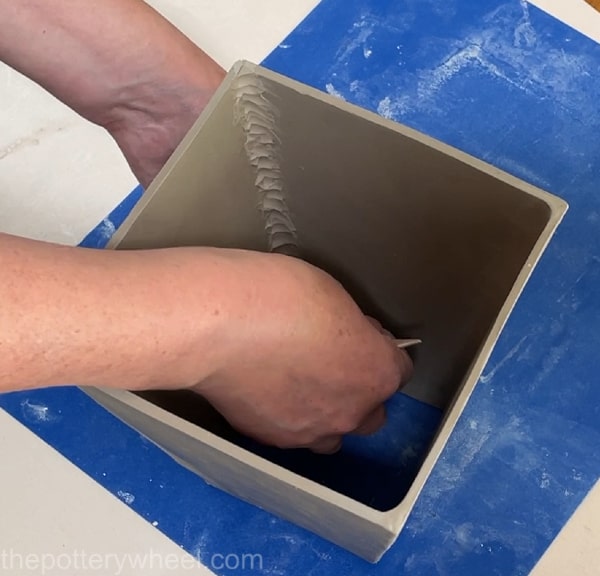
Step 3 – Reinforcing the Join
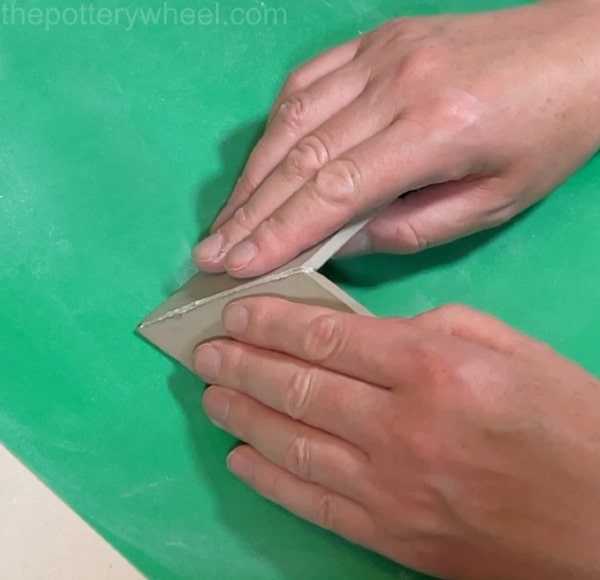
Roll a thin coil of clay. You can read more about making clay coils here. Score into the clay around the join in the corner of the base. Apply some slip and press the clay coil into the join.
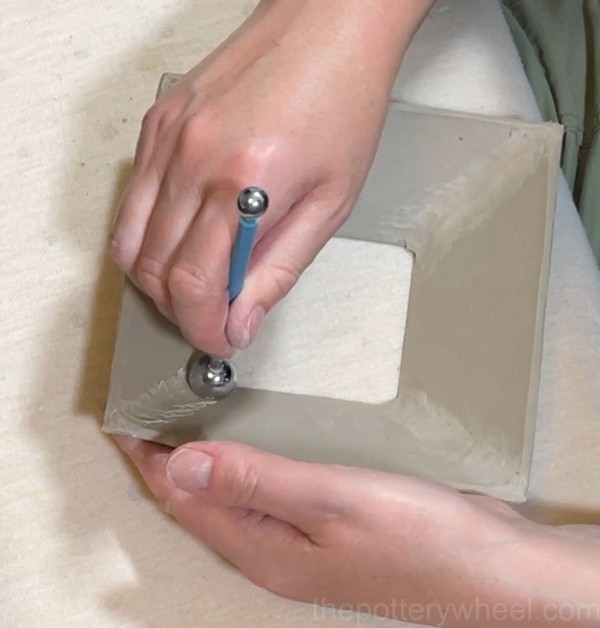
Blend the coil into the corner of the joint using a wooden tool. Another tool that is helpful with this clay vase is a stylus tool. This is shaped like a pencil, but it has a smooth metal ball on either end. They are handy for smoothing corners that are hard to reach with your fingers.
You can finish off by smoothing the join using a damp chamois leather.
Blend a clay coil into each inside corner to reinforce the join and make sure the base of the vase is sturdy.
Step 4 – Adding the Base to the Vase
With this clay slab vase, the base is part of the template. This is because the base needs to have dried out to the point of being leather hard too.
Score and slip the edge of the base and the bottom edge of the vase. Lower the bottom half onto the base and gently press it on.
Trim off most of the clay that will overhang around the edge of the bottom of the vase. Then blend in the join on the outside with a wooden tool.
You can also add a small clay coil to the bottom inside join in the vase to make sure the base is attached securely.
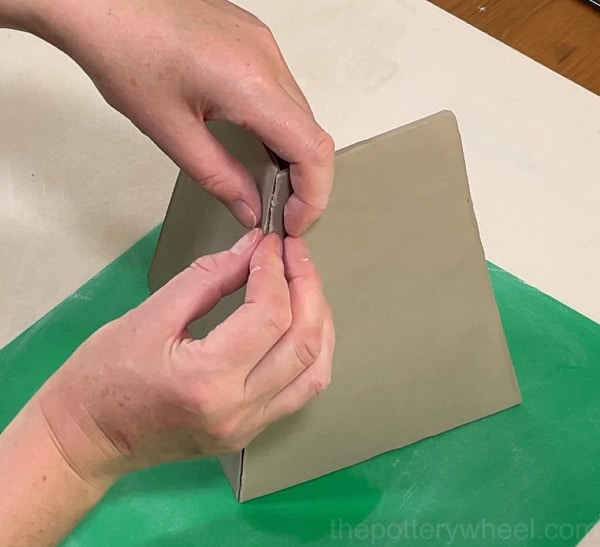
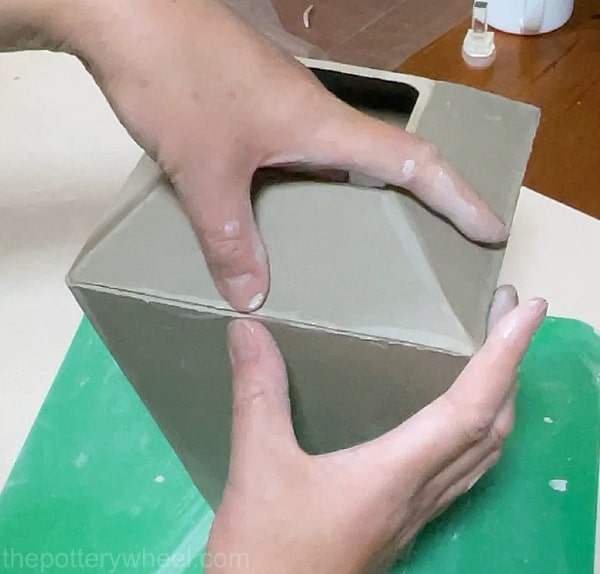
Step 5 – Making the Shoulder of the Vase
Assembling the shoulder of the clay slab vase is the same process as putting together the bottom half. You need to bevel the edges that are going to be joined.
However, before you join the four pieces together, it’s a good idea to bevel the bottom and the top edge of the slabs too. This is because when the shoulder has been assembled you want the top and bottom edge to be flat.
This will help the shoulder sit better on the base. Also, it will provide a flat surface for the neck of the vase to attach to as well.
Join the four pieces of the shoulder by scoring and slipping the short edges, pressing them together, and blending the outer surface.
Once you have joined each of the four pieces, add a small clay coil to each of the inside edges to reinforce the joint.
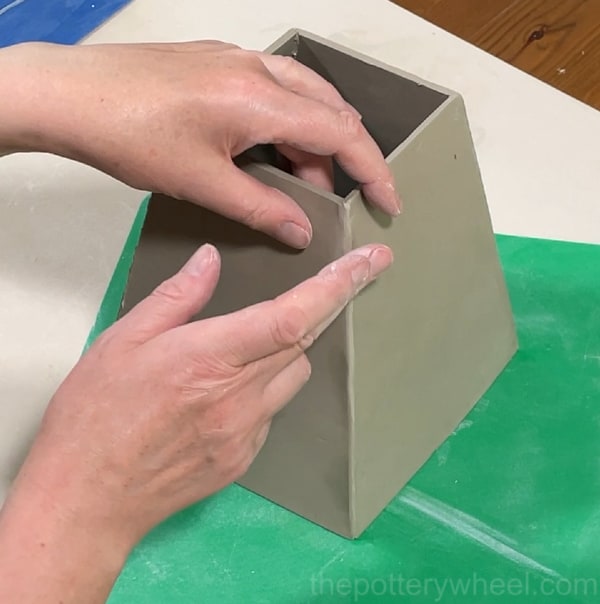
Step 6 – Attaching the Base and Shoulder
Score and slip the top edge of the base and the bottom edge of the shoulder. Lower the shoulder onto the base and wiggle it so it’s lined up correctly.
Once it’s in place, you can gently pinch and blend the seam together. It’s not possible to add a coil to the inside edge of this join, so be sure to blend the outside together well.
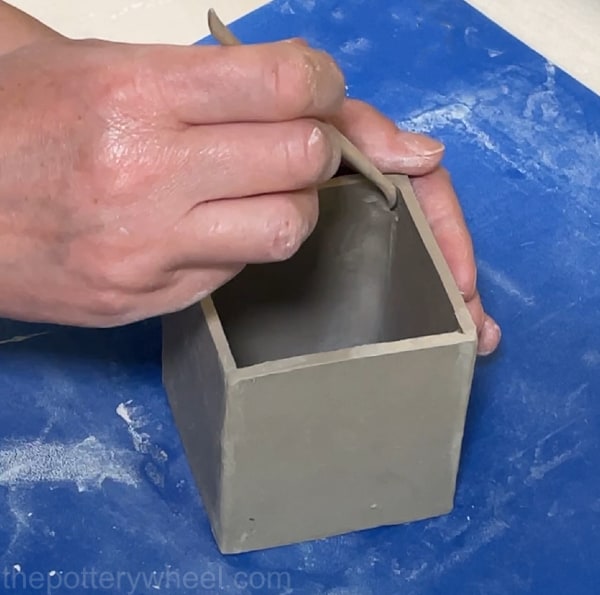
Step 7 – Assemble The Neck
The neck of the vase consists of four smaller slabs of clay. The edges of each of these need to be beveled, scored, and slipped. These four slabs can then be assembled together into a box-shaped neck.
Again, it’s a good idea to add a small coil to the inside edges. This will reinforce the neck. But also, the inside surface of the neck will be visible, and smoothing out a coil will tidy up the inside surface. It helps to have a fine modeling tool to blend in smaller areas like this.
Step 8 – Attaching the Neck to the Vase
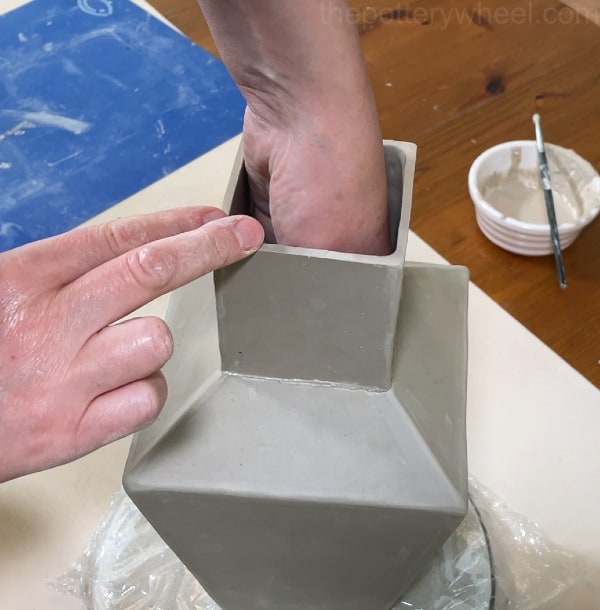
Once you have assembled the four small clay slabs that make the neck, you can attach it to the shoulder of the vase. Slip and score both sides that are going to be joined, and then lower the neck into place.
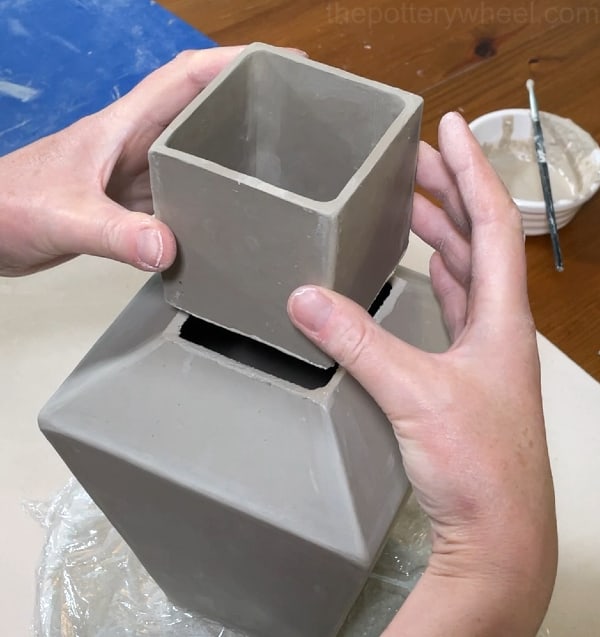
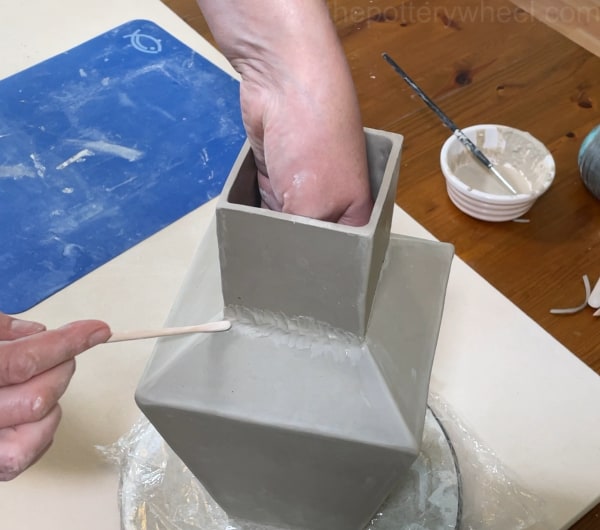
Once the neck is in position, put your hand inside the neck and support the inside surface, whilst you press the neck into place gently.
I’d recommend adding a thin coil of clay to the outside surface of the join. This will give the join a smooth finish and will reinforce the point at which the slabs meet.
Drying Your Slab Pottery
It’s always a good idea to dry slab pottery slowly. This is because slabs are prone to cracking where they have been joined. This is particularly true with the last clay vase described.
Hard slab pottery needs to be dried out carefully to avoid cracks. You can read more about the difference between hard slab and soft slab construction here.
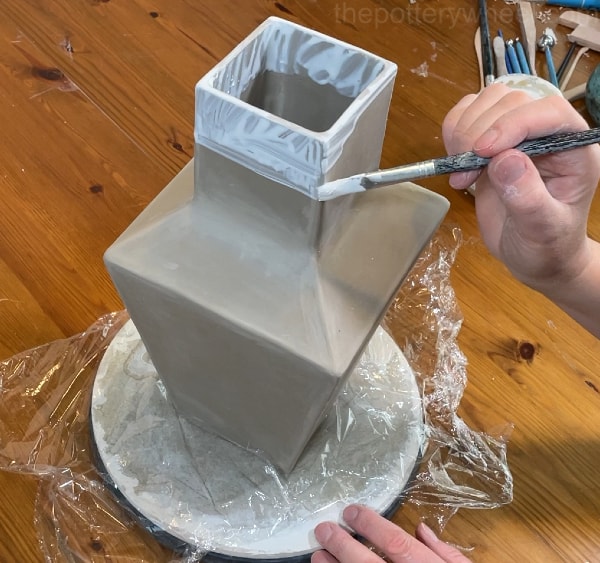
One tip to drying out the clay vase extra slowly is to paint some wax resist onto the edges that are most exposed to airflow. I paint some wax resist onto the lip of each of the vases. This will reduce how much air they are exposed to and can help avoid cracking.
When the wax resist has dried, wrap the pieces in saran wrap and allow them to dry slowly. Even wrapped in saran wrap the clay will dry out. It will just take a few weeks, so you need to be patient.
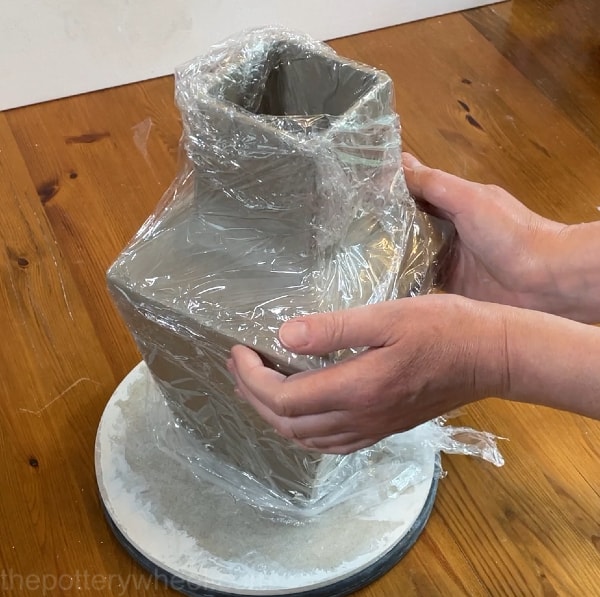
Once the clay vase has dried out, it can be bisque-fired and then glazed.
Final Thoughts
There are many ways to make a clay vase. Slab building is one approach. I happen to love slab pottery. There is something about the challenge of constructing a slab vase that fits together perfectly that I find very satisfying. I hope that you find these downloaded templates helpful.


