
Painting mugs is a great way to personalize gifts. It can be a great way to express your creativity, whatever your age. And it’s a fun way to keep children entertained when they are at a loose end.
There are lots of different ways to paint your own mugs. But if it’s not something you’ve done before, the options can feel a little overwhelming.
So, I decided to put together an overview of some of the best options for painting mugs. Why not check them out and see which technique appeals to you most. Then you can start experimenting with perfecting your favorite mug painting technique.
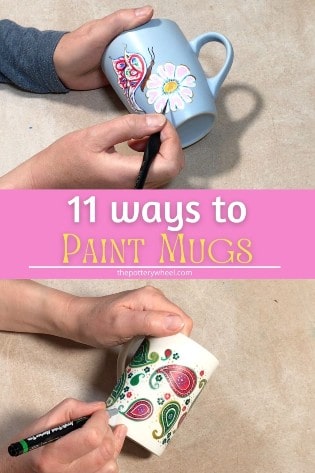
Here are the methods covered in the article:
- Painting mugs with acrylic paint
- Drawing with oil based pens
- Stipple painting your mug with a stencil
- Combining paint brush and pen designs
- Painting mugs using nail polish
- Bisque mug painting with underglaze
- Sgraffito carving into your painted mug
- Marbling your mug
- Bubble glazing your mug
- Painting your own pinch pot mug
- Decorating your own wheel thrown mug
Painting Mugs – First Things First
The first thing you want to decide is what kind of mug you are going to paint. These are the 3 different types of mugs you can decorate:
A Ready-Made Mug
This is the kind of mug that you would buy off the shelf in any houseware store. These usually have a glossy surface, which means they have been glazed fired by the manufacturer.
Sometimes the glaze is matte or has a satin finish. Either way, if you are buying your mug in a shop, it will have been glaze fired (or baked) in a kiln. This means it will be waterproof and ready to use.
A Bisque Mug
These are the kinds of mugs you would buy in a ‘paint your own pottery’ café. They have been fired once in a kiln, so the clay is hard and insoluble, so they are ready for painting.
However, bisque pottery is still a bit porous. So, once you have painted the mug, you will need to seal it afterward. The best way to do this is to glaze it with pottery glaze.
A painted mug is normally coated with glaze and then fired again in a kiln. When the glaze is fired, it becomes transparent. This means that you can see the painted design through the glaze.
You can take your painted mug back to the pottery shop and ask them to fire it for you.
Make your Own Clay Mug
Make your own clay mug and then paint it!
Let’s look at a selection of mug painting techniques that fit into each of the above options.
Painting a Ready-Made Mug
There are a lot of ways of painting mugs that you have picked up in a regular houseware store. You can choose white mugs or colored mugs. It really depends on the color of the paint that you are going to use. Lighter or metallic paint will stand out better on a darker-colored mug.
Before you use any of the following methods it’s best to give your mugs a wash in warm soapy water. Then clean the mug with rubbing alcohol.
I soak some cotton wool in rubbing alcohol and wipe the area that I’m going to be decorating. The rubbing alcohol will get rid of any greasy marks or fingerprints on the surface. Grease will stop the paint from sticking well.
Another important point is to keep your painted designs away from the lip of the mug. The mugs will be sealed and baked to make the designs permanent. However, there is still a chance that small flakes of paint can become loose. And you don’t want to consume any of it.
Different paints will have safety recommendations on their user guides. So, do read those. But as a rule, it’s suggested that you keep the paint away from the lip area of the cup.
Method 1 – Painting Mugs with Acrylics
Acrylic paints have a wide range of vibrant colors, they are easy to get hold of and easy to use. Here is how I painted this mug with acrylic paints…
You will need:
- A ceramic mug
- Acrylic paints
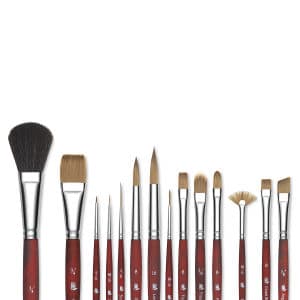
- Paint brushes – it helps to have a range of sizes
- A pencil
- An eraser
- A mixing palette or plate
- An oven
- Dishwasher Safe Mod Podge
How to Paint Your Mug with Acrylic Paints
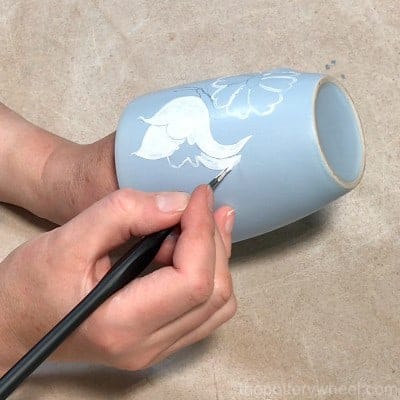
You can start by sketching your design onto the mug with a pencil. Pencils leave a very faint outline on a shiny ceramic surface that can be useful as a guide. The good thing about pencil marks is that they rub off easily with an eraser.
Pencil lines will help you figure out where you want to position your design on the mug. But it’s not essential to sketch out with a pencil first. You can just start painting with no guidelines.
First of all, squeeze some of your acrylic paints onto your plate or mixing palette. Remember that a mug is a small surface area, so you really don’t need much. A squirt of paint the size of a grape will most likely be enough.
You can mix your acrylic paints together to create the color you want. Or you can use them as they are.

Painting Your Mug
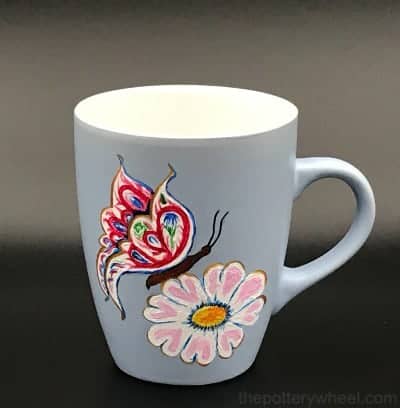
With this particular mug, I drew a basic outline in pencil. Then I painted a thin outline with a fine paintbrush. Using an outline is a good way to check that you have enough space for your design on your mug!
Once I had the outline, I fleshed out the image. First I applied a couple of layers of the white base. Then I added color details on top of the white base. When painting, it’s best to start with the light colors first and then build up the darker ones on top.
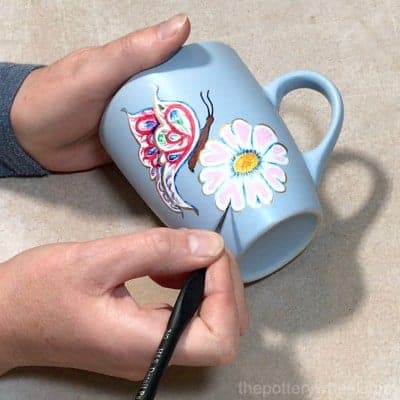
You can paint whatever design you choose. It can be an image of an object, lettering, or an abstract pattern. It’s a good idea to build up a few layers of the paint to get an opaque finish. One layer can look a bit stringy and washed out.
Let the paint dry between layers. If the acrylic paint is only partially dry and still soft, it can peel off when you paint the new layer.
So, it’s best to wait for it to dry completely. Alternatively, you can mix your colors on the mug itself when the paint is still wet.
It’s good to have a selection of brush sizes. Larger brushes are good for a bigger area, and a very fine brush is good for tiny details.
View on Blick
Finishing Touches
Once you have completed your painting, check it over for blemishes that you want to tidy up. You can dip a q-tip in rubbing alcohol and gently rub away any blemishes and smudges.
Dip the q-tip in rubbing alcohol and then give it a squeeze between your fingers. This will get rid of excess liquid before you start rubbing. And it will help avoid dripping rubbing alcohol onto your painted design.
Wipe your fingers before you start handling your mug again. Otherwise, the rubbing alcohol on your fingers could damage your painting.
If you want a gloss finish on your design, you can apply a coat of clear gloss acrylic paint. Wait until the painted design has dried before you apply the clear gloss coat.
When you have finished your painting, wait a few hours for it to dry completely. Acrylic paint will be touch dry on a ceramic mug in about 30 minutes to an hour. But even when it’s touch dry the paint may still be soft if it’s quite thick. Wait a few hours before it has completely hardened.
Baking Your Mug
Place your mug on a baking tray in your kitchen oven. Heat the oven to 350F (177C) and bake the mug at this temperature for 30 minutes.
Remember to put your mug in the oven when the oven is cold. Then heat the oven with the mug inside. If you put the mug in the oven when it’s hot, the mug may crack or shatter with the thermal shock.
After 30 minutes at 350F (177C), turn the oven off and let it cool down. I let the mug cool down completely in the oven, but you can take it out after 30-40 minutes if you like.
Once the mug is completely cool, give it wash in warm soapy water. And, hey presto, your mug is ready to be used or wrapped up as a gift!
Washing Your Mug
Baking your mug will bond the acrylic paint to your mug. However, mugs painted with acrylic paint should not be washed in a dishwasher. A dishwasher would damage the painted design.
If you want to toughen up the painted design, you can apply a couple of coats of dishwasher-safe mod podge. Mod podge is a kind of sealant that has many uses in crafting. As the name suggests, the dishwasher-safe version means your mug will be more likely to survive in the dishwasher.
You’ll notice that I say the mug design is ‘more likely’ to survive. I like mod podge, and the dishwasher-safe version certainly does offer your painted mugs more protection. However, even after applying the mod podge, I tend to hand wash mugs that I’ve painted myself. I find the designs last longer and are less prone to losing color and becoming chipped if I hand wash them.
That being said, there are ways of painting mugs that will produce a dishwasher-safe personalized mug. Let’s take a look at one of those options now….
Method 2 – Drawing with Oil Based Pens
If you don’t like using a paintbrush, you can decorate your mugs using paint pens.
You can buy acrylic paint pens that are specially designed to be used on ceramics. Or you can use oil-based paint pens. Generally, oil-based paint pens are harder-wearing and survive better on mugs than acrylic pens.
In fact, oil-based pens are usually described by the manufacturer as being dishwasher safe. So, although they cost a little more than acrylic pens, it’s worth the extra expense.
You will need:
- A ceramic mug
- Oil-based paint pens
- Rubbing alcohol
- Cotton pads and/or q-tips
Painting Mugs Using Paint Pens
With paint pens, you can paint your mug in whatever way you want. It can be helpful to sketch out your design with a pencil first.
To start using the paint pens for the first time, give the pen a shake with the cap on.
Then remove the cap. Gently but firmly press the nib of the pen down on a scrap piece of paper. Before you have used the pen the nib will be white. As you press the nib, the paint will flow into the nib and it will become colored.
Once the nib is colored, you can start to paint with the pen. If the color becomes faint, press the nib again to allow more paint to flow into it.
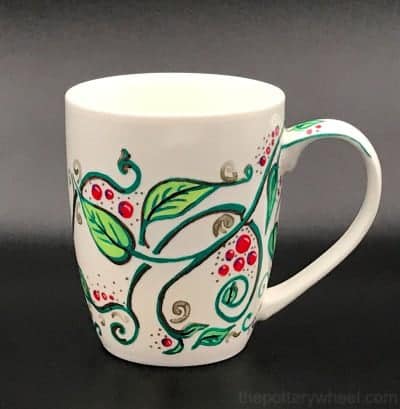
I start by sketching out the outline of the drawing with the base color that I’m using. In this case, the main color was green, so I sketched out the design in green. Then I started to fill in accent colors.
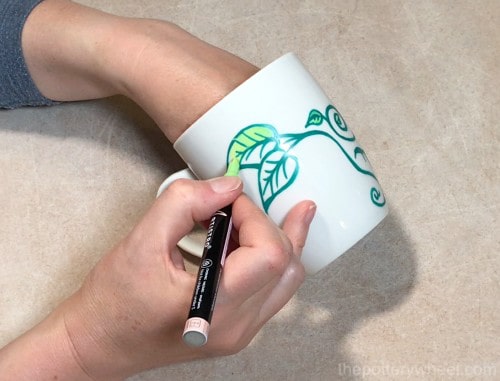
The oil-based pens don’t tend to bleed into each other when the paint is wet. So, you can use different colored pens when your work is still fresh.
However, if you want to layer your work, it’s best to wait until the layers are dry. This is because the nib of the pen is quite hard. When the paint is only partially dry it is still soft. If you draw on top of a soft layer, the pen nib will scratch into the base layer and remove the first coat of paint. So wait a few hours between applying additional layers.
You may find that the first layer doesn’t give enough coverage, and the white of the mug shows through.
If you don’t like this, you can simply wait until the first layer has dried, and apply a second layer. That should give you enough coverage to make the paint opaque.
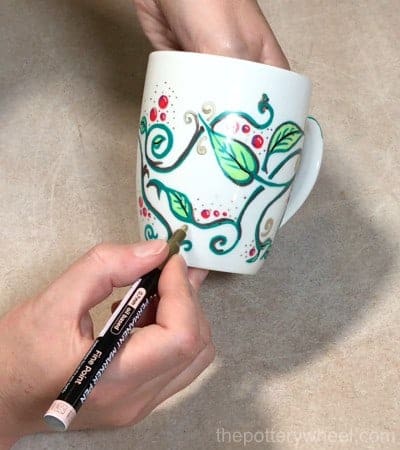
Once you have finished your design, you can tidy up any mistakes with rubbing alcohol. Simply dip a q-tip in some alcohol, and carefully wipe the areas that need to be tidied up.
Be careful to squeeze the excess alcohol from the q-tip to avoid dripping it on your design. You can also use a cotton wool pad.
Once you are happy with your design, let it air dry and cure thoroughly for 24 hours.
Baking on Your Design
When the paint has dried, place the mug on a baking tray in a kitchen oven. Put the mug in the oven when the oven is cold. If you put it in a hot oven the temperature change might be too much for the mug and it may break.
Heat the oven to 350F (175C) for around 30 minutes. After 30 minutes is up, turn off the oven and leave it to cool. Once the oven and mug are cool, remove the mug.
In theory, the design is now dishwasher safe. To be extra sure, I seal the design by applying a couple of layers of dishwasher-safe Mod Podge.
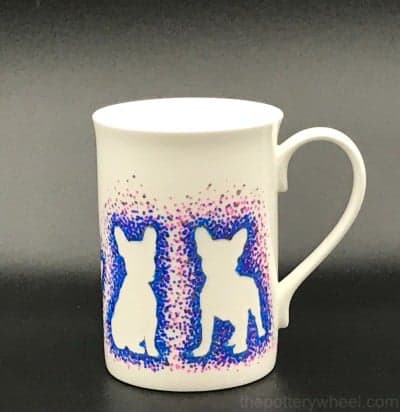
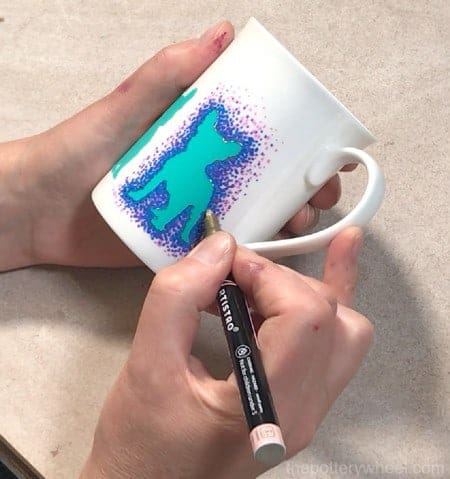
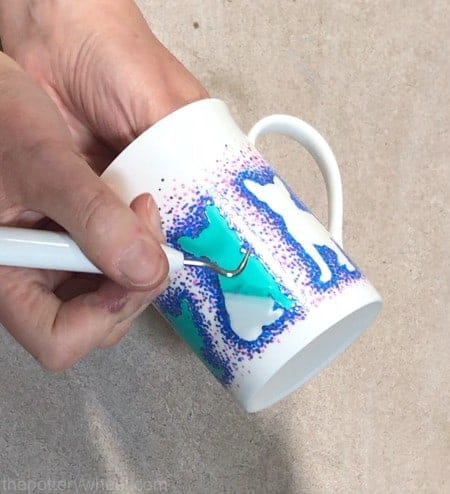
Method 3 – Stipple Painting with a Stencil
An alternative way of painting mugs with oil-based paint pens is to use a stipple technique. This simple method using a stencil can look really lovely. Here is how it’s done…
You will need:
- A ceramic mug
- Oil-based paint pens
- Crafting stickers or custom made stickers using a Cricut die cutter
- Rubbing alcohol
- Cotton pads and/or q-tips
Painting Mugs Using the Stipple Method
You can create a lovely silhouette design on your mug using a sticker. You use a scrapbooking sticker, or you can make your own stickers. If you want to make your own, you can draw and cut them out freehand. Or you can use a die-cutting machine like a Cricut to make custom stickers.
With this particular mug, I used stickers that I made on my Cricut.
Place the stickers on your mug where you want them to be. Bear in mind that you don’t want the pen paint to go on the lip of the mug. So, position your sticker on the lower half of the mug.
Make sure the sticker is flat on your mug, without creases, and without edges peeling off. Then use your paint pen to draw dots around the sticker. You can use a combination of colors and you can vary how close together the dots are.
Once you are happy with the design leave the painted mug to dry. When the paint is dried, carefully peel the sticker off the mug. The color of the mug will show through the stipple design revealing your chosen pattern.
can tidy up any little areas where the ink has bled around the sticker. The easiest way to do this is to use a q-tip dipped in rubbing alcohol.
Baking on Your Design
You seal the paint by baking it in the same way that is described above. As with the painted acrylics, it’s helpful to apply a couple of layers of dishwasher-proof Mod Podge to your finished piece.
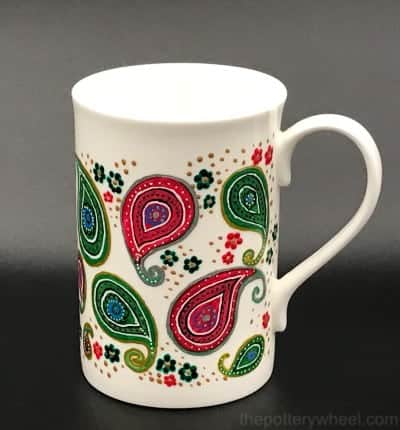
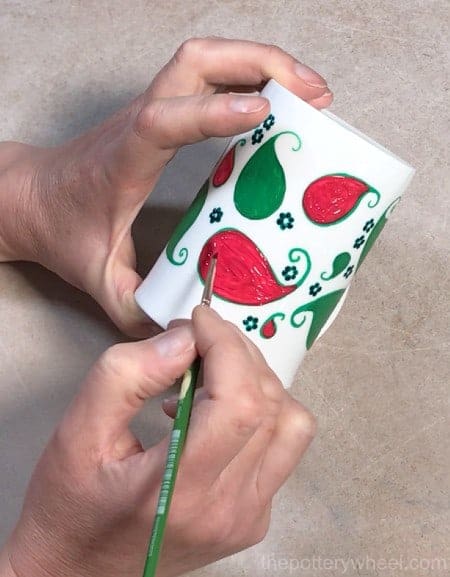
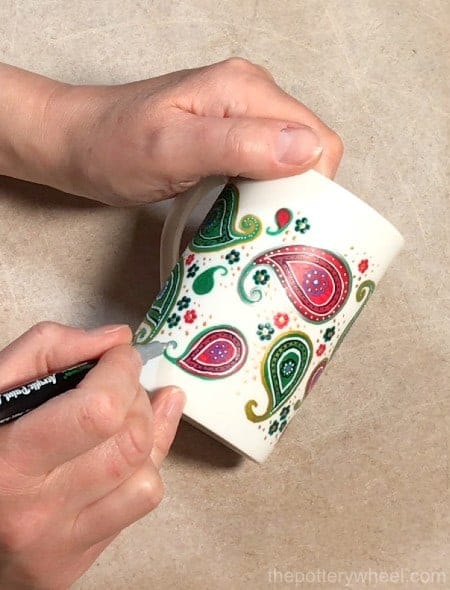
Method 4 – Combining Paint Brush and Pen Designs
You can also use a combination of painting with a brush and drawing with paint pens on your mug. The following mug was decorated using a combination of acrylic paints and pens.
If you are painting with acrylic paints, then it’s best to draw with acrylic pens too. Likewise, if you are drawing with oil-based pens, stick to using oil-based paints enamel paints too.
This is because acrylic paints are water-based. And sometimes they don’t interact well with oil-based paints. You can combine the two sometimes.
But at other times the acrylic paint will flake when used in combination with oil-based products. So, it’s easiest to use acrylics pens with acrylics paints, and oil-based pens with oil-based paints to avoid issues.
You will need:
- A ceramic mug
- Some paint pens (acrylic or oil based)
- Some paints (acrylic or oil based)
- A selection of brushes
- Rubbing alcohol
- q-tips
- Dishwasher safe Mod Podge
Painting Mugs with Paint Pens and Brushes
When you’re using this method of painting mugs, you’re really just combining the techniques outlined above, both here and here.
My preference is to start off drawing my design with my paint pens. After that has dried, I then paint onto the drawn design with my brushes. With this mug, I used acrylic paint pens and paint.
Once I’ve applied a couple of layers of paint I let them dry thoroughly. This helps avoid smudging your paintwork.
Also, when the paint has hardened, you can draw on it without the pen lifting the paint off the mug. If you draw on the paint when it’s still soft the pen can scrape the paint off the mug.
By using paint pens you can add precise details like this paisley design.
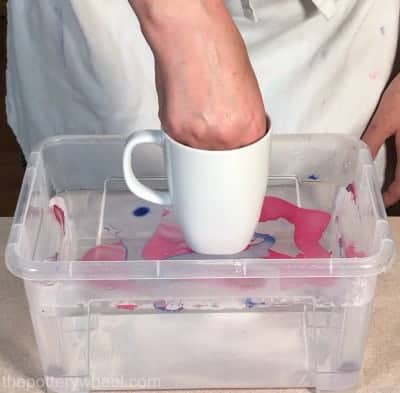
Method 5 – Painting Mugs Using Nail Polish
This is a fun simple way of painting mugs with materials that you will most likely already have at home. This is the nice random pattern you can get when painting mugs with nail polish…
You will need:
- A ceramic mug
- A selection of nail polish colors
- An old plastic bowl
- An old towel or dish washing cloth
- Nail polish remover
- Cotton pads and q-tips
- Dishwasher safe Mod Podge
Preparing Your Materials
Choose an old bowl that you don’t mind getting a bit messed up. Nail polish will sometimes stick to the bowl. The bowl needs to be deep enough to dunk your mug into.
Fill the bowl with hot water. Using hot water will stop the nail polish from drying too quickly in the water.
Leave about an inch or so empty at the top of the bowl. This will allow you to dunk the mug without the water spilling over the top of the bowl.
Choose a combination of nail polish colors that will complement each other. Then add a few drops of each color to the surface of the water.
Hold the nail polish bottle close to the surface of the water. This will encourage the nail polish to spread out a little on the surface of the water.
Some people use a toothpick to swirl the nail polish colors together. But I find that the polish can get stringy and clump together if I do this.
I’ve found the best way to get a nice pattern is to gently rock the bowl side to side. This helps spread the mix of the nail polish without it clumping.
Work quickly to avoid the nail polish drying on the surface of the water.
Painting Your Mug
I hold the mug by putting my hand inside and lifting it up like that. Lower the mug into the water. You can move the mug about gently in the water to pick up the nail polish.
Once you can see that the nail polish has stuck to the mug surface gently lift it out of the water. This normally takes about 5-7 seconds.
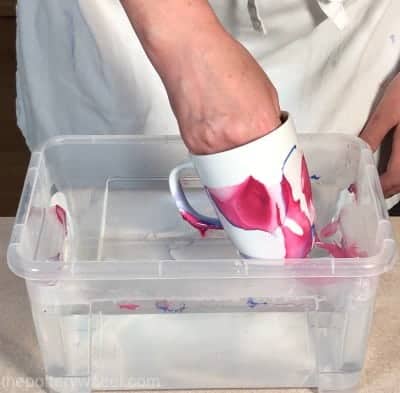
Let the excess water drip off the mug. You might find that little hardened strings of nail polish are trailing off the side of the mug. This is fine. You can gently press them down so that they stick to the soft nail polish on the mug. Then carefully turn it upside down and place it on your old dishcloth to dry out.
Finishing Touches
Leave the nail polish to dry for a few hours. Once the polish has dried, check the mug for any blobs and blemishes.
Dunk a q-tip or a cotton pad in some nail polish remover. You can then use this to tidy up any areas of the design that you want to alter.
Once you are happy with your design, apply a coat of dishwasher-safe Mod Podge. It’s best to apply this with a soft wide brush to avoid streaks. Apply a second layer when the first layer has dried.
Even though you are sealing the design, do avoid putting nail polish on the lip of the mug to avoid ingestion.
Also, although the Mod Podge is dishwasher safe, I prefer to hand wash these mugs. I find the design lasts longer if you give them a gentle hand wash. Even with the Mod Podge, I find the dishwasher is a bit too abrasive and the design will wear off in time.
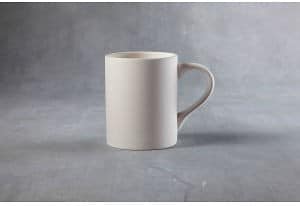
Painting a Bisque Fired Mug
You can buy ready-made bisque-fired mugs from lots of pottery suppliers. Usually, pottery is fired two times. Firing simply means that it’s been baked in a ceramic oven, or kiln, at a high temperature.
The first time pottery is fired, it is called the bisque fire. This is when the pottery turns from workable clay to hard ceramic that won’t dissolve in water. The second firing is called the glaze fire. This is when the pottery gets its nice shiny waterproof coating called glaze.
When you buy bisque ware pottery from a shop, you are buying it before it’s been glazed. This makes it ideal for decorating. When it is bisque, it is hard and absorbent, so it takes paint well. And once it’s been painted, you can put a coat of clear ceramic glaze on it and seal your design permanently.
It’s worth pointing out that clear ceramic glaze needs to be fired in a kiln. Kilns are not the same as a domestic oven. The top temperature on a domestic oven is around 480F (250C). By contrast, ceramic kilns are usually fired between 1832-2372F (1000-1300C).
But don’t worry if you don’t own a kiln. It’s very simple to find somewhere that will fire your painted mugs for you. Keep reading for more information about finding a kiln firing service near you.
The other advantage of painting mugs when they are bisque is that you can paint right up to the lip. When a mug is glazed with food-safe ceramic glaze, it is sealed and non-toxic.
Two Tips:
Before you paint your design, it’s a good idea to wipe your bisque ware down. Bisque pottery can be quite dusty, and this will interfere with your painting. So, use a slightly damp sponge, or cloth and gently wipe the mug over before you start painting.
Once you have painted your mug with underglaze, it will need to be glazed and fired. If you don’t have a kiln, that is no problem. There are lots of places near you that will be willing to fire your mugs for you. For some ideas about where you will be able to find a pottery firing service near you, check out this article.
You just need to take your decorated mugs along to them and ask them to glaze fire them. They might be able to apply the clear pottery glaze for you. If not, you can apply it yourself. Simply buy your own clear pottery glaze and brush it on yourself. If you’d like to know how to glaze your own pottery at home, check out this article.
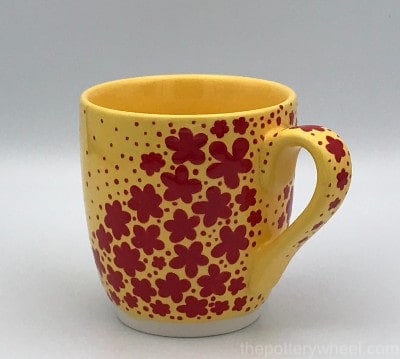
Method 6 – Painting Mugs with Underglaze
There are lots of ways to apply underglaze to pottery, and one of them is to paint it on. Here are some tips about painting mugs with underglaze….
You will need:
Painting Mugs with Underglaze
Painting with underglaze is very versatile. You can create either very detailed paintings using a fine brush. Or you can create blended gradient colors with a wide brush. Alternatively, you can create a watercolor effect using underglaze.
With this mug, I put a base color of yellow on the mug with a wide brush. I applied 3 base layers. Then I used a couple of smaller brushes to paint the red flower details.
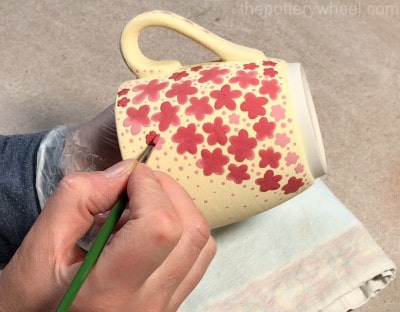
The look you want to go for is your personal choice. My best advice is to experiment with what you like the look of. That being said, there are some important things to know about underglaze.
Tips about painting with underglaze…
Tip 1: To get a nice opaque color, you need to apply two or three layers of underglaze. This is true whether you are painting a large area or a small detail. If you apply only one layer, the underglaze may look streaky and pale when it’s been fired.
You can buy some ‘one coat’ underglaze. But most underglaze requires 2 or ideally 3 applications.
Tip 2: Bisque pottery is porous, so when you paint it, the underglaze dries out very quickly. You will have to adjust your painting approach a little bit to make up for the fast drying time. One way to do this is to load quite a generous amount of underglaze to your brush. But, you need to be careful of drips when you use a heavily loaded brush.
Tip 3: Once you have completed your painting, let the underglaze dry. You then need to paint on a couple of layers of clear glaze. The mug is now ready to be fired, giving you a glossy waterproof finish.
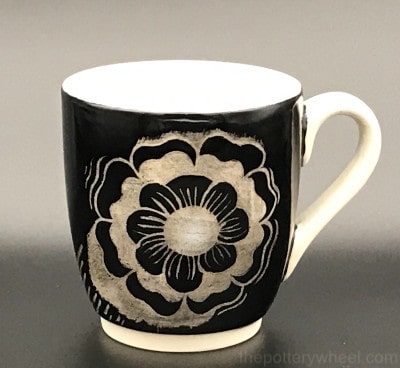
Method 7 – Sgraffito with Underglaze
Sgraffito is a way of decorating pottery. It involves painting the pottery with a colored layer, then scratching onto the colored layer to reveal the clay underneath. The painted colored layer can be underglaze, slip, or engobe.
Sgraffito is often used on clay that has not been fired yet. Unfired clay is still soft and easy to score into with a sharp tool.
However, sgraffito can also be done on bisque pottery too. And here is how you can try painting mugs using underglaze and the sgraffito technique…
You will need:
Painting Mugs Using the Sgraffito Method
Firstly, paint a layer of underglaze onto your mug. You can paint the entire mug, or you can paint a section of it.
Some underglaze is designed to require only one coat. But most underglaze needs a few layers to get full and vibrant color.
Let your underglaze dry between coats. It won’t take long for the underglaze to dry because the bisque pottery will absorb the water very quickly. You should apply at least 3 layers of underglaze to get an opaque color. Though if you want something semi-transparent, then you can apply fewer layers.
Once the underglaze has dried, you are ready to scratch your design onto the mug. I find the best tool to use to scratch the underglaze is a needle tool.
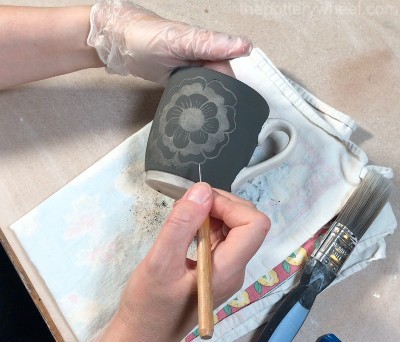
It helps to wear a rubber glove on the hand that you are holding the mug with. A rubber glove will prevent you from leaving fingerprints and smudges on the mug.
If you are good at drawing, you can scratch your design directly onto the underglaze. As you scratch, the light color of the bisque mug will show through the painted layer.
If you are less confident with your drawing skills, you can sketch the design out lightly with a pencil. The pencil marks will burn off when the mug goes in the kiln later.
Use the needle tool to scratch your design into the underglaze. The color of the underlying clay will show through the scratched areas.
Safety
As you scratch, the underglaze will come off in a powder that will collect on the mug. You can gently brush this away with a soft dry brush. Do this slowly and gently so as not to create dust in the air that you are breathing. It’s a good idea to a face mask when you do this to avoid inhaling any dust.
Tip:
A nice idea is to apply layers of underglaze that are different colors. Then when you scratch through the layers you will see the different colors showing through. If you vary the pressure you use when scratching, the different colors of the various underglaze layers will be revealed.
Finishing Touches
Once you have finished scratching your design, brush off any powdered underglaze with a soft dry brush. Then apply a couple of layers of clear ceramic pottery glaze. Once the mug has been fired in a kiln, the design will be permanent.
Painting mugs in this way will enable you to produce food-safe and dishwasher-safe items. Remember to check on the glaze packaging that the glaze is food safe.
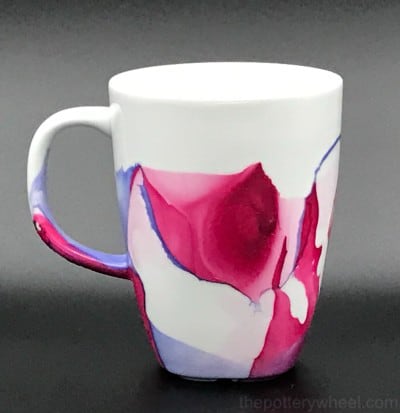
Method 8 – Marbling with Underglaze
One of my favorite ways of painting mugs is creating a marbling effect. I have found the most successful way to do this is to marble bisqueware pottery with underglaze. The technique is incredibly simple but can look amazing.

You will need:
- A bisque fired mug
- Some shaving foam
- Underglaze
- Clear pottery glaze
Preparing Your Materials
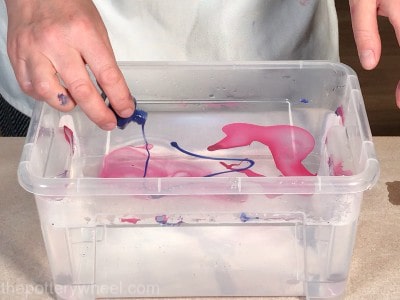
First of all, you are going to spray a layer of shaving foam onto your work surface. You can either spread out some plastic garbage bags on your table and spray the foam onto them. Or you can find a large kitchen tray and spray the foam into that.
I tend to use garbage bags, as I find they give me more room. If you use a tray, you are limited by the size of the tray.
Spray some shaving foam onto your surface and spread the foam out into a layer. The layer should be about 1 inch thick and the surface should be reasonably even. You can spread the foam out with a knife or a ruler.
Then drizzle some underglaze onto the surface of the shaving foam. You can drizzle it in whatever pattern you like. But I find that a pattern of evenly spaced dots works well. Use a few different colored underglazes to create color interest on your marbled mug.
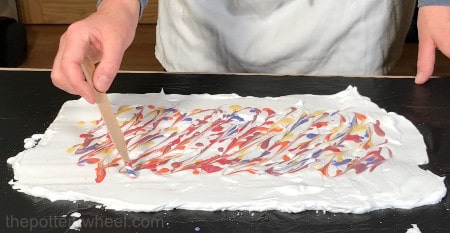
Drag a modeling tool or the tip of a knife, through the underglaze dots, to create swirls and shapes. Be careful not to over mix the underglaze, or the colors might blend in too much.
Marbling Your Mug
Carefully roll your bisque mug over the surface of the shaving foam. As you roll the mug it will pick up the underglaze which will stick to its surface.

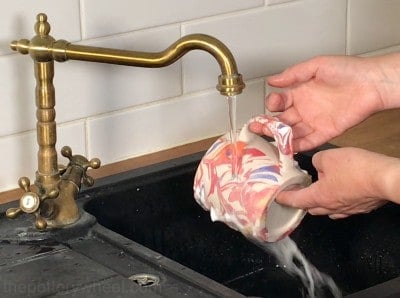
You can roll the mug a few times to make sure that the surface is covered. Once the surface of the mug is covered with the foam/underglaze mix, let it settle for a minute or two. Then carefully rinse the shaving foam off the mug under a running tap.
As you do this, the foam and excess underglaze will wash away. What is left behind on the mug is a beautiful marbled underglaze pattern.
Once the mug and underglaze are dry, you can apply a coat of clear ceramic pottery glaze. Your mug is now ready to be glaze fired.
Whilst finding a place to glaze fire your pottery might sound intimidating it really can be straightforward. Simply find a place that fires pottery near you, and take your pieces along.
Method 9 – Bubble Glazing with Underglaze
Bubble glazing is a quirky fun way to decorate your mugs. It’s also a great way of painting mugs if you are not a big fan of using paintbrushes.
You will need:
- A bisque fired mug
- Underglaze
- Clear pottery glaze
- A tray, baking tray or washing up bowl
- An old cup or jug
- Dish washing liquid
- A straw
Bubble Glazing Your Mug
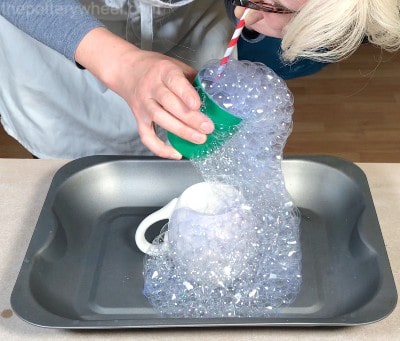
Place your mug upside down, (that is resting on its lip) on your tray.
Give your underglaze a good shake to make sure it’s mixed up thoroughly. Then put a small amount of tap water into your old cup or jug. Around 3 tablespoons of water are enough. Next, add around 2 tablespoons of dishwashing liquid to the water. Finally, add 2 tablespoons of underglaze to the mixture.
Stir the mixture gently with a spoon to mix it together. Place your straw into the mixture and blow gently through the straw. This will create a bubble mixture that will start to fill up your cup or jug.
Tip: Use a regular-sized cup or mug, rather than a large container to make your bubbles. If you use a large jug or bowl, it takes a lot of blowing to make enough bubbles to fill the container.
As you keep blowing into the straw, the bubbles will start to spill over the top of the edge of the cup. When this happens lean over your bisque mug that is positioned in your tray. Carefully drape the bubbly mixture over the upturned bisque mug.
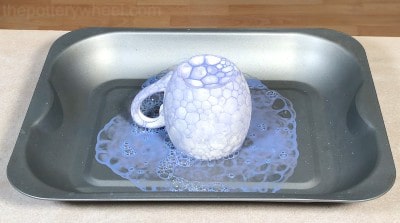
The bubbles will sit on the surface of the bisque mug, and eventually burst. When they burst they leave a colored bubble pattern behind them.
You can speed up the process by blowing gently on the bubbles to burst them.
Creating Patterns
You can apply bubbles all over the mug. Or you can let the bubbles fall onto only part of the mug. This can create a nice contrast on your mug.
Also, if you blow quickly into the mixture, you create lots of small bubbles. Whereas if you blow slowly, you will create larger bubbles. This will affect the bubble pattern on your mug. So, you can experiment with the bubble pattern that you prefer.
Finishing Touches
Once all the bubbles have burst, you can carefully turn the mug upright. Let the underglaze dry. Underglaze dries very quickly on bisque ware. In fact, it should dry almost immediately as the porous bisque draws out the water from the underglaze. However, I tend to leave it for at least a few hours so that moisture from the bisque mug can evaporate.
The bubble underglaze mixture can leave a raised texture on the bisque surface. This is normal.
If you don’t like the texture you can use an old cloth or rag to rub it gently. This will remove some of the textured effects.
If you choose to rub the texture off, remember to do this outside. Also wear a suitable face mask that filters out particulates. Rubbing the underglaze will create airborne dust which you don’t want to inhale.
However, you don’t need to rub the texture off. In fact, I rather like the texture and I always leave it on my mugs. I feel it gives the mugs an extra interest and hand-crafted charm.
Your bubble glazed mug then needs to be glazed and fired. As stated earlier you can take it along to a local paint your own pottery café. They will most likely glaze and fire it for you. Or you can apply a couple of coats of clear glaze to your mug yourself. Then you can fire it in your own kiln, or if you have access to one.
Painting a Home Made Clay Mug
Another option when painting mugs is to actually make the mug yourself out of clay. Why not? That way, you can make the mug exactly the size and shape you want it to be.
Also, you can add decorative details in clay to the mug. These patterns, textures, and details can then become part of your painted design too.
Here are a couple of ways of making and painting your own clay mug…
Method 10 – Making and Painting Mugs (Without a Potter’s Wheel!)
You don’t need to buy a potter’s wheel to make clay mugs. It’s possible to make and paint beautiful clay mugs by hand. Here is one way to make and paint a lovely clay mug without a pottery wheel.
You will need:
Making a Pinch Pot Mug
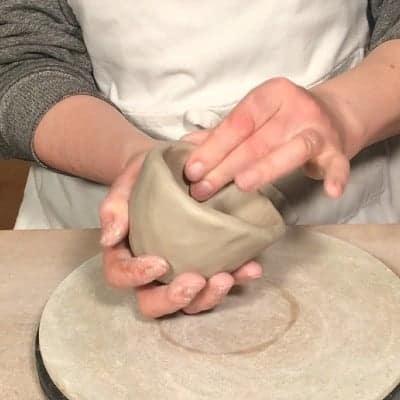
Making pinch pots is a lovely way to make pottery. All you need is some clay and your hands, and you are ready to go. It’s possible to make lovely mugs using the pinching technique.
If you want to know how to make a pinch pot mug, check out my easy-to-follow step-by-step guide.
In short, making a pinch pot mug involves pinching a piece of clay into shape. Then adding a handle! Once you have made your basic pinch pot mug shape, then you can decorate it with clay details.
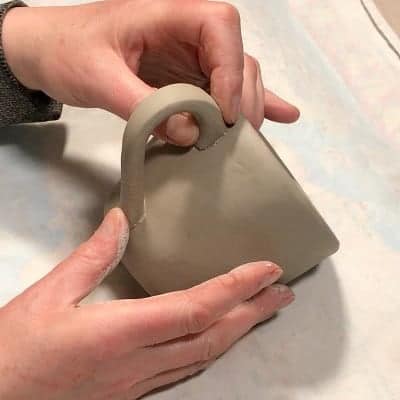
On this mug, I added some clay flower details around the handle. You can add whatever design details you like in clay.
Once you have finished adding decorative clay details to your mug, you need to let the clay dry out thoroughly.
It’s best to let your mug dry out slowly under a loose plastic bag. The slower the mug dries, the less likely it is for the clay to crack as it’s drying.
When the clay is dried, then it needs to be bisque fired. As mentioned earlier in this article, you can take your pots along to a local pottery firing service. They will bisque fire your mug and you can collect it again when it’s been fired.
Once the mug has been bisque fired, you are ready to start painting it.
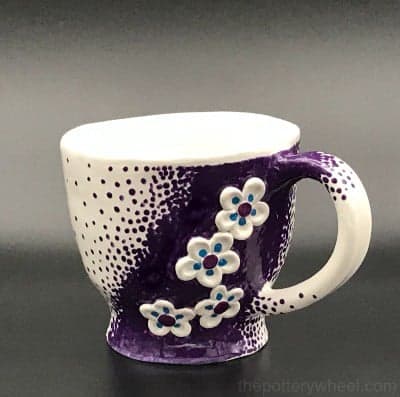
Painting Your Pinch Pot Mug
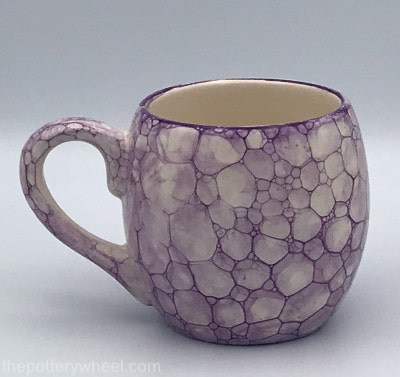
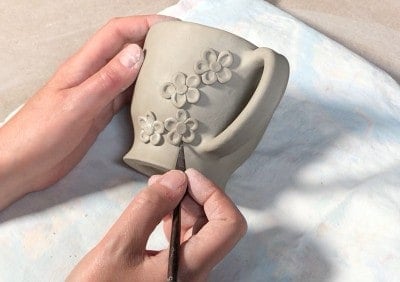
I painted this particular mug with underglaze. Firstly, I applied 3 base coats of white underglaze to the whole mug, letting each layer dry between applications.
The white base underglaze can be applied with a larger brush for speed. However, I used a smaller brush to make sure that the white went into the crevices around the flower design.
Once the white base is dried, I painted around the flower detail with purple underglaze. I used a stipple effect to make a color gradient on the side of the mug.
Stippling is great because it creates the impression that the flowers are growing out of the mug. I also added a little bit of color to the flowers themselves, painting the center of the flower and part of the petal.

Again, with the colored underglazes, I applied 3 layers to build up an opaque color.
You can use underglaze color when painting mugs in whatever way you choose.
Once I was happy with the design I applied two coats of clear pottery glaze over the whole mug.
The mug is then glaze fired, which permanently secures the painted design to the pottery.
Method 11 – Making and Painting Mugs With a Potter’s Wheel
If you have access to a pottery wheel, then you can make your own mug on the wheel. Using a pottery wheel does take some practice, but once you’ve mastered the basics, it’s a lot of fun.
You can practice your pottery wheel skills at a local pottery class. They will often hire wheels out by the hour too, so you can make your own mug there. For more tips about how to find a pottery wheel near you, check out this article.
You will need:
- Access to a pottery wheel
- Pottery clay
- Underglaze
- Clear pottery glaze
Painting Mugs Made on a Pottery Wheel
Making pottery on a potter’s wheel is called ‘wheel throwing’. This is why a mug made on a wheel is called a wheel-thrown mug!
If you haven’t used a wheel before, take a local pottery class and learn the basics. Most beginners pottery courses will teach you how to make the body of the mug, and attach a handle.
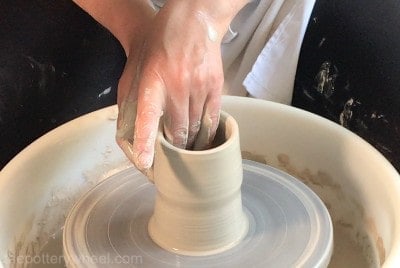
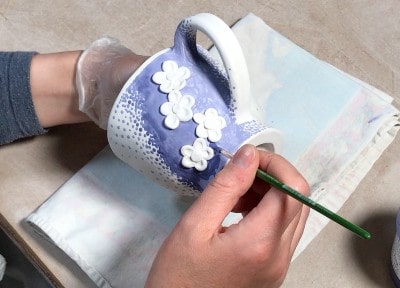
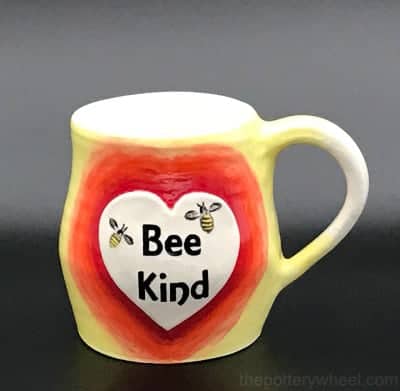
Once you have made your mug and attached a handle, you can also add other decorative clay details. With this particular mug, I added a small, flat, heart detail to the mug. I did this by cutting a heart-shaped piece of clay out of a thin clay slab. I then used clay slip to attach the heart to the side of the mug. The best way to join clay is using the score and slip method of joining.
When you are happy with your mug, let the clay dry slowly over the course of a few days. The clay mug then needs to be fired in a kiln. The benefit of taking a class locally is that they will almost certainly fire your mug in the kiln too.
Decorating Your Mug
Once the mug has been bisque fired, you can paint it using underglaze in whatever way you choose. With this mug, I added some lettering to the clay heart. I made a stencil for the lettering on my Cricut die cutter and painted the lettering on using black underglaze.
The rest of the decoration was underglaze painted on using a selection of different-sized brushes. For example, the tiny ‘bee’ details were painted on with a very fine brush. Whereas I used a larger brush to blend in the colors around the heart shape.

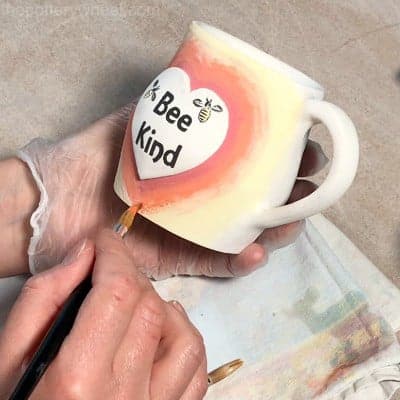
I blended the colors as best as possible to create a gradient. It’s tricky painting gradients with underglaze on bisque because the bisque pottery dries the paint out quickly. However, if you add enough layers and work quickly enough, you can create something of a gradient effect with underglaze.
Once the underglaze design was finished, I applied two layers of transparent pottery glaze. The mug was then fired a second time in the kiln. After the glaze fire, your mug is ready. The nice thing about making as well as painting mugs is that the finished product is all your creation.
Final Thoughts
Painting mugs is a lot of fun and can be a great way to express your creative flair. They make great gifts, and decorating mugs is a great way to keep children happy and occupied too. There are endless options in terms of style and technique. I hope this article is a good starting point for you and has given you some inspiration.


