Plates can be a little tricky to make. Actually making the plate is the easy bit, but problems can arise when you dry and fire the plate. One problem that you might encounter when you make plates or other flat-bottomed pottery is S cracks. But what exactly is an S crack?
S cracks in pottery are caused by stress on the clay. Stress occurs when the walls dry out faster than the base. This is often due to the thickness of the clay and the alignment of the clay particles. The best solutions involve compressing the bottom of the pot when throwing, trimming the pot well, and dry slowly.
First of all, let’s take a closer look at the question of what constitutes and S crack…
What is an S Crack in Pottery?
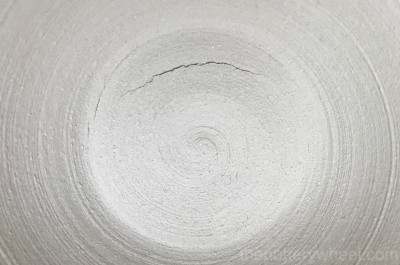
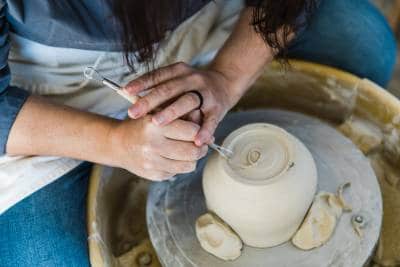
As the name suggests, they are ‘s’ shaped cracks that occur in the base of a piece of pottery. It is very unlikely for them to appear on hand-built pots, they happen most often in wheel-thrown pots.
The S crack can happen when the pot is drying out and before it’s fired. Or it can become apparent during a bisque or glaze fire. They happen most often when greenware clay is drying out in preparation for being fired. An S crack occurs when the clay tears, rather than shattering.
S cracks vary in size and depth. Some go right the way through the base of the pot. Others are only visible from the outside or the inside of the pot and don’t go right the way through.
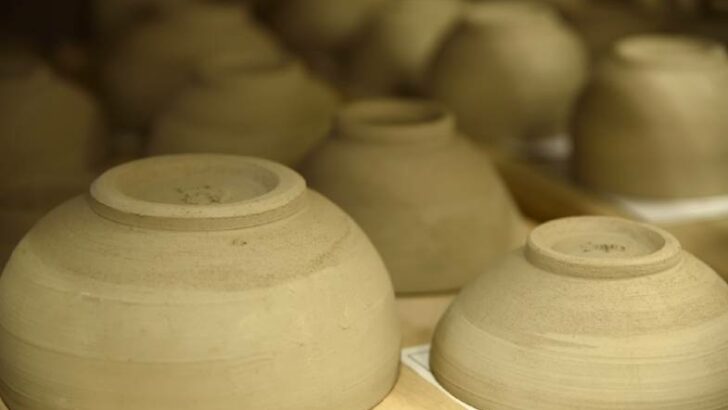
An S crack can develop on the base of smaller items like mugs and bowls. However, they are most common on larger, wider pieces like plates and platters.
What Causes S Cracks in Pottery?
There are a number of reasons why S cracks appear in pottery. If they have been plaguing your pots, then it might be a process of elimination to find out the cause.
Here are some factors that can cause S cracks in pottery:
1) Uneven Drying
As clay dry it shrinks. If one part of your pottery is drying and shrinking faster than another, the clay is put under stress. This is referred to as a drying gradient. (source)
It is common for the walls of a pot, plate, or vessel to dry out more quickly than the base. This is because the side of the pot is more exposed to air. This is particularly the case with pottery that is left to dry base down on a solid surface. If the base of a pot is resting on a solid surface, the whole underside of the pot is protected from airflow. By contrast, the sides and in particular the rim are exposed to the surrounding atmosphere. As a result, the moisture in the side and rim will evaporate more quickly. This means that the exposed parts of your pottery dry more quickly.
As the sides and rim dry, they shrink. When the sides and rim shrink they pull on the base of the pot and can cause the base to tear.
By contrast, if your base and sides are drying at the same speed, you avoid this pulling action on the base. In fact, when they dry at the same rate, the clay particles on the base are pushed inwards and together.
2) Thick Bottoms and Edges
Thick clay dries out more slowly than thin clay. If the base of your pot is thicker than the sides of your pottery, it will dry out more slowly.
Clay can be especially thick at the bottom edge of the pot where the side meets the base.
As a result, pots that have been made with thicker bases are more likely to crack in the S crack pattern.
3) Soggy Clay
Often when throwing on the wheel, a pool of water will collect on the inside of your pot at the base. The little puddle will sit there as you throw your pot and as it sits in the base, it is making the clay soggy. So, when you’ve finished making your pot, the clay in the base will have a higher water content. Even if you use a sponge to mop the excess water up, the clay will have spent a while sitting in water.
As a result, the base will have a higher water content than the sides and will dry out more slowly.
4) More Water / Less Clay
If the base of the pot contains more water, it follows that it will contain less clay. If the base has been waterlogged, it may contain fewer clay particles than the walls or rim of the pot. As a result, the base is less dense and less strong than the walls. Put simply, the base has less bulk and fewer clay particles to hold it together as the piece dries out.
5) Particle Alignment
Another factor at play in the formation of S cracks in pottery is clay particle alignment. When you throw your pot, the walls and rim of the pot are almost continually in contact with your fingers. As the clay passes beneath your fingertips, the clay particles become aligned. Clay particles are longish, flat platelet shapes.
When clay dries out, the clay particles shrink more across their width than they do across their length. The clay particles are aligned neatly in the walls. So, when they shrink, they shrink in the same direction.
By contrast, the particles in the base of the pot have had less contact with your fingers. As a result, the particles in the base are only partially aligned. Because they are more randomly positioned, they don’t all shrink in the same direction. So, the base shrinks less in volume than the walls of the piece.
The shape of the S crack indicates the direction in which the clay on the base has been dragged. Nevertheless, the clay in the base often has much less contact with your hands than the walls.
6) What Are You Making?
S cracks can occur in any size or shape of wheel-thrown vessel. However, plates are more vulnerable to S cracks because there’s more distance between the rim and the center of the base. As a result, there is more tension and stress pulling out on the base of the plate.
7) What Type of Clay Are You Using?
Porcelain clay is prone to the formation of S cracks, especially when it is used to make plates.
Also, stoneware clay that has a high ball clay content is more prone to forming ‘s’ cracks. The reason for this is that ball clay has a high water content, and shrinks a lot when it dries. As a result, if one part of your pot dries quicker than another, it puts a lot of strain on your piece.
But if you don’t want to change the type of clay you use, simply to avoid S cracks, what can you do? Here are some things to try to prevent S cracks from forming…
How to Prevent S Cracks
I’ve ordered this list of possible solutions to S cracks according to the order in which pottery is made. I thought this would be handy so you can tick off potential causes as you make your pots.
So, the list isn’t in order of how important each solution is. Rather it’s ordered according to how the pot is thrown. Starting off with suggestions about wedging…
1) Wedging The Clay
If you spiral wedge your clay, you will end up with a cone-shaped piece of clay. This looks a bit like a cone-shaped seashell. It’s common to put the cone shape pointing upwards with the wider end positioned on the wheel head.
However, as the name suggests spiral wedging causes the clay to form spiraled layers in the clay cone. It is thought that the join between the spiraled layers can create a point of weakness in the clay. So that when the clay dries out, the layers want to separate.
It’s said that these points of weakness can make the formation of S cracks more likely.
A solution is to turn the spiral-wedged cone on its side. Then center the clay so that the base of the spiral cone doesn’t form the base of the pot.
2) Throw or Drop your Clay onto the Wheel Head
Before centering your clay, trying throwing it with some force onto the wheel head. The idea behind this old technique is that the force of slamming the clay on the wheel head will start to align the clay particles.
However, it’s worth bearing in mind that this might not be great for the bearings in your potter’s wheel!
3) Throw on a Porous Bat
A metal wheel head or a plastic bat are both non-absorbent. By contrast, a wooden or plaster bat is porous. This will help draw some moisture out of the base of the pot as you throw.
Also, you can leave the pot on the bat after you have thrown your piece. Just remove the bat from the wheel head, and let the pot dry out on the porous bat. This will continue to help remove moisture from the base as the pot dries out after being thrown.
4) Centering Your Clay
Another suggestion is to cone your clay up and down a few times when you are centering your clay. When you cone your clay up and down, you are helping to align the particles throughout the ball of clay.
If you do cone up and down, it’s a good idea to make the clay into a nice long tall cone. If your cone has a fat base the particles on the inside of the base will remain randomly organized. But if you make the cone tall and sausage-like, then all the clay particles will start to align.
5) Avoid Fat Bottoms
When you are throwing, try to avoid making pots with a very chunky base. When you have opened up the pot, check the thickness of the base using a needle tool. Push the needle tool into the base and slide your finger down the tool until it touches the surface of the base. Then remove the needle tool and see how much of the pointed end was stuck in the clay.
Remember that when you slice the pot off the wheel head or bat, you will lose some thickness. Also, if you are trimming the pot, you will also lose some bulk on the base. Nevertheless, it’s good to aim for the base of the pot to be the same thickness as the walls of the pot eventually.
It also helps to make the edges of the pot where the base meets the walls, square rather than round. If the base is very rounded where it meets the walls, this will be a point of extra thickness.
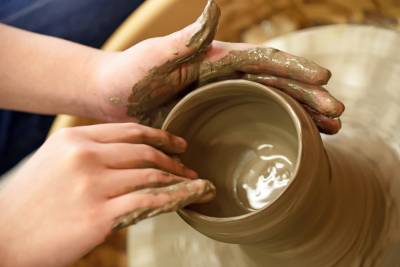
6) Compress the Base When Opening
One of the reasons S cracks occur is that the base of your pot gets less compression than the walls. As a result, the particles remain more randomly positioned in the base.
So, one solution is to spend some time compressing the base once you have opened up your form. You can do this by running the tips of your fingers or a rib tool over the base of the pot.
However, if you move your fingers in a direction from the center towards the walls you are stretching the clay particles apart. By contrast, if you move your fingertips towards the center of the pot, you are pushing the particles together.
For that reason, it’s suggested that when you are compressing the clay, it’s best to move your fingers inwards toward the middle. You may notice a little nib of clay is formed in the center of your pot or plate when you do this. That’s fine, it’s just an indication that the clay is being pushed together and compressed well. You can simply remove the nib with your fingers or rib tool and smooth the clay over.
If you are using a method called ‘throwing off the hump’, it’s not possible to compress the clay against the wheel head. When throwing off the hump a large lump of clay is centered on the wheel head. Then the potter throws a form on top of the hump of clay.
Once the piece is finished it is cut off the hump of clay. And the process can be repeated, throwing multiple pots from one hump of clay.
Because you can’t compress the base when throwing off the hump, other methods have to be used to avoid ‘s’ cracks. Here are some other suggestions….
7) Don’t Let Water Pool in Your Pottery
As much as possible, try to avoid letting water collect in the base of your pot as you throw. If you notice that water is settling at the base of your pot, mop it up with a sponge, or a ‘sponge on a stick’. You can do this now and again as you are throwing your pot. But it’s particularly important when you’ve finished throwing your piece to mop up water before you let the pot dry.
8) Cut the Pot Off the Bat
When you’ve finished throwing, cut the pot off the bat before you let the pot dry. This is said to reduce pressure on the base of the pot as it dries.
9) Turn Your Pots Over
Once the pot is firm enough to move without losing its shape, turn it over so it’s resting on its rim. This will help even out the drying process. By turning the pot, you are protecting the rim from the air, and you are exposing the base to more air.
Alternatively, you can dry your pot base down on a wire rack. Drying on a wire rack ensures that air gets to the base of the pot as well as the sides, and evens out the drying process.
Likewise putting your pot on an absorbent surface like wood or plaster will help dry out the base too.
I find if I’m drying something large and flat like a tile or plate, it’s a very good idea to put it on a wire rack. This helps even out the drying and stops the piece from bending as it dries.
However, with smaller pieces like bowls and mugs, I turn them upside down to expose the base. In fact, when the piece is still quite wet, I cover my wooden bats with a plastic bag. That way the rim of the pot is resting on top of the plastic bag. This helps avoid too much moisture being drawn out of the rim too quickly.
10) Keep Your Pots Covered
To avoid ‘s’ cracks, dry your pots as slowly and evenly as you can. One way to do this is to cover your pots with a plastic bag and keep it away from drafts and airflow.
Gradually as your pots dry out, you can loosen the bag and eventually remove it. But in the early stages when the pot is losing a lot of moisture, keep it covered to slow down the process.
11) Trimming Your Pots
I usually trim my pots when they are medium leather hard. However, if you are having trouble with S cracks, it can help to trim your pots twice. If your pot has a thicker base, it can help to trim it once when the pot is still quite damp. This will allow you to get rid of some of the excess clay. Then when the clay is firmer and leather hard, trim it again to finesse the shape and thickness of the base.
When trimming your pots, aim to make the base the same thickness as the walls. Some potters recommend making the base slightly thinner than the walls.
You can check the thickness of the base as you trim by tapping it with your nail. If the base is thick, it will make a dull sound when you tap it. When it becomes thinner as you trim, the base will vibrate more. As a result, the sound it makes when tapped will be higher and sharper.
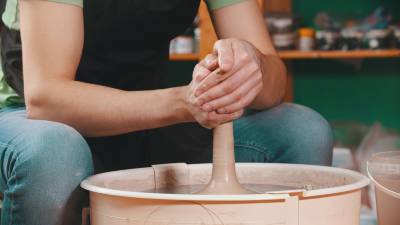
12) Beating The Base
Once the pot has been trimmed, you can ‘beat’ the base a little. Beating the base basically means tapping or tamping the base a bit. It’s said that beating also helps to align and compress the clay particles, and so helps avoid ‘s’ cracks.
How you tamp your pots, depends on the shape of the piece you’ve made. If you’ve made a large flat form, it’s easy to get your hand in there and give it a bit of a tap. You can beat it carefully with a piece of wood, stone, or even your hand.
If you have made a smaller or taller piece, you can tamp it with a long piece of curved wood. You can fashion something of your own for the job. I find that my homemade tools made for a specific job are usually my favorite tools. To tamp down taller forms, you can attach an old doorknob to a long piece of wood or dowl.
Final Thoughts
If you read around, you will probably find that there is quite a bit of discussion about the best way to tackle S cracks in pottery. For some potters, compressing the clay works best. For others, it’s a case of making sure the cone wedge their clay before throwing. However, I often find that one shoe does not fit all when it comes to making pottery.
What works for me to avoid S cracks in pottery is to trim the base so that it’s not too thick. I then turn my pots upside down as soon as possible and dry them very slowly. This seems to work for me. But, this may not be the ideal solution for you. That is why I’ve included all the suggestions listed above. That way you can try them all out and find out which works best for you.


