Slab pottery is very versatile. Slabs can be used for anything from dainty ceramic earrings to huge garden planters. So, I thought I’d put together a list of my favorite slab pottery ideas. I hope you find these projects as inspiring as I do.
Slab Pottery Ideas
I’m aiming below to give you an overview of a wide range of slab pottery ideas. Each project can be tackled in different ways. And I hope the ideas below are a good starting point in helping you decide which project you want to try first.
But before we get onto what you want to make, let’s take a quick look at what clay you might want to use to make your projects.
What Clay to Use
Some of these slab pottery ideas can be made using air-dry clay. As the name suggests, air dry clay does not need to be fired in a kiln.
However, you may want to make items that will hold water. Or perhaps you want to make a functional item that you can eat or drink from. In that case, you will need to use pottery clay.
Pottery clay does need to be fired in a kiln. But don’t worry if you don’t have a kiln. There will be plenty of places local to you that own a kiln and will fire your pots. If you want to find someone to fire your pottery, have a look at my article about where to find a pottery firing service nearby.
If you’d like some recommendations about what clay to use, here are some good options…

Buff Stoneware Clay – View on Blick

Red Earthenware Clay – View on Blick
For more information about choosing clay, you can check out my article on that exact subject here.
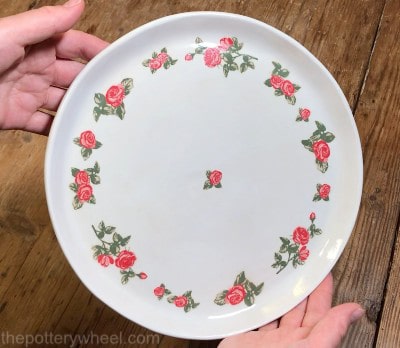
Project 1: Slab Plates
Making plates is one of the simplest slab pottery ideas.
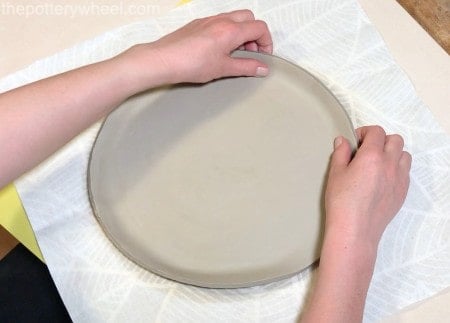
The easiest way to make a plate is to roll out a slab of clay to about ¼ inch thickness. For tips on how to roll an even slab of clay have a look at my step-by-step guide here.
Then using a clay knife or fettling knife cut out a circle in your slab. You can cut out the circle freehand if you want to go for an organic look. Or you can use a template to cut out a perfect circle.
Leave the slab uncovered for a while to allow it to firm up just a little. Exactly how long this will take depends on the temperature and climate where you are. So, check the slab regularly to make sure it isn’t drying out too much.
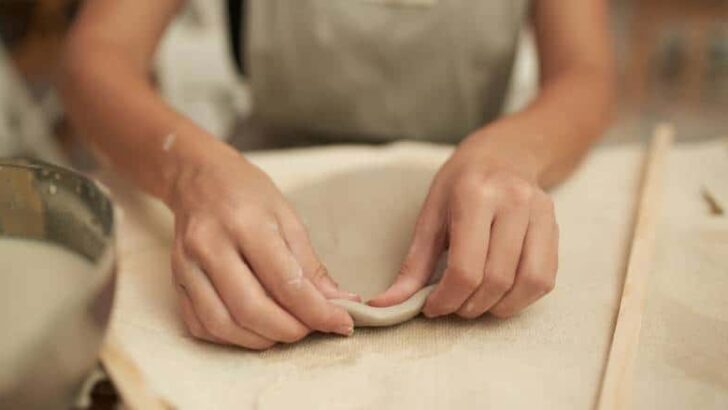
Then use your fingers to curl the edge of the slab upwards. Once you have shaped the slab into a plate form, let the clay dry out until it’s leather-hard.
You can tidy up the edges of the plate to make them nice and smooth. I refine the edges of my plates using a clay shredder or Surform. This acts like a cheese grater to remove unwanted lumps and bumps. I then smooth the shredded surface with a small damp chamois leather.
Once the plate is completely dry, or ‘bone dry’ it’s ready to be fired.
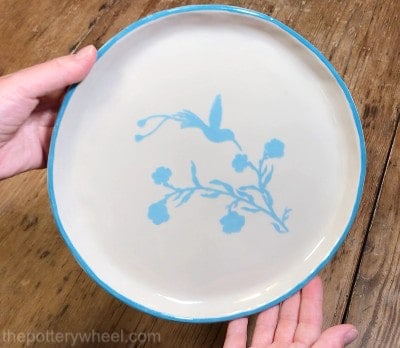
Here are two slab plates I made that were decorated with underglaze and glazed with a clear glaze.
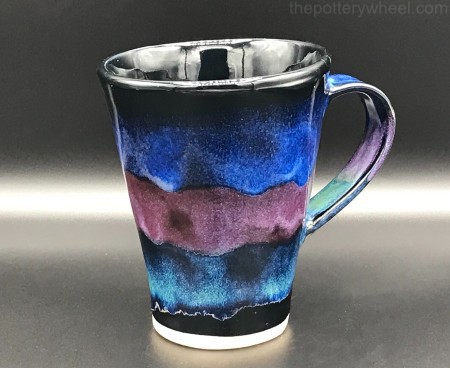
Project 2: Slab Mugs
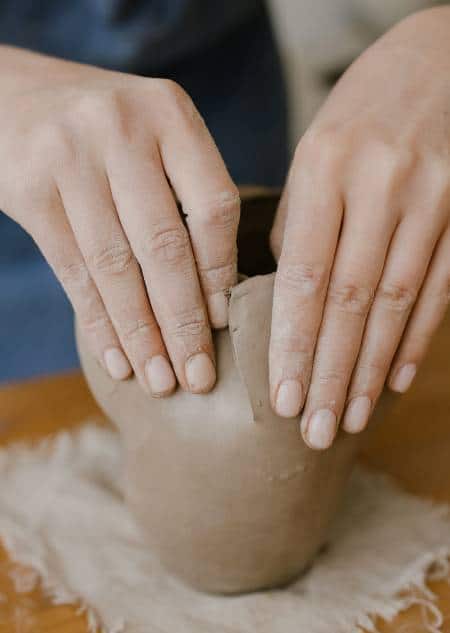
You can make slab mugs in different shapes and sizes. They can have a straight up and down cylinder shape. Or they can be cone-shaped meaning that they taper in either at the bottom or top of the mug.
Equally, you can make a rounded slab mug by pressing the walls into a curved shape, whilst the clay is still soft and fresh.

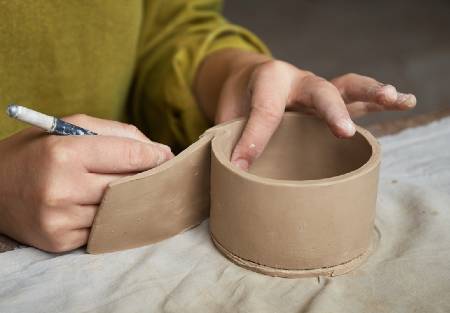
To make a simple cylinder-shaped mug, cut a rectangle of clay from a freshly rolled clay slab.
Leave the rectangle to firm up just a bit. It needs to be soft enough to bend easily without cracking. But equally, you don’t want it to be so soft that when you handle the slab it’s flopping about too much.
Once the slab is a little firmer, you can pick it up, and curve the clay round into a cylinder shape. The two edges of the slab can be pressed carefully together to make a joint.
Two Tips About Joining Slabs…
It’s usually best to bevel the edges that you are joining. This means cutting the edges at a 45-degree angle. You can do this by holding a clay knife at an angle and cutting along the edge. Or you can use a clay bevel cutter.
Score and slip the edges before you join them together. This technique involves scoring into the edge with a tool like a serrated rib, or even a regular kitchen fork. Then apply some water or clay slip to the scored edge. When the two edges are pressed together the scored and slipped surfaces create a good firm bond.
Adding a Base and Handle to the Mug
The base of the mug is simply a circle of clay that is attached firmly to the base of the cylinder.
And the handle on this mug is a strip of clay cut from a clay slab. The strip is curved round into a handle shape and attached to the mug using the slip and score method described above.
I made this mug using a conical-shaped template.
Check out how I make the template for this particular mug here. And if you want to know more about how to make a range of different types of slab mugs, you can check out my complete guide here.
Project 3: Slab Vase
A slab vase can be as simple as a larger cylinder of clay with a base attached to it. This will give you a nice, rounded form.
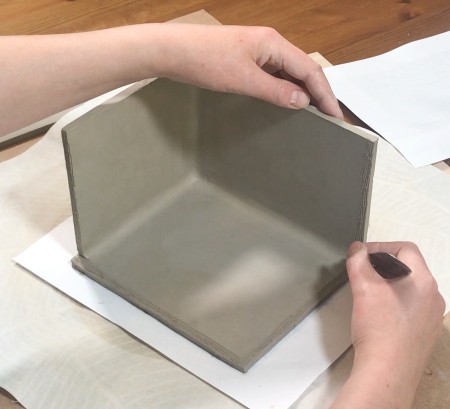
However, one of the nice things about slab pottery is that it can be used to make angular forms with straight edges like this….

One way to make a straight-edged vase like this is to cut out each section of the vase from a slab of clay. Allow the clay to stiffen up so that it is firm and board-like. This is called ‘stiff slab construction’.
At this point, you can start to join your pieces together to assemble the vase like a jigsaw. The order in which you join the sections of slab together will depend upon the overall design of the vase.
One of the fun challenges with many of these slab pottery ideas is that you need to figure out how to make bits of slab fit together nicely so that they look well-crafted.
When joining stiff slabs of clay together it is important to slip and score the edges. Because the clay has less moisture at this point, you will need to slip and score to create a good bond.
It’s also a good idea to blend a thin clay coil over the joins as this will reinforce the bond.
Project 4: Slab Teapot
Making a teapot is a little bit more involved than some of the other slab pottery ideas suggested here.
However, I’d encourage you not to feel scared of trying out a teapot. After all, you learn the most from challenging yourself!
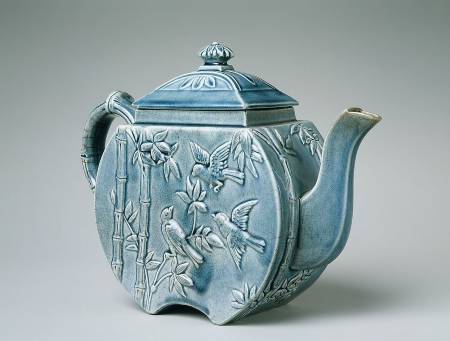
courtesy of The Met (CCO)
Slab teapots come in a huge range of shapes and designs. It would be impossible to describe all the different ways you can use slabs to make a unique teapot.
You can either find a template for a teapot that you like and follow that. Or if you like you can design your own template. The best way to do this is to make a drawing of what you want the teapot to look like. And then figure out what size each template piece needs to be to make that shape.
Then, assemble the sections of your paper template together and make adjustments so that the pieces fit together.
This is a process of trial and error. And with a more involved shape like a teapot, you may need to make a few attempts with your project before you get the measurements exactly right.
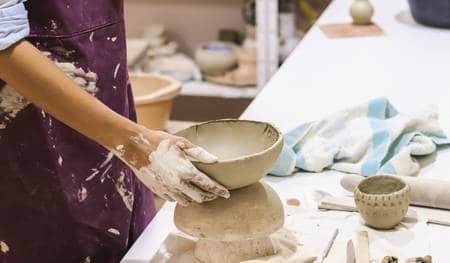
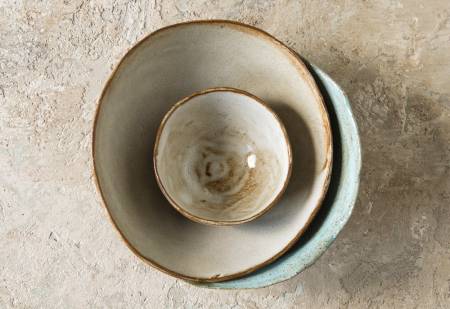
Project 5: Slab Bowls
One of the best ways to make a slab bowl is to use a mold. When using a mold, the clay slab is draped over or into a mold and allowed to firm up on the mold. That way the slab takes on the shape of the mold.
There are two main types of mold, the hump mold, and the slump mold. A hump mold is a convex shape that curves outwards, like the hump on a camel’s back. A slump mold is a concave shape that curves inwards, like the inside surface of a spoon.
Most molds are made from plaster or wood. Both of which are absorbent materials. These draw moisture out of the clay slab, and as the clay begins to dry it releases from the mold surface.
The slab bowl is removed from the mold when it is leather hard. At this point, the bowl contains enough moisture so that the rim can be refined, and other features like a foot ring or decorative details can be added.
Another way to add decoration to a slab bowl is to add texture to the clay slab before the slab is positioned on the mold.
Project 6: Slab Pitcher
A clay pitcher, also known as a jug, needs to have a spout that pours well and a comfortable handle.
The spout on a slab pitcher can be made in a number of ways. Here are just a couple of the options.
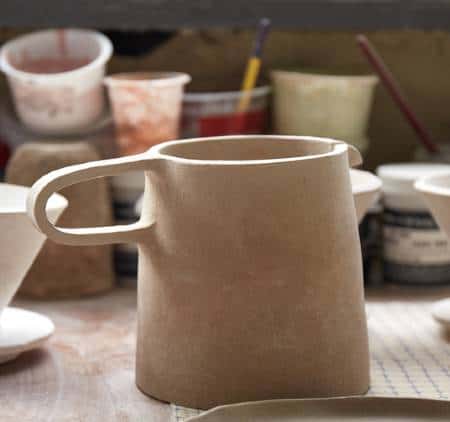
A One-Piece Pitcher
With a one-piece pitcher, the body of the pitcher and the spout are all cut out in one entire slab. The template of the pitcher body has a curved top edge. When the clay slab is cut out and put together, the curved edge of the slab acts as the spout.
The handle can be added separately, or as in this case, made out of a curved edge of the clay slab.
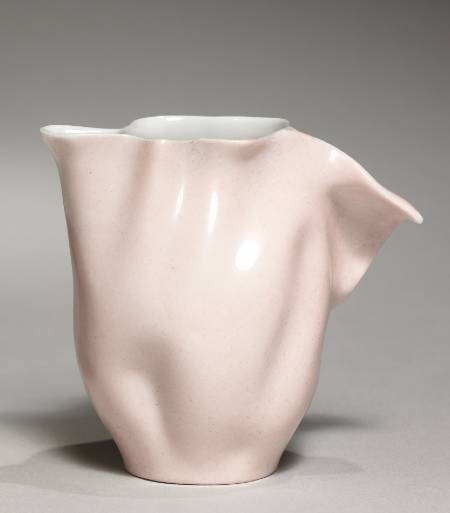
via Wikimedia Commons
A Multi-Piece Pitcher
The other option is to create the body of the pitcher using one slab (or more if you like). And then add the spout onto the pitcher body using a separate smaller slab.
Like teapots, pitchers are designed to carry quite a bit of heavy liquid, so they do need to have a strong and comfortable handle.
A pitcher and wash basin is also a lovely idea. You can check out how I make a slab pottery jug and wash bowl here, using a printable template.
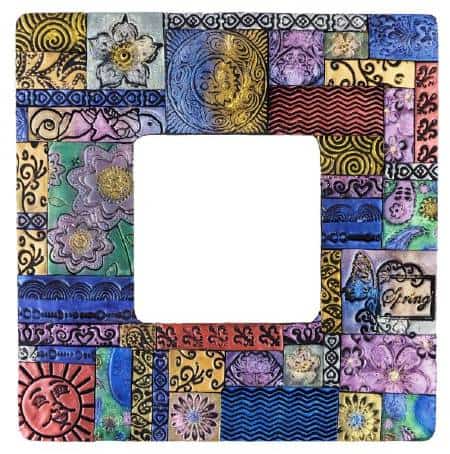
Project 7: A Mirror or Picture Frame
This is one of those slab pottery ideas where you can use either pottery clay or airdry clay. Your mirror frame does not need to be watertight, so air dry clay is fine.
There are a couple of ways to make a slab pottery mirror frame.
Technique 1
The first approach is to buy a lightweight, plain, smooth mirror frame, and use this as a base. Measure up the mirror frame, and roll out a thin slab of clay. Cut the slab so that it fits around the original mirror frame.
Eventually, you’re going to stick your own slab frame to the base frame when it’s finished. Remember that clay shrinks when it dries and is fired. So, you will need to make your slab frame a bit bigger than the bought frame you’re using as a base.
You can decorate your frame in whatever way you like. For example, you might like to have a smooth flush slab frame and decorate it with underglaze paintings or stencils. Or you might like to add texture or add some sculptural modeled details to the frame.
Once the frame is finished, this can be mounted securely on the lightweight base frame. The beauty of this approach is that you don’t have to worry about adding hooks and wires to the frame to hang it on the wall.
Technique 2
The second approach involves making the entire frame, including an inset to mount the mirror on. In addition to mounting the mirror, will need to attach some hooks and wires to the back to hang the mirror.
Project 8: Slab Teacup
Making a slab teacup is a lot like making a mug. The difference between a teacup and a mug is really a matter of size and shape. A teacup tends to be shorter and often wider than a mug.
One way to make a slab teacup is to make a simple slab cylinder shape. If you make this shorter and a little wider than a mug, then you will create something more like a teacup.
Another way to make a teacup is to use a conical-shaped template. These are templates that will enable you to cut out a slab that will make a cone shape with your clay.
If you like, you can turn a cone-shaped template upside down and create a teacup with a wider base and a narrower lip. This gives the teacup a nice squat tankard shape, like this.
A cone-shaped template is crescent-shaped, a bit like the shape of a rainbow. It’s important to get the dimensions right when making your template. This can be tricky if you are trying to draw the crescent free hand. However, it’s simple if you know how.
You can watch my video on how I make templates for conical-shaped teacups and mugs here.

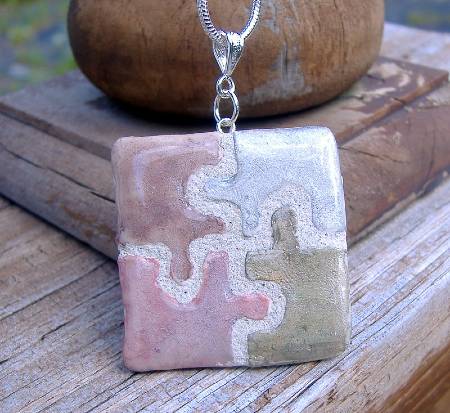
Project 9: Slab Jewelry
This project is one of the smaller-scale slab pottery ideas. You can use thinly rolled clay slabs to make unique pieces of jewelry. This can include earrings, pendants, broaches, and even decorated hairpins.
The trick to making jewelry from clay slabs is to roll the slabs thin. I would suggest rolling it to about the thickness of a match, especially if you are making earrings.
Rolling clay so thin with a rolling pin is tricky, so you might want to use a pony roller. Alternatively, you can flatten small sections of clay with your fingers and the palm of your hand.
If you like you can add texture to the clay using a clay texture roller. Textured clay looks lovely when glazed with celadon glazes. These break over the texture and create nice detail on the design. For more about breaking glazes, have a look at my guide on choosing a pottery glaze.
Cut your shapes out with a cookie cutter or cut them by hand with a clay knife. Be sure to cut them out onto a piece of fine-grained fabric so that they don’t stick to your work surface.
Because these pieces are small and soft when freshly cut, it’s best to peel the spare clay away from around the edge of the cut shape. Once they have firmed up a little you can move them onto another surface to allow them to dry fully.
Whilst the clay is still moist make a small hole in the piece. Once the clay has been fired you can thread the pieces onto a chain or an earring hook. Or you can mount them on a broach clip.
You can use a similar technique to make ceramic buttons, or custom-made drawer handles.
Project 10: A Slab Tealight Burner
One way to make a simple slab-built tealight burner is to cut out a slab of clay into whatever shape you like. Then use an object that is just larger than the base of a tealight and make an impression in the clay slab. This will act as a small dip for the tealight to sit in when the slab has been fired.
You can make a few impressions in the slab so that a few tealights can be burned next to one another.
Alternatively, you can make a small slab construction, with holes cut into the side and top. The holes act as a way of letting the oxygen in so that the tealight stays alight. And they also act as a way of letting the light from the tealight out when the candle is lit.

Be aware that if you have a tealight burning in the tealight holder, the ceramic surface will become hot. So, you need to blow the candle out and allow the pottery to cool before moving the holder.
Always put your tealight burner on a non-flammable surface.
If you are worried about fire safety, you can always use a tealight with a faux flame that runs on battery. This has the same attractive effect, without the worry about fire safety.
Project 11: A Slab Lantern
Making a lantern is similar to making a tealight holder. The difference is that a lantern is usually a bit bigger and can contain a candle. Also, they sometimes have a couple of hooks on the side so that you can attach a wire handle and hang them.
A slab pottery lantern can be made with a curved cylindrical wall. Or you can make an angular-shaped lantern out of flat slabs.
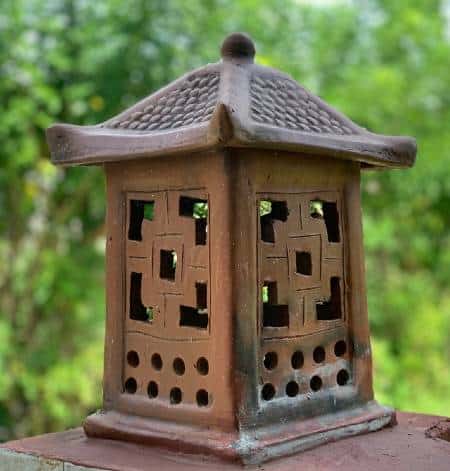
It’s up to you how many sides you want the lantern to have. You could make a triangular lantern, or a square one. If you are up for a challenge, you might even want to make a lantern with five, six, or seven sides.
However, many sides you have on the lantern, you need to cut holes in the side so that the candle can breathe, and the light can escape.
Project 12: Slab Box
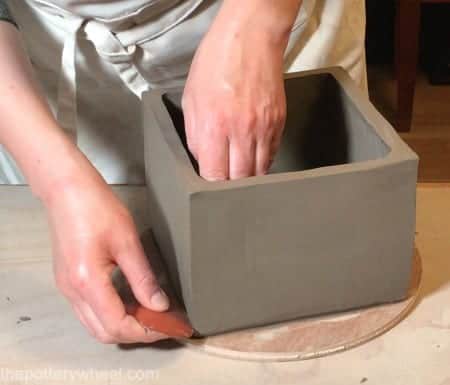
You might find that making some of these slab pottery ideas feels a little bit like carpentry or construction. This is especially true of angular projects like ceramic slab boxes.
Before you start making a slab box, it’s a good idea to figure out how big you need each slab to be before you start cutting the clay. This will ensure that the pieces fit together, and you can build a square or rectangular box that is evenly proportioned.
When I’m building a slab box, I draw out the design free hand. I then make a paper template and figure out my measurements on paper.
Once I’m happy with the measurements, I transfer the template onto craft foam. Craft foam is great because it doesn’t absorb water from the clay in the way that paper does and can be used again and again.
It’s easiest to build a slab box from clay that has firmed up. I don’t wait until the clay is leather-hard. However, I do wait until the clay is firm enough to pick up without bending and flopping too much.
When you have assembled the box, you can tidy up the outside surface and create a nice smooth slab box.
Or if you prefer, you can create a textured box like the one below.
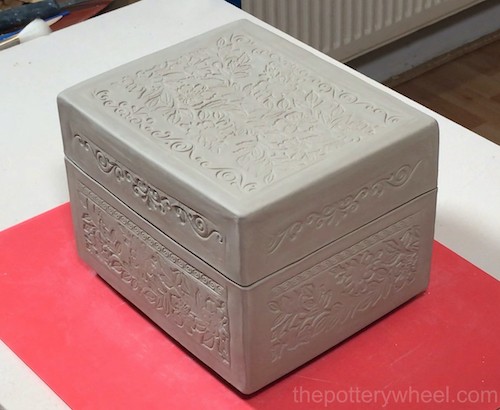
I have made a complete easy-to-follow step-by-step guide on how to make a slab box, which you can check out here.
You can also download some FREE templates to make these slab boxes above here if you’d like to give them a go…
The great thing about slab boxes is that you can use the techniques to make lots of different functional items, from a keepsake box to a butter dish.
(CC BY-NC-ND 2.0)
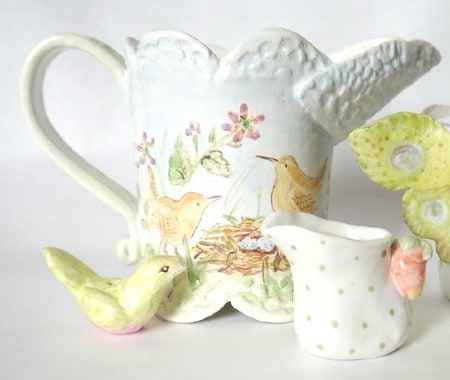
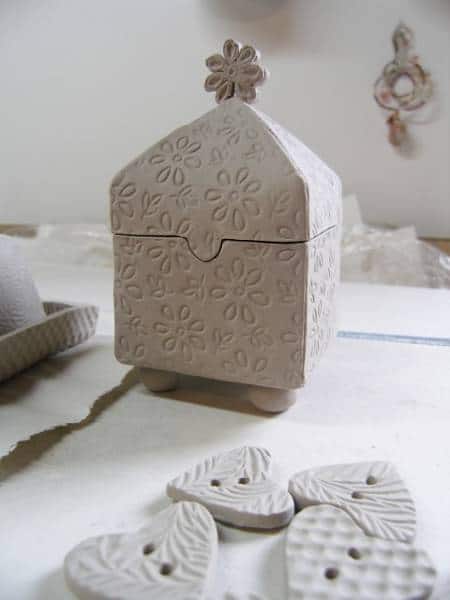
Project 13: Slab Pottery Birdhouse
In reality, making a birdhouse is the same as making a ceramic slab box. The difference is that you have a hole in the front for birds to fly in and out of.
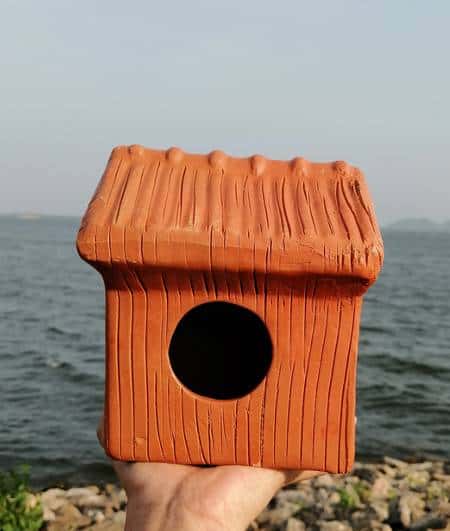
However, this is one of my favorite slab pottery ideas. It’s a joy to place a handmade birdhouse in your backyard and see birds nesting in the home you made for them.
There are a few things to bear in mind when making a birdhouse. The first thing is that the size of the hole in the front of the birdhouse will affect the types of birds that nest in the house. Check out the size of the hole that your local birds need.
The second thing is that at least one side of the birdhouse needs to be removable. This is so that you can clean out the nest once the birds have left. Birds don’t like to nest a second time in an old nest (source).
In addition to the above, make a few holes in the bottom slab of the birdhouse when the clay is still moist. These should be about 1/4 inches each. This will help any moisture drain out of the birdhouse and keep the birds home comfortable.
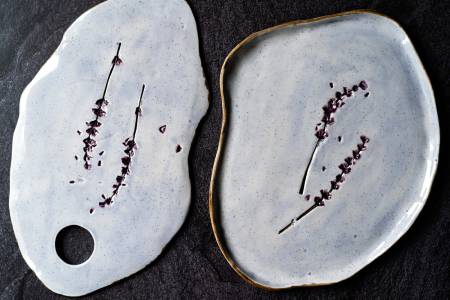
Project 14: Slab Platter
A platter can be made from a slab of clay in much the same way that you would make a plate. To my mind, the difference between a platter and a plate is that a platter is bigger and usually longer than a plate.
You can buy wooden or plaster platter molds. These can be used as hump molds, where the clay slab is draped over the mold and shaped around the mold using your hands. Or you can use these molds as a press molds too. With this technique, you press the clay slab with the mold into a block of foam.
However, the simplest way to make a slab platter is to make the dish free hand. Simply roll out the slab of clay. Cut the shape that you want out of the slab. You can use a template or cut the shape out freehand. Then use your fingers and thumbs to curve the rim of the platter upwards. Once the clay is firm enough, you can refine the rim so that it is smooth and doesn’t have any burrs or sharp edges.
You can add texture to the platter using a texture roller or a clay texture mat. Or you can carve into the slab using some sgraffito tools.
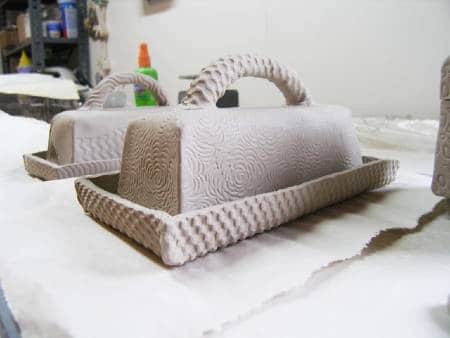
Project 15: Slab Butter Dish
There is a couple of ways that you can make a classic-looking rectangular butter dish.
Method 1
Use the ceramic box technique outlined above. With this approach, you cut out individual squares from a clay slab. Each square (or rectangle) is one side of the butter dish.
The sections of the slab are then joined together, and the box is assembled like a carpentry project.
Method 2
Alternatively, you can fold one single slab of clay into a rectangular box shape like making a piece of origami.
Folding clay slabs is another way to create boxes, bowls, and containers instead of assembling them piece by piece. When folding a clay slab, it’s best to use a template, so that you know your clay will fit together well.
To make a rectangular butter dish, you will need a template that looks something like this…
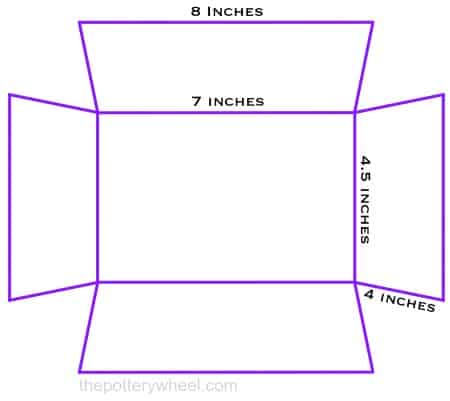
You can design your own template and play around with the measurements to get exactly the size and shape that you want.
I usually try shapes and measurements out using a paper template. Then when I like the proportions, I will commit the template to craft foam.
Once you have your template, cut out your slab of clay. You can then fold the clay slab into the shape you want it to be and join the edges with score and slip.
Because the slab is soft, you will need to drape it onto or into a mold as you work. You can make a simple plaster mold to support the slab. Or you can find an object around the house that’s the right shape to support the clay as you join the edges.
When the clay is leather hard you can remove it from the support and tidy up the edges and joins.
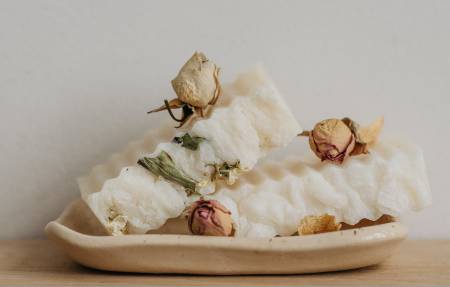
Project 16: Slab Soap Dish
As with all these slab pottery ideas, there are lots of ways to approach making a soap dish. You can get as creative and inventive as you like.
When making a ceramic soap dish, there are a couple of things to keep in mind. The first thing is that it helps if the soap dish has some way of draining liquid. Otherwise, your soap will be sitting in a puddle of water and getting soggy.
There are different ways to create a draining surface. Either you can carve channels into the clay slab, so the soap is sitting on a grid-like surface. Or you can cut holes into the slab so that the water drains away out of the bottom of the dish.
The other thing to bear in mind is to make the soap dish level on the base and reasonably small. Soap dishes can easily slide off the side of your sink and fall into the basin. A ceramic soap dish is likely to break if it slips into your sink. So, when I make soap dishes, I try not to make them too bulky.
Project 17: A Slab Tray
Making a slab pottery tray is a little like making a platter. Trays are large flat slabs of clay, usually with a slightly curved lip to stop items from sliding off them when they are being carried.
Trays are normally square, rectangular, or oval in shape. But you don’t have to stick to convention and can make a tray whatever shape you like. Just be mindful that pointed edges and corners are vulnerable to cracking when drying and being fired. And they are easily chipped when the tray is being used.
One of the key things about making a tray is to dry and fire it without the clay slab warping. Warping is when the clay curls and bends, losing its intended flat shape. One of the challenges of making slab pottery is to prevent the clay from warping.
There are a few things to do to avoid warping. Here are some tips that may help…
- Dry the tray slowly and evenly to avoid the edges drying out faster than the center of the slab.
- Bundle up some rice in an old piece of fabric and tie the fabric with an elastic band. This creates a soft round weight that you can put on the center of the slab as it firms up. The weight of the rice prevents the clay from beginning to bend as it dries.
- Cover the tray with plastic until it’s firm enough to move without bending.
- Once the tray is leather hard, transfer it to a metal grid or cooling rack for cakes. This will allow air to flow underneath and circulate the whole tray.
- Keep the clay covered in plastic until it’s almost bone dry.
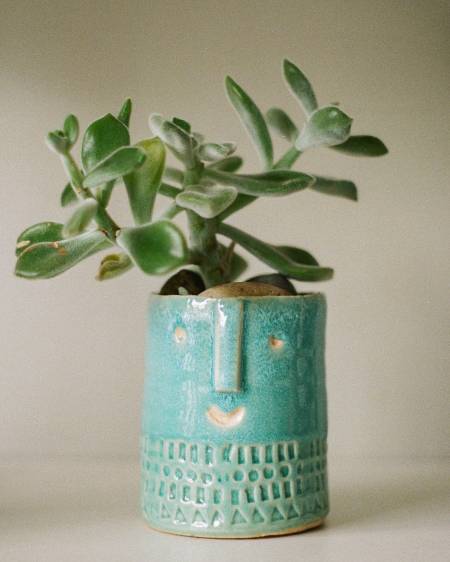
Project 18: Slab Flower Pot or Planter
A basic flowerpot or planter is a simple enough slab pottery project. Planters are typically either round or square. So, a basic planter is either a slab cylinder or a slab box.
However, you can really build upon these simple ideas and make some fantastically decorative plant pots for your home or garden.
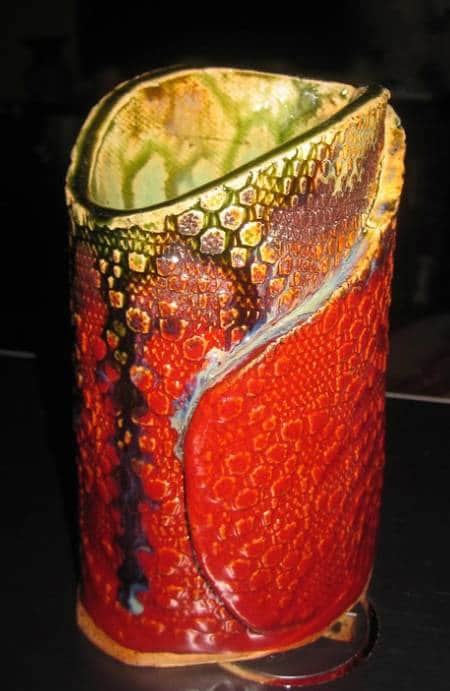
Project 19: Slab Pencil Holder / Desk Tidy
A pencil holder or a desk organizer is a good option if you are using air dry clay. This is because neither of these items needs to be watertight. They just need to be strong enough to hold your stationary in place.
If you have a flair for painting, then you can make a simple slab cylinder shape and treat the smooth surface as your painting canvas.
Alternatively, you can add texture to the clay and curve the slab around overlapping the slab to create a visible seam. When making slab pottery, you don’t have to blend the seams in to make a smooth surface. Lots of potters will leave the seams visible and include them in part of the charm and design of the piece.
Project 20: Sculpture and Modeling with Clay Slabs
Strictly speaking, sculpture and pottery are different. Exactly how they differ is a bigger question that I won’t get into here. However, there is a cross-over between clay sculpting and pottery. So, I wanted to include sculpture in this list of slab pottery ideas.
One of the beauties of sculpture is that it’s often a purely artistic form. Sculpture doesn’t need to be functional (though it can be).
It’s possible to make sculptures from clay slabs. Exactly what you want to make would be guided by your own creative impulses.
Tip
Smaller delicate features are prone to cracking as your clay dries or is fired. It can help to use paper clay when you are modeling with fine clay slabs. Paper clay contains paper fibers that give the clay extra strength and help it to dry quickly and evenly.
Project 21: Slab Pottery Clock Face
Making a ceramic clock may seem daunting, but as slab pottery ideas go, they are actually quite simple. The first thing to do is to buy a clock mechanism. These are surprisingly inexpensive usually costing around $10.
To make an average-sized wall clock, roll a slab of clay about 12 inches in diameter. The actual size of the clock face depends on the length of your clock arms. Plus, you need to factor in that clay shrinks when it dries. So, make the clock face a bit larger than what you need it to be.
You need to roll the slab quite thin, as it is going to be the face of the clock. It’s best if the clock face is not too heavy, so aim to roll the slab to be about 1/8 of an inch thick.
Typically, a clock face will be circular. You can cut a circle out of your clay slab using a circular template, as you would if you were making a slab plate. You can read my step-by-step guide on how to make a ceramic slab clock here.
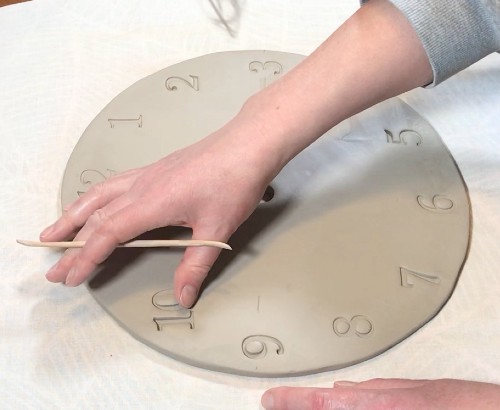
The stamps that I use on my slab clocks are made by Relyef. They are great stamps as they leave a nice clean impression and come in a good range of sizes and styles. You can buy these number stamps here.
However, there is no rule that says a clock face has to be circular. You can get creative and make the slab clock in whatever shape you like.
Make a hole in the center of the slab. The arm of the clock mechanism will go through this hole, so make sure the hole is large enough. Remember that the hole will be smaller when the clay has dried and been fired.
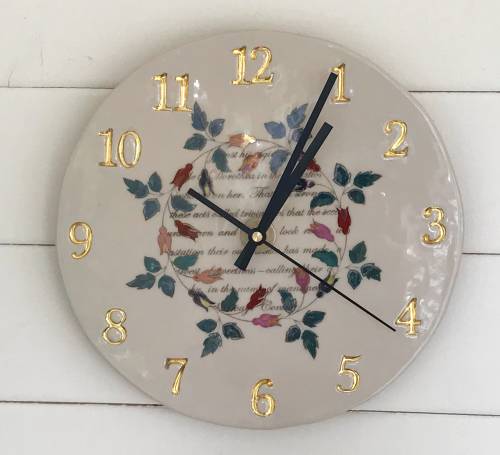
How you choose to decorate the clock face is up to you. Once the clock face has been decorated and fired, you can mount the clock mechanism.
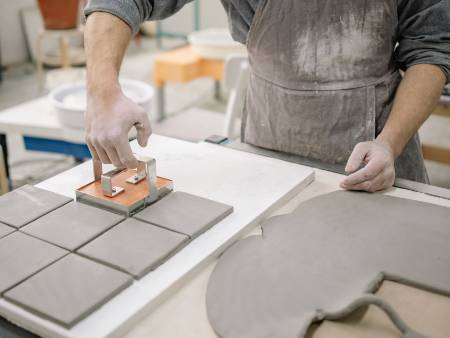
Project 22: Slab Wall Tiles
Making wall tiles is perhaps one of the most obvious slab pottery ideas. This is because a wall tile is really just a slab of clay that has been cut to size.
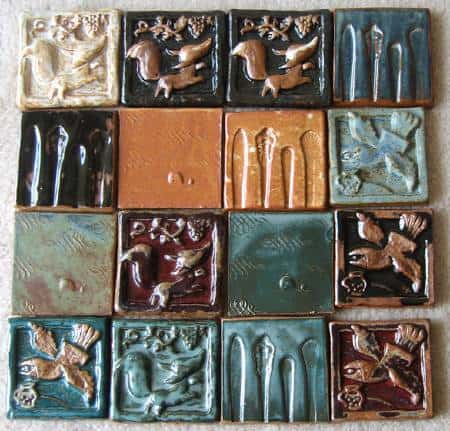
Image is cropped.
(CC BY-NC-ND 2.0)
This sounds simple enough, but there are a few tips to making the process easier.
Firstly, it’s a good idea to use rolling sticks when you are rolling out your clay slabs to ensure that your tiles are of the same thickness. If you have access to a slab roller, that will help you make slabs of an even thickness. But, you can make slabs with an even thickness using rolling sticks.
Secondly, you can make the process of cutting out your wall tiles easier using a clay tile cutter. There are a few types of tile cutters available. Amaco makes a tile cutter that you can roll over your slab. The edges of the cutter ensure that the strips of clay you cut out have a consistent width.
Alternatively, Scarva makes a tile cutter that works a bit like a cookie cutter which you press into the clay.
The third thing to be mindful of when making wall tiles is to dry the tiles slowly and carefully. Like slab plates, tiles are notorious for warping when they dry. This is because the edges of the slab dry more quickly than the center.
To avoid warping, it can help to sandwich the tile between a couple of sheets of drywall or MDF board at the start of the drying process. This will help even out the drying process.
Once the tiles are leather hard, you can then transfer them onto a metal grid-like an old cake cooling rack. This allows air to flow around the whole of the tile and helps even out the drying process.
Project 23: Slab Coasters
Coasters can be made in much the same way as wall tiles. The only difference is that with coasters you are not under as much pressure to make a set with exactly matching measurements.
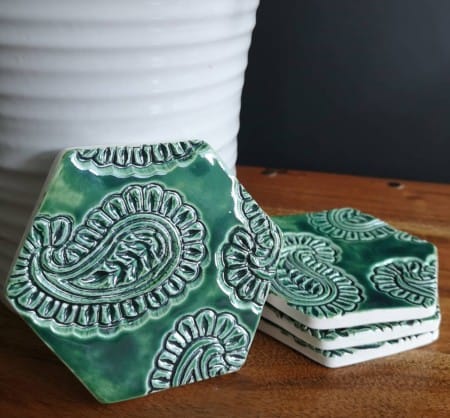
One factor to bear in mind when making coasters is that they will be resting on your tabletop. So, it’s a good idea to sand the underside of the coaster before you use it. Any sharp bits of clay will easily scratch a polished wooden table top.
You can sand clay when it is bone dry, bisque fired, or once it has been glazed. For tips on how and when to sand your pottery, check out my guide here.
Project 24: Slab Incense Burner
There are lots of different styles of incense holders. You can make a very simple incense burner by cutting out a strip of clay from a slab, and making a small hole in the strip to support the incense stick.
However, an incense burner can really be any shape or size, provided it does the job of supporting the incense stick. In addition, it helps if it’s designed to catch the falling ash from the burning stick.
That’s why slab pottery lends itself so nicely to this particular project. You can shape your slab in whatever way you like. And you can gently curve up the edges of the slab if you like to catch fallen ash.

Project 25: Slab Built Cake Stand
Making a cake stand is one of my favorite slab pottery ideas. To make a slab cake stand, simply roll out a slab of clay and cut out a circle.
Whilst you are allowing the slab to firm up, cut out a rectangular clay slab. Curve the clay rectangle around and blend the seams together to make a cylinder.
The cylinder is going to be the stem on which the cake stand rests, so it needs to be reasonably wide. A wide stem will ensure that the cake stand does not wobble. Alternatively, you can make a conical-shaped stand, and use the widest part of the cone as the foot of the stand.
When the slab plate and the stand are both soft leather hard, join them firmly together using score and slip.
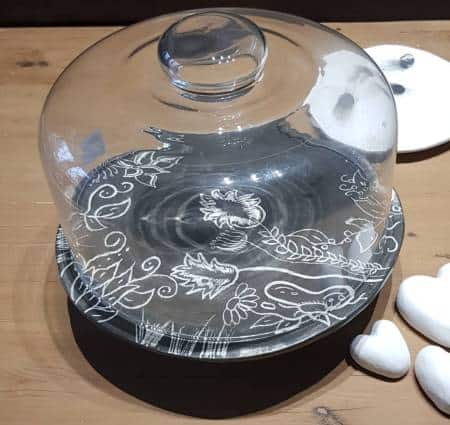
Photo courtesy of Candice Meistre
You can also add a strip of slab clay to the edge of the slab circle. This can function as a rim to stop your cake from sliding about on the stand. It can also act as a decorative skirt hanging down from the slab stand.
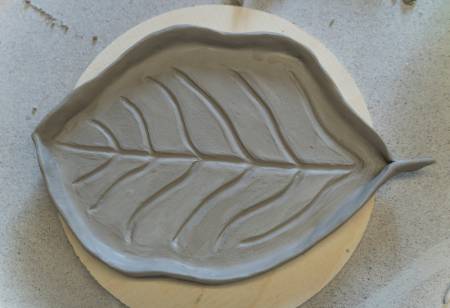
Project 26: Slab Ring / Jewelry Dish
To make a simple ring dish, you can roll out a slab of clay and cut out a small circle in the slab.
Tidy up the edges of the slab a little with a damp potters sponge. Then curve the edges up a little as if you were making a very small slab plate.
Alternatively, you can get creative and cut your slab into whatever shape appeals to you.
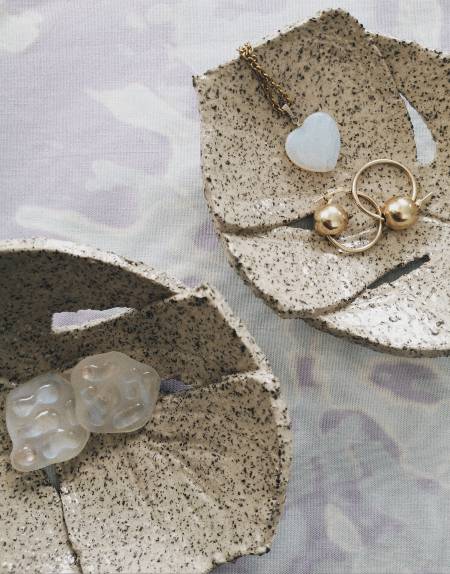
To make a ring dish like this one, cut out your slab into the shape of a leaf. Then drape the slab into a concave surface.
As you drape the slab into the mold you can carefully fold the tips of the leave over one another and press them gently so that the clay bonds together.
If you have a concave pottery mold then that is great. But if you don’t, then you can drape the slab into an ordinary kitchen bowl.
If you are using a kitchen bowl, cover the inside surface of the bowl with some saran wrap. This will enable you to lift your slab ring dish out of the bowl easily once the clay has firmed up.
Like each of these slab pottery ideas, a ring dish can be as simple or as detailed as you want it to be. Provided your piece is well crafted this project can make a lovely gift. Or a nice way to tidy up your dresser.
Project 27: Slab Wall Hanging
Last on my list of slab pottery ideas is making wall art. There is no limit to the way that ceramics can be adapted to work as hanging wall art.
A slab could be used as a canvas to be painted upon. The clay can be texturized and glazed. Or you could use the slab as a base and add modeled details on the surface of the slab.
Alternatively, you could use multiple slab pieces and arrange them together.
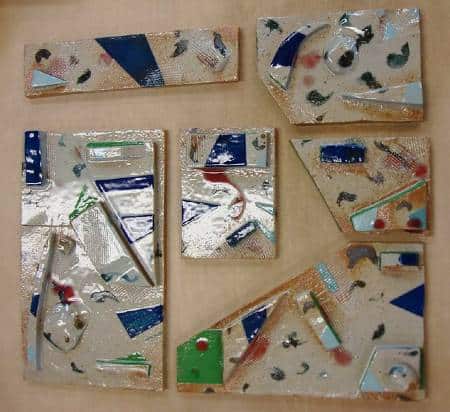
Image is cropped
(CC BY-NC-ND 2.0)
Final Thoughts
I hope you’ve found some inspiration from this list of slab pottery ideas. It’s by no means exhaustive. Slab pottery is versatile and once you’ve got the hang of working with slabs you can make most things. So, the options are almost endless. But hopefully, this article is a starting point to get your creative cogs turning.


