If you are learning about firing pottery, you may have heard the term ‘pottery cone’ or ‘ceramic cone’. But what are cones in pottery and how do they work?
Cones are small pieces of ceramic material shaped like tall pyramids. They are placed in a kiln when it fires. Cones bend over as the kiln heats up, and the amount the cones bend tells you how hot the kiln has become. They also let you monitor if the pottery was fired for long enough too.
Pottery cones are sometimes called pyrometric cones. Hamer and Hamer define pyrometric cones as ‘elongated three-sided pyramids, 2cm-8cm tall, which are placed inside a kiln as a measurement of heat-work’. I say a bit more about heat work here.
Cones Before and After Firing
Cones come in different shapes and sizes. The most common shape for a cone is a tall, thin, three-sided pyramid shape.
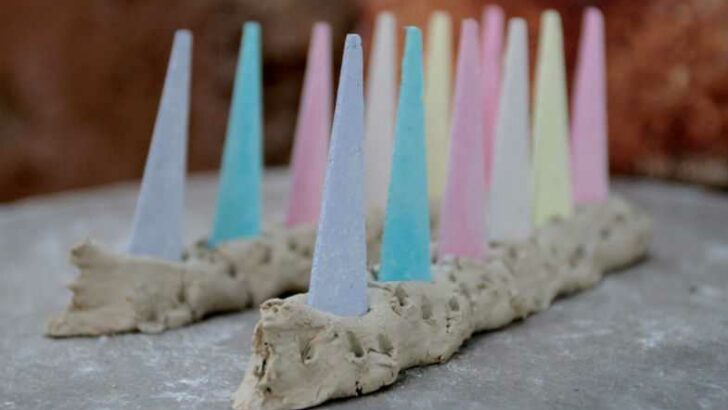
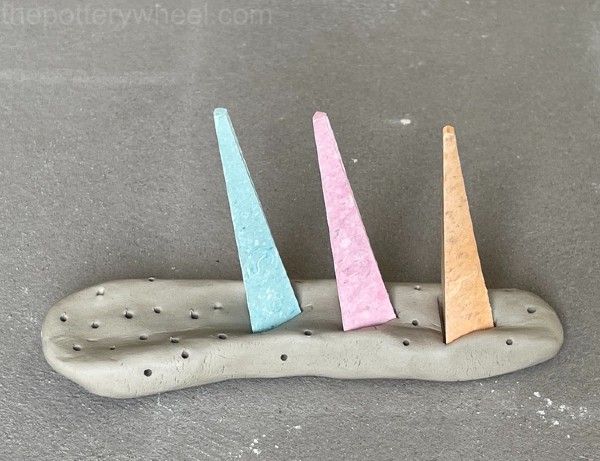
They come in different sizes. Some are smaller and can be propped up in the right position by pressing them into a strip of clay. This is sometimes called a cone pack.
Others are larger and have a wider base. These are self-supporting cones and will stand on their own without being pressed into clay.
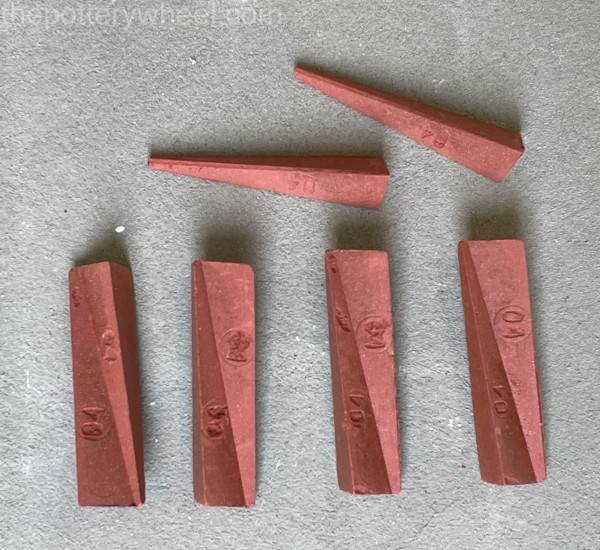
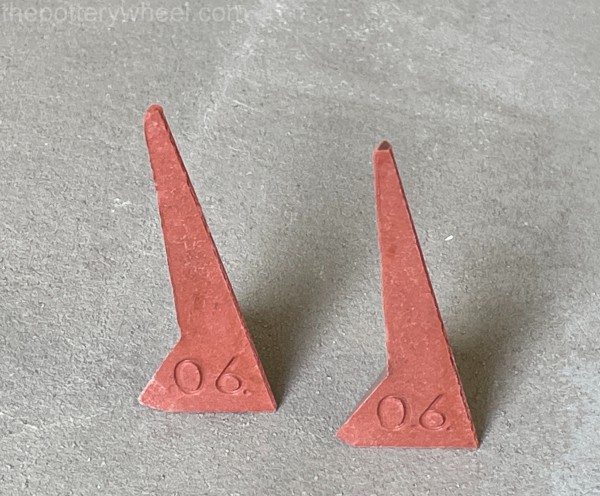
Ceramic cones that are made to measure temperatures up to 2134F (1168C) are a dark red-brown color. This is because they contain a lot of iron. When you buy them they are joined together in blocks of two. You need to gently separate them by snapping the block in two.
Cones that are used to measure temperatures above this come in a range of different colors. The different colors show the different temperatures at which the cone will melt. The cones below are supported in a strip of clay and is called a cone pack.
Before being fired the kiln cones will be upright and straight. When the kiln has been fired, the cones will have bent over like the ones on the left of this picture below.
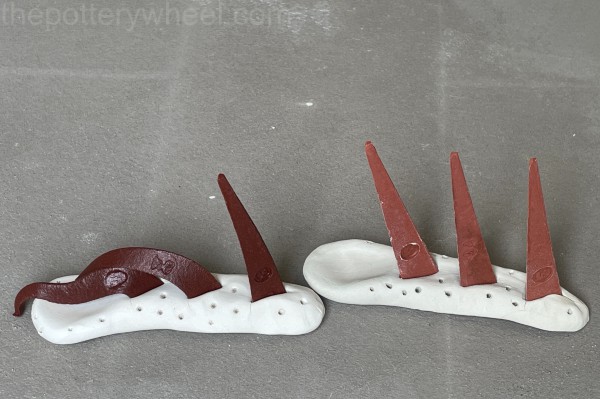
I will say more about why these cones have bent a different amount later in a section on using cones.
Why Are Cones Important When We Fire Pottery?
Cones tell us whether pottery has been fired correctly. There are different types of pottery clay, and these types of clay need to be fired at different temperatures.
The temperature at which a clay should be fired depends on the elements and minerals it contains. When clay is fired at the right temperature, it is said to be mature. This means that it is as hard and strong as it can be.
Some clay will mature at lower temperatures, whilst other clay will mature at middle or higher temperatures. I’ll say more about different temperature ranges later.
Higher temperatures don’t always mean stronger clay. Clay that has been fired at a temperature that is too high for that clay body can be overly dense and brittle.
Glazes that are fired to high can lose their color or have blemishes like pinholes. These blemishes are called glaze defects. Firing your pots too high is called ‘over-firing’.
Similarly, clay that is fired at a temperature that is not high enough will not mature and will be porous and weak. This is called ‘under firing’.
Each clay body has a ‘target temperature’, or a range of temperatures that it can be fired in. Pyrometric cones help us know if that temperature has been reached. The cones bend as the kiln heats up.
If the cones are too bent, then you know that the pottery is over-fired. But if the cones aren’t bent enough you know that the pottery is under-fired.
Pottery Cones and Heat Work
When clay is fired, it goes through many physical and chemical changes. These changes happen because of the heat, but they also happen because of the amount of time the clay is in that heat.
Pottery doesn’t just need to reach a target temperature, it also needs to reach that temperature over some time. This gives the clay time to go through the necessary changes. The heat plus the amount of time the clay is fired is called ‘heat work’.
A helpful way to understand heat work is to liken it to baking a cake. When baking a cake, it’s not enough for the oven to reach 356F. If the cake is to be fully baked, it needs to be in the oven for 30 minutes or so. It’s similar to pottery, the clay needs to spend a certain amount of time at a particular temperature to be fired correctly.
Positioning the Pottery Cones in Your Kiln
Pottery cones can be positioned in different places in the kiln. Sometimes the cones are placed next to the spy holes on a kiln and can be checked whilst the firing is taking place.
Spy holes are holes in the side of the kiln that let you look at what’s going on during the firing process. Sometimes they are called peep-holes.
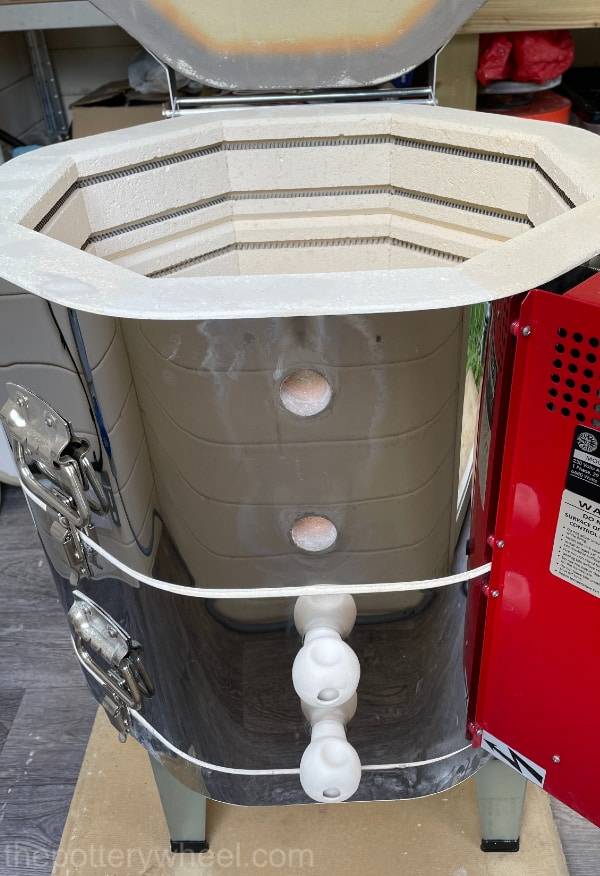
If the cones are placed by the peep hole, you can see how much the cone has bent over as the pottery fires. It’s important to wear kiln safety glasses when you look in a peep hole to protect your eyes from infrared radiation.
Do You Need to Use Cones in an Electric Kiln?
Most kilns these days can read the temperature of a kiln during a firing schedule using a sensitive thermometer-type gadget called a thermocouple. The thermocouple goes through the wall of the kiln and pokes into the firing chamber.
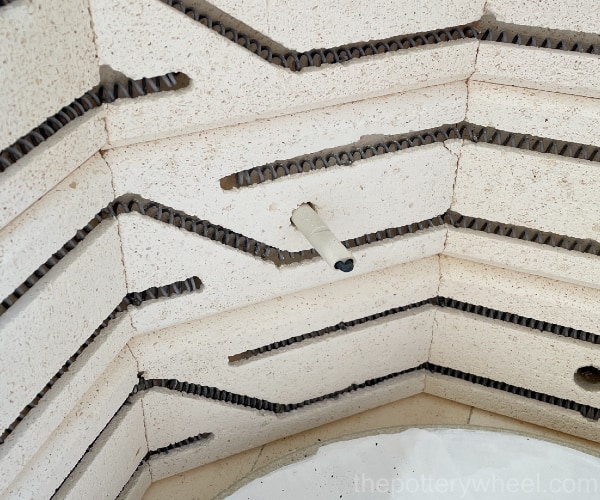
Information from the thermocouple is then visible on a digital screen on the side of the kiln. In addition to this, electric kilns can be programmed to fire according to a particular firing schedule, so you know that the pottery is fired correctly.
You may wonder why cones are necessary if the kiln firing schedule is digitally controlled and recorded. Well, cones are helpful even in electric kilns because they can tell you if your kiln is working properly.
Electric kilns are heated up by metal coils that run around the inside edge of the kiln. These are called elements. Over time elements become less efficient and eventually need replacing.
If an element is failing, it will cause a cool spot in a kiln. This means that one shelf in your kiln may not get as much heat work as the rest of the kiln. If you use pyrometric cones on each shelf, this will tell you if there are cool spots in your kiln.
So, cones don’t need to be positioned right by the spy hole. They can be used on each shelf and positioned wherever it is convenient between your pots.
The Pottery Cone Chart
As mentioned above, cones that are used to read temperatures below 2134F (1168C) are brown. Cones above that temperature are a different range of pastel colors before they are fired.
In addition to being different colors, each cone has a number impressed on the side. This number refers to the temperature at which it bends.
Pottery cones are made by a company called Orton, and cones are sometimes called Orton cones. It can be helpful to get an idea of the range of cones and their temperatures by looking at the Orton Cone Chart.
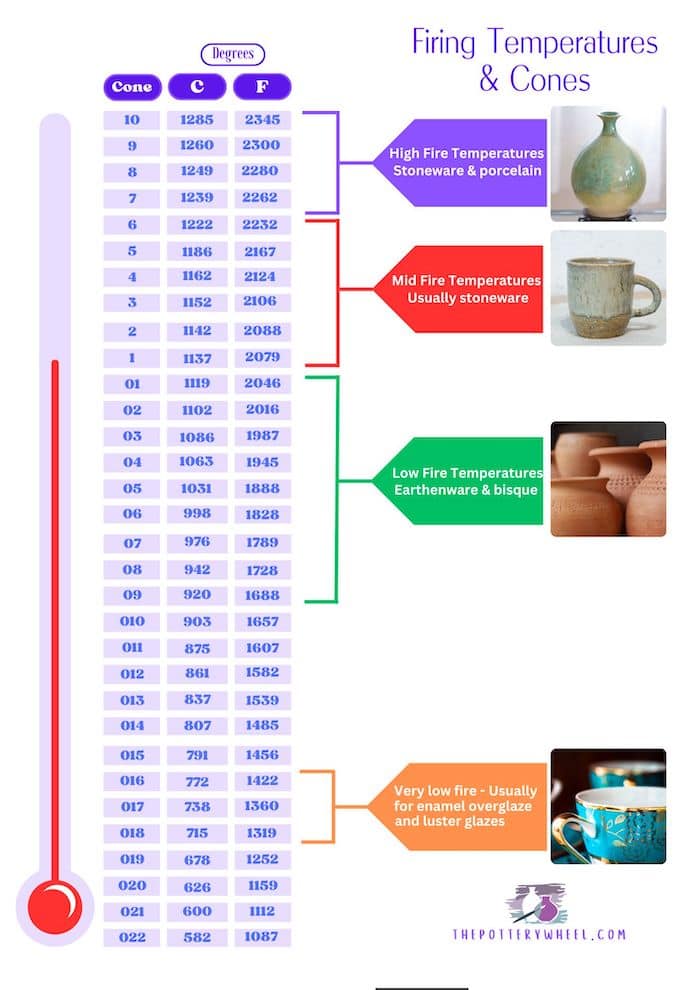
The range of cones and temperatures on the cone firing chart can be a bit baffling when you are starting. So, here is a bit of an overview that will hopefully help.
There is a range of cones to measure a range of temperatures. And the cones within the range have different numbers. The numbers start at 022 and go all the way up to 14.
Cone 022 might sound like a higher cone number than 010. However, the cone numbers that start with a zero (eg 014) are like negative numbers. The zero is a bit like a minus sign. So, 022 is lower than 020, just as -22 is less than -20.
When the cone numbers get to 1 and above, they can be thought of as positive numbers. So, cone 6 is higher than cone 1. A visual graphic can help get an idea of what this looks like…
Using The Pottery Cone System
The cone system described above is so important in firing pottery, that clay and glaze are often classified in terms of the cone temperature that it is fired at.
For example, you will hear potters talking about a ‘cone 6’ clay or ‘cone 5 glaze’. They might say that they are firing at a cone 10 temperature or at cone 10.
When you are choosing what cones to use, you need to know the temperature your clay and glaze should be fired. This information will always be included in the manufacturer’s information.
For example, if you spot a type of clay on a website that you like the look of, take a look at the description. It will also tell you the temperature at which it should be fired.
This information is usually given as a temperature range, say 2232 – 2381F (1222-1305C). However, the firing temperature will often also be given in cones, for example, cones 6-10. That means that the clay will mature at temperatures between cone 6 and 10.
You then need to decide what temperature in that range you will fire the clay at. Let’s take the example of the clay that is labeled cone 6-10. If you want to fire your clay at cone 6, then you need to choose the right pyrometric cones. In the next section, we will look at choosing the right cones…
What Pottery Cones to Use
You should use three cones next to each other on each shelf of your kiln. Let’s say your pottery supplier has recommended that you fire your particular clay at 2232F (1222C). This is cone 6 on the cone temperature chart.
You should use the cones 5, 6, and 7 positioned in a row. The easiest way to position them in a row is to press them into a small sausage of clay. I have a guide on how to make cone packs here.
When the kiln is firing, cone 5 will be the first to bend, as it melts at the lower temperature of 2158F (1196C). Cone 6 will fall next and cone 7 will bend last.
The amount that the cones bend depends on the heatwork that they receive. When a cone gets the ‘right amount’ of heatwork, it will bend to the point where it is just touching the clay sausage supporting it.
If it gets too much heatwork, it will become completely flat. And, if it doesn’t get enough, it will only bend a little.
So, by looking at your fired cone pack you can tell if the kiln was hot enough for long enough. Ideally, with a cone 6 firing, the cone with the 6 stamped on it will bend over to the point where it’s just touching the support. Like in this picture…
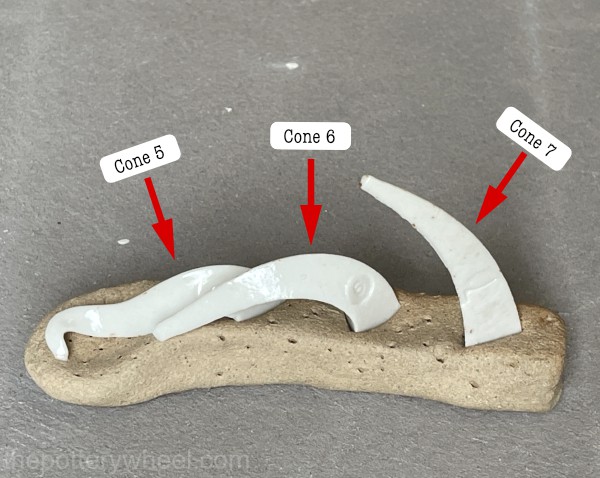
In this picture, cone 5 flattened completely, and cone 6 bent over just the right amount. And cone 7 didn’t bend much at all. This tells us that the kiln fired to the right cone 6 temperature.
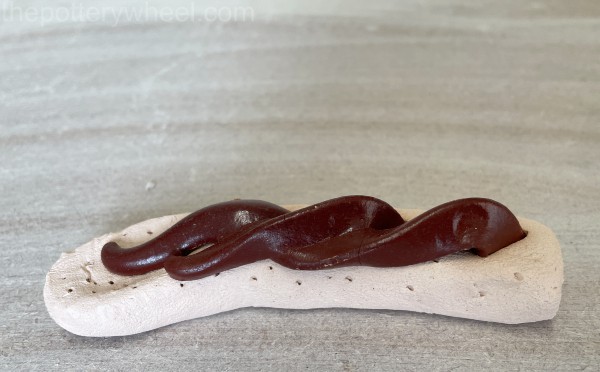
In the picture below, all the cones have flattened out. The middle cone was cone 06, and the cone pack shows that the kiln was hotter than intended.
Pyrometric Cones and Temperature Firing Ranges
I mentioned earlier that the cone system ranges from cone 022 at the bottom, to cone 10 at the top.
This is only partly true. Most potters fire at temperatures that are cone 10 or below. I usually fire at cone 6. But some potters fire at higher temperatures up to cone 14. Some industrial products are fired between cone 13 and cone 42.
Very Low Cones
Cones at the lower end of the spectrum are usually used for firing specialist glazes like over-glaze enamels or metallic luster glazes.
When firing overglaze enamels, the pottery has already been fired at a higher temperature. The overglaze is painted onto the glazed surface, and the pot is fired again at a lower temperature, often around cone 016 or 017 to fuse the overglaze to the original glaze.
Low Fire Cones
These cones are in the 06 – 04 range. They are used for bisque-firing pottery and also for glaze-firing earthenware clay.
Mid Fire Cones
The mid-fire range is between cone 4 and cone 7. This is the stoneware range of temperatures. Usually, stoneware pottery is glazed at either cone 5 or 6.
High Fire cones
The high fire temperature ranges are between 8 and 10. Some stoneware clay and a lot of porcelain clay are fired at this higher end of the spectrum.
| Temp range | Cone | F | C |
| Very low fire | 022-013 | 1112-1566F | 600-852 |
| Low fire | 012-02 | 1623-2048 | 884-1120 |
| Low/mid fire | 01-3 | 2079-2134 | 1137-1168 |
| Mid fire | 4-7 | 2157-2264 | 1186-1240 |
| High fire | 8-14 | 2305-2530 | 1263-1388 |
What are Pottery Cones Made of?
Cones are made of ceramic materials. They also contain fluxes. Fluxes are materials that lower the high melting point of the glass-forming components in the clay. The more flux a cone contains the more quickly it will bend. Therefore, cones with different numbers will contain different amounts or ratios of flux.
The contents of the cone are designed to match the behavior of different clays or glazes.
Different Types of Ceramic Cones
Cones come in different shapes and sizes, including the following…
Small Pottery Cones
These are the cones that we’ve been talking about so far in this article. They are small, pyramid shape pieces of ceramic material, that are usually pressed into a strip of supporting clay to make a cone pack. You can also buy small ceramic supports that will hold small cones upright.
Self-Supporting Cones
These cones are also pyramid-shaped, but they are larger and wider at the bottom, so they are free-standing. When a large self-supporting cone is fired at the right temperature, it will bend over enough so that the tip will touch the surface of the kiln shelf.
Bars
These cones are normally used with kiln sitters. A kiln sitter is a mechanical device that switches the kiln off when it’s reached the right temperature.
The bars are the shape of small oblongs. They are held between two rods on the kiln sitter. When the bar has bent or sagged enough, the kiln sitter turns off the kiln. You can read more about kiln sitters here.
Rings
Another way of measuring heat work is to use a ring. These are hollow rings that contract during firing. The amount by which it contracts indicates how much heatwork has been done to the pottery ware. A gauge measures how much the ring has contracted.
Final Thoughts
As technology moves on, kilns become more sophisticated. Many kilns can now be controlled remotely by wi-fi. This is a far cry from when kiln workers had to stoke wood-burning kilns overnight to keep them burning. The first type of pyrometric cone was invented back in 1886 (source).
I love the fact that even though technology marches on, we still use pottery cones to help us fire our pots. Digital controllers are great, but you can’t beat the satisfaction of a perfectly bent pyrometric cone

