Your cart is currently empty!
Texture Mats for Clay – How to Make a Clay Texture Mat
Published:
Last Updated:
Affiliate Disclaimer
As an affiliate, we may earn a commission from qualifying purchases. We get commissions for purchases made through links on this website from Amazon and other third parties.
I love adding texture to pottery clay and there are countless ways to do this. However, one of the simplest and most satisfying ways to add some interest is to use texture mats for clay.
These are pieces of flexible rubber that have a texture on them. They can be pressed onto your clay to leave an exact impression of the texture.
For a long while, I’d been using texture mats that I had bought through my pottery supplier. These are great and I love them.
However, I wanted to add some texture to the inner circle on some slab plates that I had made. And I couldn’t find anywhere to buy circular clay texture mats.
So, I decided to make some of my own. After a bit of trial and error, I figured out a very simple way to make my own texture mats. And this is how I make them…
Table of Contents
show
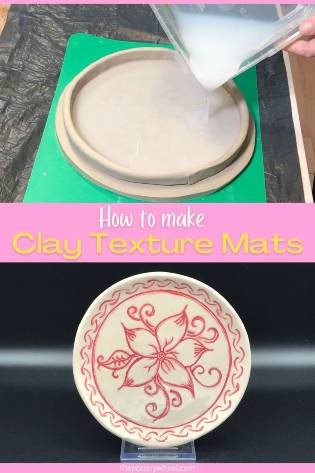
How to Make Texture Mats for Clay
The process is very simple, but it does involve a few easy-to-follow steps. First, let’s take a quick look at some of the things you will need to make your own personalized texture mats.
Why not save this guide for later too?
You will need:
- Paper
- Pencil
- Pottery clay
- Rolling pin
- Rolling sticks
- Some fabric to roll your clay on
- A silicon mold-making kit
These are the steps that I took to make this clay texture mat and a sample plate that I made using the mat…
Step 1 – What Size do You Need the Texture Mat to Be?
Think about the size and shape of what you are going to use the texturizing mat to decorate.
For example, perhaps you want to make a round mat to decorate the inside of a plate. Or you may want to decorate the side of a slab box.
Whatever you plan to use the mat on, check the measurements so you know how big you need to make your design.
The good thing about making your own texture mats for clay is that you can make them in whatever shape and size you want. In this guide, I make a circular mat, as I want to use it to add texture to a plate. But you can customize the process to suit your needs.
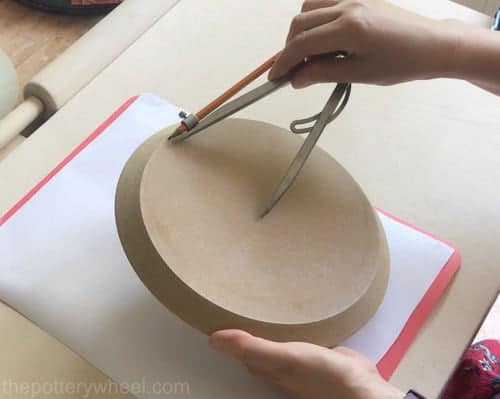
When I’m making slab plates, I often use this press mold. So, I measure the base of the press mold to gauge how wide the inside base of the plate will be.
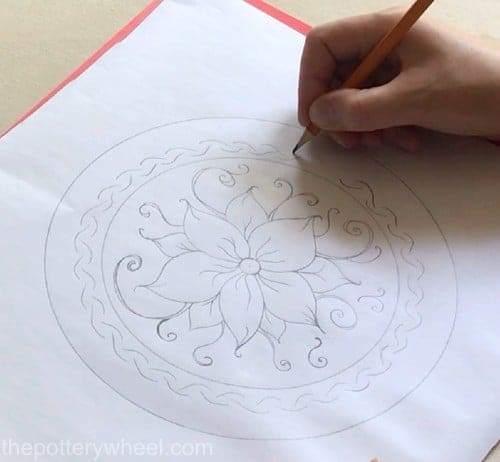
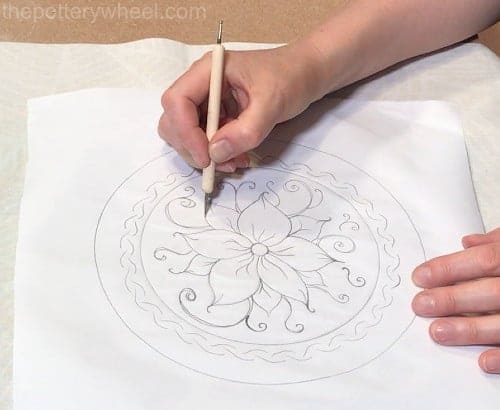
Step 2 – Drawing the Design
Next, I plan out my design on paper. Strictly speaking, you don’t have to draw your design on paper beforehand. You can skip this step, go straight to step 5, and start carving your design onto your clay slab.
However, I find it helpful to visualize the design on paper first. And then use this as a guide for my carving later.
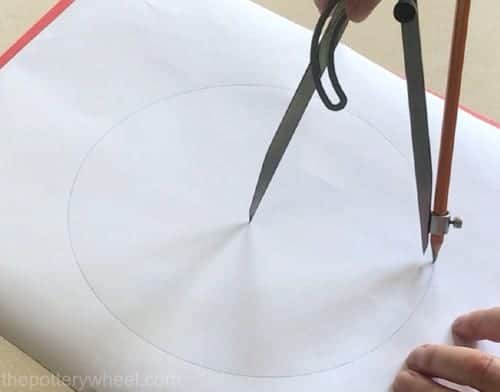
I start my drawing by marking a circle on the paper using the measurements I took from step 1. This measurement is the size of the base of my press mold. I draw this on the paper so that I know how big I can make my design. If my design goes beyond this circle, it will be bigger than the base of my plate.
Also drawing this border helps me visualize how big I want the textured clay design to be on my piece. Do I want the clay texture mat to be an intricate design on a small section of my piece? Or do I want the design to cover the whole of my clay slab?
I’m now free to draw whatever design I like within the border.
Step 3 – Preparing a Slab of Clay
I roll out a slab of clay that is just a bit larger than the measurements I took in step 1. It’s important to roll your clay onto a piece of texture-free fabric so that it doesn’t stick to your work surface.
I’m going to carve my design into this slab of clay. So, I need the slab to be big enough for my drawing. In addition, I need a bit of extra space around the drawing for a later stage in the process.
The clay slab needs to be flat and even. So, I use roller guides (also called rolling sticks) to make sure that the slab is level and smooth.
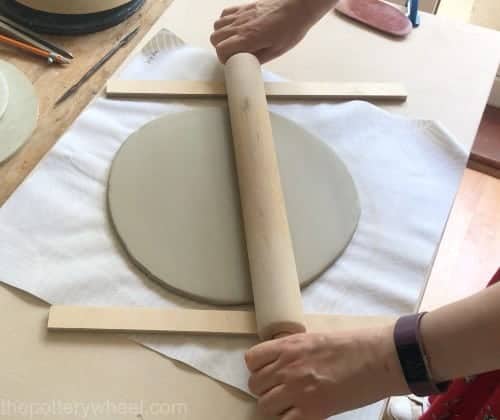
The slab needs to be reasonably thick because I’m going to carve into the slab. I don’t want my carving to go right through the slab to the worktop. Therefore, I use rolling sticks that are 9mm thick. This is about 1/3 of an inch.
If you would like to know more about how I roll slabs, you can check out my guide on rolling the perfect slab here.
After I’ve rolled the slab out, I leave it to firm up until it’s leather hard. It doesn’t need to be stiff leather hard. Soft leather hard is fine. It just needs to be firm enough that you can carve into the slab without making a sticky mess on the surface of your slab.
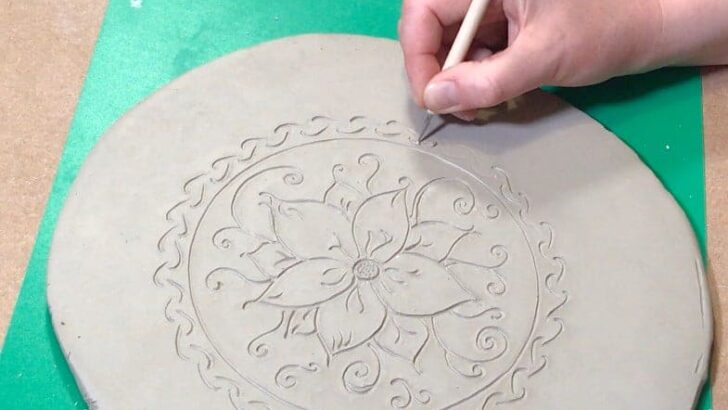
Step 4 – Transferring the Design
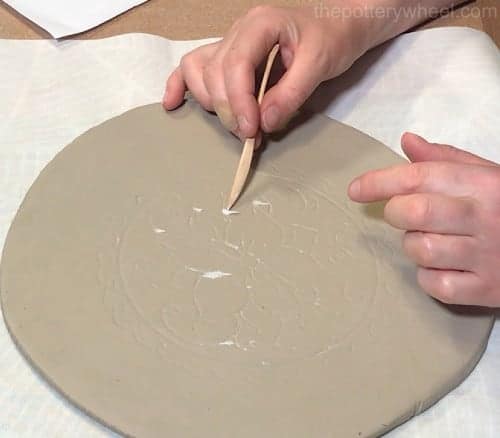
Once the slab has firmed up I place the paper design on top of the clay.
I then gently go over the pencil drawing with a blunt pencil or a very small stylus ball tool. This will leave a faint impression on the clay slab of the design.
In the following picture the paper drawing lies on top of the clay slab as I trace carefully over the design.
It’s important not to use a sharp tool to trace the design. The moisture in the clay will be absorbed into the water quite quickly so the paper will become a bit soft. If you draw with a sharp point, like a needle tool, you will tear the paper and gouge the clay.
So, a small ball tool or blunt pencils is best.
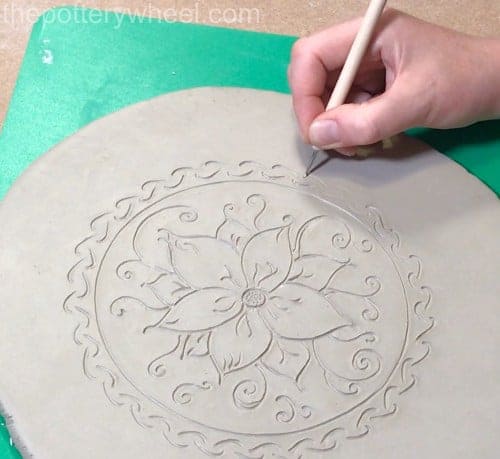
Step 5 – Carving the Design
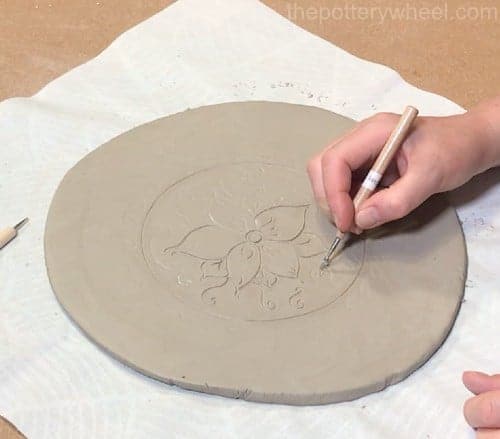
Once you have traced your image, remove the sheet of paper. Don’t worry if a few bits of damp paper are left behind on the clay. You can remove these easily with your fingers, a needle tool, a small wooden tool or some tweezers.
I use the faint impression of the design as a guide for carving into the clay.
As I carve, small balls of clay will form around the carved area. I’m careful to remove these or smooth them down. This is important because whatever is left on the carved design will become part of the clay texture mat too.
I carve the clay using a selection of tools. My favorite tools for the job are:


I also try to make the carved markings quite bold too. If the carved lines are too fine and delicate, they don’t tend to show up very well on texture mats for clay.
Carve around the whole design, until you have recreated your drawn design on the surface of your clay slab.
Step 6 – Preparing the Slab
Roll out a coil of clay that is long enough to go all the way around your design. If your design is large, you may need to make a few coils of clay to go all the way around.
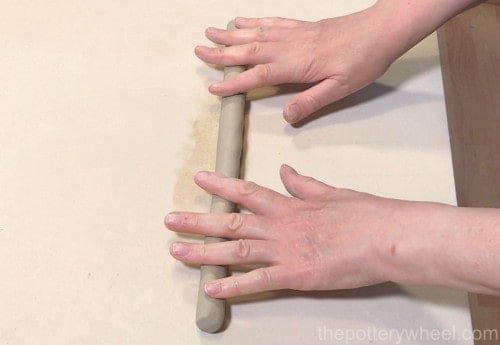
If you want some tips on rolling a coil of clay, you can check out my guide on that subject here.
Flatten your coil just a bit to make the coils into strips of clay that are about 2/3 of an inch (2cm) wide.
You can flatten the coils with your fingers and palms, or you can use a pony roller.
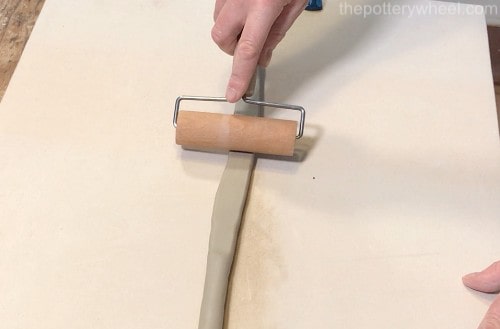
Position a strip of clay all the way around your carved design. Make sure there is a space between the edge of your design and the clay strip. I usually make this gap at least 1 inch. You don’t want the strip to be too close to the design.
I attach the strip to the slab by blending the flattened coil and slab together with my fingers and a wooden tool.

It’s important to ensure that there is a good seal between the clay strip and the slab. If you have used several coils of clay, make sure that the joins between the coils are blended together well to make a good seal too.
Step 7 – Making the Clay Texture Mat
Mix up your silicone mold-making liquid as per the instructions on the pack. With the brand that I use, I mix two liquids together in equal parts and give them a good stir.
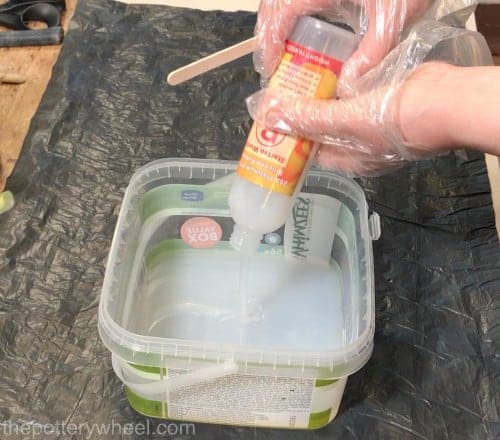
Once the two parts are mixed together, I pour the mixture onto my carved design so that it covers the entire design. I use enough of the mixture so that the silicone layer is about 1/8 of an inch (3mm thick).
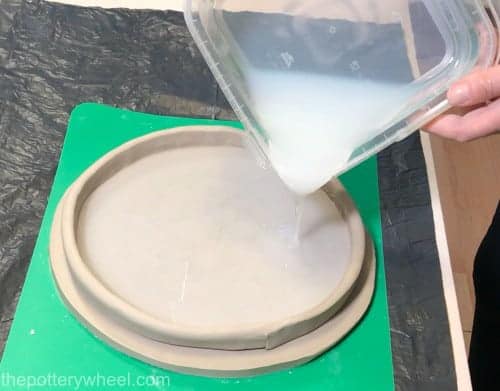
Make sure that the mixture covers the whole design and that it goes right up to the strip of clay that you added around your design.
Leave the mixture to set. How long it takes to set depends on the brand kit you are using. The brand that I use requires that you leave it for 6 hours to set.
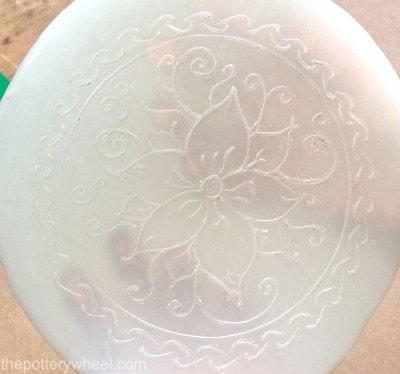
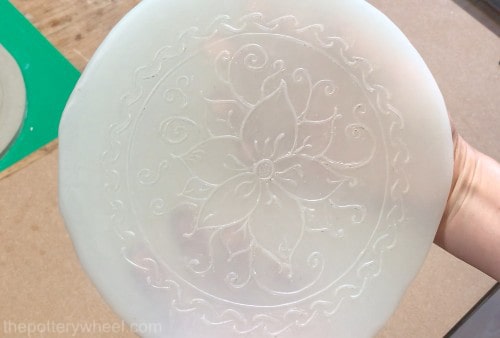
Once the mold has set it will be firm and rubbery. Peel away the strips of clay that you used to keep the liquid mold in place.

You can then peel away the mold itself, separating it from the carved design on the slab.
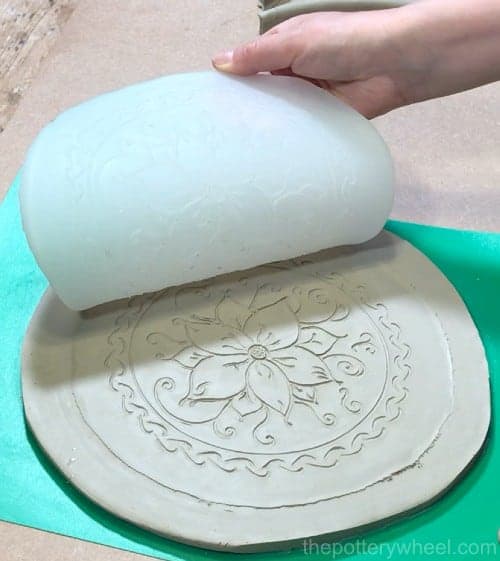
An impression of your design will have been made in the rubber mold. The mold can now be used as a clay texture mat. It’s such a simple way of making your own texture mats for clay, using your own unique design.
Step 8 – Using the Clay Texture Mat
Roll out your slab and cut it to the size that you want it to be. Let the slab firm up a little so that it is not too soft and fresh. If you use texture mats for clay on a freshly rolled slab, the mat might stick to the slab a little.
I wait until I can touch the surface of the slab without my finger leaving a sticky impression on the clay.
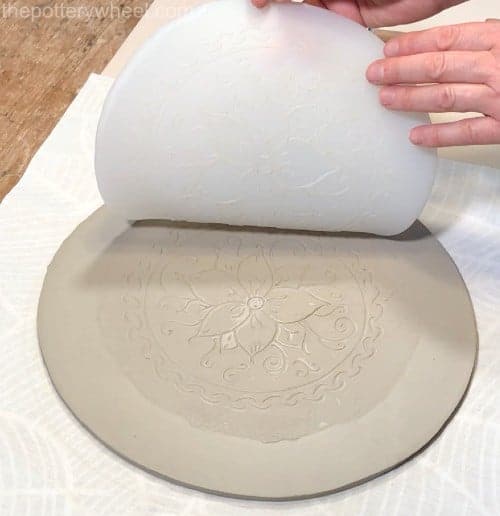
Position the texture mat on the clay slab. Press gently but firmly on the mat with your fingertips, thumb, or a pony roller. Apply an even amount of pressure to each area of the mat.
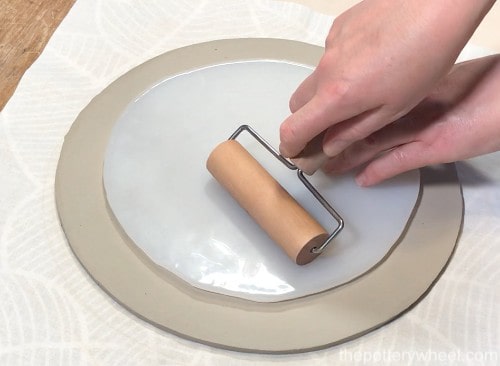
Carefully peel up one corner to check and see if the clay texture mat has left a clear impression. You may find that you need to put the mat in place again and roll a little more. This is much easier if you have checked a small corner.
Once you are happy with the impression that the clay texture mat has left, you can peel the mat off the slab to reveal the design left behind.
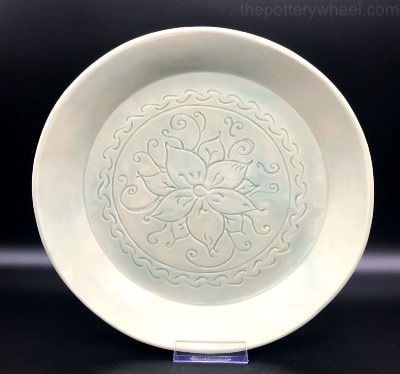
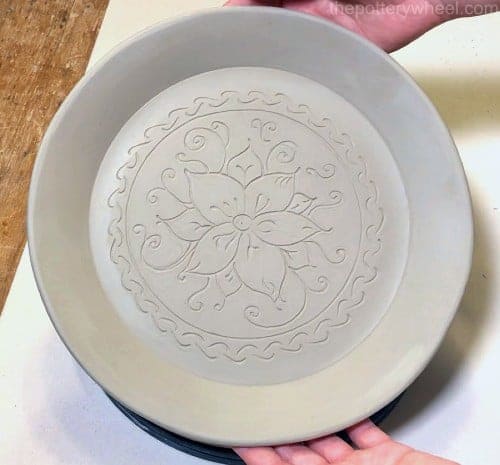
After I have used the texture mat to add my design to the slab, then I shape it into the form that I want it to be.
For example, with this slab plate, I pressed the textured clay slab onto a hump mold. You will find that you can press and shape the textured slab quite easily without losing the impressed design in your clay.
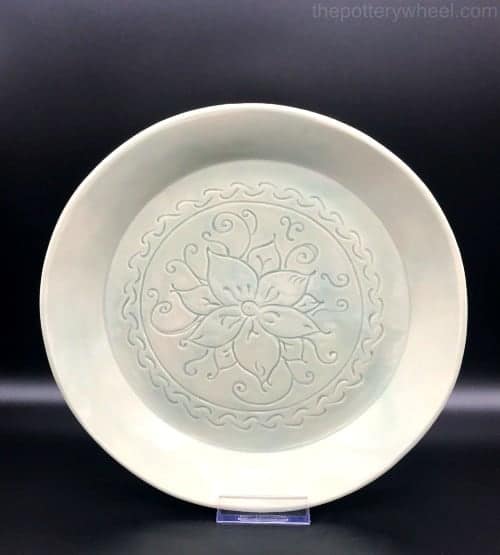
You can glaze your textured pots in a number of ways. For example, you can use celadon glazes that flow into the texture and highlight the design. These are the celadon glazes that I use.
Or you can paint underglaze onto the textured design and wipe away the excess. Then apply clear glaze to the textured pot. These are the underglazes that I use. Here are a couple of text plates that I made using this underglaze technique.
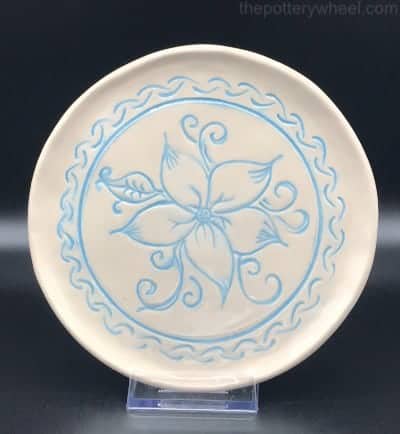
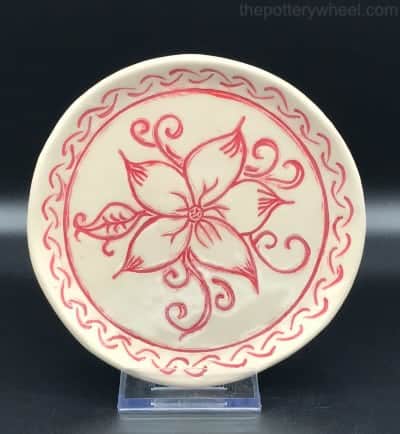
The great thing about using texture mats for clay is that using different colored underglaze can give you a very different look. These two plates were made using the same silicone mat, with different colored underglazes.
If you’d like to watch my video on how to make clay texture mats, you can watch that here…
How to Make Texture Mats for Clay
Buying Texture Mats for Clay
As well as making your own texture mats for clay, you can buy them too. Mayco makes a nice range of clay texturizing mats.
But there are other options too. For example, you can use rubber mats that bakers use to add texture to fondant.
These are often a great size for adding texture to mugs.
However, if you want a truly unique design, I’d recommend making your own.

Final Thoughts
The great thing about making your own texture mats for clay is that you can make them in whatever shape you like. And you can create whatever texture you like. So, your pottery will be completely original. You are literally putting your own stamp on it.