
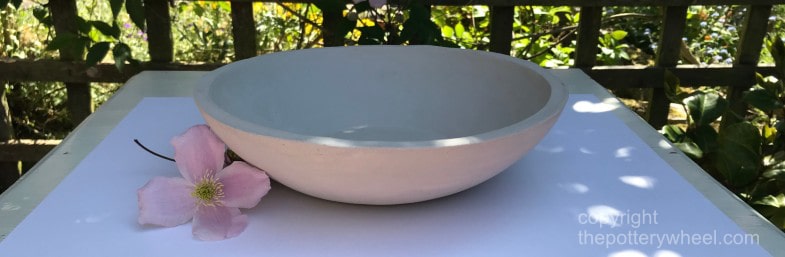
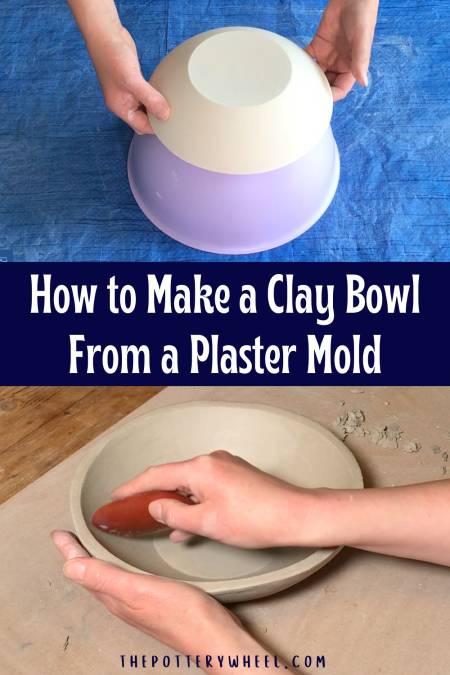
Plaster hump molds for clay pottery can be expensive to buy, but they are simple to make. And you can make beautiful pottery with a hump mold, very easily. Here is how to make a plaster hump mold for clay. Plus, how to make a lovely drape mold pottery bowl with your DIY mold.
The nice thing about making hand-built pottery with a mold is that you can make perfectly shaped bowls easily.
This is a step-by-step guide on how to make this bowl from a plaster hump mold:
How to Make A Plaster Hump Mold for Clay
What you will need to make a plaster hump mold:
- A plastic bowl
- Casting plaster (Plaster of Paris or Pottery Plaster)
- Rubber gloves
- Vaseline or Release Agent
- A respirator face mask
- Mixing bucket
Here is a short overview of the process…

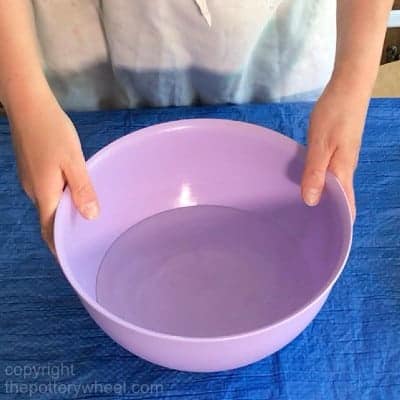
STEP 1: Selecting a Plastic Bowl to Make a Plaster Hump Mold
Find or buy a plastic bowl that you like the shape of. Your clay bowl is going to be the shape of the plastic bowl. So, use a shape that appeals to you.
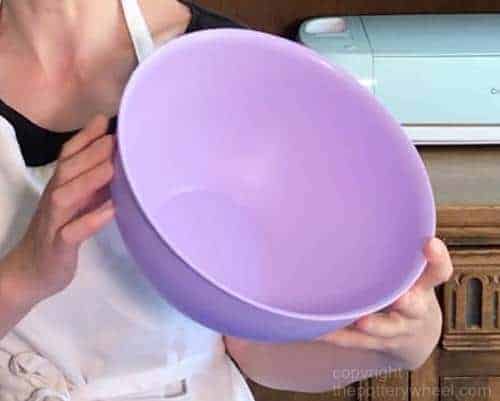
3 important features of the bowl you choose:
Choosing a bowl with a nice shape isn’t the only consideration. Here are some other factors to take into account…
1) Use a Bowl with a Bit of Flex
If your bowl is completely rigid, it can be hard to get the solid plaster out. This is because the plaster creates a bit of a vacuum with the bowl.
Think about trying to remove a cake you have baked from a cake tin. To get the cake out, you have to press the loose base up and out of the cake tin. If the base didn’t move it would be hard to get the cake out.
The same is true of a plaster mold. You need some flex in the bowl to pop the mold out. It doesn’t need to be very flexible. Just flexible enough that you can give it a little wiggle.
2) Avoid Undercuts
An undercut is when the lip of your container is narrower than the body of the bowl. It sounds obvious but it’s an easy mistake to make. If the lip is narrower than the rest of the bowl, you won’t be able to remove your plaster mold.
3) Use a Bowl with a Plain Surface
Lots of bowls have some details and textured shapes on their inner surface. You may notice these until you start looking. But it’s best to use a bowl that does not have any patterns or indents on the inner surface.
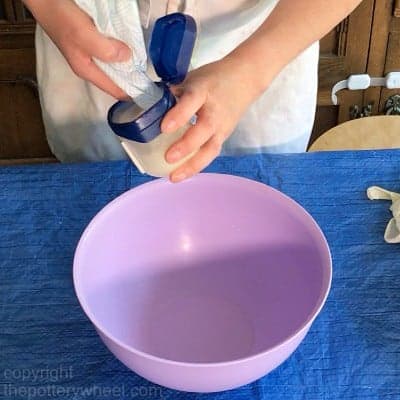
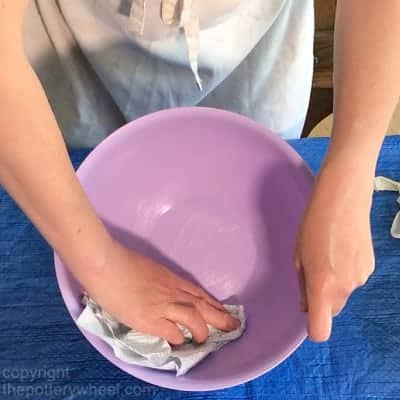
STEP 2: Use a Release Agent
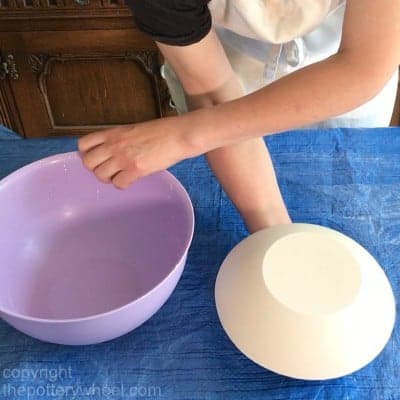
A release agent is a layer you put on the bowl to stop the plaster from sticking to it permanently. You can buy commercially made release agents. But Vaseline is fine, and normally what I use.
Using a soft cloth or paper towel, spread a thin layer of Vaseline over the inside of your bowl. Vaseline is thick, so be careful to spread it thinly.
If there are streaks in your Vaseline these will make a streaky pattern on your mold. So, be sure to wipe away obvious lumps of Vaseline. As long as the jelly gives a bit of a sheen to your surface, you should be fine.
STEP 3: Measure Out Your Water
Decide how deep you want your mold to be. Then pour water into the bowl up to that height. For example, if you want your bowl to be 3 inches deep, pour 3 inches of water into your bowl.
I use cool water. If you use warm water the plaster will set more quickly and give you less time to work.
You are basically measuring out the right volume of water by doing this. The volume of the water will increase a small amount when you add the plaster. However, this increase is small, so just use the water level as a guide.
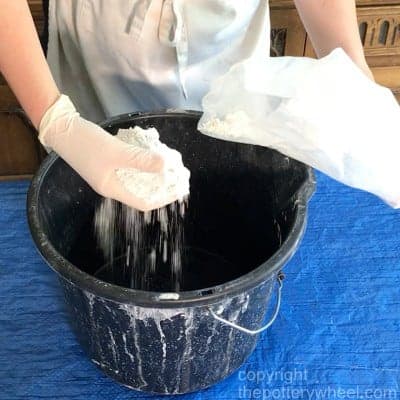
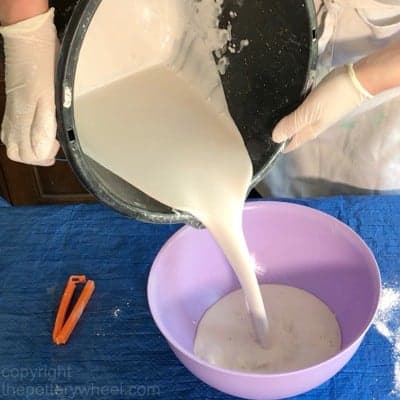
STEP 4: Mix Your Plaster
Once you have measured out your water, pour it into a mixing bucket. Plaster can be a bit dusty and splashy. So, it’s best to mix your plaster in a bucket rather than the bowl itself.
You can either use Plaster of Paris or Potter’s Plaster. Plaster of Paris is often a bit cheaper, but Pottery Plaster no. 1 is harder and more durable. If you use Potter’s Plaster your plaster mold will weather bumps and knocks in your studio more successfully. But Plaster of Paris is fine too.
Plaster is dusty and will create fine dust in the air as you work. So, it’s important to wear a face mask. Or better still, a dust respirator like this, if you have one.
You will be mixing the plaster with your hands, so, wear rubber gloves too.
Once you have your water, mask, and gloves ready, add your plaster to the water.
Add the plaster a handful at a time, and sprinkle it gently into the water. If you dump a lot of plaster into the water at once it won’t mix well.
Important!
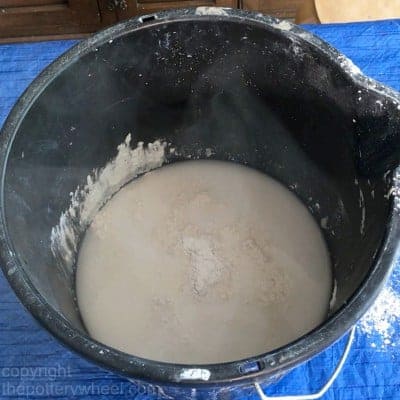
Gradually sprinkle the plaster into your water, but don’t mix it as you go along. Instead, you need to keep adding plaster until ‘plaster islands’ start to form in the water. This looks like little peaks of plaster poking out of your water.
Once you start to get plaster islands, you have added enough plaster and need to start mixing.
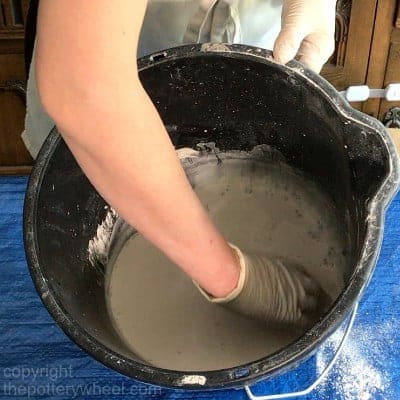
Mix the plaster with your gloved hand, breaking up lumps with your fingers. Avoid stirring too vigorously, or using a whisk or electric mixer. This will add too many air bubbles to the mix. And you don’t want lots of air bubbles in your mold.
Gently stir the mix until it is lump-free, and has the consistency of pouring cream. Once the plaster is thoroughly mixed, pour it carefully into your plastic bowl.
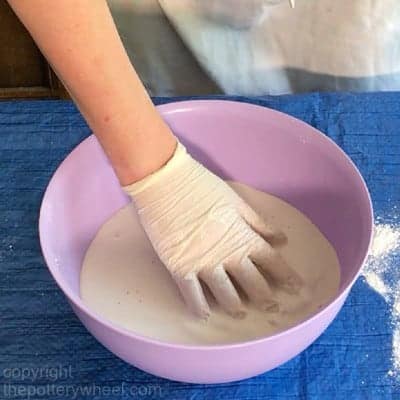
STEP 5: After Pouring Your Mix
There are a couple of important things to do after you have transferred the plaster mix into your bowl. Both of them need to be done before the plaster sets, so time is of the essence. You need to:
- Clean your bucket – not exciting, but good practice.
- Get rid of the air bubbles in your plaster mix in the bowl.
You can do these in any order, but I tend to get rid of the bubbles first.
Getting Rid of Bubbles in Your Plaster:
Put your hand in your plaster mix and very gently vibrate your hand and fingers. This will loosen any air bubbles that are trapped in the plaster mix.
You can also spray a bit of rubbing alcohol onto the surface of the mix to pop any bubbles. You can get rubbing alcohol from a pharmacy.
Transfer the alcohol to a spray bottle and spritz the plaster a couple of times. This will break the surface tension of the bubbles.
Washing Out Your Bucket:
Give your bucket a rinse out as soon as you are able. Plaster sets quickly, and you don’t want it to set on your bucket.
It’s not a good idea to rinse your plaster down the sink. This will block your drains as the plaster sets. Instead, I put some water in the bucket and swirl it about to remove the plaster. Then I pour the water outside on a patch of ground in the backyard.
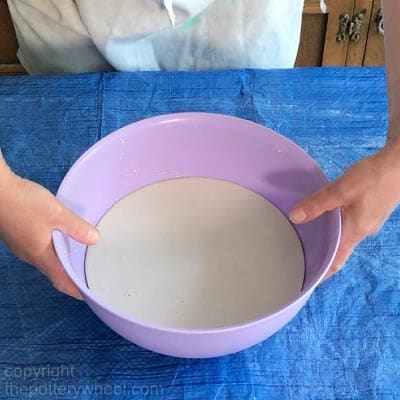
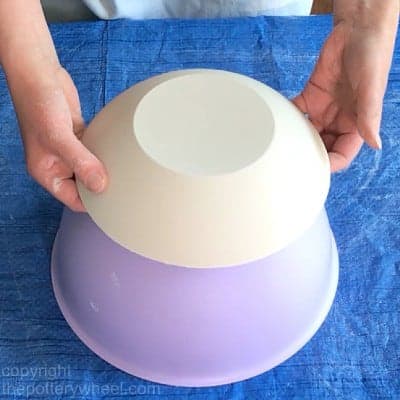
STEP 6: Removing Your Plaster Hump Mold
Let your mold sit for a little while. I generally let mine sit for an hour or so. By that time the plaster will have set hard.
To remove the plaster hump mold, simply wiggle the sides of the plastic bowl gently. Do this gently because although the plaster is now solid, it is still quite soft and cheesy. You just need to wiggle it enough for the mold to pop away from the bowl.
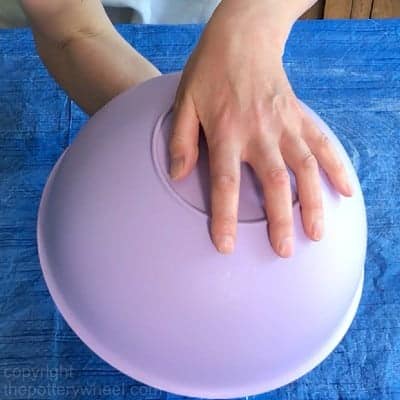
Once the mold has separated away from the bowl, turn the bowl upside down. You can then carefully remove the plaster mold and put it to one side to dry. You can rest the plaster mold on the top of the bowl you used. This will let air circulate it so it will dry faster.
It’s best to let the plaster hump mold dry out for about a week before you use it. Even though the plaster has set, it still contains a lot of water.
If you drape a clay slab over the mold when it’s dry, the mold will draw moisture from the clay. This helps the clay and mold separate. However, if the mold is wet, it will take a long time for the clay to become leather hard.
If you want to watch the complete step-by-step video of how to make a hump mold for clay, check out my YouTube channel.
Visit The Pottery Wheel Store
Fancy treating yourself to some homemade pottery? Looking for a unique gift? Check out my handmade pottery store…
Using your Plaster Hump Mold To Make a Clay Bowl
What you Need to Use Your Plaster Hump Mold
- Clay
- A rolling pin, or a slab roller if you have one
- A pottery/craft knife
- A hard and soft pottery rib
- A trimming tool
Making a Bowl with Your Plaster Hump Mold
After around a week, the plaster hump mold will have dried out enough to use.
STEP 1: Rolling Out Your Clay
Firstly, roll out a slab of clay. This needs to be large enough to cover the mold.
In order to make a slab of even thickness either use a rolling pin, with roller guides. Or if you have wooden battens you can place those on either side of the clay as you roll.
The slab can be whatever thickness you like. However, remember that thicker pottery is more likely to crack when it’s drying or explode in the kiln.
Also, a thick slab of clay will feel heavier to lift and drape over the mold. In the pictures below my slab was about 1/3 of an inch thick.
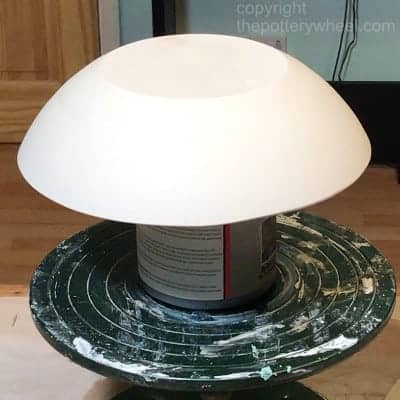
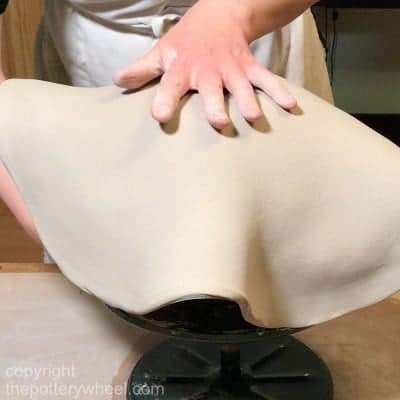
STEP 2: Draping the Clay Over the Plaster Hump Mold
Balance the mold over something narrower than the mold rim. This will allow the edges of the slab to drape over your plaster mold easily. In the pictures below, I’ve balanced the mold over an old jar of glaze.
Once your slab is large enough, lift it and drape it over the hump mold. This can feel a little awkward at first. An easy way to do this is to roll the slab loosely around the rolling pin and lift it like that.
Then carefully drape it over the plaster mold. Once the slab is positioned evenly on the top, press the slab down against the hump mold. Press down gently but firmly so that the slab begins to sit against the side of the mold.
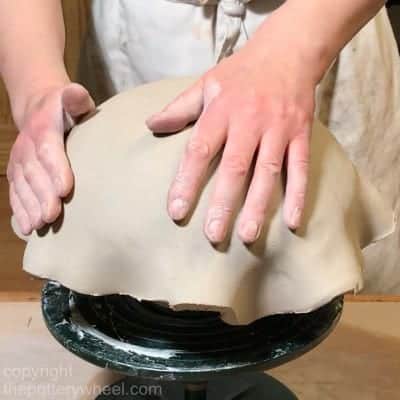
STEP 3: Trimming Your Clay Around The Plaster Hump Mold
Slice off most of the excess that is hanging around the edge of the plaster mold. You can use a kitchen knife or a craft knife. You don’t need to be too precise the first time you trim the clay off. Just get rid of most of the excess clay to make shaping the remaining slab a bit easier.
Once most of the excess is off, you will find it easier to flatten what’s left of the slab against the mold.
When the slab is flush against the mold, use your knife to make a second pass around the edge. Trim the slab so that the lip of the bowl is flush with the edge of the plaster hump mold.
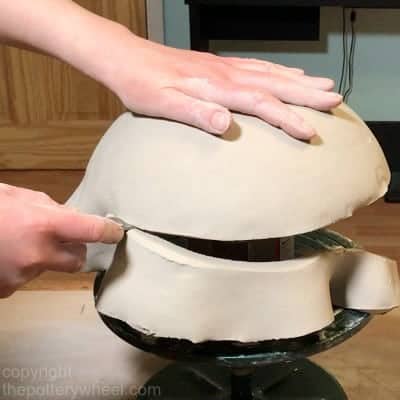
Be careful when you are trimming not to grate the plaster as you cut. This can push plaster flakes or chunks into your clay which can cause your clay to bloat when it’s fired. You can learn more about bloating in pottery clay here.
Once the excess is trimmed off, tidy the edge of the slab with your finger or a pottery rib. Check that the slab is smooth against the mold with your pottery ribs. Then leave it to become leather hard.
STEP 4: Finishing Your Hump Mold Pottery
Once it is leather hard, the bowl will pop off the plaster mold easily.
It’s now time to tidy up the bowl. You can start smoothing the edge of the bowl with a trimming tool. Then use a combination of a metal rib and a rubber rib to smooth the finish of your edge.
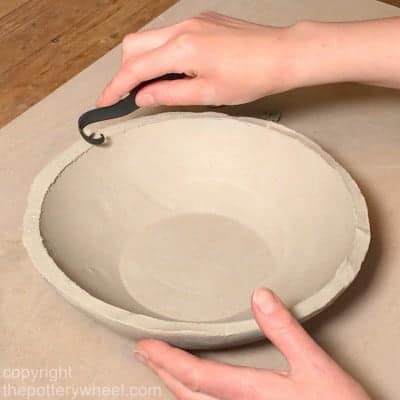
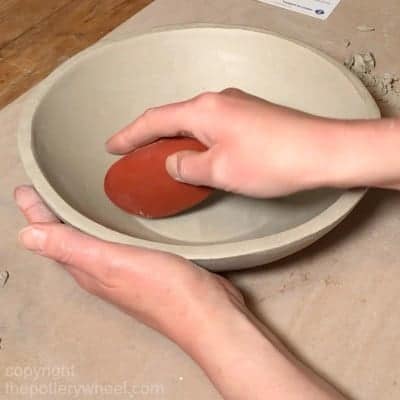
You can also use the rib tools to compress and smooth the overall surface of your bowl. Finally, compress the lip of the bowl with a chamois leather, to give it a flawless finish.
Final Thoughts
What I like about plaster hump molds for clay is that they are easy to make and use. You can make an even, nicely proportioned bowl. If you make a plaster hump mold you are saving money. And, you can make it exactly the shape and size you want. So, before you shell out money buying a mold, try to make a plaster hump mold. You will be surprised at how simple it is.


