Your cart is currently empty!
How to Keep Clay Flat – 16 Ways to Avoid Warping
Published:
Last Updated:
Affiliate Disclaimer
As an affiliate, we may earn a commission from qualifying purchases. We get commissions for purchases made through links on this website from Amazon and other third parties.
Flat pieces of clay, are prone to losing their shape and curling up when they dry or when they are fired. This can happen regardless of whether they are large or small. And it can happen to hand-built or wheel-thrown pieces. So how do you keep clay flat once it’s been formed?
You can help to keep clay flat by wedging your clay so it has an even moisture content. Avoiding overhandling and bending your clay too much when it’s plastic. It helps to compress slabs and plates after forming and it’s important to dry your pieces slowly and evenly. Support slabs and plates on an even kiln shelf when glazing to avoid warping in the glaze fire.
That being said, curling and warping can happen for a number of reasons. And it may take a bit of investigation, trial, and error to eliminate the problem and keep your clay flat. This article covers the key areas to consider if your pottery is losing its shape after it’s been formed.
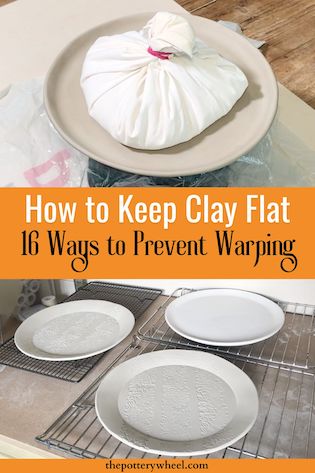
Table of Contents
show
What is Warping?
Strictly speaking the term ‘warping’ refers to clay that loses its shape when it’s being fired (source). But it is also often used to talk about clay that curls or bends as it is drying too. In this article, I will be using the word warping to refer to clay losing its shape at any point after it’s been formed.
How to Keep Clay Flat
There are lots of possible reasons why your clay is warping and it may take a bit of investigation on your behalf to pinpoint the cause. Here are some of the main causes and some tips on how to keep your clay flat.
Clay Memory
You may have heard people saying that clay has a memory. What this means is that clay will want to return to an earlier shape when it dries.
When you are handling and manipulating clay in its plastic state, you are altering the way the clay particles are arranged. After you have bent or squeezed plastic clay, you can flatten it out again afterward. But some of the clay particles will keep their ‘bent’ orientation and this will start to show as it dries.
Let’s say you have a slab of clay, and you want to check that the slab is smooth underneath.
You may be tempted to pick the clay up at the edge and peel it up, off the surface. If the clay is bent or curled up during this process, the clay particles will change their position.
After you have checked the underneath, you may well put the clay down flat on your surface. But the clay will ‘remember’ that curled position. As it dries, in all likelihood it will start to curl upwards at the point where it has been lifted and bent.
It’s worth noting that you don’t need to bend clay much to see this clay memory in action. It’s easy to make the mistake of checking to see if clay is leather-hard by bending the edge of a slab. But as the clay dries, that spot where you bent the slab to check it will start to curl up as it continues to dry.
Solutions
The best way to avoid the effect of clay memory is to be mindful of how you are handling your clay.
For example, if you are working with slabs, try not to bend the clay unnecessarily. If you want your slab to be flat, keep it as flat as you can as much as you can.
You may need to pick the slab up. Perhaps you want to flip it over or move it to a different table. If you pick the slab up by the edge with your fingers this can stretch and bend the clay. When you pick it up, sandwich the slab between the palms of your hands to lift it.
Here is another way to turn a slab over without stretching or bending it too much…
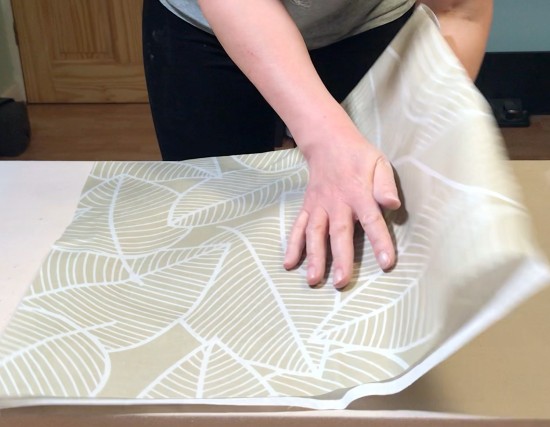
Tip 1: Flipping Your Slab
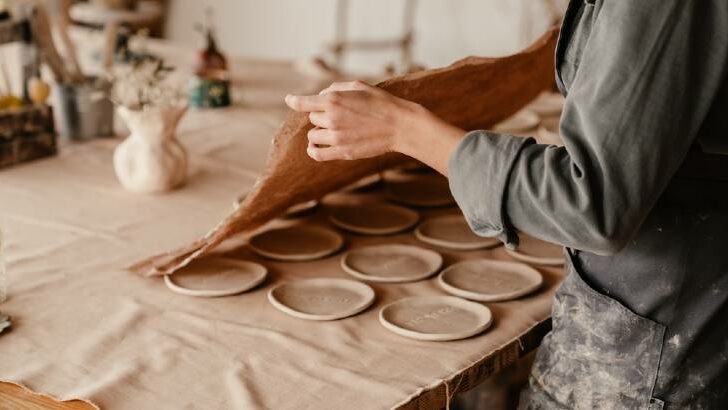
Roll the clay out onto a piece of fabric. Stiff fabric like canvas works well. Or even better you can use a cotton-backed vinyl tablecloth. This is great stuff as the cotton backing stops the clay from sticking to the surface. And the vinyl backing makes it stiff and less absorbent.
Once you have rolled out the slab, put another piece of fabric or tablecloth on top. Slide one hand under the sandwiched clay, and place your other hand on top. Flip the whole thing over, with the clay slab sandwiched between the two.
You can then peel the fabric off the top and carry on working with the clay. Flipping the slab this way will help keep the clay slab flat as you turn it over. You can read more about how to make a clay slab here.
Tip 2: Minimize Handling
It’s generally best to move your clay slabs as little as possible whilst the clay is still plastic. The less you move it, the less risk there is that the clay will ‘remember’ being bent.
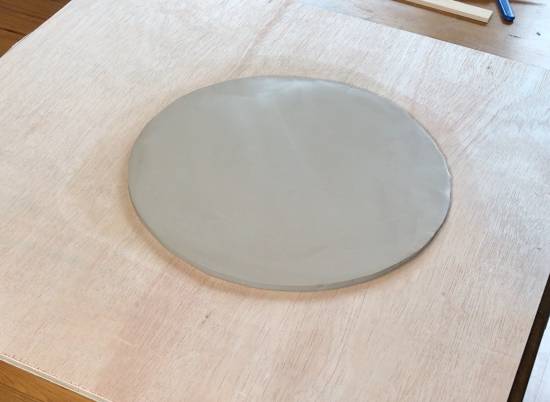
One way to do this is to let the clay slab firm up on the surface that you cut it on. Let’s say you are making some clay tiles. Cut the clay tiles out on a slightly absorbent surface and leave them on the surface until they are firm.
A good rule of thumb is to let them firm up to the point where they can be lifted without flexing.
I like to cut out clay slabs on plywood (also called OBS). Plywood is good because it’s a bit absorbent, but the surface is smooth, so your slab won’t pick up texture from it.
Some potters use drywall, which is also called plasterboard. The danger with plasterboard is that crumbles of plaster might get into your clay.
You can tape the edges of the board to avoid this. But I don’t like cutting out slabs on plasterboard, in case I score into the plaster by accident.
Once the clay is firm, you can lift the slab off and tidy up the edges before letting it become bone dry.
Tip 3: Use a Bat When Throwing On The Wheel
It’s not just clay slabs that remember being bent. It’s also a good idea to be careful lifting wide flat wheel thrown pieces such as plates or platters.
When you are making a large flat piece on the wheel, it’s best to throw on a wheel bat. Bat’s attach to the wheel head. The bat can then be lifted off the wheel head once you have finished your plate.
If you throw a plate and then try to lift it off the wheel head the soft clay will bend and lose its shape. However, if you throw on a bat, you can run a clay wire under the piece once it’s made. This will separate the piece from the bat.
But because it’s on the bat, you can remove the whole thing from the wheel head and let it firm up before you start to handle the plate for trimming.
Stretched Clay – How to Keep Your Clay Flat
When you roll a clay slab, you are stretching the clay out quite quickly. This is true whether you are using a rolling pin or a slab roller.
The clay goes from sitting in a nice compact lump to being pulled into a thin slab. This process puts the clay under quite a bit of stress. This stress can cause the clay to warp as it dries.
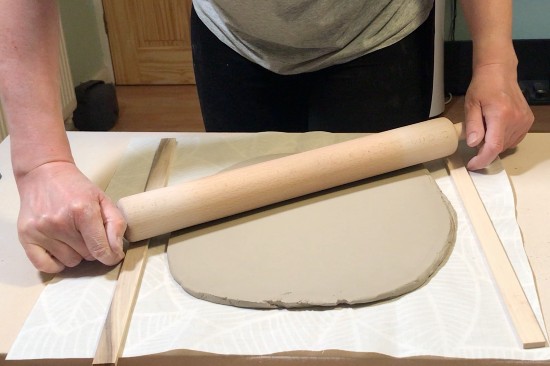
Tip 4: Roll Slabs in Different Directions
One way to compensate for the stress that the clay is undergoing is to change the direction in which it is being stretched.
If you are using a rolling pin, change the direction that you are rolling the clay. Turn the clay around so that you are rolling in a different direction. And also flip the clay over so that you are rolling on the other side.
The same applies to using a slab roller. As you arrange the clay to put it through the slab roller a second or third time, change the orientation of the slab.
This will help avoid the clay being stretched and stressed over and over in one direction. And it can help to keep the clay flat when it dries.
Clay Particle Alignment
As mentioned in the section above, pottery clay is made up of part of clay particles. Clay particles are flat platelets.
One way to keep clay flat as it dries is to help the clay platelets align with one another. When the particles are aligned they are bonded together more strongly and create an internal structure for the clay. This can help prevent cracking and warping.
Tip 5: Compress Your Clay
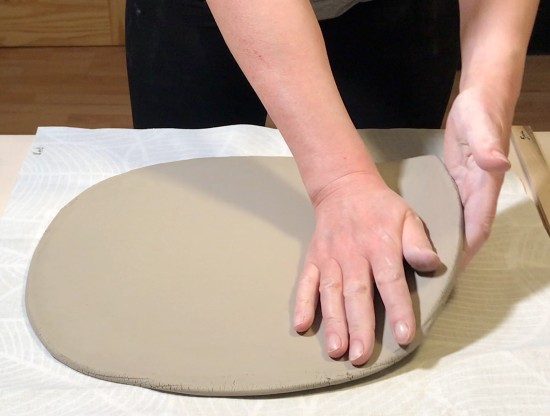
The way to align the clay particles is to compress the clay.
If you are rolling out a clay slab run a rubber rib tool over the surface of the slab. Run the rib over the clay in the same direction to align the particles. Remember to flip the slab over carefully, without stretching it, and rib both sides.
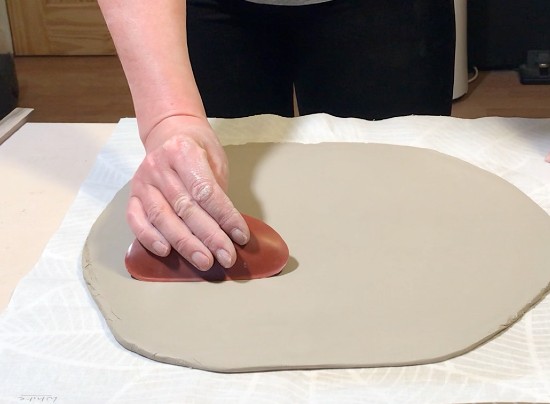
Also, when you are cutting out your shape from the slab, use the clay from the center of the slab. The clay at the edges of the slab has been stretched more and put under more stress.
When you are throwing on the wheel, you can compress the base of a plate or platter. One way to do this is to run your fingers over the base from the center to the outer edge of the plate a few times.
Moisture Content in Clay – How to Keep Your Clay Flat
When your clay contains a lot of water, it shrinks a lot when the water evaporates as it dries. If you are working with large flat pieces of clay, it’s better to use clay that is on the stiffer side.
Pottery factories that use a heavy press to make tiles use stiff clay in the press. The clay will have around 15% moisture content (source). As a result, the tiles take less time to dry, and they shrink less during drying. This can help prevent warping.
By contrast, when we make pots on the wheel, the water content is around 25%. So, as it dries the clay will shrink quite a bit.
Usually when potters hand build the clay is a bit less wet than it would be on the wheel. Nevertheless, clay does need to be quite malleable to make slabs, so it will still need to be plastic and contain quite a bit of water.
Tip 6: Wedge Your Clay
When making large flat pieces, avoid using clay that is very moist and soft.
If you are making slabs using a roller use slightly drier clay. A good rule of thumb is that if the clay is leaving a sticky residue on your roller, it’s too wet. Wedge the clay on an absorbent surface for a while until it’s lost some of its moisture.
Moisture can also cause warping when the clay has an uneven moisture content. When clay is wetter in some parts than others it will shrink at different rates. In extreme cases, this can cause the clay to crack as it dries. But often it will result in the clay warping.
Wedge your clay well to give the clay an even consistency, and get rid of any soggy sections.
If you are throwing on the wheel, mop up any puddles of water or slip that pool in the base of your piece.
Wall Thickness
Thin slabs or plates can be more prone to curling and warping than thicker-walled pieces. The reason for this is that thinner pieces of clay have less internal strength. As a result, they are less able to resist being pulled out of shape as they dry (and whilst they are fired).
Tip 7: Work with Slightly Thicker Slabs
Finding the right thickness for your pottery can be tricky. You may not want to make chunky slabs, plates, or platters. Also, very thick pieces are more vulnerable to exploding in the kiln.
As a rule, thicker pieces of clay will keep flat more easily. So, if you want to make thinner pieces you will have to be more careful with the drying process. Let’s take a closer look at the drying process now…
The Drying Process and How to Keep Your Clay Flat
There can be a number of factors that contribute to clay warping. I have found that the most important factor to control is the drying process.
Regardless of how carefully I make my pottery, if I don’t manage the drying process well, then flat clay will warp.
One key reason that flat clay curls up when it dries is that the edges of the clay dry more quickly. The edges of a slab are more exposed to air than the center of the slab. As the clay dries, it shrinks, and to avoid splitting or cracking it will curl.
The key to drying a flat piece of clay is to dry it slowly and evenly. I have found that there are no shortcuts to drying. You just need to be patient.
Having said that, there are some hacks that you can use to help your flat clay dry evenly. Here are some different techniques you can try:
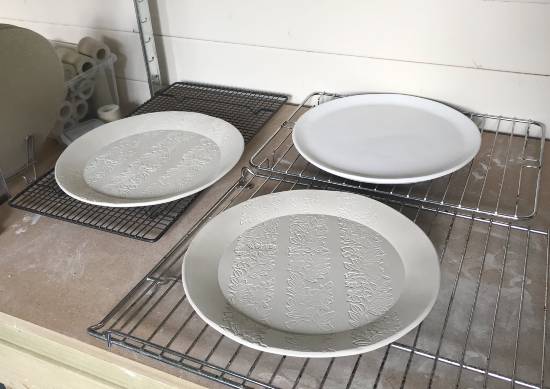
Tip 8: Use an Absorbent Board
Cut your slab on a piece of plywood or drywall. Leave it on the plywood for a few hours. The absorbent surface will draw moisture out of the slab at an even rate. Exactly how long this takes will depend on the temperature and atmosphere where you are.
Once it is leather hard, you can finish the edges and transfer it onto a metal drying rack.
If you find that your slab is still curling using the above method you can add an extra step. Once you have cut out your slab, place another flat piece of plywood on top of the slab. This will sandwich your clay between two boards, and keep it flat as it dries.
You can add a little pressure to the top board by putting something on it. Something like a pot of glaze would be fine. Be careful not to apply too much weight to the wooden board. If you sandwich the clay too tightly it might tear as it dries and shrinks.
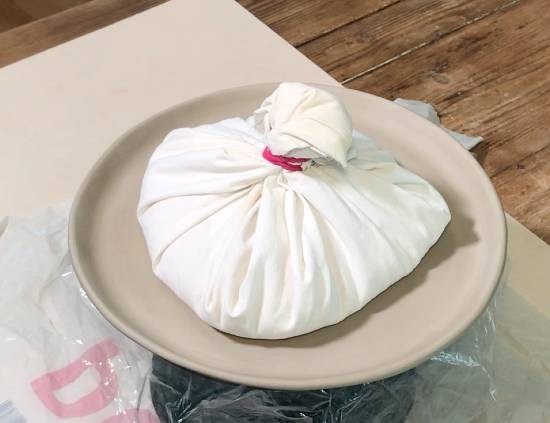
Tip 9: Use Rice Bags or Sand Bags
If you are making a plate with a lip, you won’t be able to sandwich your clay between boards. One solution is to use what I call a ‘rice bag’.
Cut out a circle of fabric from an old sheet or t-shirt. Pile some dry rice onto the fabric and then tie the fabric around the rice with a rubber band.
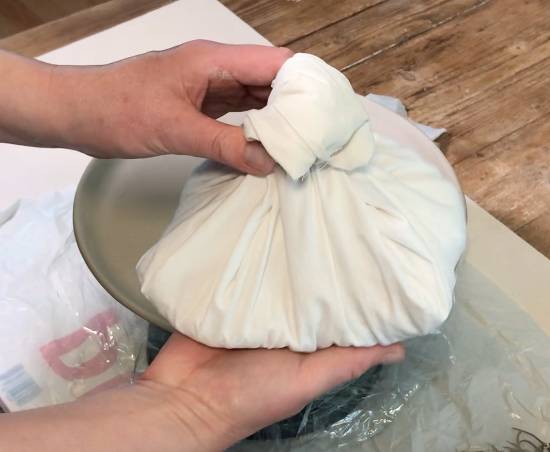
You can then place the ‘rice bag’ on the middle of the plate as it dries. This will stop the base of the plate from bowing as it dries. Some potters use sand instead of rice.
Tip 10: Use a Metal Drying Rack
Sometimes you can’t put weight or pressure on your slab. For example, you may have added some delicate decorations to your piece.
If I have made a slab that I can’t weigh down to keep flat, I transfer it onto a metal drying tray. An old oven shelf or a baking rack will work fine.
To slow the drying process down, I cover the slab loosely with a piece of plastic. Garbage bags are good as they are so roomy.
As the clay dries, moisture will collect on the inside surface of the plastic. This can sag against your clay slab creating a damp patch on your slab and causing problems. You can prevent this by putting another metal grid over the slab.
You can either buy baking trays that are designed to stack on top of one another.
Or you can separate out old oven trays with any kind of spacer you have available. You can see in this picture that I separate mine out with old Lego blocks. High tech, I know!
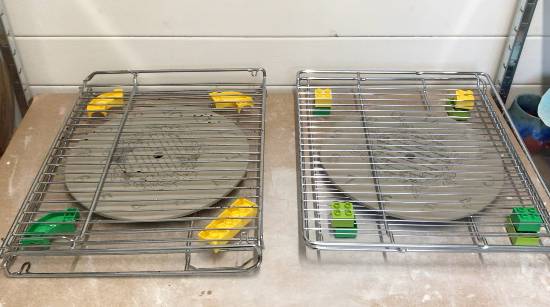
Once the slab has a grid above it, you can drape a large sheet of plastic over it. This really slows the drying process down, and I find that it’s one of the best ways to keep clay flat.
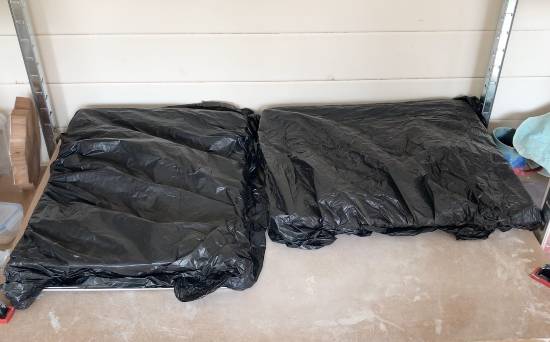
I leave the clay covered like this until it’s bone dry. This does slow the drying process down a lot. But it’s worth it to keep the clay flat and prevent warping or curling.
You can also buy a ware cart, which is a rack specifically made so that you can store your clay safely and use very little worktop space. Or if you want to go really fancy, you can buy a ware cupboard that is covered with plastic to slow the drying process down.
A Word on Drafts
Drafts are the worst. If your pottery is drying in a drafty zone, you can bet that the clay will curl and warp.
A draft hitting your pottery at a particular point will speed up drying in one spot and cause warping. This is because the exposed point of your pottery will shrink more rapidly than those that are protected from the draft.
Be sure to dry your clay in a draft-free area. Or, cover the clay with a plastic bag to protect it from pesky drafts.
Choice of Clay Makes It Easier to Keep Your Clay Flat
Some clay bodies are more prone to curling or warping as they dry than others. For example, ball clay is often used in clay recipes to make the clay more plastic. Plasticity is when the clay is workable, but also keeps the shape that it has been formed into.
Ball clay adds plasticity partly because it absorbs a lot of water and has a high moisture content.
Clay that contains a higher percentage of a plasticizer like ball clay or bentonite shrinks more as they dry. As a result, these clay bodies are harder to keep flat as they dry and are more prone to warping.
Some clay bodies are designed to shrink less as they dry. A good example is raku clay, which contains gritty ingredients such as molochite. Molochite is a granular material made from kaolin that has already been fired to a high temperature. Because it’s been fired already and ground up, it doesn’t absorb water and doesn’t shrink as it dries and is fired.
Clay with added grog might have an overall shrinkage rate of 7% when it is dried and fired. By contrast, some porcelain clay will have an overall shrinkage rate of 18% and warp easily.
Tip 11: Use Clay with a Lower Shrinkage Rate
Experiment with different clay bodies, and find one that suits you best. Most manufacturers will specify the shrinkage rate of a clay body on the product information. Check out the shrinkage rate of the clay before you buy it.
If you are making slab pottery or tiles, it’s best to choose a clay body with a shrinkage rate that is lower than 12%.
Firing Your Pottery
The final point at which pottery can warp is during firing. Warping is more common in a glaze fire, but it can happen in a bisque fire too.
How to Keep Clay Flat When Bisque Firing
The beauty of a bisque fire is that you can fit more into the kiln. This is because you don’t have to worry too much about the pieces of greenware touching one another.
As a result, you can stack the greenware on top of each other. However, you do have to be careful about how you load the kiln.
It’s important to think about how your pieces are resting on one another. If you put too much weight or pressure on a particular piece, its shape may become distorted during a bisque fire.
Tip 12) Load Your Bisque Kiln Carefully
Load your bisque kiln carefully. If you have enough space in your kiln to bisque fire slabs, plates, and platters lying flat, then this is ideal. However large flat pieces of clay take up a lot of space and firing them on a flat surface may not be an option.
There are different ways of stacking slabs and plates so that they keep flat during a firing. You can read more about these different options in this article here.
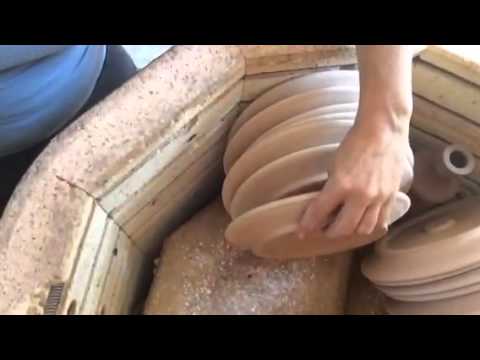
Most of the time I find that I can stack plates on their side and rest them against the wall of the kiln during a bisque fire. You can see this method in this helpful video here.
How I load my plates to bisque
Tip 13: Add a Foot Ring
Another way of keeping your clay plates and platters flat in the kiln is to add a foot ring. Adding a foot will give the base some additional strength and prevent it from warping in the heat of the kiln.
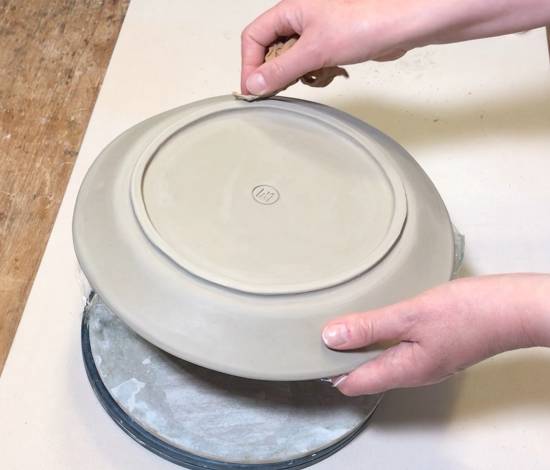
In fact, adding a double foot ring is the best solution. One foot ring towards the edge of the plate and then another towards the center will give the base of your piece maximum strength.
How to Keep Your Clay Flat When Glaze Firing
If you are using earthenware clay, then your glaze fire will probably be at the same temperature, or maybe a bit lower than the bisque fire. When low-fire clay is fired at earthenware temperatures, it is unlikely to warp in the kiln.
Warping in the glaze fire is more of an issue for mid and high-fire clays like stoneware and porcelain. Stoneware and porcelain are fired at higher temperatures.
When stoneware and porcelain are fired at the right temperature, they undergo a process called vitrification. This is when the glass-forming components of the clay melt during the firing process.
When the kiln cools the molten ingredients harden again to form a water-tight ceramic body. However, during the firing schedule, when the ingredients are molten, the clay body softens.
When the clay is in this softened state it is prone to losing its shape whilst being glaze fired. If your slab, plate, or platter is resting on an even kiln shelf, the whole piece will be supported by the shelf. However, if it isn’t supported evenly, your piece may bend or warp.
For example, if you are a bit pushed for space in your kiln, you may rest a plate or slab on some kiln props. This doesn’t give the clay enough even support and it’s likely to bend during firing.
Tip 14: Keep Your Slabs and Plates Level in a Glaze Fire
It’s best to avoid using uneven kiln shelves or spanning slabs or plates across two kiln shelves.
Tip 15: Try Using Alumina Hydrate
Another option is to dust your kiln shelves with alumina hydrate. This is a granular substance that has a very high melting point of around 3200F (1760C). As such, it won’t melt during a glaze fire.
A light dusting on your kiln shelf allows large flat pieces of clay to move as they shrink in the glaze fire. Rather than gripping onto the kiln shelf at points and warping, the granules allow the plate or slab to glide across the top.
Alternatively, you can mix alumina hydrate in with some wax resist. The mixture is then painted onto the base of the pottery before glaze firing. When the wax resist melts, the granules of alumina act as little coasters that prevent the pottery from sticking to the kiln shelf and warping.
Tip 16: Avoid Overfiring Your Pots
One final tip is to make sure that you aren’t overfiring your pieces in the glaze fire. If you over-fired your pottery the clay can sag and warp during the glaze fire. This can cause rims on plates to become uneven, and it can cause bases and foot rings to wobble.
Final Thoughts
I’ve found that most of the time keeping my clay slabs and plates flat is a matter of patience. It’s never a good idea to rush things when you are making pottery. Cutting corners and trying to speed things along usually causes problems at some point. This is especially the case for large flat pieces of clay. If I’m working with slabs and plates, I usually slow things down even more. This helps me keep the clay flat as I’m working on each stage.