Your cart is currently empty!
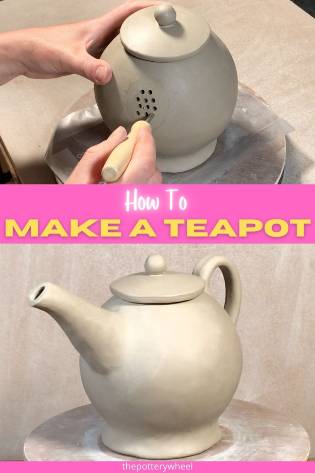
How To Make a Teapot – An Easy Step by Step Guide
Published:
Last Updated:
Affiliate Disclaimer
As an affiliate, we may earn a commission from qualifying purchases. We get commissions for purchases made through links on this website from Amazon and other third parties.
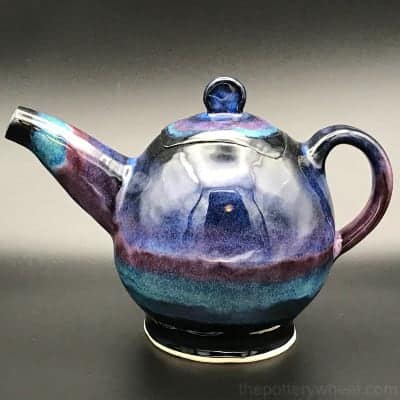
This is a step-by-step guide on how to make a teapot. Making a clay teapot is actually quite a simple process. But it’s extremely satisfying. There are few things as nice to make in pottery as a nicely shaped teapot. Plus, at the end of it, you get to enjoy a nice cup of tea…. Perfect!
In this article, I will be illustrating how to make a teapot using the simple pinching technique. There are other ways to make a teapot, including throwing them on a wheel or slab building.
I like to pinch out clay when making a teapot. Pinching the clay gives the teapot a lovely curve. I made the following teapots using smooth stoneware clay.
Table of Contents
show
How to Make a Teapot
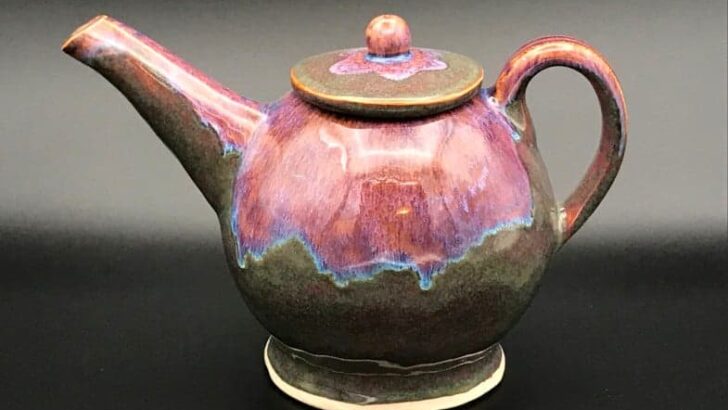
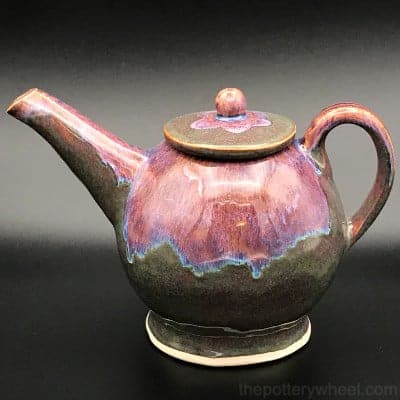
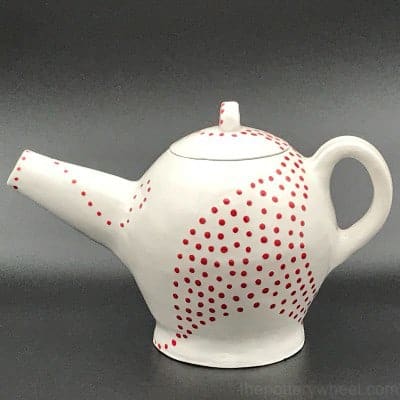
So, without further ado, here are the steps I take when I make a teapot from clay. Here are 3 teapots I made using these steps…
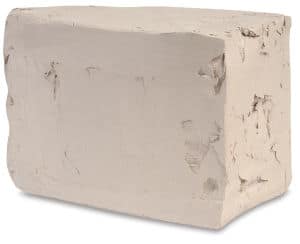
Step 1 – Weighing Out the Clay
Weigh out two equal-sized balls of clay. These two balls of clay will be used to make the main body of the teapot. Therefore, the amount of clay you use will affect how big your teapot is.
I like to use two balls of clay, each weighing 1.65lb or 750gm. This will make a medium-sized teapot, suitable for making about 3 or 4 cups of tea.
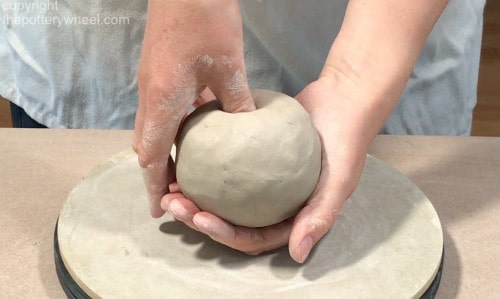
Roll each lump of clay into a nice smooth shape, like a nice big orange. Cover one of the balls of clay with a plastic bag. This will stop it from drying out whilst you work on the other ball.
– View on Blick
Step 2 – Starting to Pinch the Clay
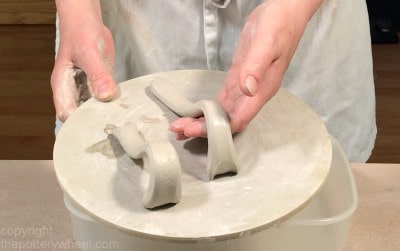
You are now going to start pinching out the main body of the teapot. The body is made by making two pinch pot bowls, and then joining them together. This is called the double pinch pot technique.
Each bowl is made one at a time. To start pinching out one bowl, use one hand to support the clay. Use your other hand to press your thumb into the center of the ball.
Keep pressing your thumb into the clay until you start to feel it with your supporting hand. It can be a bit tricky gauging how far to press your thumb into the clay.
The best advice is to press carefully and slowly. Stop pressing when you start to feel a bit of pressure in your supporting hand.
You will start to feel your thumb as the clay between your palm and the thumb gets thinner. I aim to make the walls of the pot around ¼ inch thick at this point.
Step 3 – Pinching out the Clay
Once your thumb has been pressed into the clay, you can start pinching the clay into a bowl shape. Pinch with the whole length of your finger and thumb.
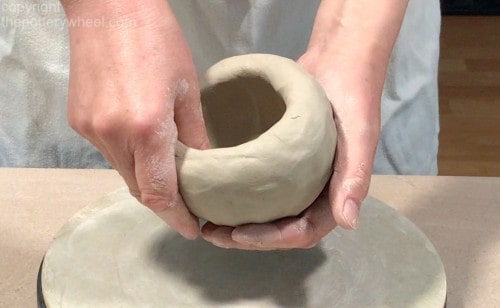
Don’t just pinch with the tips of your fingers. If you pinch with the tips, the clay bowl won’t open out. Instead, you will get a narrow line in the clay that is thinner than the rest. You want your pinching action to apply equal pressure to a wide section of the clay.
Step 4 – Evening the Thickness of the Clay
I use a mixture of techniques to shape the clay into a bowl shape. I pinch the clay. But I also use the tips of my fingers to smooth and thin out the clay. Once the clay is a bigger bowl shape, it’s hard to get your fingers in to pinch the base.
If a section of the bowl feels a bit thicker, I use a different technique to thin it out. I support the bowl in one hand. Then, using the fingertips of my other hand, I smooth and drag the clay at the base.
This thins out the clay at those parts of the bowl that can’t be reached by pinching fingers.
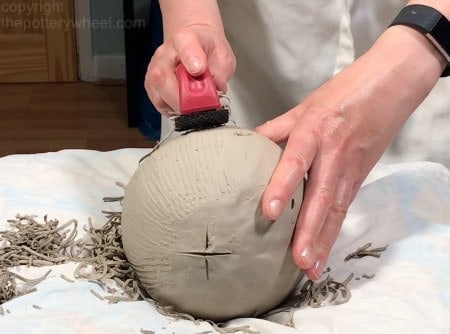
Step 5 – Smoothing out Cracks
As the clay opens into a bowl shape, the clay rim can become a bit cracked. This is because the clay is changing shape and opening up quite quickly.
Remember to smooth down any cracks on the rim with the tip of your fingers. This will stop the cracks from opening up anymore as you continue to work.
Step 6 – Reshaping the Clay
I like to work with quite soft clay when I’m pinching out a form. The reason for this is that pinching drier, harder clay can be tough on the wrists.
However, if you are pinching soft, moist clay, it can become a bit floppy when it’s been pinched into shape. This can cause your bowl to lose a bit of its shape.
Don’t worry, you can easily reshape your bowl if it has become a bit flat and wide. Simply put the clay bowl, rim down, onto a flat wooden pottery batt or piece of wooden board.
Then cup the palms of your hands and fingers on both hands around the side of the bowl. Put gentle pressure on the clay bowl. This will narrow out the width of the bowl.
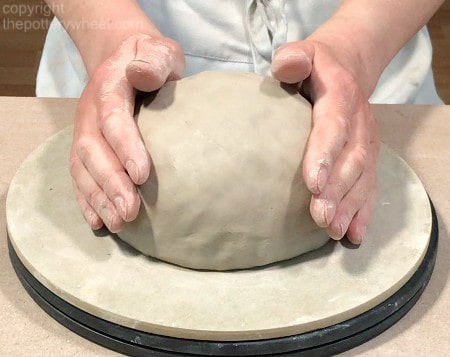
Turn the wooden board round, and move your hands to another spot on the side of the bowl. And once again, gently squeeze the clay. Keep turning and squeezing the clay until the bowl is the shape of a half-circle.
Once you are happy with the size of the bowl, then start pinching out the second ball of clay. Repeat the process so that you have two clay bowls, of the same size and shape.
Step 7 – Letting the Clay Firm Up
At this stage, the clay will still be soft and floppy. So, you will need to leave it to firm up for a while. I normally leave the bowls overnight to become firmer.
I don’t leave them until they are leather hard. But I do wait until I can pick the bowls up and handle them without them losing their shape easily. Ideally, I can still bend and reshape the clay without it cracking.
How long it takes for the clay to become firm but workable depends on the temperature and humidity of your region. I generally leave the bowls uncovered for around 4 hours.
Then, I cover them with a plastic bag overnight. In the morning I uncover them and let them dry a little more. I check the clay regularly to ensure that it hasn’t become too hard and dry.
I’d suggest experimenting with how long it takes for the clay to dry where you are located. You will find the ideal schedule of leaving the clay out in the open and covering it up with plastic.
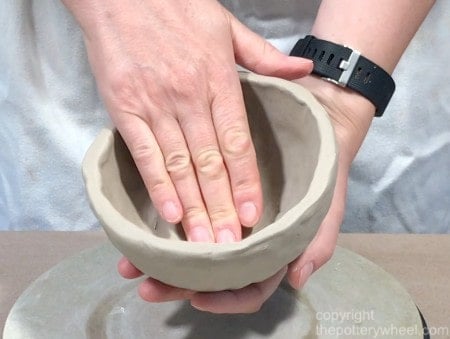
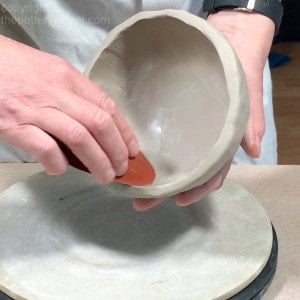
Step 8 – Smoothing the Inside of the Bowls
Once the clay bowls are firm but workable, I tidy up the inside surface. I find the easiest way to do this is to use a platter rib. This is a plastic curved modeling tool made by Mudtools. Scrape and smooth any lumps and bumps on the inside surface of the bowls.
When any uneven surfaces have been removed, I go over the clay with a soft rubber rib. This compresses the clay and creates a nice smooth surface.
This is going to be the inside of the teapot. So, it won’t be visible from the outside. However, details like this make a difference to the overall effect of the teapot. When someone looks inside the teapot, it’s best if they see a nice smooth even surface.
Step 9 – Lining Up the Bowls
You now need to find a way of supporting the teapot so that it keeps its nice round shape. I use an old measuring jug, lined with a tea towel and a refuse sack.
This creates a nice soft cushion for the rounded base of the bowls. The rounded bottom of the lower part of the teapot nestles into the rim of the plastic jug.
When one of the bowls is sitting on the soft cushioned surface, lower the other half on top. The two bowls will be resting rim to rim.
You want to find the spot where they fit together best. If they don’t fit together well, separate them gently, rotate the top bowl, and reposition them. Do this until you have found the position where they fit together well.
Once you have found the best position, make a small line across the rims of the two bowls. This will act as a key. When you separate the bowls, you are able to find the best joining position by lining up the two markers.
Step 10 – Slip and Score
You now going to join the two bowls together using the score and slip technique. Using a fork, or a serrated rib tool, create a rough texture on the rim of both bowls.
Then paint some clay slip onto the roughed up rim of the bowls. Clay slip is just clay that has been dissolved into water. It is liquid clay that will help glue pieces of clay together.
I usually use joining slip to do this. The easiest way to make a good joining slip is to add a little vinegar into some regular clay slip. For more about making clay slip, check out this article.
Step 11 – Joining the Bowls
Then position the bowls up so that the key marks on the rim are in line with one another. Gently press the rims of the two bowls together. You may need to wiggle the clay a little to get the rims to fit nicely together.
Once the bowls are lined up nicely rim to rim, apply gentle pressure to ensure that they are joined together. At this stage, the join is very fragile. So, you need to be careful how you handle the sphere, otherwise, the bowls will pop apart.
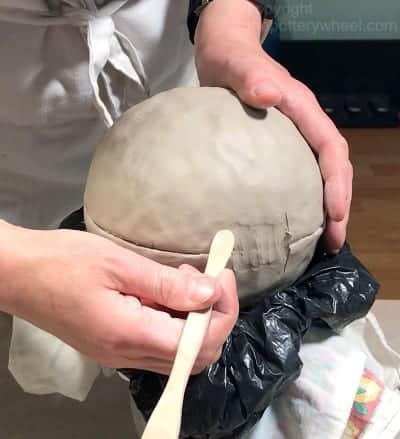
Step 12 – Blending the Join
Now that the two bowls have been joined, you have a clay sphere. Place the sphere onto the cushioned jug. Ensure that the join between the two spheres is parallel to the rim of the jug.
Then using a wooden modeling tool blend the clay on the join together.
Step 13 – Reinforcing the Join
Once the clay has been blended together, it’s a good idea to reinforce the join a little more. I do this by rolling out a thin coil of clay and then flattening the clay into a strip.
Position the strip on the clay sphere around the point where the join has been blended. Then using your thumb, smooth the clay strip onto the join.
This will fill out any dips in the clay where the clay bowls join. It will also add a bit of extra strength to the joint.
By the way, you can download an ebook copy of this step-by-step guide if you would like. Here it is…
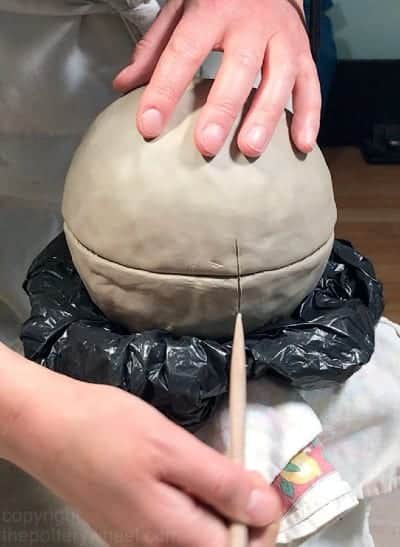
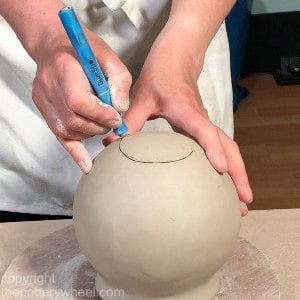
Step 14 – Marking the Top or Bottom of the Teapot
At this stage, it will still be really easy to see where the clay bowls have been joined together. It’s a good idea to make a mark on the sphere to indicate where the base of each bowl is. The base of the bowl is the point furthest from the rim.
The reason for doing this is so that the join in the clay runs around the midline of your teapot. Once you start smoothing out the clay sphere, it can become impossible to tell where the two bowls were joined.
When you make a lid for the teapot, you will cut a hole in the sphere. Once you have made a hole for the lid, you can tidy up the join on the inside too. This is much easier to do if the join is parallel with the midline of the teapot.
So, it’s best to make a little mark on the base of at least one of the bowls. This will then become either the top or the bottom of the teapot.
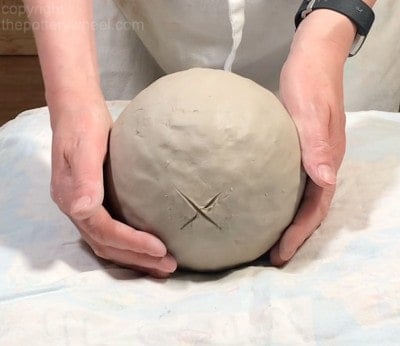
You can make a mark by scoring a cross into the clay. Or, you can attach a little button of clay to the right spot.
Step 15 – Inflating the Balloon!
The air inside the clay sphere acts as a support. It applies pressure to the clay from the inside, which means you can reshape the sphere at this point.
You can add a little extra support to the sphere by blowing a little extra air into it.
Roll out a little coil of clay, about ¼ inch thick and 1.5 inches long. Blend the clay coil onto the side of the sphere. Then make a hole that goes into the clay coil and through the side of the sphere. You can use a cocktail stick or a needle tool to make the hole.
Then gently blow into the clay tube. This will pass a small amount of extra air into the clay sphere. Don’t blow too hard, or the seams may pop apart. But a little extra air will make the sphere firmer and easier to shape.


When you have added some extra air, pinch the clay coil to seal off the hole in the clay. Smooth off the area on the sphere where the coil was joined onto it.
Leave the sphere to allow the join in the clay to firm up and become more secure. Again, I tend to leave the sphere overnight to make sure the seam is well joined. At this point, I don’t want the clay to get harder, so I cover the sphere in a plastic bag.
Step 16 – Smoothing the Teapot
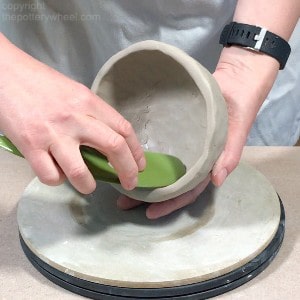
Once the clay is still moist but quite firm, I start to smooth the surface of the teapot. I start off the smoothing process using a shredding tool. This is called a Surform Clay Shredder. These are essential little tools if you like to hand build with clay.
To shred the surface, I position the sphere on a soft surface like an old cushion or a piece of foam. Any soft surface that will support the teapot will do.
Then I use the Surform to remove any lumps and bumps from the clay. Don’t remove the mark that reminds you of where the top or bottom of the teapot will be.
The Surform is also a good way to thin out the clay walls. If there are patches on the sphere that feel bulky or heavy, you can refine them using the Surform.
Just be aware that it can remove a lot of clay quite quickly. Be careful not to make the walls overly thin, or shred so much that you make a hole in the surface.
The Surform will leave a rough shredded texture on the clay. You can tidy this up using a metal rib tool. This will scrape away the texture left by the shredder.
After using the metal rib tool, I smooth the surface, some more, using a soft rubber rib. This compresses the clay particles and will create a nice smooth finish to the teapot body.
Step 17 – Shaping the Teapot
At this point, I gently shape the sphere a little with my hands. Another way to shape the teapot body is to use a wooden paddle. I pat the clay sphere gently with the wooden paddle to even out and alter the shape.
Now that the clay is well bonded together, you can alter the shape of the hollow sphere quite a bit. You can pat it into a perfectly round circle, a teardrop, and oval or give it a flat base.
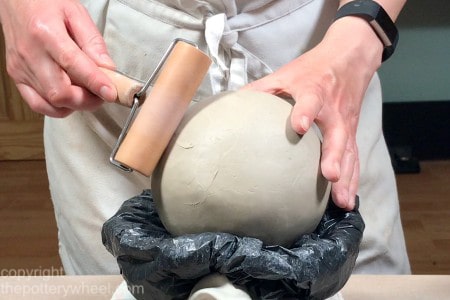
Once I am happy with the shape of the body of the teapot I smooth out the clay again. This time I use a rolling tool. I roll the tool over the surface of the teapot body to smooth out any uneven surfaces.

– View on Blick
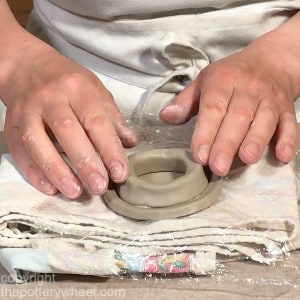
Step 18 – Making a Foot Ring
There are a number of ways to add a foot ring when you make a teapot. This is the method that I usually use. I like the profile that it gives the teapot.
To make the foot ring, roll out a coil of clay a little thicker than your pinky finger.
Turn your teapot upside down so you are looking at the base where the foot ring will be attached. I use the cushioned jug setup mentioned earlier to support the teapot whilst it’s upside down.
Drape the coil around the base, where you want to add the foot ring. Gauge how long you need the coil to be and cut it to the right length with a modeling tool.
Reposition the shortened coil to check that it’s the right length. I sometimes have to trim a little extra of the length to get it exactly right.
Once you are happy with the length of the clay, slip and score the ends of the coil. Then join the ends of the coil together to make a clay ring.
Shape the clay ring a little, flattening it a little to give it 4 sides. By shaping it, I’m making it into a square tube of clay, rather than a round coil. Using a roller can help to flatten the sides of the coil evenly.

When I like the shape of the clay foot ring, I draped it over the base of the teapot. I then cover the teapot and foot ring in a plastic bag and leave them overnight.
The next day the foot ring will have about the same level of moisture as the teapot. This will prevent it from cracking at the joint when it is attached and drying out for firing.
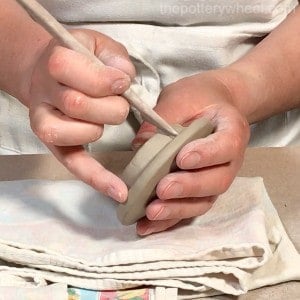
Step 19 – Attaching the Foot Ring
When the foot ring has firmed up overnight, I attach it to the teapot.
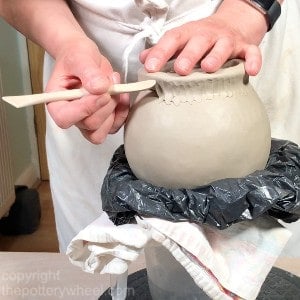
Firstly, I mark a circle on the teapot where I want the foot ring to be attached. You can mark this out with a needle tool, modeling tool, or pencil nib.
Then I score the base of the foot ring and the place on the teapot where the foot will be attached. I apply slip to both scored surfaces and then press them gently but firmly together.
Using a wooden modeling tool, I blend the foot ring firmly onto the base of the teapot. After it is firmly attached, I tidy up the clay using a combination of modeling tools. I find that a combination of the platter tool and a rubber rib gives a smooth finish.
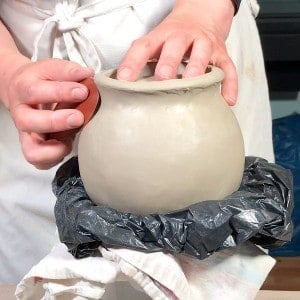
I then wait a few hours until the foot ring is firmly attached to the teapot. Once it is set, I use a Surform to ensure that the base of the foot ring is completely level. Again the marks from the shredder can be removed using metal and rubber pottery ribs.
Step 20 – Making a Lid for the Teapot
There are lots of different designs for teapot lids. The one you choose is really a matter of personal preference. Here are two ways to make a teapot lid:
A Flush Teapot Lid
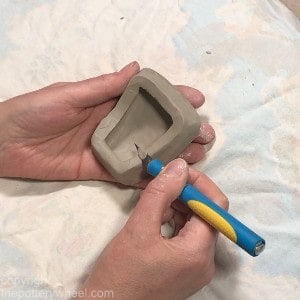
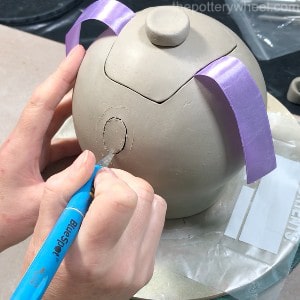
Firstly, I mark out on the top of the teapot where I want the lid to be. You can make a round lid if you like. However, with this teapot, I made a lid with straight sides. This shape is called a trapezoid shape. I like how this contrasts with the curves of the teapot.
To mark out a nice accurate shape for the lid, I draw the lid on a piece of paper first. I then cut out the shape from the paper, and use this as a template. Holding the paper template against the top of the teapot, I draw carefully around the shape.
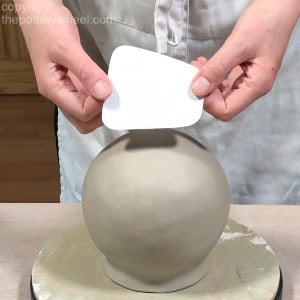
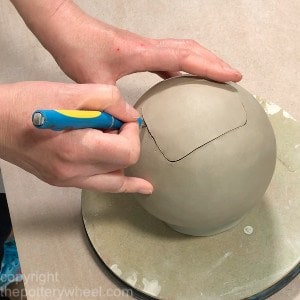
When I’m happy with the shape of the lid on the teapot, I cut along the drawn lines. I find the best way to do this is by using a sharp craft knife.

– View on Blick
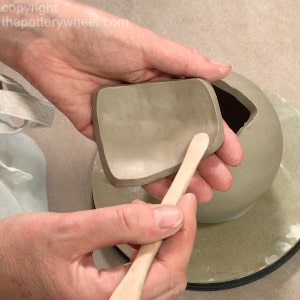
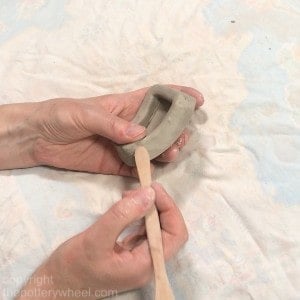
Once the lid has been cut out, lift the clay lid off the teapot carefully. You can now look inside the teapot and check the inside surface. At this point, I use a wooden modeling tool to smooth down the inside seam on the teapot body.
I then smooth down the edge of the teapot where the lid will sit. And I smooth down the edge of the lid itself. It’s important not to overdo the smoothing down at this point. If you smooth the lid too much, it won’t fit the hole in the top of the teapot.
To stop the lid from getting wedged into the teapot, I drape some ribbon across the lid opening. The lid then rests on the ribbon and can be removed by lifting the ribbon upwards.

Once the lid has a knob or handle, you won’t need the ribbon. But whilst there is no knob, it’s hard to remove a flush lid when it’s in place.
Making a Lip for the Lid
I make a lip for the lid so that it stays in place when the teapot is being poured. To make a lip, I roll out a coil of clay about half the width of my pinky finger. I then shape the coil around the edge of the inside surface of the lid. This is then attached to the lid using the slip and score technique described earlier. It is also blended on firmly so that the lip has a nice neat flush finish.
Once the lip is attached, I check that the lid still fits into the hole on the top of the teapot. It will probably need trimming, shaping, and refining to fit well and look nice.
Alternative Lid Design
Here is an alternative to making a flush lid.
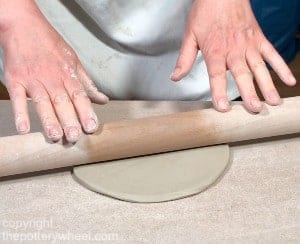
Start by rolling out a slab of clay, about 1/3 of an inch thick. Then cut a circle out in the clay with a craft knife or clay knife. The circular slab is going to be the lid, so, cut it out that size that you want the lid to be.
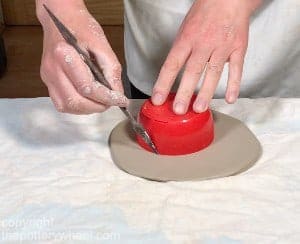
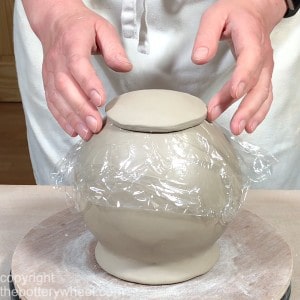
Cover the clay sphere teapot body with some saran wrap. Then lay the slab circle on top of the saran wrap. Gently press the slab so that it takes on the curve of the teapot.
Leave the teapot and slab overnight so that the slab firms up. The next day, you should be able to lift the slab lid off the teapot by peeling up the saran wrap.
Cut a hole in the teapot sphere smaller than the slab lid. To get an accurate circle, it’s best to draw around a circular object and then cut around the drawn line.
You can use the same object to draw a line on the underside of the slab lid. Use this drawn line as a guide when you are attaching a lip to the underside of the slab. That way the lip will fit inside the hole on the top of the teapot. Here is how I attach the lip to the lid…
Making a Lip for the Lid
Make a clay coil about the thickness of your pinky finger. Drape the coil around the underside of the slab lid using the drawn line as a guide for the length of the coil.
Once you cut the coil to length, join the two ends using the slip and score method. Position the coil on the underside of the lid and shape it so that it will fit into the hole on the top of the teapot.
When the lip is the right shape, attach it to the underside of the slab lid using slip and score. Leave the lip to firm up and attach securely to the lid.
Once the lip is firmly attached, use some modeling tools to tidy it up. I test the lid in the teapot to see if it fits. If it doesn’t fit well, you can slice back some of the clay lip to cut the lip to the right size.
When the clay lid fits the pot, I line the hole with saran wrap and put the lid in place. This will allow the lid to dry in place, without sticking to the teapot body.
Step 22 – Making a Knob for the Teapot Lid
You can make the knob for the lid in any shape you like. With this teapot, I made a simple disc-shaped knob. Usually, I make the clay knob and then leave it resting on the lid overnight. This ensures that the knob has the same moisture levels as the lid.
I then attach the knob to the lid using slip and score. I also like to blend in a little coil of clay around the joint. This will make sure that it is firmly attached.
Step 23 – Making a Spout
To make a spout, I roll and squeeze a piece of clay into a fat carrot shape. By this, I mean that it’s a little narrower at one end than the other.
I then press a piece of wooden dowel or a narrow paintbrush handle through the clay. Do this carefully so that the paintbrush passes through the middle of the clay and out the other end.
Then, gently roll the clay on your work surface, using the paintbrush, like a rolling pin. This will open up the clay carrot into a tapered clay tube.
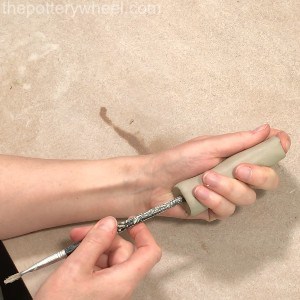
I then use my fingers and thumbs to finish off the shape of the spout. You can widen the spout at one end, give it a bit of a curve or keep it straight. It’s really a matter of what you prefer the look of.
It’s important to make the spout longer than you need it to be. This is because the spout will need to be cut to shape when you attach it to the teapot.
However, before you attach the spout, it’s important to let the clay firm up first. It would be very difficult to attach the spout when the clay is soft. So, I leave the spout overnight with the teapot under a plastic bag.
The next day I will leave the spout out in the open air. I let it dry a little more until I feel happy that the is firm enough to handle.
In the meantime, I get on with making a handle for the teapot.
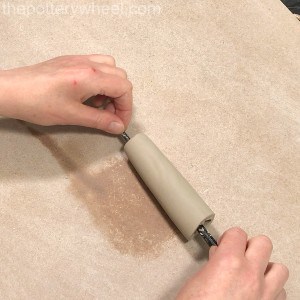
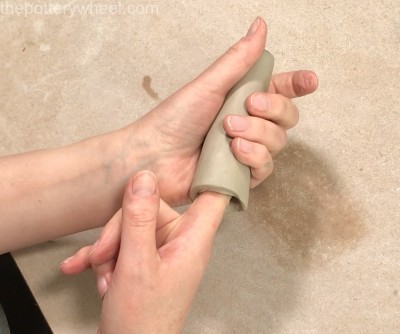
Step 24 – Making a Handle
There are different ways to make handles for pottery. I like pulling handles because it gives you a nicely shaped smooth, evenly proportioned handle.
This is how I pull handles when I make a teapot:
- Get a shallow dish of water and put it on the table in front of you.
- Take a chunk of clay about the size of an orange, and shape it into a fat carrot shape.
- Wet the palm of your hand, and the narrow end of the clay carrot.
- Run your wet fingers in a circle over the narrow end of the clay.
- Squeeze and pull the clay gently as you repeat this action.
- Turn the clay carrot in your supporting hand between pulls.
- When the handle starts to reach the right length, use the tips of your fingers to flatten it a little.
This last point is important. Using a handle that is very round can feel uncomfortable. So, when you are pulling a handle, use the tips of your fingers to flatten out the handle a bit.
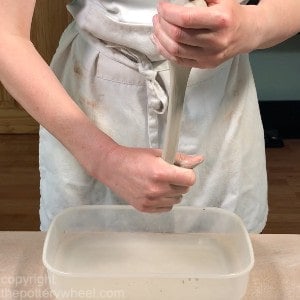
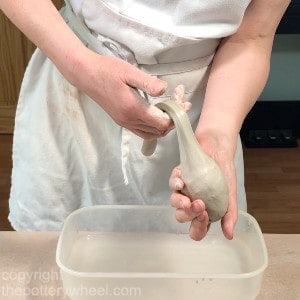
Once you are happy with the length and shape of the handle you can pinch the clay off. Place the pulled handle on a wooden bat to firm up. I tend to place the handle in a curved position to firm up on the wooden board. This means that the clay won’t have to bend too much when you attach it to the teapot.
I usually make the spout and the handle at the same time. Then I set them both aside to set and firm up before attaching them. Once they are firm enough to handle without losing their shape, I attach them. I start by attaching the spout…..
Step 25 – Attaching a Spout
Before I attach the spout I trim it. First I trim the tip of the spout where the tea comes out. I normally cut this at a 90-degree angle, so that the end of the spout is square. I will do a little more trimming and shaping of the end once it’s attached.
To attach the spout to the teapot, you will need to trim the wider end of the spout too. This needs to be trimmed at the correct angle so that the spout sits well on your teapot. If you put your spout in the wrong place on the teapot, or at the wrong angle, the teapot can leak.
Some Guidelines for Attaching the Spout:
Generally, the spout is attached to the teapot by positioning on the top ½ of the teapot. However, this is ‘rule’ is not always followed. Some teapots will have the spout attached in the middle or lower half of the body.
I prefer to add it to the top half as I like the proportions this gives the teapot. Regardless of where you attach the spout, it’s essential that the following ‘rule is followed…
The tip of the spout needs to be as high as the lid of the teapot. Ideally, the tip is just a little higher than the lid. Imagine that you fill your teapot to the brim. If the tip of the spout is lower than the water level in the body, the tea will leak out.
It’s best to angle the spout at 45 degrees or more upwards. If the spout is angled too low, the tea is more likely to spill out of the tip.
Angling the Spout
To find the right angle for the spout, I hold the spout up next to the teapot. I get down so that my eye line is level with the teapot. Then I hold the spout up behind the teapot. This gives me a visual read on where to trim the wider end. Then using a sharp tool, I mark onto the spout where I need to trim the clay.
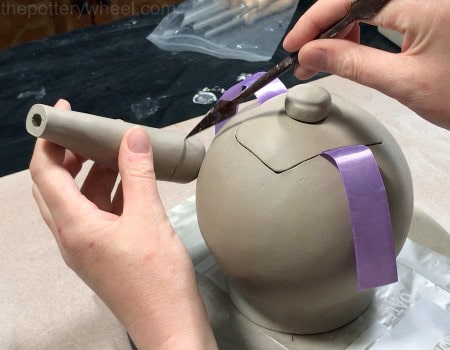
I trim the excess clay off using a sharp potters knife and tidy up the clay edge I just cut. Then I hold the spout up against the teapot to check the angle. If it’s not quite right, I trim again until I’m happy with the angle.
Once I’m happy with the angle and length of the spout, I hold it in place on the teapot. I then draw around the spout as it is in place on the teapot.
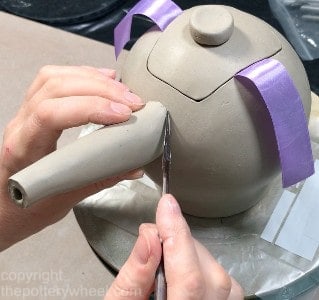
Attaching the Spout
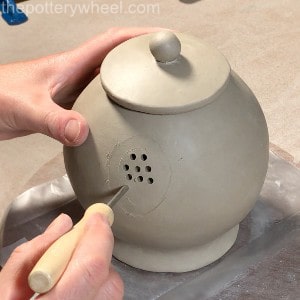
Using a small clay hole cutter, make a few small holes inside the area where the spout will attach. This acts as a filter for some tea leaves and also stops teabags from getting stuck in the spout. If you have made a narrow spout, then you can just cut a single hole in the side of the pot.
Slip and score the surface of the teapot and the end of the spout. Then firmly press the spout against the body of the teapot.
You can simply smooth the join with your finger or a piece of damp chamois leather. Or, like me, you can add a thin coil of clay to the join and blend this in. I like adding coils to joins because it gives a nice smooth finish. But also, because it reinforces the join.
Finishing the Spout
Teapot spouts can drip and dribble as you pour if they are not the right shape. There are various different designs for teapot spouts to avoid dripping. You can research these to find which ones you like the shape of. I find that the following steps help to avoid drips:
When the spout has been attached, I find it helps if the tip is at a 45-degree angle. Once the spout is on the pot, if it isn’t at the right angle, I trim it a little more.
Then I put a small wooden tool into the end of the spout and make a little V shape in the opening. Putting a V shape in the bottom half of the pouring hole also helps to prevent drips when pouring.

Step 26 – Attaching a Handle
Hold the handle up to the teapot and decide where you want to attach it. Cut any excess clay off the two ends of the handle to tidy it up and cut it to length. Then hold the handle up against the teapot where you want it to be attached. Using a needle tool or sharp tool mark on the teapot body where you want the handle to attach.
Score and slip the teapot surface and the ends of the handle too. Then position the handle on the teapot and press the handle firmly against the teapot. To add a bit of extra strength to the join I blend the clay. And as above, I add and blend in a small coil of clay to the join too.
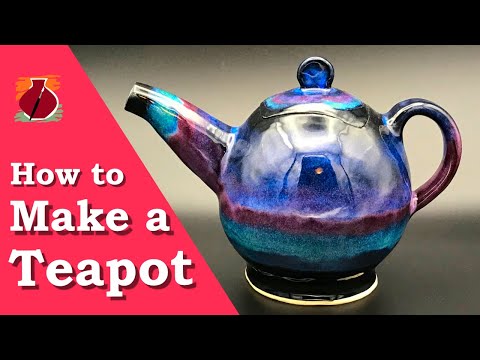
So, there you have it. Those are the steps I take when making a teapot. If you’d like to watch my full video of these stages, why not check out my YouTube video here…
How to Make a Teapot
Final Thoughts
There are lots of different ways to make a teapot. You can play around with all the different elements. I’d recommend experimenting with different types of handles, spouts, and lids. You can throw a teapot on the wheel, build it out of clay slabs or slip cast a teapot. My favorite way to make a teapot at the moment is to pinch it. I hope you find your perfect teapot style too!