Even if you use a kiln with an electric controller, it’s a good idea to use pyrometric cones when firing. But there are different types of cones and these are used differently. If you’ve just started firing your ware, you have probably wondered how to use pyrometric cones. This article is all about how to use different types of cones.
There are 4 styles of pyrometric cone: Self-supporting, large, small, and pyrometric cone bars. Large and self-supporting cones are placed in the kiln to measure heatwork during a firing. Self-supporting cones are placed directly on the kiln shelf. Large cones are used in a cone pack. Small cones and bars are normally used with Kilnsitter controllers.

Before looking at how to use pyrometric cones in their different ways, here is a short video on how to make a cone pack.
Let’s take a look at how pyrometric cones work.
How Pyrometric Cones Work
Pyrometric cones, sometimes called ‘witness cones’ are made out of the same material as clay and glazes. Like clay and glaze cones will start to melt at a particular temperature.
Ideally, when we fire clay to the right temperature, it becomes ceramic and usable. If we overfire it the clay becomes weak and brittle.
Eventually, if the temperature gets high enough, a piece of clay will melt into a puddle on your kiln shelf. Similarly, over fired glaze can run down the side of a piece of pottery.
In a similar way, pyrometric cones become fluid and bend at certain temperatures. They are formulated so that they bend at very particular temperatures. And it is this bending that tells a potter when a kiln has reached a particular temperature.
Temperature Vs Heatwork
However, it’s not as simple as reaching temperature. Cones measure the heatwork that has gone on inside a kiln. Heatwork is a combination of the temperature achieved and how long the pottery has been fired.
Simply getting to a particular temperature isn’t enough to fire pottery. Rather like making a roast dinner, it’s not enough to get the oven to a particular temperature. It needs to be in the oven at that heat for a certain length of time to be cooked properly.
Well, the same can be said of pottery. The heat in the kiln needs enough time and to be of sufficient temperature to do its work. Pyrometric cones measure heatwork and will bend when a certain amount of heatwork has been done.
How to use Pyrometric Cones – The Cone System
The most commonly used pyrometric cones are Orton Cones. Each Orton cone has a number impressed into the side.
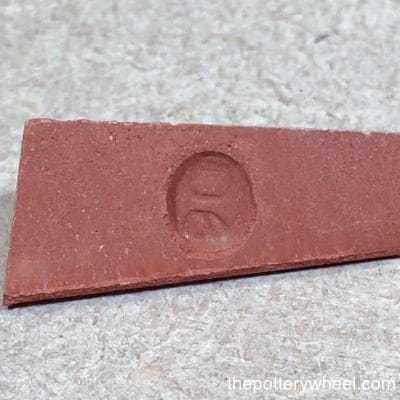
These numbers range from 022 to 14. The number is a part of a rating system and tells you the heatwork required for that particular cone to bend.
A cone with a rating of 022 will bend with much less heatwork than a cone with a rating of say 10.
Reading the Cone Chart
When I first saw the cone chart, I found it intimidating. However, the principles behind the information are relatively simple. Here are some guidelines for reading the chart:
- Cones with a 0 in front have a lower melting point than those without a leading zero. And the higher the number to the right of the zero, the lower the melting point.
So, 022 melts at a lower temperature than 06. The numbers to the right of the leading zero gradually decrease as the melting point gets higher. After cone 01, the numbers on the chart lose the 0 and start to ascend. - Because the chart is referring to heatwork, it also includes information about the speed at which the ceramics are fired.
If you fire something quickly, you need to go to a higher temperature to get sufficient heatwork done. If you fire more slowly, you don’t need the kiln to get as hot.
This is because some of the heatwork has been done by the amount of time taken. The chart tells you what temperature you need to fire to depending on the rate at which the temperature is increasing. - Incidentally, when people talk about cone 06, they say ‘oh’ 6, rather than zero 6.
The Orton Cone Chart
Here is part of the information from the Orton Cone Chart. I’ve included the information for large cones only because these are what I use. But also, because I wanted to explain the way the information on the chart is presented.
If you want to have a look at the whole chart, which includes self-supporting cones and small cones check it out here.
The first chart here is in Fahrenheit, the second is in Celcius.
Partial Cone Temperature Chart for Large Cones (Fahrenheit)
| Cone | Medium Rate 108 F/hr | Fast Rate 270 F/hr |
|---|---|---|
| 019 018 017 016 015 014 013 012 011 010 09 08 07 06 05 04 03 02 01 1 2 3 4 5 6 7 8 9 10 | 1249 1314 1357 1416 1450 1485 1539 1576 1603 1648 1683 1728 1783 1823 1886 1940 1987 2014 2043 2077 2088 2106 2120 2163 2228 2259 2277 2295 2340 | 1279 1350 1402 1461 1501 1537 1578 1616 1638 1675 1702 1749 1805 1852 1915 1958 2014 2048 2079 2109 2124 2134 2158 2201 2266 2291 2316 2332 2377 |
Partial Cone Temperature Chart for Large Cones (Celcius)
| Cone | Medium Rate 60 C/hr | Fast Rate 150 C/hr |
|---|---|---|
| 019 018 017 016 015 014 013 012 011 010 09 08 07 06 05 04 03 02 01 1 2 3 4 5 6 7 8 9 10 | 676 712 736 769 788 807 837 858 873 898 917 942 973 995 1030 1060 1086 1101 1117 1136 1142 1152 1160 1184 1220 1237 1247 1257 1282 | 693 732 761 794 816 836 859 880 892 913 928 954 985 1011 1046 1070 1101 1120 1137 1154 1162 1168 1181 1205 1241 1255 1269 1278 1303 |
How to use Pyrometric Cones
Here is a look at each type of cone individually and consider how to use pyrometric cones.
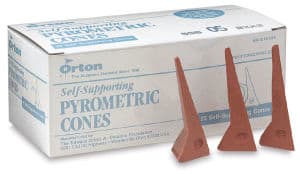
Self-Supporting Pyrometric Cones
These cones have a wide supportive base that is broad enough to be put directly onto the kiln shelf. Because of the broad angled base, they support themselves and don’t need to be positioned in a holder. They are the largest of the different types of pyrometric cones and measure around 1 ¾ inches above the base.
Ideally, pyrometric cones are positioned near the peephole (spy hole) on your kiln. This will enable you to look at how the cones are doing whilst you are firing. It’s important to mention that you should wear appropriately rated welders glasses when you are looking at the peephole.
Repeated exposure to ultraviolet (UV) and infrared (IR) rays can damage your retina and cornea, so remember to protect your eyes.
How Many Cones to Use?
Usually, 3 pyrometric cones are placed in a row. Each of these 3 cones has a different rating and role. The cone in the middle of the row of 3 is the target cone. This is the temperature that you want your kiln to fire to. So, for example, if you are firing to cone 06, the middle cone, or target cone is an 06 cone.
The target cone is positioned between a guide cone and a guard cone. A guide cone is one cone lower on the rating system than the target cone. So, if your target cone is 06, then your guide cone is 07. The guard cone is a cone higher, so in this example, the guard cone would be 05.
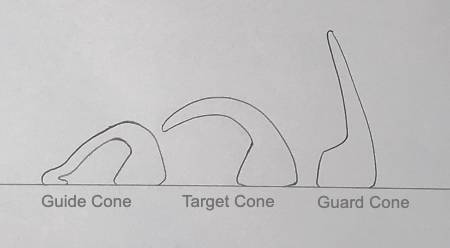
The guide cone melts sooner than the target cone. And ideally, if the ceramics have had the right amount of heatwork, the guard kiln will not melt. If the guard kiln melts and bends, then you know that your work has been over-fired.
If your kiln is reaching the target temperature, the guide cone will melt flat. The target cone will bend over.
With self-supporting cones, ideally, the cone bends so that its tip is level with the top edge of its supportive base.
Large Pyrometric Cones
Large pyrometric cones are around 2 1/3 inches tall (or 6 cm). They differ from self-supporting cones in that they don’t have an angled base. If you balance them carefully, you can get them to stand up on their own. But they are designed to be used in a cone holder. You can either buy a cone holder (cone plaque) or you can make one very easily.
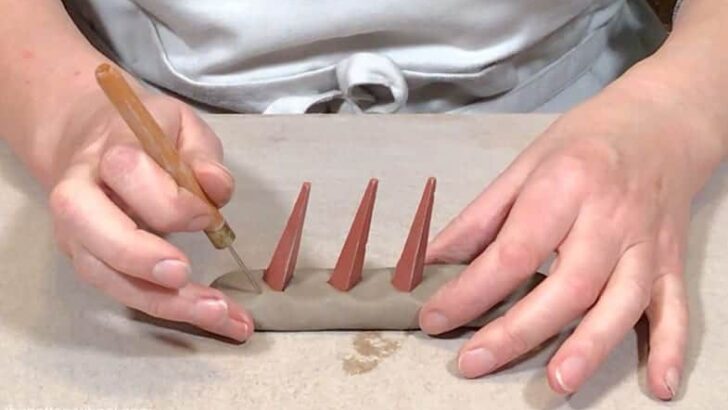
How to Make a Cone Pack
Like self-supporting cones, large cones are usually used in groups of 3. When you position 3 large cones together in a cone holder, you are making what’s called a cone pack.
As described above, you need a guide cone, target cone, and guard cone. In this example, let’s say you are firing to cone 6. Your target cone would be cone 6. And your guide cone would be cone 5. Whilst the guard cone would be cone 7.
Roll out a sausage of clay about the width of your thumb. Remember to use clay that fires to a suitable temperature. I use the same clay to make my cone packs that I’ve used to make my pottery.
If you use earthenware clay to make your cone pack for a stoneware firing, the cone pack clay will melt. So if you are firing to stoneware temperatures, make sure you use stoneware clay.
Flatten the sausage out a little so that it’s stable on a flat surface. If you’re working on a surface that clay sticks to, press it onto a paper towel or piece of cloth. This will stop the cone pack from sticking to your table. It can be awkward to lift them if they have stuck to the surface.
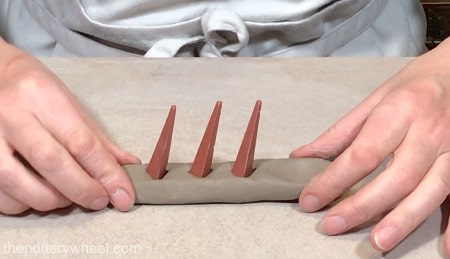
Press your three cones into the clay sausage in a row.
How to Position Pyrometric Cones
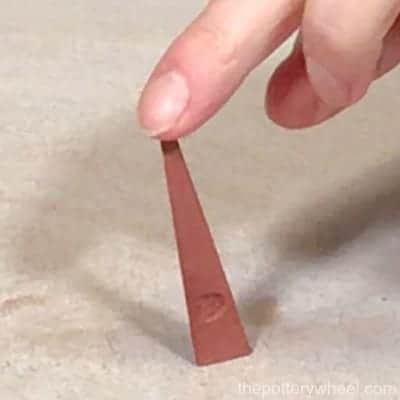
Each cone will have a longer side or spine. When the cone is placed on the table, it will tilt at an 8 degree angle away from its longest side.
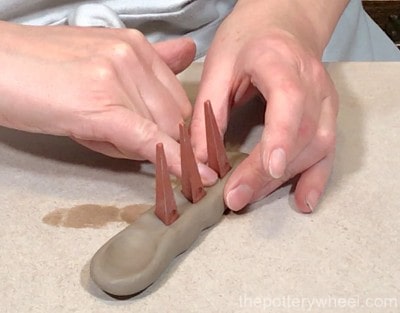
The cones are then pressed in a row into the sausage of clay. They need to be positioned in ascending order. The guide cone needs to be able to bend first. The target cone is in the middle, and the guide cone is at the end of the row.
It doesn’t matter too much about the distance between the cones. I tend to position mine about half an inch away from one another
Angling the Cones
Press the cone into the clay at the angle it would have if it were resting directly on the table. If the cone is too vertical, the shape it takes when it melts won’t give you a clear bend. The cones need to be able to easily bend forward away from their spine.
The cones need to be positioned with their spines in the same direction. This means that when they bend, they will bend over in the same direction, rather than tumbling in different directions.
However, it’s best not to have the spines all aligned perfectly with each other. If the spines all align, then as they melt and bend, they can melt directly on top of one another. This means it’s difficult to read how much the cone has melted.
If a cone had been allowed to melt as far as it could, it might melt right down. But if it melts onto another cone, it’s prevented from bending as much as it would have done. Therefore, it’s best to angle the cones slightly so they fall a little to the side of one another.
Reading the Cones
As with self-supporting cones, the guide cone will melt flat. If your pottery has had the right amount of heatwork, with large cones, the tip of the cone should be about level with its base. This is different from the self-supporting cone, which should melt to the top edge of its supporting base. And the guard cone should not have bent.
Extra Tips on Your Cone Pack the Cones
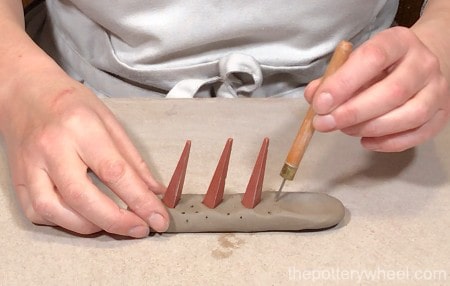
It can help to make a little spoon-shaped piece of clay at the end of the clay sausage. This catches the guide cone when it melts. If the cones get enough heatwork, the guide cone will melt flat or near to flat. A little spoon shape will help prevent the guide cone from melting onto your kiln shelf if it’s very over fired.
Once the cones are in place, poke holes into the clay holder. This allows the clay to dry more quickly and makes it less likely to explode in the kiln.
Ideally, you should let the cone pack dry out before you put it in the kiln. If you are pre-heating or candling your kiln, a bit of moisture in the cone pack shouldn’t be a problem.
Small Pyrometric Cones and Mini Bar Cones
Small cones and mini bar cones are normally used in conjunction with Kiln Sitter controlled kilns. Small cones are shaped like large pyrometric cones, but they are about 1 ¼ inches long (around 3cm). Mini bars are 1 inch (2.5cm) long.
KilnSitter Kilns don’t have a digital controller. Instead, they are switched off by a mechanical device when they reach temperature. A KilnSitter device uses a bar cone (or a small cone) to measure when the kiln has reached temperature.
The Sitter has a 3 pronged device that sits on the inside of the kiln. The prong in the middle is mobile and can move up and down. Before the kiln is switched on, a bar cone is sandwiched between the 3 prongs. The mobile prong is positioned on top of the mini cone.
When the cone is straight, it holds a connected device on the outside of the kiln in the ‘on’ position. As the kiln heats up, the cone bends. Eventually, when the cone is bent enough, the rod that it is supporting drops. When this rod drops and the mechanical on the outside of the kiln switches off.
Final Thoughts
Cones are simple devices, but their construction is sophisticated, in that they are accurate measures of heatwork. Even when using a kiln with a digital controller, it’s a very good idea to use cones. The digital controller might tell you that the kiln reached temperature.
But without witness cones, you can’t tell if your ware got enough heatwork to be fully fired. If you’ve bought a digitally controlled kiln, you might be thinking that you can avoid using cones. But it’s worth learning how to use pyrometric cones for this very reason.


