If you have a kiln with a digital controller, you might be tempted to think that you don’t need to use pottery cones when you are firing. After all, the controller monitors the temperature in the kiln. But even if you have a digital controller, it’s wise to use pyrometric cones with an electric kiln for a few reasons.
Here are some reasons to use pyrometric cones with an electric kiln:
- Thermocouples measure temperature rather than heatwork.
- Kilns can have hot and cold spots, and cones help you identify these.
- Cones indicate if your elements need replacing.
- Thermocouples are not always 100% accurate.
So, in general, using cones is good practice and will save you time and money in the long run.
Why Use Pyrometric Cones with an Electric Kiln Controller?
Let’s take a closer look at why it’s wise to use cones when you already have a digital controller.
Reason 1: All Kilns Are Different
The rate at which a kiln heats up and cools down depends on its age, design, and size. So, it’s not realistic to have a standard firing schedule for bisque and glaze firings that will fit all kilns. There are useful firing schedule suggestions and guidelines. And if you ask a lot of potters, their firing schedules will differ between them.
When you are using a kiln that is new to you, it’s helpful to have a suggested firing schedule in mind. But it’s also important to test these out to see if they are right for your kiln.
Reason 2: Heatwork V’s Temperature
The temperature of a kiln is a specific reading at a given point in time. Digital controllers use thermocouples to read the temperature in a kiln.
By contrast, heatwork is the amount of energy that has gone into firing a piece of ceramic work. Heatwork is a measure of how much heat the potter has been exposed to. This depends on the temperature reached and also the amount of time that heat has been maintained.
It sounds basic, but one way of looking at it is that a kiln is essentially an oven. When you are cooking anything, the cooked item needs to be in the oven for a set amount of time. If it is not in the oven for long enough, it will be undercooked. Similarly, if you leave it in there for too long, it will be overcooked.
A comparison can be drawn with clay. It’s not enough to reach a particular temperature. The pottery needs to be in the kiln for long enough to mature. If you take it out too early or too late the pottery will be under or over-fired. Both of which will affect the durability of your ware. Also, under or overfired bisque ware can encounter various problems when you try to glaze it.
It’s good to use pyrometric cones with an electric controller because cones measure heatwork. They will bend when they have had sufficient heatwork. And they will flatten out or collapse when they have had too much heatwork.
Cones give you a fuller picture. Your pottery might look okay when it comes out of the kiln. But your cones will tell you if your ware is underfired, overfired, or just right.
Reason 3: The Amount of Ware in the Kiln Affects Heatwork
There will be more heatwork going on in a fully loaded kiln than in a kiln with a light load. The reason for this is that heat is reflected back off the surface of pieces of ware in the kiln. This reflected heat adds to the overall heat energy that is generated.
If you use pyrometric cones in addition to an electric controller you will get an accurate picture of heatwork. Over time, using cones will give you an idea of how the load in your kiln affects heatwork. And you will be able to adjust your firing schedule to suit the amount of ware you are firing.
Reason 4: Thermocouples are Not Always 100% Accurate
A thermocouple is a probe that goes into the kiln through a hole in the side of the kiln. The thermocouple tells the controller what the temperature is in the kiln. The controller then adjusts the amount of heat being generated by the kiln elements. This in turn controls the temperature in the kiln.
Inside the thermocouple, is two metal wires that are welded together at the tip of the tube (source). One wire is set at a given temperature. And the temperature in the other wire responds to the temperature in the kiln.
The difference in the temperature of the two wires produces a voltage. And the size of the voltage depends on the size of the difference in temperature. The controller measures the voltage and adjusts the temperature of the kiln elements accordingly.
Over time and with use the accuracy of a thermocouple will deteriorate a little. This means that the temperature recorded by the thermocouple will be a little lower than the temperature in the kiln.

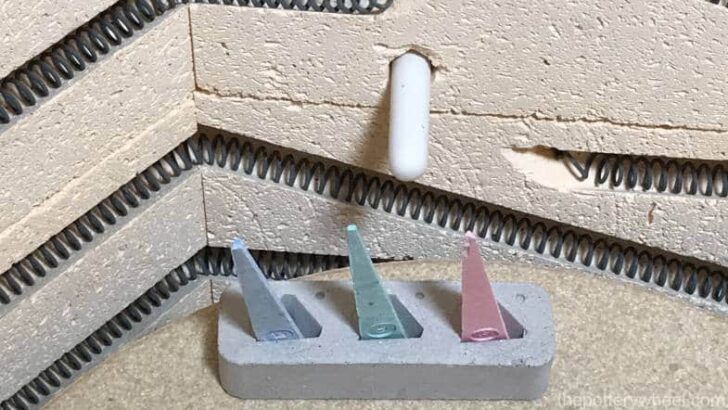
Using pyrometric cones with an electric kiln controller will give you a more exact picture of the kiln temperature. If you position your cones by the peephole of the kiln, you can look at the cones as you fire. This will give you a visual guide to the kiln temperature.
It’s important to wear suitable protective glasses when looking into a kiln peephole. Repeated exposure to UV and IR rays from a kiln can damage your eyes.
Reason 5: Elements Get Old
With time, as you use your kiln the elements will get old and less efficient at generating heat. When you rely entirely on your digital controller, you may not be aware that the elements are struggling. If you use pyrometric cones with an electric controller, you’ll be alerted to the fact that your elements need replacing.

When your elements are not working as efficiently as they might, they will find it harder to reach temperature. This will be reflected in the shape of the cones when you have finished firing. Your target cone will not have bent as much as you would have expected.
Reason 6: Kilns Have Cool Spots and Hot Spots
A related problem to aging elements is the issue of hot and cold spots in the kiln. It’s not uncommon for kilns to have uneven temperatures in the firing chamber. Some parts of the chamber will get hotter than others, these are known as hot spots. And other areas will stay cooler. These are sometimes called cool spots.
What this means is that pottery positioned at different points within the kiln will fire differently. There are lots of different things that can contribute to a kiln getting cool spots. One of them is damaged brickware, especially around the kiln lid. Another reason for a cool spot might be that one of the elements is not working as well as the others.
If you place witness cones on each shelf, you will be alerted to differences in temperature in the kiln. The cones in the area that are cooler will not bend as much as those in the hotter areas. Fixing cool spots in a kiln can be a challenge. However, if you use pyrometric cones with an electric kiln controller at least you will know there is an issue. Then you can start to tackle it.
Final Thoughts
Digital kiln controllers are great. You can program them, turn the kiln on, and let it do its thing. However, it’s best not to assume that you can leave the kiln entirely up to its own devices. As the above points suggest, it’s always a good idea to use pyrometric cones with an electric controller. They are simple to use, and a relatively inexpensive way of monitoring how your kiln is doing.


