I love using underglaze, and for the most part, I find it very versatile and reliable. However, just occasionally, I have had an issue with underglaze flaking, cracking, and peeling. So, I went on a mission to find out why this was happening, and this is what I have discovered…
The most common cause of underglaze flaking, cracking, or peeling is that it has been applied in too thick of a layer to the pottery. It’s best to apply 2-3 (possibly 4) thin layers of underglaze for an opaque finish, rather than 1 or 2 thicker ones.
That being said, whilst applying your underglaze too thick may be the most common cause of flaking, it’s not the only cause. So, let’s take a closer look at some of the causes of underglaze flaking, cracking, and peeling.
When Does Underglaze Flaking Occur?
One of the best things about underglaze is that in theory it can be applied to your pottery at any stage.
Although a few underglazes are designed to be applied to bisque ware only, most can be applied to unfired greenware, and bisque ware. And some potters apply underglaze on top of glaze to create Majolica ware.
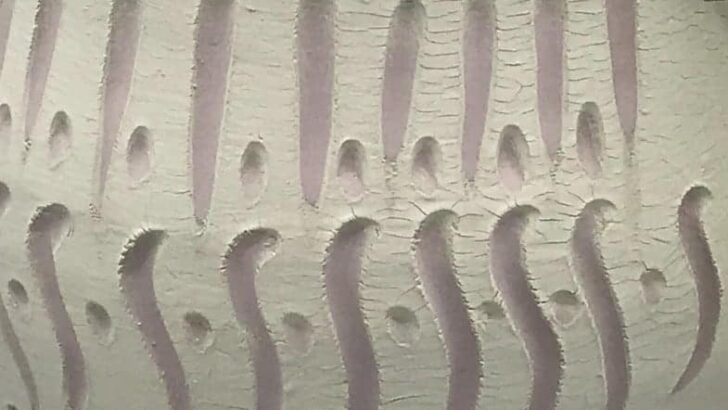
For the most part, underglazes are quite stable and behave reliably when applied to different stages of clay. However, sometimes they do flake, peel, or crack. Peeling is sometimes called ‘shelling’ and cracking is also known as ‘crazing’.
The times that underglaze is most likely to crack or peel are:
- When underglaze has been applied to greenware and the clay and underglaze are drying out together.
- During the glaze firing, when the underglaze has been given a coating of transparent or translucent glaze.
It is possible that underglaze will flake when it’s been applied to bisque ware. However, this is less common. If you’ve applied your underglaze to bisque ware, it’s more likely that you will encounter problems when the pot has been glaze fired.
Underglaze Flaking When Applied to Greenware
Underglaze can be applied to greenware clay at any stage, from fresh wet clay to bone dry clay. Most potters find that it’s best to apply it to clay when it’s in the leather hard stage.
One of the reasons that underglaze can flake or peel when applied to greenware is that as the clay and underglaze dry out they shrink.
If the clay and the underglaze are shrinking at different rates, the underglaze will be put under pressure and separate from the surface of the clay.
This is one of the reasons why underglaze flaking typically happens on curved ware or at the edges of ware. It can be tricky to make sure that your pot dries out at an even rate.
The edges of pots are more exposed to air and do tend to dry out more quickly than the rest of the pot.
Because of this a drying gradient is set up in the pot with some parts of the pot drying and shrinking more quickly than others (source).
Underglaze on the parts of the pot that are ahead in the drying process will be under more tension and more likely to flake or peel.
How to Avoid Underglaze Flaking on Greenware
There are a number of reasons why your underglaze may be flaking or peeling. Finding out what’s going on and addressing the issue can take patience with trial and error. You might have to try a few things to find the right solution. Here are some solutions that may help…
Solution 1 – Don’t Apply Too Much Underglaze
A thick layer of underglaze will be solid, rigid, and more likely to crack, peel or flake. In many ways, underglaze behaves like other water-based paints as it dries and will crack if it’s applied in a too heavy-handed way.
Underglaze manufacturers usually recommend applying 2-3 thin layers of underglaze to achieve an opaque look. It’s best to apply multiple thin layers and build up the color gradually rather than applying one thick layer.
To build up multiple layers, you need to let the underglaze dry between applications. If you apply a further layer on wet underglaze, the new coat will just lift the existing coat off your pot.
Solution 2 – Water Down Your Underglaze
If you open your pot and the underglaze is thick and creamy, it’s probably too thick. Underglaze is water-based, so you can thin it out with water. Add small amounts of water to thin it out.
However, you don’t want to make it too thin, as then you will find it hard to build up your color.
The best way to find the perfect consistency is to thin it out and apply it to a test tile. That way you can check that it gives you enough coverage, color, and opacity, without being so thick it is cracking or peeling.
Solution 3 – Add a Bit of Clay to Your Underglaze
Another solution is to help the underglaze shrink at the same rate as the clay. One way to do this is to add a little bit of the clay body you are using to the underglaze. The best way to do this is to make some smooth clay slip and then add a little of that into the underglaze.
Underglaze contains clay anyway, it’s part of the ingredients used by the manufacturer. This is so that it can be applied to greenware and shrink as it dries.
However, if you add some slip that is made out of the clay body you are using, you can achieve a closer shrinkage rate between underglaze and greenware.
Solution 4 – Dry Your Pots Slowly
Dry your pots slowly. Drying your pots slowly makes it easier to dry the pieces at a uniform rate. Left to their own devices in the open air, certain sections of your pottery will dry quicker than others.
These quick-drying areas include the rim, handles, and any fine details. If you cover the pot whilst it’s drying, this helps slow down the rate at which extremities dry out. Letting your pot dry slowly can prevent the underglaze from cracking under the strain of sudden change.
Solution 5 – Apply Underglaze to Leatherhard Clay
Apply the underglaze to leather hard clay rather than very wet clay or bone dry clay. Very wet clay has a lot of moisture to lose and will do a lot of shrinking as it dries. This is putting extra strain on the underglaze.
By contrast, bone dry clay is very absorbent and will suck the liquid out of underglaze very quickly. This can make it harder to create a good bond between the underglaze and the surface of the pot.
Solution 6 – Experiment with Repairing the Problem
You can try to repair the problem underglaze. Either you could try to apply a touch-up of underglaze to the affected area. Or you could bisque fire the pot and then apply a touch-up layer. Sometimes this can work.
However, if the underglaze has crazed, it’s likely that the texture of the crazing will show in the glaze firing too.
Also, you may find that a touch-up to an affected area will continue to flake, peel, or craze. But it might be worth a shot if you are not ready to scrap your project and start again.
Another Tip!
When I’m underglazing mugs, I tend to put my left hand into the mug and use it as a support as I paint the outside. I find this is a good way of getting the mug into handy positions to paint on designs.
For that reason, I would leave the inside of the mug bare of underglaze until I’d finished the outside decoration.
Then once the outside underglaze decoration was complete, I would paint the inside surface of the mug with 2 or 3 layers of whatever color underglaze I wanted.
I found that when I did this the underglaze on the outside of the mug would quite often crack as it was drying.
My thinking was that most likely when I was underglazing the inside of the pot, the clay was absorbing moisture from the underglaze and swelling up a little. So, rather than cracking as the clay shrank, the underglaze was cracking because the clay was swelling up.
My solution to this issue was to refrain from using underglaze on the inside of the mug. I tend to bisque fire the mugs once the outside is decorated. Then I use a colored liner glaze on the inside surface of the mug during the glaze fire.
Why is Some Underglaze More Prone to Cracking?
If you have had a problem with underglaze cracking, you may have noticed that it isn’t a problem that affects all your underglazes.
You might find that certain colors within a particular underglaze product range are more prone to cracking than others. Or you might find that one range is more vulnerable to this issue than others. Why might that be, and what is going on?
Possibility 1: Underglaze and Clay Fit
Different brands of underglaze are made up of different ingredients. And different colored underglazes within the same range also contain different components. So, they behave differently when applied to clay.
In addition to this, underglaze will behave differently when used on different clay bodies. You may experience underglaze cracking because that particular brand or color of underglaze does not get on well with the clay you are using.
One solution is to use a different brand of underglaze that has the color you want in their range. Or experiment with a different clay body.
Low fire white clay bodies that contain a higher percentage of talc are known to cause some problems with flaking and peeling underglaze.
Possiblity 2: Using Old Underglaze
One final consideration is the condition of the underglaze that you are using. Is your underglaze old? Has it been sitting on the shelf for months and separated out? Have you mixed it sufficiently before using it?
Over time the ingredients in underglaze will separate, with the heavier particles sinking to the bottom. If you don’t mix it sufficiently before you apply, the composition of the underglaze that you are applying to your piece won’t be quite right.
Equally, if you’ve used a particular bottle regularly without mixing it sufficiently, the composition of the underglaze left in the bottle won’t be quite right either.
Underglaze Flaking When Applied to Bisque
It’s less common for underglaze to flake off after it’s been applied to bisque and before it’s been glaze fired.
However, it can happen. If you find you have this issue, you might want to consider some of the causes mentioned above. For example, did you apply the underglaze too thickly?
There are some other possible causes of underglaze not adhering well to bisque pottery. These can include:
Oily marks left on the bisque ware from being handled with greasy fingers. Make sure your hands are clean before you handle your bisque ware to avoid contaminating the surface.
Dust and debris on the surface of the bisque ware can prevent underglaze and glaze from adhering properly. It’s best to give your bisque ware a wipe down with a damp sponge to get rid of dust before decorating it.
It’s possible that the bisque ware was contaminated by another substance such as wax resist.
Underglaze Flaking During Glaze Fire
The final point at which you might get underglaze flaking, crazing, or peeling is during the glaze fire.
Sometimes your underglaze will look fine when it comes out of the bisque fire. However, once it’s taken out of the glaze fire, a problem with the underglaze might become apparent.
Again, it’s worth considering if the underglaze was applied too thickly.
Other than thick application, a few other solutions are worth trying out. These are:
Solution 1
Check that you are allowing your underglaze to dry sufficiently before you apply your glaze. And equally, make sure that your glaze is dry before you start the glaze firing. This can sometimes make a difference.
Solution 2
Another factor that might be at play is that some colorants used in underglaze are quite refractory. This means that they don’t melt at lower temperatures. If your underglaze contains a particularly refractory color component, it may not be melting and bonding with the overglaze.
One solution to this is to try firing your pieces to a higher temperature. For example, if you’ve been firing to cone 04, try firing to 01 and see if that helps the underglaze melt.
Solution 3
A problem that can arise from firing your underglaze to a higher temperature is that it can change some of the colors. Colors that were nice and bright at low fire temperatures can start to be washed out at mid-fire temperatures.
If you find that this is happening, and you want to stick to low fire temperatures, then there are other measures that you can try. For example, you can mix a small amount of your clear glaze in with the underglaze before you apply the underglaze to your pottery.
This can help the underglaze melt around the same temperature as the glaze. Alternatively, you can add a small amount of a flux like Gerstley Borate to your underglaze. This will help it to melt at a lower temperature, and can also help prevent crazing.
Solution 4
The last suggestion that you might try is to apply your glaze in a different way. If you have been dipping or brushing your glaze, try spraying it on in a thin layer. This can sometimes eliminate problems of underglaze flaking, peeling, and cracking.
Final Thoughts
Underglaze flaking, cracking, and peeling are very disappointing. Not only have you applied it to your lovingly crafted pottery. But applying underglaze is time-consuming in itself. However, in pottery, when things go wrong, it’s best to chalk it up to experience and try again. I hope that some of the tips above will help you address some of the underglaze issues that you might have encountered.


