Your cart is currently empty!
Washing Bisqueware – Is it a Waste of Time?
Published:
Last Updated:
Affiliate Disclaimer
As an affiliate, we may earn a commission from qualifying purchases. We get commissions for purchases made through links on this website from Amazon and other third parties.
I’m in the habit of giving my bisque pottery a wipe down with a damp sponge before glazing. But I recently read that some potters never wipe or wash down their bisque ware. I wanted to know if I was wasting my time, so I looked into the pros and cons of washing bisqueware, and this is what I found out…
It can be helpful to wash your bisqueware. Bisque can collect dust over time. It can also be left with a powdery residue on its surface when it’s been fired. Dust, debris, and powder can cause glaze problems like pinholing, and crawling. Washing bisqueware can prevent these issues.
Nevertheless, it is true that some potters don’t bother washing bisqueware. So, let’s take a closer look at some of the reasons for and against this practice.

Table of Contents
show
Washing Bisqueware – Pros and Cons
If your bisqueware is dusty or dirty, then it’s a good idea to give it a wash. Bisque that has been sitting around in a studio collects dust and debris.
Why is Dust and Dirt an Issue?
Dust and dirt on your bisqueware can affect the glazing process and also your glaze results. This is the case whether you brush or dip your glaze.
If you brush your glaze on, and your bisque is very dusty, it can be harder to get an even covering of glaze.
As you brush the glaze on, it can roll off the bisque surface because of the dust. You can, of course, keep brushing until the dust has been mixed into the glaze and is adhering.
However, it doesn’t feel good to be mixing contaminants into your glaze. Plus, it’s harder to get a nice even coating of glaze if you are focused on trying to work around a dusty bisque surface.
Pinholes
Dust and debris can also cause problems if you are dipping your bisque in glaze.
Dust can prevent the glaze from accessing all surface areas of the bisque. The result is that you can have small patches or pockets of air on the surface of the bisque that have not been glazed.

This can cause a pinholing effect on your pottery once it’s been through a glaze fire. Pinholes in glaze are small holes in the glaze surface that go right the way through to the clay body.
Crawling
Dust and debris on the bisque surface can also cause glaze crawling. ‘Crawling’ is when glaze rolls away from patches of bisque during the glaze fire. The glaze collects in certain areas of the pottery and leaves other areas of the bisque bare and unglazed.
Contaminating the Glaze
Another factor that is worth considering is protecting the glaze from contamination. If you dip bisque into glaze, and the bisque is coated with dust, this debris will be transferred into the glaze itself.
Over time the dirt from the bisqueware will be mixed up into your glaze formula, which may create problems with your glaze in the long run.
Oil and Grease on Bisque
Bisque that has been waiting and left unfired for a while is more likely to have been handled. Every time you handle your bisqueware you will be leaving a slightly oily residue on the surface of the bisque from your skin. This oily residue may not be visible to the naked eye.
I’m not talking about picking your ware up with greasy fingers from your mayo sandwich. Rather I’m talking about the natural oils that we have on our fingers at any moment in time. If this residue of oil builds up over time, it can make your bisqueware less receptive to glaze.
This is not just an issue with glazing. Underglaze also does not like to be applied to a greasy surface. In fact, underglaze is known to peel and flake off (known as shelling), if it’s applied to bisque that has been contaminated with oil or grease.
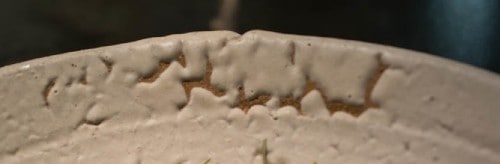
Spotting Cracks and Defects
Another advantage to washing bisqueware is that when the bisque is wet, any cracks in the pottery will darken and become visible.
A very fine hairline crack may not be noticeable when the bisque is dry. But once it becomes wet the crack holds more water and will become more apparent.
Although disappointing, this will help you avoid wasting glaze and electricity glaze firing a faulty piece of ware. Or, it will alert you to the problem so you can try to fix the crack with a bisque repairer like bisque fix.
With all of these factors above, washing bisqueware like an obvious choice. However, not all potters do wash their bisque ware, and here is why…
Washing Bisqueware Takes Time
Washing bisqueware takes time. It takes time to wash the bisque and it also takes time to wait for it to dry out before you glaze it.
Production potters, who are making hundreds of pieces of pottery a week simply don’t have the time to wash every piece of bisque. It’s simply not an economic use of their time and waiting for the bisque to dry out would interrupt their production flow.
Most production potters will cover their bisqueware once it’s been removed from the kiln to avoid dust settling on it in the first place.
Also, their bisqueware is not sitting around for long enough to collect a lot of dust. Generally, it’s out of the bisque fire, and more or less straight into being glazed give or take a day.
A studio potter or hobby potter is more likely to have a slower pace of production. This allows for more chance that the bisque will collect dust or be otherwise contaminated through handling.
That being said, some clay comes out of the bisque fire with a fine coating of dusty powder on its surface. This isn’t the case with all clay bodies, but it is certainly true of some.
If you’ve noticed this fine powder and you are not a production potter with strict production deadlines to meet, then washing bisqueware makes sense.
So, let’s take a look at some of your options when it comes to washing bisqueware…
How to Clean Your Bisqueware
There are a few options when it comes to cleaning your bisque ware. Washing bisqueware isn’t the only choice, you can also try the following…
- Cover your bisque ware with a dust sheet or paper sheet when comes out of the bisque firing.
This can be a good option if you are very busy and want to cut down on the need to wash your bisque.
However, it’s worth remembering that some clay will come out of the bisque fire with a fine dusting of powder on the surface. So, covering your ware to avoid dust settling on it from the atmosphere may not quite do the trick. - If you have an air compressor, you can also remove dust and debris from your bisque with a blast of pressurized air. The advantage of this technique is that you don’t need to wait for your bisque to dry afterward.
- You can try dusting down your bisque with a brush or a towel. If you try this technique it’s best to do it outside to avoid the build-up of clay dust in your pottery space. Even if you are dusting down your pots outside, it’s also recommended to wear a mask that filters out particles.
If you find that the above methods are not effective, then washing bisqueware may work better.
Cleaning Your Bisque with Water
- Some potters use a hose when washing bisqueware. A hose is helpful to create a bit of pressure from the water flow to flush away any dust or debris.
- Rinsing under the tap is an option.
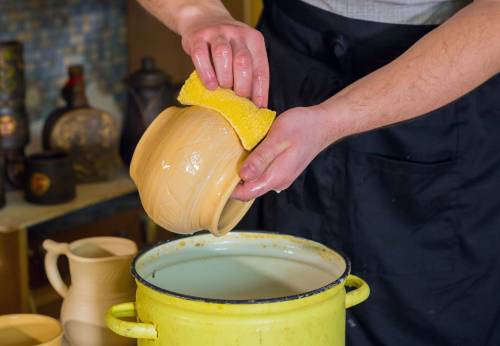
- Dunking your bisqueware in a bucket of water. If you choose this option it’s a good idea to change the water regularly. Dust from the bisque can settle on the surface of the water. So, as you remove the bisque from the water, you might redeposit a film of bisque on the ware if the water is not clean.
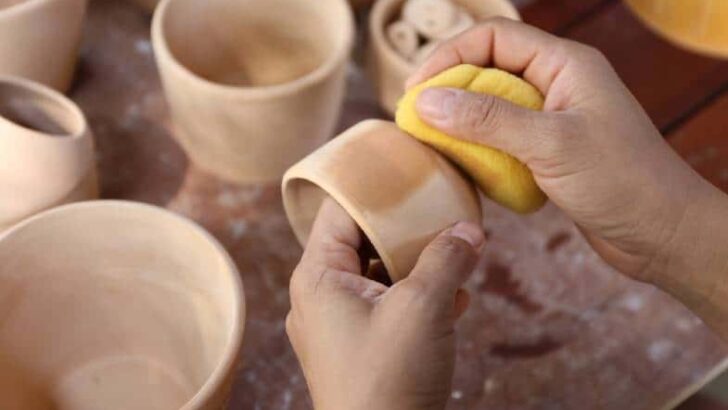
- Alternatively, you can wipe your bisqueware down with a damp sponge. Bear in mind that if your potter has a textured surface, this can shred your sponge. The result is that you will end up with small pieces of shredded sponge on your pottery instead of dust. If your pots are very textured, then trying one of the above options is probably preferable.
How Long to Leave Your Bisqueware to Dry?
Exactly how long it takes for your bisqueware to dry thoroughly will depend upon how warm and dry your pottery space or studio is.
Bisque is very absorbent, so the surface of the bisqueware will be touch dry very quickly. However, even though it feels touch dry, it may still contain quite a lot of water.
This is important because if you apply glaze to wet bisqueware, less glaze will stick to the bisque surface. The result is that you will get a thinner coating of glaze on your pottery.
Some potters deliberately wash their bisque to ensure that they get a thinner coat of glaze on their pots. But if this is not something you want to achieve, then be sure to leave the bisque to dry out thoroughly. I’d suggest leaving it overnight somewhere warm and dry.
It’s also recommended that you let your bisque dry out before you apply wax resist to the foot ring. The wax resist will seal the base of your pot with a waterproof layer. This will prevent moisture from evaporating from the base.
Final Thoughts
Not everyone finds washing bisqueware essential. However, there are a few good arguments in its favor. Personally, I clean my bisque with a damp sponge before I glaze it. I find it easier to apply an even layer of glaze to clean bisque. But it may be worth your while experimenting to find out which method suits you and your pots best.