
If you like hand building pottery, then learning how to make a double pinch pot is a game-changer. It’s a simple technique, but once you have mastered it, you can use it to make almost any pottery form. I use the double pinch pot to make teapots, vases, jugs, and pitchers.
In this post, I will show you how I make a double pinch pot pitcher or jug. But the technique can be adapted to make whatever object you like. So, let’s dive into the nuts and bolts of making a double pinch pot.
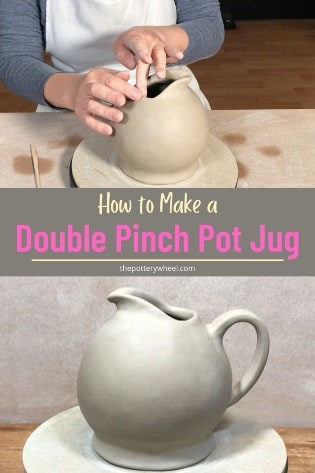
How to Make a Double Pinch Pot
Learning how to make double pinch pots will allow you to make round or spherical pottery forms. It will also enable you to make larger pinch pot forms but joining two smaller pinch pots together. Another name for a double pinch pot is a composite form.
Step 1 – Weighing Out the Clay
The first step in making a composite double pinch pot is to weigh out two balls of clay. It’s important that the two balls of clay weigh the same amount. You’re going to make two pinch pots that are the same size, so using the same quantity of clay is key.
For this piece, I weigh out two balls of clay weighing 700g, or 1.5lb each. I use buff stoneware like this one…

View on Blick
If you’d like to know more about the best clay for hand-building pottery, check out this article that I wrote on that subject right here.
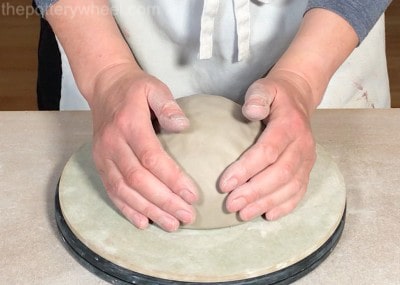
Once I have weighed out the clay, I roll the two lumps of clay into nice round balls. These will be about the size of a large orange.
Step 2 – Starting to Pinch Out the Clay
Support the ball of clay in one hand. Then press the thumb of your other hand into the clay ball. Keep pressing until you start to feel your thumb with the palm of your supporting hand.
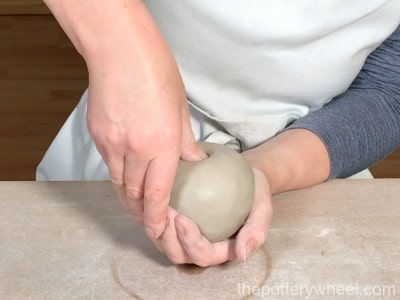
You need to be careful not to push the thumb all the way through. At this stage, I aim for the clay to be around 1/3 of an inch thick.
It will get thinner as you work on the pot. But at this point, you don’t want it to be too thin, as the pot will go floppy.
Once you have pushed your thumb into the center, then you can start pinching out the ball of clay.
Pinch the clay with your thumb and forefinger. It’s best to keep your thumb and finger reasonably straight when you do this. By keeping them straight you are compressing the whole length of the clay.
If you pinch just with the tips of your fingers, then you end up with a thin ridge in a clay lump, rather than a pinched-out pot.
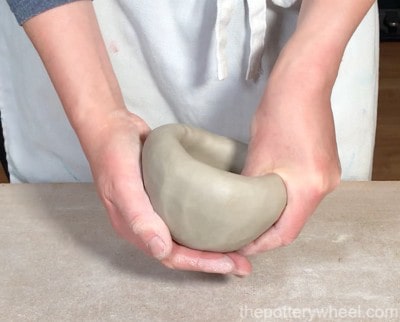
Pinch the clay, turn it, and then pinch again. You will work up a bit of a rhythm where you pinch and turn, pinch and turn.
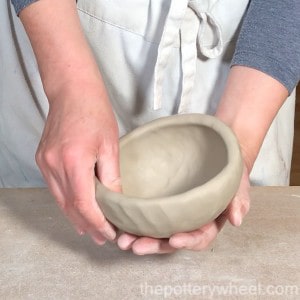
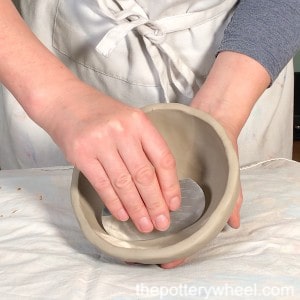
Step 3 – Shaping the Pinch Pot
The aim is to make the walls of the pinch pot of an even thickness. As you pinch the sides out you might find that the base of the pinch pot is thicker than the rest.
You can even out the base and the sides using the tips of your fingers. Put the tips of your fingers on the base of the pot on the inside surface.
Then gently but firmly press and drag your fingers from the base up the walls of the pot. This will thin out the base and move the excess clay up the walls of the pot.
I use a combination of this stroking motion with the pinching technique to shape the pot.

It’s best to keep the pot supported in your hand rather than pinching it when it’s on a surface. If you rest the clay on a table and pinch it, the clay will get a flat base. The pot is also likely to turn into a flat wide shape if you rest it on the table.
So, it’s best to keep it supported in your hand until you are happy with the shape.
If you find the pot gets a bit wide you can turn it upside down on a flat surface. It’s best to put it on a wooden pottery bat or wooden board which can be moved around easily.
When it’s turned upside down, you can cup your hands around the pinch pot. Then squeeze the clay gently. This can help to reshape the pot and make it rounder if it has flattened a bit too much.
Step 4 – Repeating the Process
Go through the same process with the second ball of clay to make your second pinch pot. These two pots will be joined together at the rim, so aim to make the two pots the same size and shape.
Step 5 – Letting the Pinch Pot Firm Up
Once the pinch pots are the correct shape, I leave them to firm up overnight. I turn each pot rim down on a pottery bat and cover them loosely with a plastic bag.
If your pottery bat is wooden, then cover the bat with a plastic bag before you put the pot rim down.
If you put the pot directly onto a wooden bat, the wood can absorb too much moisture. As a result, the pot can end up with a dry hard rim that is difficult to work.
Check the pots now and then to see how firm they are. The next time you work on them, they need to be firm but workable.
At this point, you don’t want the clay to be leather-hard. But you do want it to be firm enough to handle without going out of shape. I aim for soft leather hard clay at this point.
When I check the clay, if it’s still too soft, I take off the covering plastic bag. This will let it set a bit quicker. But, I keep an eye on it to make sure it doesn’t get too dry.
Step 6 – Pinching the Clay Some More
When the clay is firm, I carry on pinching the clay a little longer. I do this to even out the thickness of the walls. And to thin out any sections that look a little chunky.
Because the clay is still flexible, you can press and shape the pots to improve the shape.
However, it’s important not to overdo the pinching at this point. The clay has dried out quite a bit, and if you work it too hard you can create cracks in the surface or edge. These cracks can then open up and get worse as the clay dries out.
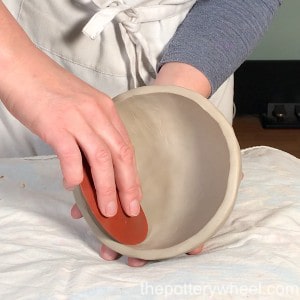
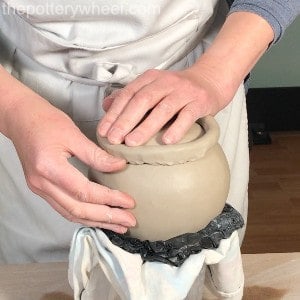
Step 7 – Refining the Pinch Pots
Once I’m happy with the shape I tidy it up and refine the pots.
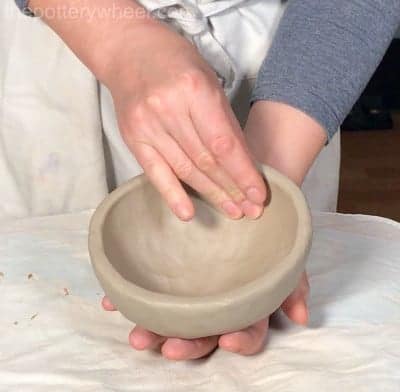
I start by smoothing out the clay on the inside of the pinch pot. This double pinch pot is going to be a vase, so the inside of the pot won’t be especially visible. Nevertheless, I want it to look nice on the inside too.
I place a piece of foam covered in an old tea cloth on the work surface. This soft surface is a good way to support your pinch pot as you work.
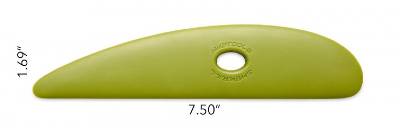
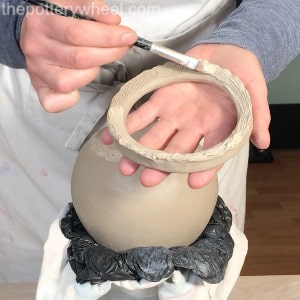
Then I use a platter rib to start smoothing out the inside of the pot. The platter tool is a good way to get rid of any big lumps and bumps on the clay surface.
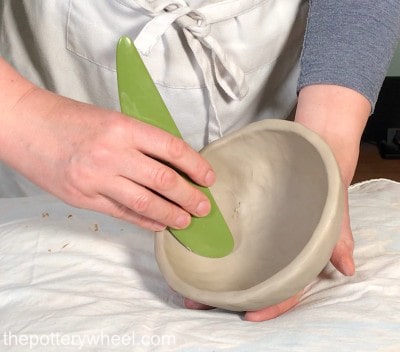
Simply scrape the curved edge of the platter tool over the inside of the pinch pot.
I then use a combination of metal rib tools and rubber tools to smooth out the clay surface. The metal tool is good for removing clay bumps. The rubber rib is great at compressing the clay and giving a nice smooth satin finish.
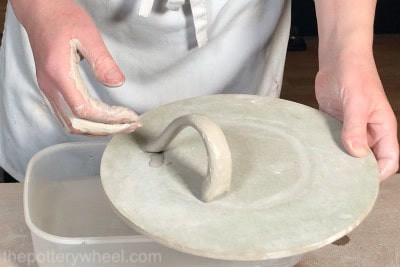
Step 8 – Lining up the Two Halves
It’s now time to find where the two halves fit together best. I do this by supporting one pot so that it is resting rim upwards.
Find an old measuring jug, small bowl, or plant pot. Stuff it with a soft cloth and then cover the soft cloth with an old refuse sack. This creates a soft concave supportive surface for the curved bottom of the pinch pot.
Then lower the other pinch pot onto the rim of the supported pot. You aren’t joining them at this point, you are just finding out where they fit together best. Are they the same size? Is there one position where they fit snugly together?
The aim is to line them up so that they fit well together. Once you have the best fit, use a modeling tool or knife and make a mark at the join across both pinch pots. This will help you easily line them up together again later.

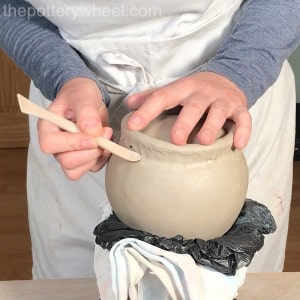
Step 9 – Joining the Two Halves into a Double Pinch Pot
The best way to join two bits of clay is to use the score and slip method of joining. Using a serrated rib or a kitchen fork scuff up the rim of both pinch pots. It’s a good idea to scratch the clay in two directions to make a crosshatch pattern in the clay.
After scoring the clay, paint or daub some clay slip onto the scored rim. Clay slip is simply water and clay mixed together to form a smooth clay liquid. Check out this post for information on the best ways to make clay slip.
Once you’ve applied slip to both rims, line the pinch pots up using the score mark you made in step 7. Then gently lower one pinch pot onto the rim of the other.
Press the pots firmly together without damaging the shape of either half.
Then using the smooth end of a wooden modeling tool, blend the two halves of clay together.
You can reinforce the join by adding a flattened coil of clay on top of the joint. Simply roll out a coil of clay about the width of your pinky finger.
Flatten the clay coil either with your fingers or a clay roller. Then drape the flattened coil around the clay sphere over the join.
Blend the coil over the join with your thumb and fingers. This will create a bit of ridge on the clay sphere. You can scrape the excess clay off the ridge using a metal rib, or an old bank card.

Cover the sphere in a plastic bag and leave overnight. This will give the clay a chance to bond together well.
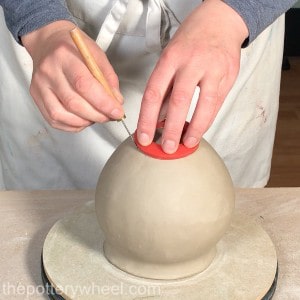
Step 10 – Firming up the Double Pinch Pot
Because this is an enclosed sphere the air inside creates pressure on the clay. This means you can alter the shape of the piece into more or less whatever shape you want.
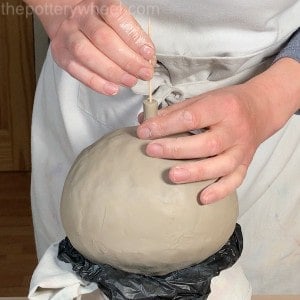
You can increase the pressure in the sphere by inflating the pinch pots with more air. To do this, roll a short coil of clay about an inch long and half an inch wide. Blend this coil onto the side of the sphere.
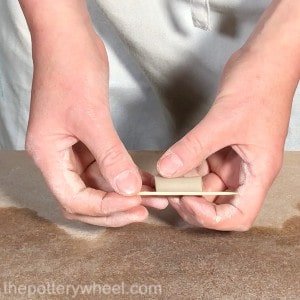
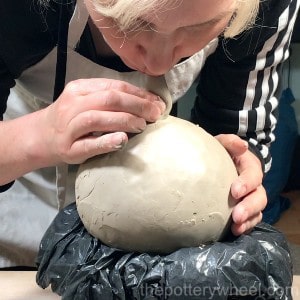
Then push a cocktail stick down the coil and through the surface of the sphere. This makes a small hole in the side of the sphere. You can then blow gently into the clay ball and increase the pressure inside. This makes it even easier to shape.
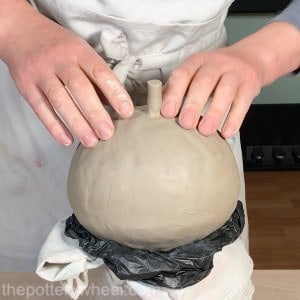
When you have blown into the sphere, pinch the short coil to close the small hole. Then blend any remaining bits of clay from the coil into the surface of the sphere.
It’s best to do this after you have let the two joined halves bond together well. I’d suggest leaving it for at least a few hours to let the double pinch pot set up and join firmly.
If you blow air into it too soon after joining the clay, the join won’t be strong enough. As a result, the additional pressure might force the two halves apart again.
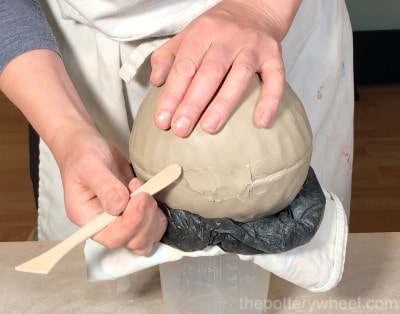
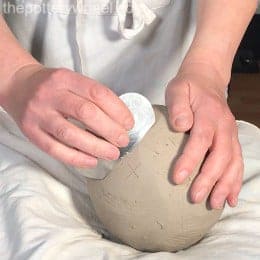
Step 11 – Smoothing the Surface of the Double Pinch Pot
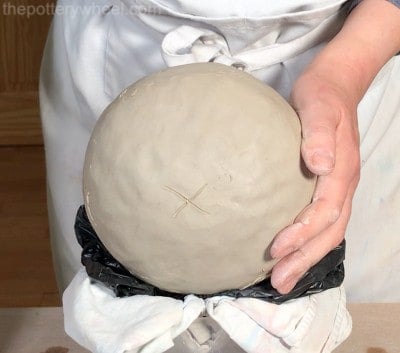
It helps to remember where the seam between the two pinch pots exists. Ideally, the join should be halfway down the sphere, a bit like the equator on a globe of the earth.
I help myself to remember where the seam is by marking an X on the top and bottom of the sphere.
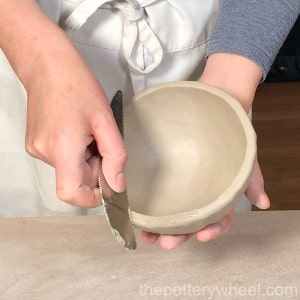
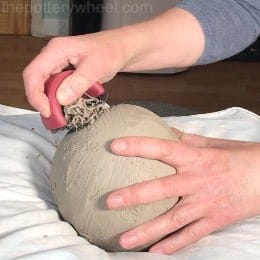
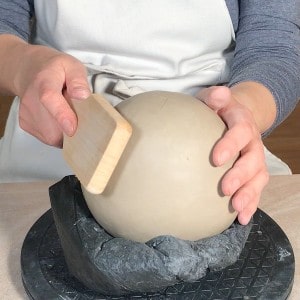
I then use a shredding tool or ‘surform’ to scrape off the major lumps and bumps on the surface. The surform acts a bit like a cheese grater, scraping away excess clay.
This process is also good for thinning out the clay sphere and making it a bit less bulky.
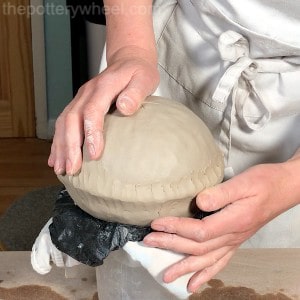
The surform will even the clay out, but it will leave score marks on the surface of the sphere. You can remove these by scraping them away with a metal rib tool.
Once you have removed the texture with the metal rib, you can compress the clay with a rubber rib. This will leave a nice smooth surface.

Step 12 – Shaping the Double Pinch Pot
You are then ready to start shaping the double pinch pot as you like. You can shape the sphere using a variety of methods. The simplest method is to pat/tap or squeeze it with your hands and fingers.
Alternatively, you can tap it with a wooden pottery paddle. A wooden kitchen spatula is fine too.
I also like to use a clay roller to make it super smooth and flat.
With this pot, I have fashioned it into a bell shape. This makes a nice shape for a small pitcher. I did this mainly by squeezing the sphere with my hands.
When it was more or less the shape I was looking for, I used the paddle and clay roller to refine the shape.
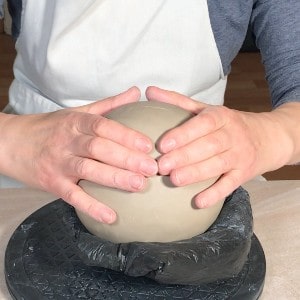
Go easy when you alter the shape of the sphere. If you change the shape too quickly the clay can tear and get holes in it. So, shape it gently and slowly and you should be fine.
Once I’m happy with the shape of the sphere, I add a foot ring to the double pinch pot.
Step 13 – Adding a Foot Ring
You don’t have to add a foot ring to a double pinch pot. If you prefer you can just flatten out the base and have a flush base. But I like to add a foot ring. It gives it a bit of extra stability, and I like the shape too.
This is how I add a foot ring:
Firstly, I roll a coil of clay about the thickness of my pinky finger. Then I drape the coil around the base of the pot and cut it to length.
I then join the two ends of the clay coil using the slip and score method, to make a clay ring.
At this point, I shape the clay ring roughly into the shape that I want it to be as the foot ring. I leave this resting on the double pinch pot overnight. This ensures that the foot ring and the body of the pinch pot have the same moisture content.
The foot ring is then joined to the base of the pot using slip and score. Once attached, I blend the foot ring onto the base of the pinch pot on both sides.
The foot ring can then be leveled out using a shredder and rib tools to make a nice flat bottom.
Step 14 – Creating a Neck
You can turn a double pinch pot into whatever you like. For example, you can make a vase, pitcher, jug, teapot, piggy bank, etc.
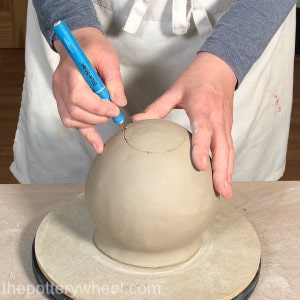
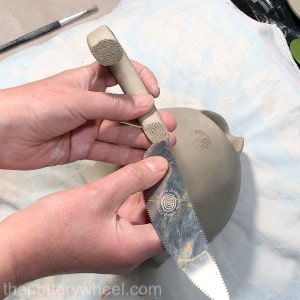
This particular pinch pot is going to be a pitcher. To create the neck of a double pinch pot, you need to cut an opening in the top.
The size of the opening depends upon what you are turning it into. Find an object that is the size that you want the opening to be. Hold it up against the top of the pinch pot and draw around the object with a pencil or needle tool.
This will leave a mark on the clay where you are going to make the neck.
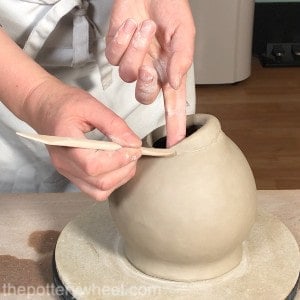
Using a craft knife or a fettling knife, cut the clay around the mark you made on the neck. Lift the clay plug out of the neck to expose the opening in the top of the double pinch pot.
You can then shape or adapt the neck as you like. If you want to make a vase, you might like to build the neck up with some clay coils.
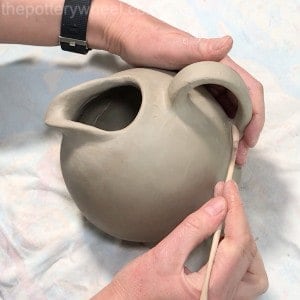
As I’m making a pitcher, I add a section of clay to the neck to create a spout.
Before I add the spout, I tidy up the opening to the neck with a wooden tool and my fingers.
Step 15 – Making and Adding the Spout
To make the spout, I shape the clay on the neck a little to begin the spout shape. Then I make a small coil of clay about half an inch thick and three inches long.
I hold the clay coil up to the neck of the double pinch pot and gauge exactly how long the coil needs to be. Then I cut the ends of the coil off at a bit of an angle. This gives the coil tapered ends.
Then I slip and score the neck of the pitcher and one side of the coil. The coil is then attached to the neck of the pitcher by blending it on with my fingers and a modeling tool.
Once the coil is attached firmly, the clay can be shaped into a nice spout shape.
Step 16 – Making a Handle
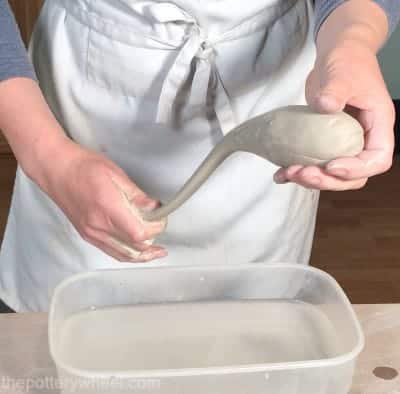
There are lots of different ways to make handles for pots. My favorite way is to ‘pull the handle’.
Pulling a handle is just as it sounds. You take a ball of clay about the size of an orange and shape it into a pear or a fat carrot.
Hold the clay pear in one hand over a bucket of water. Wet your other hand. Then pull and slide your hand down over the thin end of the clay pear.
As you do this, the narrow end of the clay will thin out and get longer. It looks a little like milking a cow.
As you milk the clay cow, turn the ‘clay pear’ around in your supporting hand. This ensures that the clay being pulled is an even shape.
Once you are happy with the length and thickness of the clay, you can flatten the handle out a bit.
A flatter handle is more comfortable to hold than a round one. The way to do this is to gently run your forefinger and thumb over the handle.
When you are happy with the size and thickness of the handle, pinch it off and put it on a wooden bat. Leave the handle to firm up so that it is soft leather hard.
Step 17 – Attaching the Handle to the Double Pinch Pot
Trim the handle to the right length with a potter’s knife. Then hold the handle up against the double pinch pot and decide where you are going to position it. Mark where the handle will go with a needle tool.
Then slip and score the ends of the handle, and the points on the pitcher where the handle will be attached. Press the two surfaces together firmly.
You can simply wipe away any slip that has squeezed out and leave the handle as it is.
However, I like to make a very small coil of clay and wrap this around both joins on the handle. I then blend the clay coil into the join to make sure that the handle is attached very firmly.
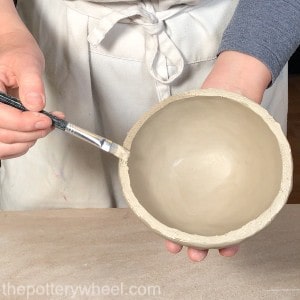
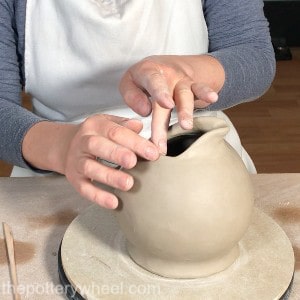
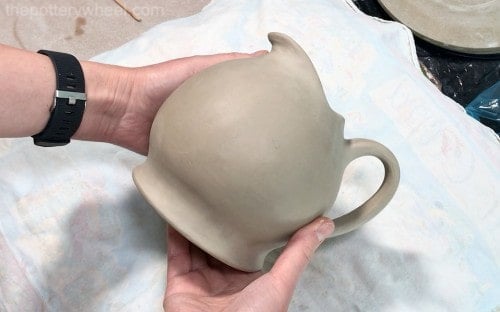
When the handle and spout have been attached, I clean up the surface of the double pinch pot.
I find the easiest way to do with is with a small damp chamois leather. This will smooth out any little tool marks on the clay surface.
But this isn’t essential. Lots of pinch pot artists like to leave their finger marks on their work to show the making process.
And this is the finished piece before it has gone into the kiln.
Final Thoughts
The technique for making double pinch pots is very simple. Once you have mastered it you can use it to make a whole range of spherical pieces. Pinch pots have a lovely organic look, and they are one of my favorite ways of making pottery.


