Your cart is currently empty!
How to Attach a Burner Torch to a Propane Tank for Raku
Published:
Last Updated:
Affiliate Disclaimer
As an affiliate, we may earn a commission from qualifying purchases. We get commissions for purchases made through links on this website from Amazon and other third parties.
There is quite a bit of information online about how to make raku pottery. However, I recently built my first raku kiln. And in the process of planning my first raku firing, I realized that there were practical things I didn’t know. For example, I’d never used a propane torch before. So, I found myself trying to find out how to attach a burner torch to a propane tank. In the end, I consulted a gas plumber and this is what I learned…
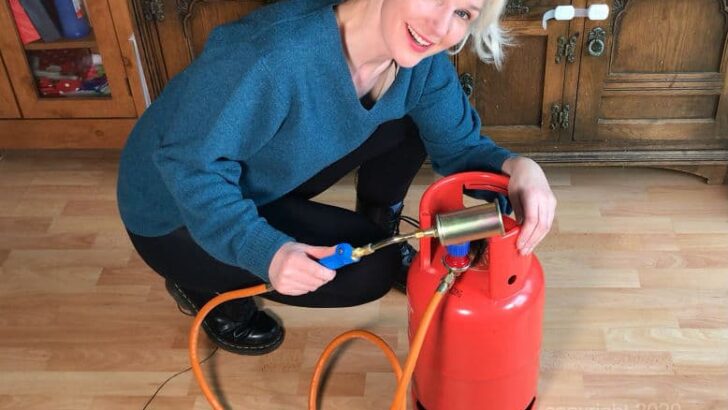
For a raku fire, you need a propane tank, a tank regulator, a burner torch, and an adjustable spanner. The regulator inlet screws onto the propane tank. The hose on the torch screws onto the regulator outlet. You control the intensity of the flame with a valve on the torch.
Disclaimer – I should mention that I’m not a gas technician. I’m a potter who is learning about DIY raku and sharing what I’ve learned for informational purposes. For advice about gas safety, please consult a qualified professional.
That being said, here’s what I’ve learned about how to attach a burner torch to a propane tank. What I’d like to convey is that it’s not as daunting as it might initially seem!
Table of Contents
show
Attaching a Burner Torch to a Propane Tank for a Raku Kiln
This is what you will need to get your burner ready to fire your raku kiln…
What You Will Need:
- A propane cylinder – the cylinder I used was 6kg, which is a little bit larger than an 11lb tank.
- A propane regulator – be aware that some regulators have screw fittings and some have clip-on fittings. You need to make sure the regulator you buy is compatible with the propane tank you have.
- A burner – also known as a propane torch or weed burner.
- An adjustable spanner
Steps to Attach the Burner Torch to a Propane Tank
The propane cylinder will come with a plastic screw cap for extra safety. Make sure the valve on the propane cylinder is off. Then, you need to remove the safety cap.
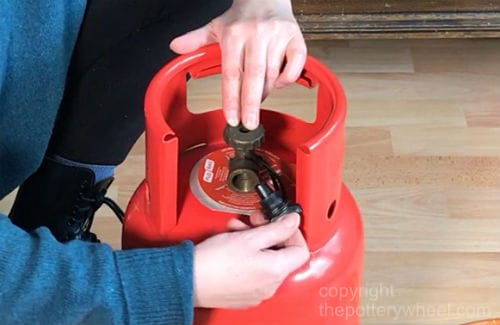
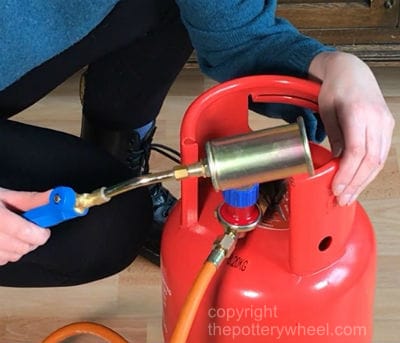
The regulator will have two male fixings on it. One of these screws into the propane bottle, the other screws into the rubber lead on the propane burner.
With the valve on the bottle still fully off, screw the regulator onto the propane bottle. The regulator may come with instructions about which male fixing fits into the propane bottle. But if it should be obvious from the width of the thread.
This is the regulator I used and it screws in counter-clockwise. Make sure that the regulator is screwed in tightly. Use an adjustable spanner to make sure it is tightened all the way.
You may have to hold the regulator firmly to stop it from spinning around as you tighten the bolt.
When screwing in the regulator, be mindful of two things. Position the valve knob at 12 o’clock. And, be careful not to thread the screw as it goes in.
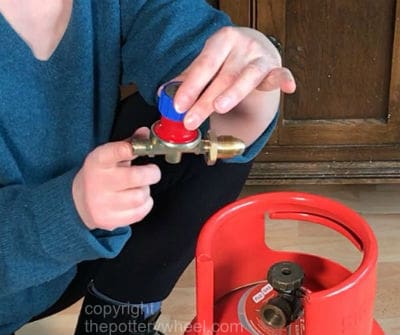
Once the regulator is screwed into the propane tank, it’s time to attach the burner. The screw on the end of the rubber lead simply screws onto the regulator valve outlet. Again, mine tightens counter-clockwise.
Use the adjustable spanner to make sure that the rubber lead is fixed onto the regulator securely.
Turning the Propane Burner On:
You have three valves in the above setup. For clarity, I will give them a number, as follows:
- 1st Valve: On the head of the propane tank.
- 2nd Valve: The regulator valve
- 3rd Valve: The valve on the burner torch
To start off, make sure all the valves are off. Then open up valve 1 (on the head of the tank first). Open it all the way.
Next, open valve 2 (on the regulator). These stay fully open.
To light the torch, turn the valve on the burner on a little. You don’t need to turn it on very far, just enough so that a little gas is coming out. If you open it wide or fully, the gas will come out quickly and the flame will be strong. But, if it’s only open a little, you will get a gentle orange flame, which is all you need to actually light it.
Once you have opened the valve a little, you can light the gas. You can light it in whatever way you prefer. It’s easy to light with a cigarette lighter, or lighter with a long handle. The kind you might use to light a BBQ.
When the torch is alight, you need to position it at the burner port on your raku kiln. It’s a good idea to secure the burner so that it doesn’t roll or get blown over as you fire. One way to do this is to position it in a hollow concrete building block.
Controlling the Size of the Flame:
You can control the strength of the flame with the valve on the burner or the regulator. However, I was advised to use the valve on the burner. The ceramic fiber on the raku kiln does a good job of insulating heat. So, it’s fine to get close enough to the bottom edge of the kiln to adjust the valve.
Turning the Propane Burner Off:
To turn the propane burner off, first of all, turn off the valve on the burner, i.e. valve number 3. Then turn off the valve on the propane canister (valve 1). And finally, turn off the valve on the regulator (valve 2)
There will be a little excess propane in the rubber tube. So, once the flame is out and the burner is not near an ignition source, you may want to open the burner valve. This will release any residual propane in the rubber hose.
To take the set up apart, just make sure all the valves are fully off. Then using the adjustable spanner, and turning clockwise, unscrew each valve. Once the regulator is removed, replace the plastic safety cap on the propane bottle.
If you want to watch my full step-by-step video on attaching a burner torch to a propane tank, check out my YouTube channel.
Final Thoughts About Attaching a Burner Torch to a Propane Tank
This was definitely not designed to be an exhaustive account of Raku firing. However, I struggled to find a simple step-by-step guide on how to attach a burner torch to a propane tank. So, I thought it would be helpful to share it with other potters who are venturing into DIY raku too. If you found this useful, please do give it a share! I really appreciate it.
References:
- Mastering Raku: Making Ware, Glazes, Building Kilns, Firing. By Steven Branfman