Your cart is currently empty!
Pinholes in Pottery Glaze – 6 Causes and Simple Solutions
Published:
Last Updated:

Affiliate Disclaimer
As an affiliate, we may earn a commission from qualifying purchases. We get commissions for purchases made through links on this website from Amazon and other third parties.
Pinholes in pottery glaze are one of the most common glaze defects you will encounter. They can be tricky to resolve because they are often caused by more than one factor. However, through a process of elimination, you can often find the main culprit and fix your pinholing issue. It may just take a bit of investigative work.
Pinholes in pottery glaze can be caused by a number of factors. These can include the type of clay you are using, how you are constructing your pottery, and your choice of glaze. It may also be how the glaze is being applied and either your bisque or glaze firing schedule.
This article goes through each stage in the pottery production process. Hopefully, going through the process in a systematic way will help you identify what might be causing pinholes in your glaze. Luckily there are solutions that you can try at each stage, which will help you resolve the issue.

Table of Contents
show
What is a Pinhole In Pottery Glaze? The Diagnosis
Pinholes are like chickenpox, in that most people will get them at some point or another in their pottery career. And to stretch the analogy, like chickenpox, they are irritating and can take a while to go away. But eventually, they do resolve.
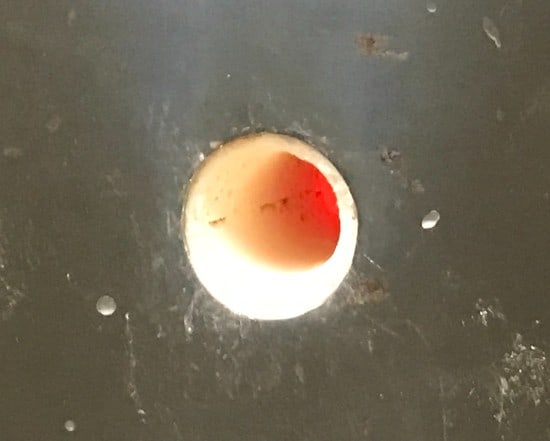
As the name suggests, pinholes are small holes in your pottery glaze about the size of a pinhead. The hole goes all the way down from the surface of the glaze to the surface of the underlying clay body.
This distinguishes it from other surface defects such as pitting and crawling. Pits in glaze are like pinholes, the difference is that they don’t go all the way down to the underlying ceramic ware.
Pinholes are also different from crawling. Crawling occurs when the glaze literally crawls or creeps away from patches of clay during the glaze fire. This leaves bald patches of clay in the glazed ware. These bare patches are larger than the small pimple size holes of a pinhole.
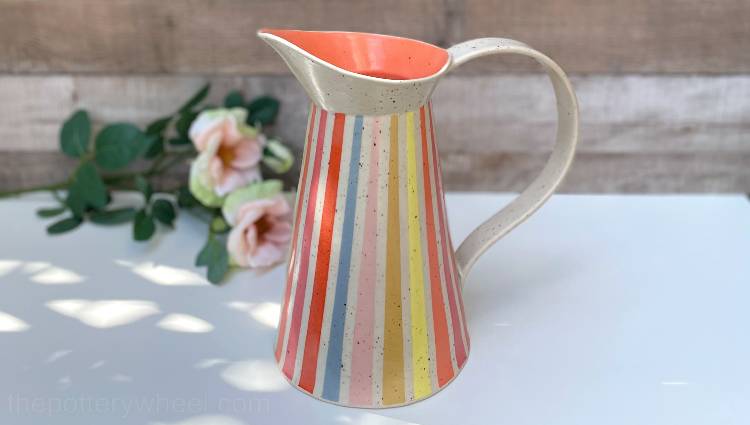
Not only are pinholes ugly, but they are a waste of your time and effort. Pinholes are thought by many to compromise the food safety of ceramic ware. So, generally, a pot with pinholes will end up in the seconds pile, or in the trash. You can read more about pinholes in pottery glaze and food safety here.
What Causes Pinholes in Pottery Glaze?
As I mentioned earlier, part of the reason pinholes can be a conundrum is that they can have multiple causes. However, although there may be a few factors playing into their formation, one of the main causes is something potters call ‘outgassing’.
But what is outgassing? Let’s take a look at that now. You may be buying your clay in a powdered form with the intention of making some clay body to your own recipe. Or you may be buying clay that has been constituted into its plastic workable form by the manufacturer.
Either way, clay ingredients go through a process of being cleaned up and milled in the processing plant before they arrive in your studio.
In spite of this, raw, unfired clay still contains small particles of organic matter. These pieces of organic matter range from little specs of coal to tiny bits of leaves and vegetation. Many raw clays contain minerals such as sulfur and calcium.
Whilst the clay is being fired in the kiln, these combustible materials burn and create gases. The gases need to be expelled from the body of the clay out through the surface of the pots.
In addition to organic matter and minerals, clay can also contain other ingredients that produce gas. For example, some clay recipes contain talc and whiting. These ingredients add beneficial properties to the clay body but produce a lot of gas whilst the clay is being fired.
Gases and Pinholes
Usually, most of these gases leave the clay during the bisque fire. However, some outgassing still occurs during a glaze fire. Ideally, when gases are produced during the glaze fire, they leave the clay body before the glaze has started to melt.
Sometimes gases leave the clay body and create a bubble in the molten glaze. As more gas is produced, the bubble becomes larger, until it bursts through the surface of the pottery glaze. When this happens, the bubble creates a small hole in the liquid glaze surface.
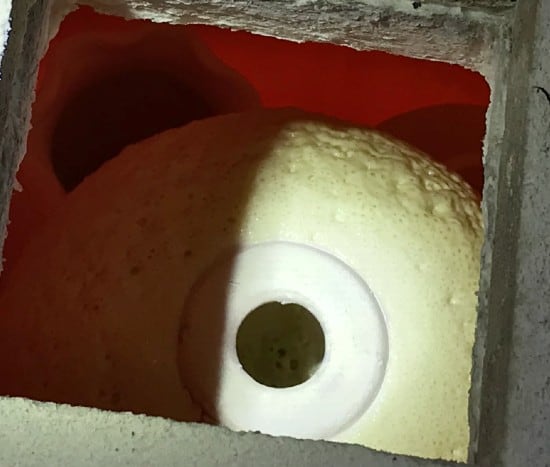
Usually, molten glaze will flow into the hole left by the bubble and fill in the gap. As the glaze fire continues, any holes or pock marks left on the surface of the glaze will heal over. So, when the kiln and glaze cool a smooth blemish-free surface is left behind.
However, the healing process does not always happen. Sometimes the crater left by the bubble remains unhealed as the kiln cools. It is these craters, created by escaping gases that form pinholes in the pottery glaze.
So, why is it that the pinholes left in pottery glaze don’t always heal over? Let’s take a look at some of those reasons now, starting with the type of clay you are using…
Factor #1) Is Your Choice of Clay Causing Pinholes in Your Pottery Glaze?
Pinholes are often more of a problem when you are glazing clay that contains gritty additions like grog or sand. These additions are designed to make the clay easier to work with and to give the clay more plastic strength. They also help the pottery dry and fire without cracking.
However, they are also linked to a higher incidence of pinholing. My own experience of pinholes in my pottery glaze is that they occur when I’m using clay that contains sand. So, why might that be?
Grit, Grog, and Sand in Your Clay
One suggested reason is that some additions to clay may melt on the surface of the pot whilst it’s being fired. These coarse melted particles form a glassy layer on the surface of the clay. In turn, the liquid glaze finds it harder to key into the ceramic surface and heal over the holes left behind by bubbles (source).
Also, when gritty clay is fired, the grit or grog can create a network of channels in the fired body. This network can lead to pores or exit points on the surface of the pottery.
Gases will travel down the channels during firing. This leads to a convergence of gases escaping at certain points on the pot surface. As a result, there is a concentration of gases leaving the pot at pinpoints. At these points, the glaze is unable to heal over and pinholes can form.
Solution 1:
If you suspect that pinholes are being created by coarse particles in your clay, you have a few options. One option is to try to reduce the size of the coarse particles. This is an option if you are mixing your own clay recipe from powdered clay ingredients.
You can sieve the larger particles out of the dry clay mix and try grinding them down with a ball mill. This will break down the larger particles into a finer powder and possibly prevent the problems outlined above.
However, many potters, myself included, don’t own ball mills. And pulverizing your clay into smaller particles is very time-consuming. Plus, you may not be buying your clay in powdered form, perhaps your clay arrives already mixed up in a workable plastic block.
As such, ball milling the coarse particles in your clay body may not be a practical solution.
What is more, coarse clay particles are not the only kind of clay impurities that can cause pinholes in glaze. Other impurities can exist in higher concentrations in clay bodies that are quite smooth in texture.
For example, some stoneware clay contains larger quantities of carbons than others. Usually, the darker the clay the more carbon it contains. For example, darker gray or brown stoneware will contain more carbon than white or light grey stoneware.
These darker clay bodies usually produce more gases during firing than cleaner clays. Similarly, you are more likely to encounter issues with pinholing with specked clay bodies too.
Solution 2:
You might want to experiment with different clay bodies. It’s likely that choosing a cleaner, smoother clay will remove the pinhole problem.
But this isn’t always an ideal solution. Perhaps you love darker or speckled clay and don’t want to compromise the aesthetics of your work to deal with a practical problem. So, what other options do you have?
Solution 3:
Another solution worth trying is to adjust your bisque firing schedule. Try slowing the bisque firing schedule down overall, and simply ramp up the temperature at a slower rate. This may give the clay longer to expel any gases.
Or you could introduce a hold time part way through the bisque fire at a point when most carbons are being burned out.
Different carbons burn out at different points in the bisque fire. So, there is no one specific point at which all the outgassing is taking place. You can read more about what happens to clay during the firing process here.
I was always taught that by 1112F (600C) any significant carbons would leave the clay body by this temperature. As a result, I bisque fire slowly to this temperature and then speed up after this point.
One way to ensure a thorough burnout of any residual carbons is to introduce a hold time mid-way through the bisque fire. You might for example bisque fire slowly up to 1292F (700C), and then hold for a period of time or ‘dwell’.
Exactly how long to hold the dwell, would need some experimentation, depending on the clay body that you are using. You can read more about hold times here.
You might find that slowing down your bisque fire and adding a hold in the middle or at the end of the schedule is enough to prevent pinholing.
Factor #2) How Are You Making Your Pots?
The types of pieces and how you form them can also play a role in the appearance of pinholes in your glaze.
Thicker Walls and Larger Pieces
You may find that pinholes don’t affect every piece of pottery in your kiln. It’s not uncommon for the smaller thinner pieces like cups and mugs to escape the pinholing issue. Whereas larger, thicker pieces like plates and platters fired in the same glaze fire are affected.
One possible reason for this is that the larger pieces didn’t get sufficient heatwork during the bisque fire. Thicker pieces need longer for enough heatwork to burn out the carbons from their deeper layers.
Equally, it takes longer for gases to migrate to the surface of thicker pieces too. As a result, carbons and minerals may burn out sufficiently from thinner pieces. But, in thicker pieces, the burnout may not be complete.
Any remaining gases that need to be expelled, then work their way out from the clay body during the glaze fire. These can then cause pinholes in the glaze if other factors are at play too.
Rough Surfaces from Trimming
Leaving your pottery with a rough textured surface after trimming can also cause pinholes in your glaze. This is a particular issue if you are using a coarser clay body.
As you trim clay off the pots, it can leave behind a rough surface. The pots are then bisque fired and glazed. When you apply glaze to the bisque, small pockets of air in the rough texture can prevent the glaze from creating a uniform coat.
The air pockets can form bubbles on the surface when you glaze. These then burst once the glaze has been applied, leaving small bubbles in the glaze coating.
Also, as gases migrate from the pottery during a glaze fire, their exit can become concentrated around little pits on the ceramic surface. Tiny dips in the textured bisque can act as channels for the gas as it leaves and pinholes can form at these points.
Solutions
If you glaze your pots and find that tiny bubbles have appeared you can try the following:
- Rub the pinholes gently with your fingers. This will push glaze powder into the holes and cover them over. Sometimes this will be enough to prevent pinholes from forming during the glaze fire. However, you may find that the bubbles reappear if you apply another coat of glaze.
An alternative way to tackle pinholes before the glaze fire is to load up a very fine brush with an amount of glaze. You can then daub a tiny amount of glaze into the open pockmark in the glaze. - The glaze needs to be liquid enough to fill the hole in the surface. You can make the glaze more liquid by adding a small amount of water. However, ideally, you would make the glaze runnier by adding a little deflocculant to the mix. Sodium silicate makes a good deflocculant and is readily available.
Getting rid of bubbles on the glaze surface before it’s fired is time-consuming and doesn’t always work. There are a few ways to prevent a rough bisque surface from causing pinholes.
Here are a couple of suggested ways to smooth down your bisque ware after trimming:
- Run a rubber rib tool over the surface of the pot after trimming and whilst it is still on the wheel. This smooths out any ridges left on the pot by the trimming tool.
- Apply a layer of fine clay slip onto the pot after trimming. This will fill in and seal small irregularities in the surface of the clay.
Factor #3) Is The Bisque Fire Causing Pinholes in Your Pottery Glaze?
The bisque fire is an opportunity to get rid of as many impurities from the clay as you can. If clay is underfired during the bisque fire, carbons will remain in the clay body. These will create gas at a later stage in the glaze fire and can cause pinholes.
Solutions:
Here are some suggestions about bisque firing that can help you to avoid this problem…
Avoid Over-Packing Your Kiln
If you stack a lot of greenware on top of one another, this will create a dense mass of pottery. For example, if you stack several plates or platters on top of one another, this creates a thick slab of clay in the kiln.
This can make it harder for moisture and gases to escape the tightly packed pots. But also, it’s harder for the heat of the kiln to penetrate underlying pots in a very full bisque fire. Pots in an over-packed kiln may not get enough heatwork and as a result, will be under fired.
Air Flow
Try to ensure that there is sufficient airflow in your kiln so that carbonaceous material can burn out of the clay. Combustion requires oxygen.
If you have a downdraft ventilation system on your kiln, that can help. But if you don’t have an additional vent system, make sure you leave your peepholes out on the kiln until around 1112F (600C).
Bisque Fire to a Higher Temperature
If you are making low-fire earthenware pottery, it’s often recommended that you bisque fire 2 cones higher than you intend to glaze fire. For example, if you plan to glaze fire at 06, ideally you want to bisque fire at 04.
This is so that the pottery doesn’t reach a temperature in the glaze fire when it starts to create gases again.
But if you are glaze firing at stoneware temperatures or above, this isn’t an option. So, what do you do? My rule of thumb is that if I’m firing cleaner whiter clay, then it’s ok to bisque fire at 06. But if I’m bisque firing darker clay that I know to contain lots of organic matter, carbons, and/or minerals, I bisque fire to 04.
It’s also helpful to bisque fire slowly and introduce some hold times into your bisque schedule. It’s wise to bisque fire slowly at a rate of 210F (100C) an hour until 1112F (600C). After 1112F, you can increase the speed to 300F (150C).
In addition to bisque firing slowly, adding one or two holds into the schedule can help with outgassing.
You might, for example, add a hold at 1112F (600C), and also add a short hold or dwell at the end.
When I’m bisque firing darker coarser stoneware clay, this is what my bisque schedule looks like:
| Rate | Target Temp | Hold Time |
| 210F (100C) p/hr | 1112F (600C) | 15 mins |
| 300F (150C) p/hr | 1940F (1060C) | 10 mins |
Use Pyrometric Cones
You may find that some of your pots are pinholing in the glaze fire and others are not. If that’s the case, it can be helpful to use cone packs.
Place a cone pack at different points in your kiln during the bisque fire. This will help you see if some points in your kiln are getting significantly hotter than others. It may be that certain cool spots in your kiln are leaving your bisque ware underfired.
Factor #4) Glaze Application
Bisqueware is porous and very absorbent. This can be an advantage when you are glazing because the porous bisque sucks water out of the glaze. Often this will help the glaze to adhere to the pots, leaving a dry coat of glaze powder on the bisque ware.
However, sometimes the dry, porous, and absorbent nature of bisque ware is behind the appearance of pinholes. There are a few reasons for this…
a) Bisque Porosity
Bisqueware contains pores, and those pores are filled with air. When clay is fired at mid or high-fire temperatures, the pores in the clay disappear. The reason for this is that the clay particles move closer together and become more densely packed.
This process is called ‘densification’. As the clay becomes denser, the air that was in the pores needs to be expelled. If this happens in the glaze fire, after the glaze has started to melt, there is an increased chance of pinholes forming.
b) Glaze Absorption
When you apply glaze to a pot, water from the glaze will be absorbed by the bisque. This displaces some of the air in the bisque ware. Some ways of applying glaze involve coating the whole pot at once.
An example of this dipping the pot in glaze. When you coat the whole pot rapidly, the air can be trapped in the bisque rather than being displaced. The air finds pinpoints on the glaze surface where it can escape. As a result, pinholes form in the glaze surface moments after it is pulled out of the glaze.
c) Dust and Debris
Bisqueware sometimes comes out of the kiln with a fine layer of dust on the surface. It can also gather dust and debris in the studio. These dusty particles can trap air as the glaze is being applied. Trapped air will form bubbles that burst on the surface of the wet glaze, forming pinholes.
Solutions:
There are a few things that you can do to prevent trapped air from causing pinholes…
- The higher temperature at which you bisque fire, the less porous the bisque ware will be. Denser bisque ware contains less air to be expelled during the glaze fire.
- Use a glaze that melts at a higher temperature. The higher the temperature at which the glaze melts, the less chance that air, moisture, and gas will escape when it’s in a molten state.
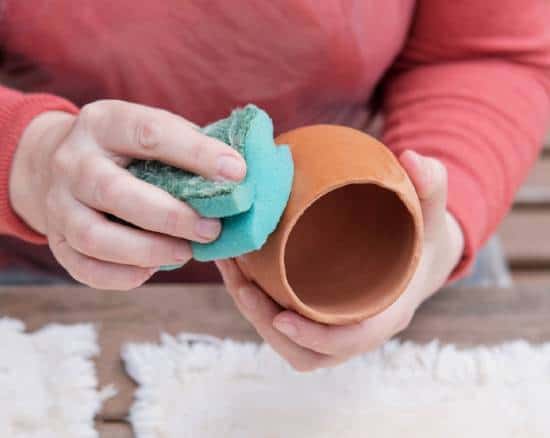
- Wash your bisque ware before you apply the glaze. This will remove the dust and debris from the surface of your pots. Also, washing the bisque will remove some of the air that is sitting in the bisque pores. If you wash your bisque, you need to let it sit and dry for a while before glazing.
Applying glaze to bisque that contains a lot of water will result in a very thin application of glaze. So, let it dry for a while before you glaze. You can read more about the do’s and don’ts of washing bisque ware here.
d) Glaze Thickness
The thickness of your glaze application can also be behind the appearance of glaze defects. Pinholes can be caused when your glaze is either too thin or too thick.
If your glaze is applied too thinly, any surface imperfections or irregularities on the bisque ware are more likely to break through the glaze layer. For example, tiny burrs on the bisque ware can poke through the glaze and cause a pinhole in the glaze layer.
Equally, if your glaze is too thick it might take air bubbles too long to work their way to the surface. As such, there won’t be enough time during the glaze firing schedule for the pinholes to heal.
Solution:
Ideally, you want your glaze layer to be about the thickness of a credit card or a postcard. It can take a bit of experimenting to find out how many layers will give you a thickness of this grade.
One option is to use a test tile and scrape off the unfired glaze with a needle tool to see how thick it is after each application. You can read more about what happens if you apply too much pottery glaze here.
Factor #5) Choice of Glaze
Another factor to consider when trying to establish what is causing pinholes in your pottery is the glaze itself.
Glaze Ingredients
Some glaze ingredients are more likely to cause pinholing than others. An example of this is rutile. Rutile is a mineral that’s added to glaze to create interesting variegated colors.
A glaze containing rutile can have crystalline patterns, streaks, and speckles that look lovely. But it can also increase the chance of pinholing.
Other glaze ingredients that can increase the chance of pinholing are zinc, strontium carbonate, and some glaze binders.
Solution:
If you are making your own glaze, then you can tweak the ingredients to see if this makes a difference. But if you are buying commercially mixed glazes, then you may want to consider using an alternative.
Glaze Viscosity and Surface Tension
Some pottery glaze is more viscous than others. A viscous glaze is one that does not move much or become fluid, even when it has melted during a firing schedule.
Because viscous glaze does not move or flow, it will have a harder job healing over any pinholes that may appear during the glaze fire. A high alumina content or the presence of ingredients like zirconium can make glaze stiffer.
Another issue is glaze surface tension. Some glazes have higher surface tension when they are in a molten state. This can make it hard for bubbles to break through the glaze surface. The bubbles can get trapped in the glaze. Or they can break the surface, but there isn’t enough time left for the pinholes left behind in the pottery glaze to heal.
Solution:
Viscosity and surface tension aren’t connected. Thick glazes, don’t necessarily have high surface tension, and vice versa (source).
However, it’s possible to reduce viscosity and surface tension by adjusting the glaze in a couple of ways…
- Reduce the amount of alumina silicate in your glaze. Clay is a form of alumina silicate. It’s added to glaze to stiffen it up so that it doesn’t slide off the bisque. However, glaze with a higher clay content will be stiffer and more viscous.
- Adding more flux to the glaze will increase the amount of time the glaze is in a molten state during the glaze fire. This gives it more time to heal over craters left on the surface by gases that are being expelled.
Glaze Consistency
If your glaze is too thick or viscous, you may not get a good application on your bisque ware. A very thick glaze is less likely to form an even layer that is well-bonded to your bisque.
If your glaze is too thick on application, it’s more likely to flake off the bisque ware before or during the glaze fire. And, as stated above, an overly thick layer of glaze is more likely to encounter issues with pinholes.
Solutions:
Add a small amount of deflocculant like sodium silicate to the glaze. This will thin the glaze out and make it less viscous without watering it down. A deflocculated glaze will adhere more successfully to the bisque ware and is less likely to get pinholes.
Factor #6) Adjusting The Glaze Fire to Prevent Pinholes in Your Pottery Glaze
The final factor when you are figuring out why you might be getting pinholes in your pottery glaze is the glaze fire itself.
Ideally, most of the gases that need to leave your pots will do so during the bisque fire. But inevitably there will be some that need to be expelled during the glaze fire too. Glaze itself will create fumes and gases that need to be outgassed.
So, even if you bisque fire longer, or at a slightly higher temperature, your glaze will need time to heal.
Pinholes can be caused by the glaze firings schedule for the following reasons:
- The kiln didn’t reach a high enough temperature.
- There wasn’t enough time for the molten glaze to fill in the holes left by gas as it escaped.
Solution:
Make sure that the glaze has enough heatwork. This is a combination of both the temperature reached and the amount of time the pottery spends in the heat.
Adding a Hold / Soak
One adjustment that you can make to your firing schedule is to add a hold time at the target temperature. You may have to experiment with different lengths of hold time to see how they affect the glaze. This will depend on the kiln you are using.
For example, my kiln is quite old and takes a long time to get up to cone 6. By the time I’ve reached the target temperature, the pottery has already had a lot of heatwork. So, I don’t need to add much of a hold time at the end to make a difference.
By contrast, if your kiln is new and efficient, it may have reached the target temperature quickly. As such, your pottery could probably tolerate a longer hold time at the end.
Too little heatwork will leave your pottery underfired. This can result in pinholes because the glaze hasn’t healed over. But equally too much heatwork can cause your pottery to be overfired. This can also lead to pinholes because the glaze effectively boils and bubbles on the pot surface.
As such, you may have to tweak the glaze firing schedule to find the sweet spot that suits your kiln.
Drop and Soak
One way to avoid overfiring your glaze is to use a schedule that has a drop and soak at the end.
I have found this to be one of the most successful ways to address the pinholing issue. Crash cooling is when the kiln reaches the target temperature and switches off. At this point, the kiln starts to cool rapidly and naturally.
Alternatively, you can schedule the kiln to reach its target temperature. Rather than letting it switch off completely, program the kiln to drop by around 122F (50C). Then hold the kiln at this slightly lower temperature for a short dwell. Some sources recommend letting the temperature drop between 100-200F (37-93C) (source). Others recommend letting it fall around 104F (40C) (source). I’ve found that dropping by 122F (50C) works well in my kiln. You may need to experiment with yours.
Equally, you will likely have to experiment with how long to soak the pots at this temperature before you allow the kiln to cool. I have found that soaking for 10 minutes at this temperature works well.
The idea behind drop and soak is that it gives the glaze time to heal. However, you are more likely to avoid issues around over-firing because you aren’t holding at a peak temperature.
Final Thoughts
Your clay and glaze are going through a lot of physical and chemical changes when they are being fired. Because there is so much going on in the kiln, there are plenty of causes for pinholes in pottery glaze. Sometimes it is one factor at play and other times it’s a combination. You may find it will take a while to figure out which factor is the main cause. I hope the information above will help you pinpoint the pinhole culprit.