Your cart is currently empty!
Melting Marbles in Pottery – Ways to Fuse Glass onto Clay
Published:
Last Updated:
Affiliate Disclaimer
As an affiliate, we may earn a commission from qualifying purchases. We get commissions for purchases made through links on this website from Amazon and other third parties.
One of the first pieces of pottery I made in pre-school involved melting marbles in pottery. However, mixing glass with ceramics is not just for kid’s projects. It is a technique much used by potters and can create lovely results in a few simple steps.
To melt marbles in pottery, make a small shallow dish out of clay. Then, bisque fire the dish. Some potters put marbles directly onto bisque ware before firing. Others decorate the bisque first with slip, underglaze, or glaze. Then place a few marbles in the dish before glaze firing.
However, there are a few things to take into account when you are melting marbles in pottery. Here are your key considerations:

Table of Contents
show
Making Your Pot to Melt Marbles in
When melting marbles in pottery, smaller, shallow pots work best. There are a few reasons for this:
Artistic Design
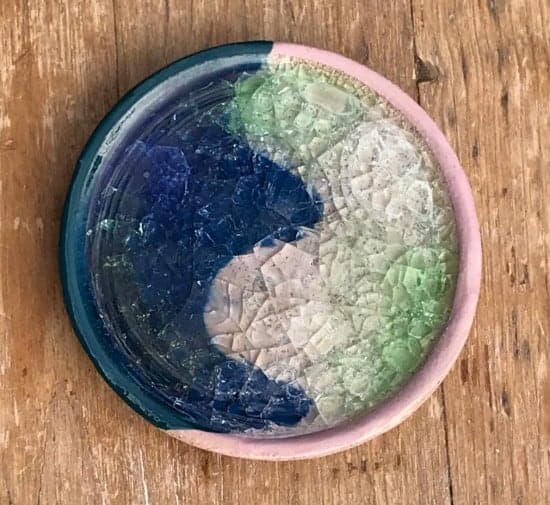
Once you have fired your piece and the marbles have melted, you want to be able to see the effect. So, from an artistic point of view, it’s best to have a shallow dish. This will help make the melted glass more visible.
To Make Sure It Isn’t Used for Food or Drink
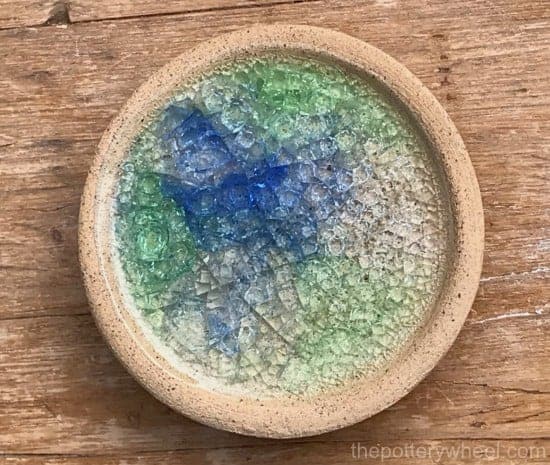
Pots that are decorated using melted marbles are not food safe. The reason for this is that when the glass marbles cool after being fired, the glass gets a crackle effect. A crackle effect is basically very small cracks in the glaze that looks like crazing.
This is lovely to look at, and lots of glazes are designed deliberately to crackle. However, because the melted marbles are crazed, over time tiny bits of dust and dirt can settle in the cracks.
The dust and dirt are microscopic, so it doesn’t pose a threat if your pottery is for decorative use. However, it does mean that it’s not hygienic to use this pottery for food or drink.
For this reason, making a smaller dish that people won’t eat out of is a good idea. The sorts of items that work well when melting marbles in pottery are ring dishes, small trinket bowls, and coasters.
To Prevent the Piece Breaking in the Kiln
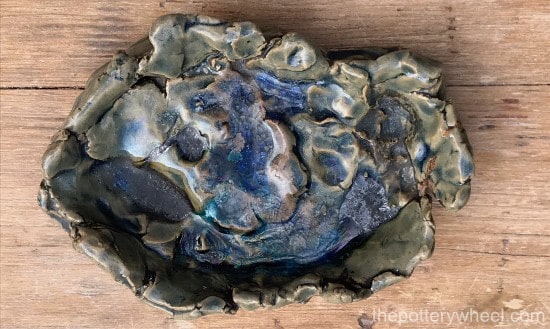
Smaller pieces of pottery with sides that slope up gradually are less likely to break when fired. When you fire your pottery, the marbles will melt like butter and pool up at the bottom of your piece.
As the kiln cools, the glass will harden again in its new shape. As the clay cools down it shrinks, and it is shrinking against the hard glass. If the sides of the pot are deep and steep, the clay is shrinking around the glass. This puts the clay under more pressure and there is a greater chance it will break.
If the sides of the pot are shallow and gradual, then the clay is under less pressure as it cools. This is another reason why trinket bowls and coasters are a good choice for melting marbles in pottery. They are small and they have shallow sides.
Nevertheless, the amount of pressure the bowl is under also depends on how much glass you use. If you use a lot of glass in a deep bowl, then the clay will be under more pressure. But if you use a small amount of glass, you can get away with deeper bowls.
Large flat platters and trays can also crack when they cool if you melt glass in them when firing. It’s often the corners that crack as the platter cools. (source)
Bisque Fire Your Pottery
The next important step is to bisque fire your pottery. Most of the time pottery is fired twice, and the first fire is the bisque fire. This is when the pottery turns from soluble clay to hard ceramic that can’t be dissolved in water.
Most potters will bisque fire to cone 04 or 06. When potters talk about ‘cones’ they are referring to the temperature at which they fire clay. Cones measure the temperature clay is fired at and the length of time the clay is fired. If you want to know more about the cone system, check out this article.
However, when firing clay that is going to have glass melted into it, potters will sometimes bisque to cone 6. When you bisque fire to cone 6, the clay will do all its shrinking in the first fire. This means that you don’t have the same difficulties outlined above of the clay shrinking around the hard glass.
However, you don’t have to bisque fire to cone 6. And most of the time potters will bisque fire as normal to cone 04 or 06.
Decorating Your Pottery
Once your pottery is bisque fired, the next stage is to think about how to decorate your pots.
You may be wondering if you put the marbles directly onto the bisque pottery or if you glaze it first.
Well, the answer to that question depends upon whom you ask. Some potters state that for the melted marbles to stick to your ceramics you need to use a glaze too. The argument is that glaze is formulated to melt and stick to ceramics. And that the marbles need the glaze to adhere to the clay.
Others find that they can put marbles directly onto bisque pottery and that the glass melts successfully to bisque ware.
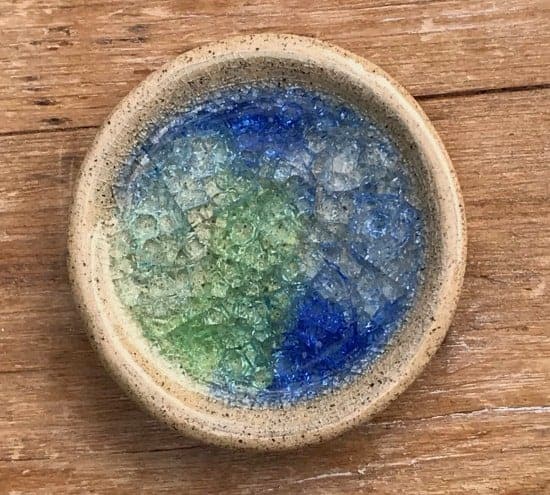
I have found that you can place marbles onto unglazed bisque ware and the marbles melt nicely. I haven’t had issues with the melted marbles not adhering to the pottery. In fact, I like the combination of the glossy melted glass, against the earthy look of undecorated clay.
But perhaps I’ve just been lucky. It’s best to experiment for yourself. I know that some potters do recommend always putting the marbles on top of glaze. But I haven’t found this to be necessary.
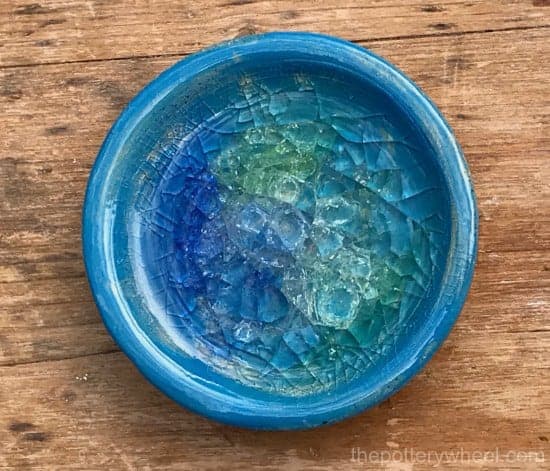
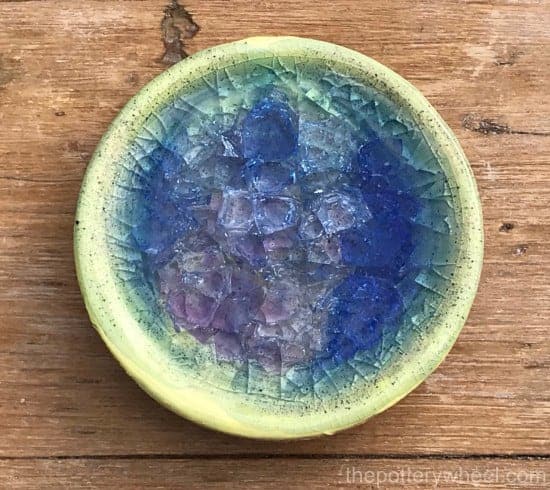
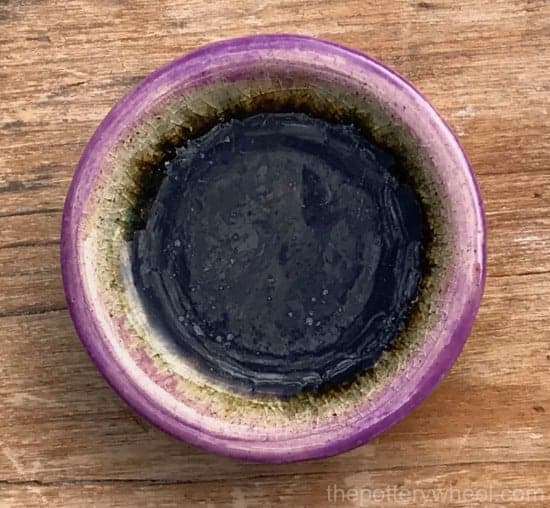
Decorating Combinations
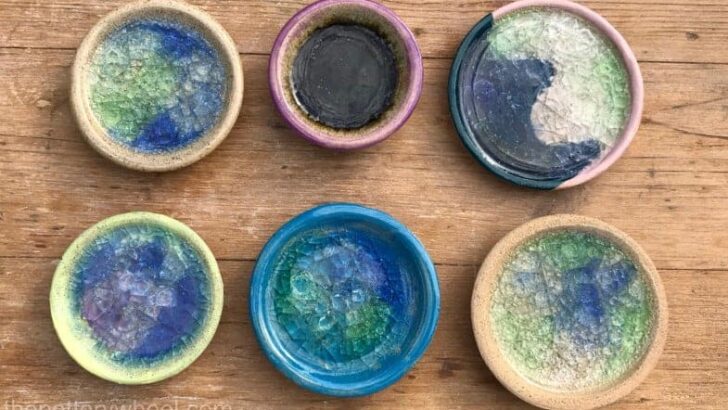
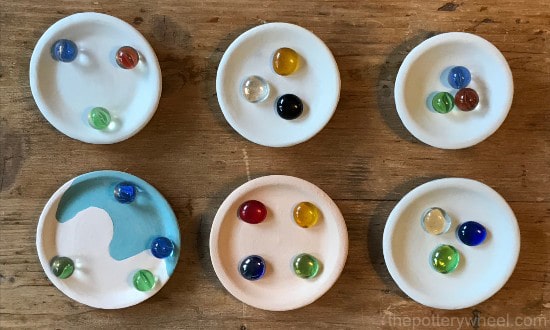
These are some of the decorating combinations I’ve used successfully, along with some pictures to illustrate.
Glaze Firing your Pottery
Before you put your pottery in for the second glaze fire, you need to place the marbles in the pots.
You don’t need to use many marbles. For example, for a small palm-sized pinch pot or a coaster, you would need maybe 2 or 3 marbles. This does depend on the size of the marbles you are using. Some marbles are quite large.
In short, it’s important that the glass simply pools up in the base of the pot. Avoid putting in so many marbles that the pot is overflowing with melted glass.
You just need enough glass in there to form a glossy layer in the base of the pot. You are not trying to fill it up with liquid glass.
What Temperature to Glaze Fire?
Like many things in pottery and ceramics, there are different opinions about this.
Some potters state that you need to glaze fire to cone 6 to successfully melt the glass. Others point out that glass melts at a lower temperature than most pottery glaze. And claim that as such, you don’t need to fire up to cone 6.
Others say that when you are melting marbles in pottery you can fire to cone 04, 6, or 10.
I have found that glaze firing to 06 is fine. The pots pictured above were fired at cone 06 and the marbles melted nicely.
Do You Have to Use Marbles?
There are other alternatives when melting glass into ceramics. You don’t have to use marbles.
Marbles are cheap and easy to get hold of. However, some other alternatives to melting marbles in pottery are:
- Terrazzo glass
- Mosaic glass
- Glass gems – the sort you might use in a flower vase or fish tank
- Recycled broken glass bottles
- Specialist Fusing Glass – 90 Coe or 96 Coe
- Glass frit
Allowing Your Pottery to Cool
It’s always a good idea to leave your kiln to cool enough before you open it. It can be tempting to look inside the kiln before it’s cooled down enough.
But really, it’s recommended that you don’t in order to avoid the pottery being damaged by a sudden change in temperature. Sudden changes in temperature can cause ‘thermal shock’, which can cause pottery to crack.
This is particularly important when melting marbles in pottery. As mentioned above, glass and clay have a different coefficient of thermal expansion. This means that they shrink and expand at different rates as their temperatures change.
If you open the kiln too soon the clay can shrink suddenly. This stresses the clay puts the glass under pressure too.
The result of this is that the clay can crack, or the glass can craze even more. Also, if the glass is under a lot of pressure small slivers of glass can break off. This can cause sharp edges on the surface of the glass. But it also means that little bits of glass can break off at a later date.
Even if you allow the kiln to cool gradually the glass will continue to craze over time even once cold. In fact, some potters report that glass that has been melted on ceramics will sometimes pop off weeks after firing. This is not something I have encountered, but I have heard other potters experiencing this.
On the other hand, melting glass in pottery is a popular project for school children. And many of these pieces survive for many years. For example, here is a piece that I made when I was about 3 years old! It has stood the test of time well.
Firing Tips when Melting Marbles in Pottery
Here are another couple of tips to bear in mind when melting marbles in pottery:
- Make sure you don’t have cracks or gaps in your pot, or the glass may drip onto the kiln shelf. This is the reason it’s good to avoid melting marbles in coil pots.
One way to use melted marbles on a coil pot is to blend the inside surface of the pot. By blending the coils together, you can remove any gaps between the coils. - Use kiln wash on your shelves just in case you do get drips from the melted glass.
- Make sure your kiln shelves are level, otherwise, when glass melts it may flow over the side of the pot. You will then have a job getting it off your kiln shelves.
Safety Considerations When Melting Marbles in Pottery
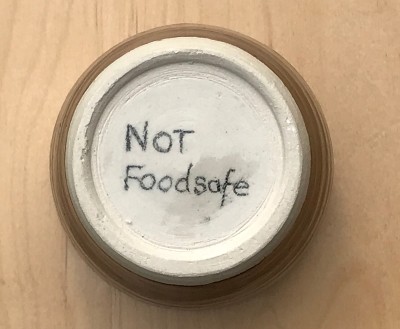
As stated earlier, glass melted onto ceramics is not food-safe. Items made in this way need to be for decorative purposes or for non-food use, like coasters.
I’m always aware that pottery can find its way into thrift shops and being given as gifts. You never really know where your pottery will end up and who will be using it.
So not everyone who sees your pottery will know that it’s not safe for use with food and drink. For that reason, I tend to write ‘not food safe’ in underglaze pencil on the bottom of the pot.
Sealing the Glass Surface
As mentioned, some potters find that sharp edges can form on the surface of the glass. Also, little shards of glass can break off over time. One way to resolve both of these issues is to cover the glass with an epoxy resin.
A 2 part epoxy resin used to seal jewelry is a good option. However, it’s good to remember that even if you use resin, the pot will still not be food safe.
Wearing Gloves
If you decide to use recycled glass from broken bottles rather than marbles, wear gloves when you’re handling the glass. You can buy ‘cut resistant gloves’ that are specially designed to prevent you from cutting yourself whilst handling sharp materials.
Final Thoughts
Melting marbles in pottery can create really lovely pottery. There are some safety considerations that need to be attended to. However, provided you are mindful of these issues and make your pots carefully, you can make some very special pieces.