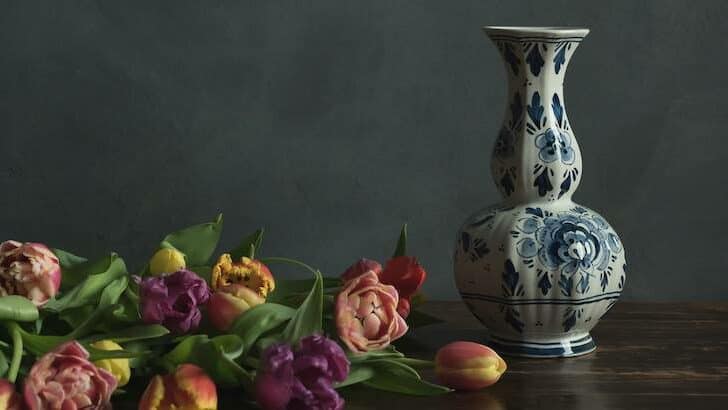
Pottery has been made in Delft for hundreds of years. When we talk about Delft pottery we are often referring to the ceramic ware that is decorated in iconic blue and white colors. These decorations often depict traditional Dutch themes and designs. But how is delft pottery made? And how has the production method changed over the years?
Delft pottery, sometimes called ‘Delft Blue’ is still being made today in the Netherlands. The process of making Delft pottery involves a high level of craftsmanship and artistry.
Who Makes Delft Pottery?
In its heyday back in the 17th century, there were over 30 pottery factories in the Dutch city of Delft alone making Delftware.
Now, only one of the original Delft factories remains in Delft. It is called De Porceleyne Fles or The Porcelain Bottle and dates back to 1653. In 1919 De Porceleyne Fles was given the title of ‘Royal’ by the Dutch Royal family, so now it is usually called the Royal Delft.
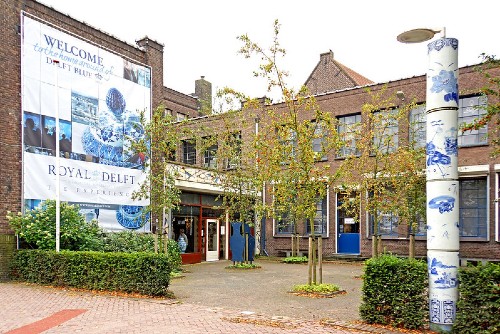
(CC BY-SA 2.0)
There is another factory in Delft currently operating today which makes handmade Delft pottery to a high standard. This factory is called De Candelaer and it was established in 1975. In addition to being a relatively recent institution, De Candelaer is a much smaller factory than The Royal Delft.
Nevertheless, like the Royal Delft, De Candelaer makes high-quality hand-crafted Delft pottery following a lot of the original techniques that were established hundreds of years ago.
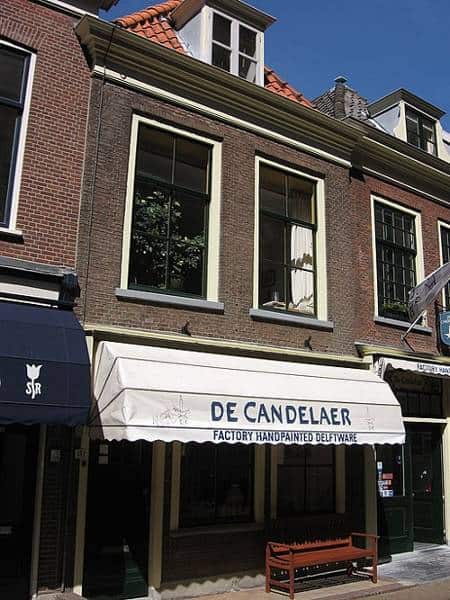
Michiel1972, CC BY-SA 3.0, via Wikimedia Commons
Until recently, there was another Delft Blue factory called De Delftse Pauw or The Delft Peacock. This factory was a smaller family-run business, that was also one of the older established factories. Sadly, it closed down in 2020, leaving the Royal Delft as the last of the older factories in operation.
How is Delft Pottery Made?
The word ‘factory’ is a little misleading in the sense that it’s easy to assume that the pottery is being churned out on a production line. However, this isn’t the case.
Genuine Delft pottery is still handmade and hand painted. And there is a refined process involved in how Delft pottery is made.
All pottery starts with clay, so let’s start by taking a look at the clay that is used to make delft pottery.
The Clay Used to Make Delft Pottery
A lot of the local clay sourced in the Netherlands is reddish brown when it is fired. So, the Delft potteries import clay from elsewhere in its powdered form.
Most clay that is used to make Delftware is a white firing clay that is imported from Cornwall, England. But some is imported from France, and the Czech Republic.
The clay is transported and arrives at the pottery in sacks of powdered clay. This is then mixed with water to make a liquid form of clay called slip.
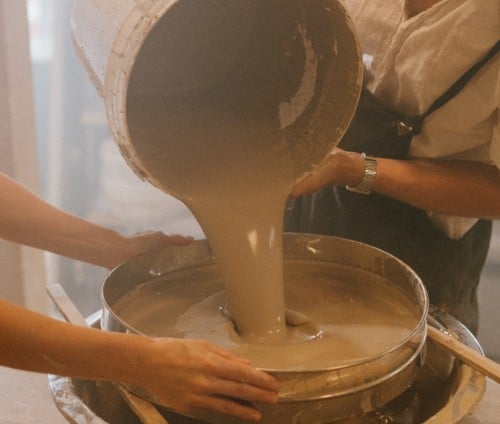
Other materials are added to the clay to give it the right consistency. The main ingredients include Kaolin, chalk, feldspar, and quartz(1).
If you’d like to know more about how clay is made up by pottery factories and potters, you can check out my article on the different stages of clay here.
Slip Casting Delft Pottery
Some pieces of Delft pottery are made on the pottery wheel. For example, some plates and other regular shaped items.
However, most Delft pottery is made through a process of slip casting. This is because many of the pieces have either angular or complex shapes that would be hard if not impossible to make on a pottery wheel.
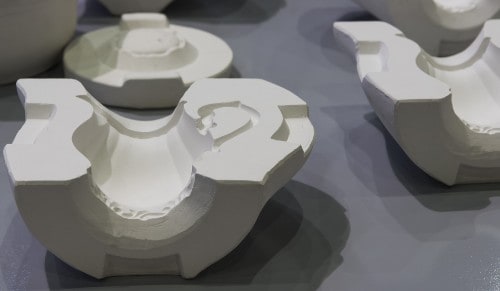
Slip casting is the making of pottery using plaster-cast molds. The pottery molds usually come in 2 or 3 parts. These are bound together using strong elastic straps.
The liquid clay (called clay slip) is poured into a hole in the top of the mold. In fact, the Delft factories, have a handheld pump attached to a hose that allows them to easily pump the right amount of slip into the plaster mold.
When the cast is full of liquid clay, it is allowed to sit for a short period of time. During this period the plaster mold draws water out of the clay. The clay slip that is in contact with the surface of the mold begins to firm up and form a skin around the inside of the mold.
Draining the Mold
After around 30 minutes the mold is turned upside down over a container and the liquid clay is poured out of the mold. This removes the liquid slip and leaves behind the clay skin on the inside surface of the mold. The skin is around 3mm thick or just under 1/8th of an inch.
The cast is allowed to drain for a while to make sure all the slip runs out of the mold. It’s important to let the clay drain out whilst the mold is resting at a slight angle.
If the mold is positioned upright, drips of clay can form on the inside base of the pottery. These drips become sharp points when the clay has been fired.
Pottery glaze doesn’t cover these sharp drips well during firing and the drips form points in the pottery that is not 100% watertight. As a result, the pottery would absorb water and leak at this point. So, it’s important that the inside base of the piece is smooth.
The image below is a useful model of how the slip casting process works. This model was on display at a workshop at the Manufacture Nationale de Sevres which is in France and is one of the principle European porcelain factories.
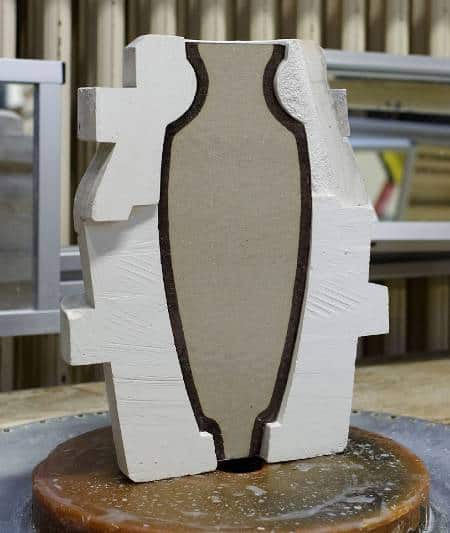
Image by Coyau. (CC BY-SA 3.0)
via Wikimedia Commons
Removing the Pottery from the Mold
The clay is left to dry in the mold for around 3 hours. As it dries the piece shrinks away from the mold surface just a little. This means that it can be removed easily from the mold.
At this point, the clay is leather hard, which means that it still has water content and can be refined. However, leather hard clay is firm and can be worked on without losing its shape.
Whilst the clay is leather hard, the potter can cut off any excess pieces of clay using a sharp clay knife. They can also add any details to the pottery at this time. For example, one of the iconic Delft pottery tulip vases may need to have additional spouts added to the piece.
Spouts, handles or other details are added to the piece using a method called score and slip. This involves scoring into the two surfaces that are to be joined and painting them with clay slip.
The two surfaces are then pressed together, and the slip acts as glue to join them. The join is then tidied up and the piece is allowed to dry slowly in the open air.
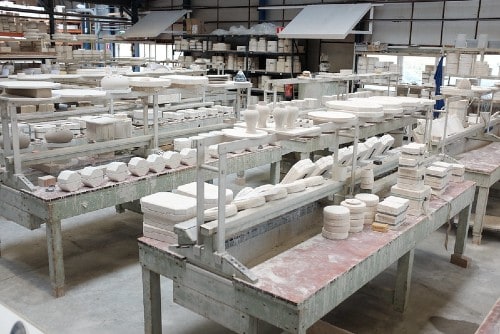
Image by Henry. (CC BY-NC-ND 2.0)
Refining the Pottery
The pottery is left to dry for around two days. When it is dry, the potter will tidy up the piece. This is done with a fettling knife. Seams from the mold a scraped away and edges and details are smoothed out and refined.
After this, the potter will wipe the piece with a damp sponge to give it a smooth finish. Once it’s been wiped down, the piece will contain some moisture which needs to dry out again before the pottery is fired.
Adding a Layer of Engobe
Often, though not always, another layer of a particular kind of clay slip called ‘engobe’ is applied to the pottery at this stage.
Engobe is a colored is a slip like liquid that contains a lot of clay, but also contains colorants. The engobe applied to Delft pottery is white.
Engobe acts like a bit of a primer to the pieces of pottery. It creates a bright white surface, smoothing out any imperfections, and creates a good surface for the painters to decorate later on.
The First Firing
Once the pieces have been allowed to dry completely, the clay is then fired in a kiln. ‘Firing’ basically means baking the clay at a very high temperature in a special pottery oven called a kiln. The kilns used by the Delft potteries today are heated using electricity. Electrical elements run around the inside surface of the kiln and generate a lot of heat.
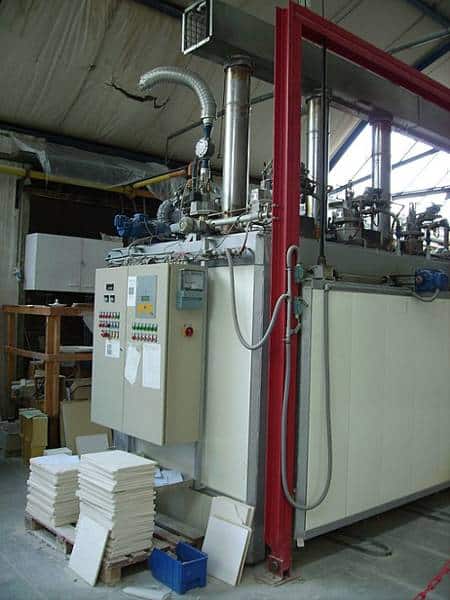
Muesse, CC BY 3.0, via Wikimedia Commons
Most Delft pottery is fired two times. (Some pieces are fired three times, but we will look at that later). The first firing is called the bisque or biscuit firing.
During the bisque firing, the clay is turned from a fragile material that can be dissolved in water, into a hard ceramic material that won’t dissolve if made wet.
The kiln is heated to around 2012F (1100C) during the bisque fire. It takes about 9 hours for the kiln to reach that temperature. Once it has reached its target temperature, the kiln switches off and is allowed to cool.
Cooling the kiln takes about 24 hours. Once the kiln is cool, the Delft pottery can be removed from the kiln and decorated.
Sketching Out the Design
When Delft pottery is made, the decoration needs to be sketched on the surface of the piece first.
This is in a couple of ways. Either it is drawn freehand using a pencil. Or, the artist will use a stencil. The stencils are made of paper, on which the design of the pottery is drawn. Small holes are then made around the design, following the outline of the design.
The painter then holds the stencil up against the pottery and dusts it with charcoal. They do this either with a brush or using a stick with a pouch of fabric attached to the end containing charcoal dust.
The charcoal dust passes through the holes in the stencil and makes a feint charcoal outline of the design. This outline can then be followed by the painter, and the charcoal burns off the pottery during the second firing.
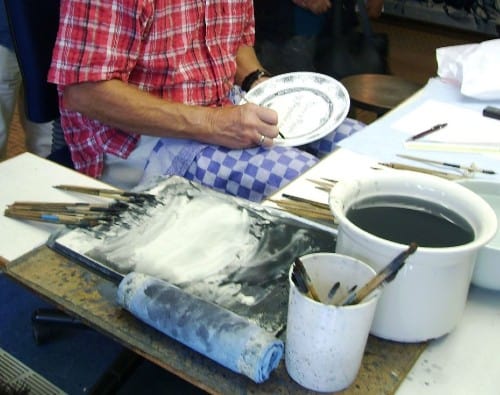
Painting the Decoration
The potter paints the piece with a water-based underglaze. This is made of cobalt oxide dissolved in water. At this stage the cobalt oxide mix is black.
The potter traces out the outline of the design with a very fine brush. After tracing out the design they add shade and tone to the piece. They start off by adding lighter shades to the painting. Then add darker shades and tones.
Because the cobalt oxide mix is water-based, the painter can make the tones lighter by adding more water to the mix.
Muesse, CC BY 3.0, via Wikimedia Commons
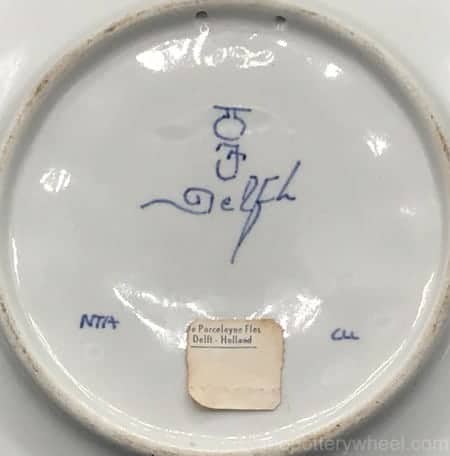
Once the piece has been decorated the painter will sign the piece. Each factory had its own individual signature stamp. This included an icon representing the pottery.
In the case of the Royal Delft, this signature is a drawing of the bottle. In addition to this, the initials JT are added to the pottery mark. JT stands for Joost Thooft who owned and ran the Royal Delft from 1876 onwards.
The painter also adds their own initials, plus a code to indicate what year the piece was made. If you would like to know more about Delft pottery marks, you can check out my article on them here.
All of the pottery decorated in the smaller factory of De Candelaer is hand painted. However, The Royal Delft decorates some lines of pottery with decals or transfers.
Color Schemes
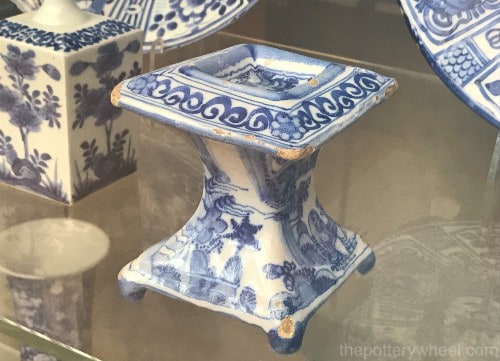
The majority of Delft pottery is made using the iconic blue and white decorative patterns. This is called monochrome Delftware. However, some Delftware is decorated using a wider range of colors, including amongst others, yellows, reds, oranges, and greens.
Delft pottery that is decorated in a range of colors is called polychrome Delft.
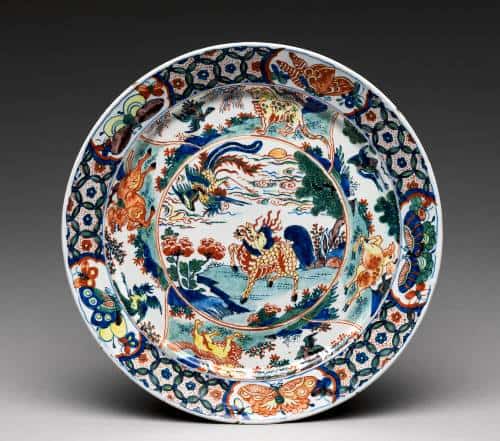
Courtesy of The Met. Public Domain
Today this is partly to appeal to a wider market, including the tastes of a younger generation of buyers.
However, polychrome Delft has a long history. In the latter half of the 17th Century, the original Delft factories made pottery with a range of colors.
This change in the way that Delft pottery was decorated was the direct result of the influence of imported Japanese Imari porcelain.
Japanese Imari porcelain was decorated in a range of beautiful colors and was imported to the Netherlands around 1655. It was very popular and the Dutch potters worked hard to innovate and find ways to recreate the Japanese color palette.
If you’d like to know more about the history of Delft pottery, you can take a look at my article here.
The Second Firing
Once the pottery has been painted, it is covered with pottery glaze. Put simply, pottery glaze is powdered glass, suspended in water, and mixed with a few other ingredients.
The pottery glaze is applied in its liquid form to the decorated Delftware. The glaze dries quickly on the surface of the pottery to form an opaque layer.
Delft pottery is glazed by either dipping it in a bucket of glaze or by spraying the glaze onto the surface. Most Delft pottery is glazed with an airbrush, using a compressor. This gives the piece an even coating of glaze.
Once the glaze has dried, the bottom of the piece is wiped clean so that there is no glaze on the foot of the piece.
The pottery is then loaded into a kiln for a second time and it is ‘glaze fired’ at 2192F (1200C). During the glaze fire, the glass in the glaze coating melts and covers the pottery with molten glass.
As the glaze is fired it becomes transparent. The black cobalt oxide turns blue, and the blue decoration shows through the transparent glaze.
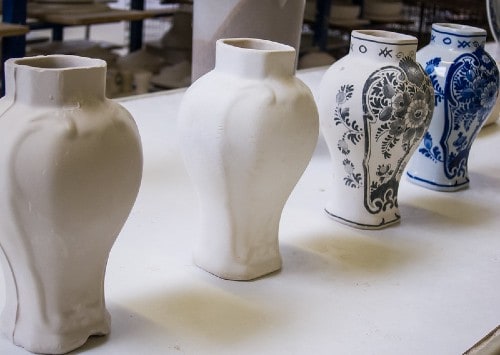
Image by Bob Denaro (CC BY 2.0)
The glaze firing takes around 9 hours after which the kiln is allowed to cool. As the kiln cools, the glaze that has melted during firing turns solid again and forms a water-tight, glossy surface on the pottery.
The reason that the base of the pottery is wiped clean of glaze before it is fired is to prevent the pieces from sticking to the kiln shelf.
Enamels and Lusters
If the design of the Delft pottery involves gold details or special enamel glazes, then it needs to be fired a third and final time.
After the glaze firing, details using specialist paints such as gold luster are applied to the glazed surface of the pottery. The pieces are then fired one final time at a lower temperature of around 1323-1458F (717-792C).
This cooler temperature is sufficient to melt the luster glazes onto the pottery to create gold detail finishes on the glazed surface.
Often a third kiln is used specifically to fire luster glazes in their lower temperature range. Historically, these low-firing kilns have been called ‘muffle kilns’.
How was Delft Pottery Made in the Past?
The process outlined above is the way that Delft pottery is made nowadays. A lot of the craftsmanship and techniques have remained the same over the centuries.
However, there are some differences in how Delft pottery was made in the past. So, let’s take a look now at the earlier production process.
A Bit of Background
In the early 17th Century, a lot of Chinese porcelain was being imported into the Netherlands and it was very sought after. At the time, the Dutch potters were making simpler maiolica-style pottery and they struggled to compete with the popular imported Chinese ware.
However, not defeated, the Dutch potters adapted to this competition by finding ways to make their ceramics similar to the Chinese porcelain imports.
The Chinese porcelain had detailed blue decoration on pure white porcelain clay. In addition to this, the porcelain was thinner and more refined than the Dutch maiolica.
So, the Dutch adjusted the clay that they used, experimenting with different clay recipes so that they could make thinner pieces.
However, although they were able to make thinner pieces, the clay that they used was still earthenware and had a yellow color.
To cover the yellow or buff-colored clay, they developed a technique of tin-glazing the pottery all over. Tin glaze is a lead glaze that contains a small percentage of tin oxide. The tin oxide gives the glaze a white opaque look once it has been fired.
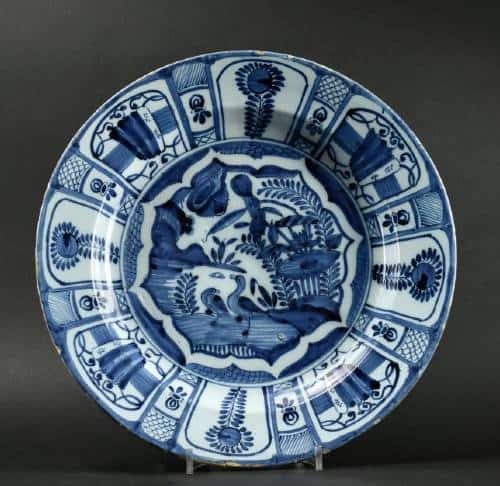
Picture used with kind permission by Robert McPherson Antiques
A number of European countries, including Italy and Spain had been using tin glaze to create maiolica pottery for some years. Fortunately, in the 16th century, some skilled Italian potters had moved to the Netherlands and their tin glazing skills were adopted by Dutch potters.
Here is the process by which the early tin-glaze Delft pottery was made…
The Way that Delft Pottery was Originally Made
The clay was shaped in a way that is more or less the same as the techniques used today. Plates and circular objects were thrown on a pottery wheel. And more pieces with more complex shapes were made using plaster molds.
Once molded, the pottery was tidied up and refined in the same way described above. And, any additional details to the piece like spouts, sections, or handles could be attached to the pot using clay slip.
One difference in the older technique was that the clay was not coated with a white engobe slip. Instead, they were formed and then placed in a drying loft to dry out completely before being fired for the first time.
The Bisque Fire
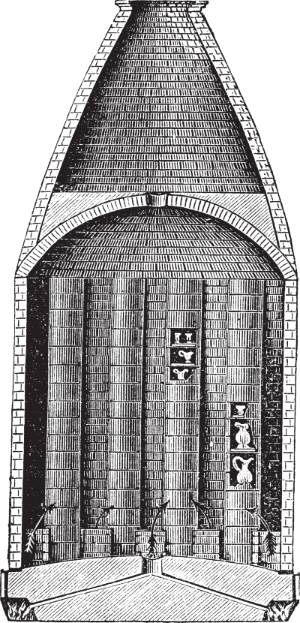
Like today, the first firing that the pottery went through was the bisque fire. What was different, however, is that in the early days of production the pottery factories used wood-burning kilns instead of electric kilns.
The wood-burning kilns required a lot of maintenance to run. There was a team of kiln stokers who had to work during the hours that the clay was fired to supply the kiln with wood. They also made sure that the kiln was at the right temperature, neither too hot nor too cool.
Electric kilns are a clean way to fire pottery. The atmosphere in an electric kiln gets hot, but it does not get dirty. By contrast, wood-fired kilns were full of ash, smoke, and fumes.
One way to protect the pottery from the dirt of the kiln environment was to fire it in a container called a saggar. The saggars used by the Delft factories were made of fireclay, which is a refractory clay that can cope with the high temperatures in the kiln.
Saggars were tubular-shaped containers that plates could be stacked inside. The sides and lid on the saggar would protect the clay from the dirt in the kiln.
During the bisque fire, the potters could stack around 19 unfired plates on top of one another in a single saggar(2).
Nevertheless, when the kiln had cooled, and the pottery was removed from the saggar, the pieces of bisque would be washed before being glazed.
Glazing and Decorating the Delft Pottery
The Delftware made by the original factories in the 17th and 18th Centuries was essentially maiolica pottery.
The process of making maiolica involves coating the bisqueware with a layer of tin glaze. And then painting the decoration directly onto the as yet, unfired layer of glaze. The tin glaze itself was made out of a mixture of sand, soda, potash, lead, tin, and salt (source).
It’s thought that sometimes a small amount of cobalt oxide was added to the glaze. This was done to balance out the yellow tint in the glaze and make it closer to the color of Chinese porcelain(3).
The glaze was applied to the pottery either by dipping the pottery in the glaze or painting it on. This glazed surface was then decorated using the same method described above. Namely, a charcoal outline of the design was transferred onto the glaze using a template perforated with holes.
The painter would then paint the design onto the piece using the same cobalt blue oxide mix that is used today.
In the very early days in which Delft pottery was made, the glazed and decorated piece would then be fired as it was.
However, over time an extra step was introduced. After the piece had been decorated with the cobalt oxide painting an additional layer of clear lead glaze was applied on top. It was found that this extra layer of clear gave the pottery a brilliant gloss that would equal the appeal of Chinese porcelain.
Glaze Firing Delft Pottery
The ash and dirt of the wood-fired kiln posed a challenge during the glaze firing process too.
When glazed pottery is fired in a wood-fueled kiln, the color and texture of the glaze are affected by the dirt in the atmosphere of the kiln.
As a result, saggars were used during the glaze firing too. To make the most of the space in the kiln, the pottery needed to be stacked on top of each other during the firing.
The difficulty was that if the pots were in direct contact with one another, the molten glaze would weld the pieces together. They needed to be stacked separately.
The original Dutch maiolica potters had stacked their pieces using small three-pronged spurs that sat between the stacked plates. The plates were fired upside down. A spur would rest on the back of one plate, and then another plate was rested, face down, on top of the spur.
This left three little marks or scars in the glaze on the top side of the plate. Here is an example of the kinds of marks that were left. I added the red circles to highlight the marks on the glaze which might otherwise be hard to spot.

Rijksmuseum, CC0, via Wikimedia Commons
Adapting the Saggar
Chinese porcelain didn’t have marks of this kind, so the Delft potters needed to adapt their firing process to avoid these visible marks.
The solution was to stack the plates the right way up. Pegs would be inserted into holes that were made along the side of the saggar. The plates would rest on three pegs that supported them on the underside.
This meant that the three scars on the glaze would be on the underside edge of the plate rather than on the top side.
The image below is of the underside of a plate made at De Roos (The Rose) Factory around 1727-55. As with the image above, I added the red circles to highlight the marks on the glaze.
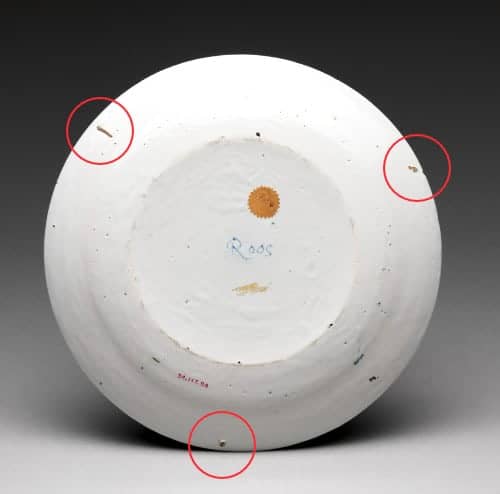
“Plate” ca. 1727-55. De Roos Factory. Courtesy of The Met. Public Domain
One of the ways of distinguishing the Chinese porcelain from the Delft pottery being made in its likeness is that the Chinese porcelain did not have such scars on the underside rim.
Loading the Saggar
Loading the saggar was a skilled job. The loader had to be sure not to touch the glaze on the plate too much to avoid damaging the unfired glaze surface.
But equally the plates stacked on the pegs were quite precarious in the stack. Also, during firing, it was important to keep the kiln temperature in the correct firing range. If the kiln got too hot, and one of the plates in the stack warped, it could slide off the pegs it was sitting on.
This could cause the whole stack of plates to collapse in the saggar, costing the factory valuable time and resources.
The picture below is a photograph of a stack of plates that did exactly that. During the firing process, one of the plates fell, bringing the whole stack of plates down to form a tower of broken plates.
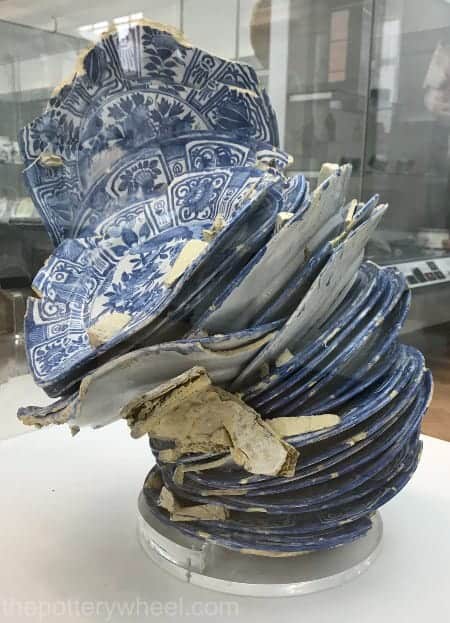
On display at The V&A in London.
During the firing process, the entire tower of collapsed plates fused together. When this expensive mistake happened, it was called ‘a waster’.
In this photograph, you can see that fragments of peg and saggar have fused to the tower too.
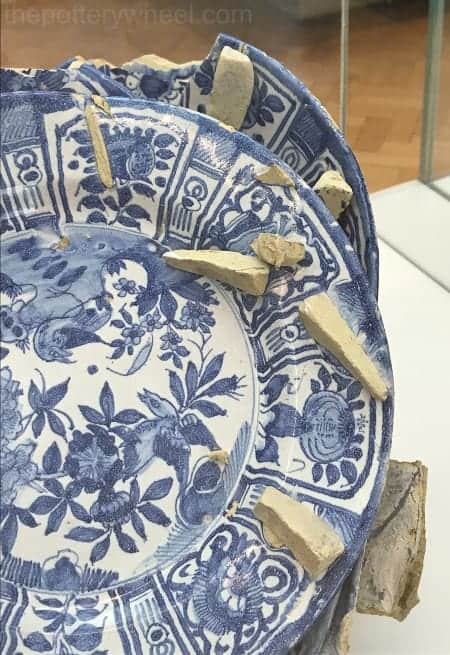
On display at The V&A in London.
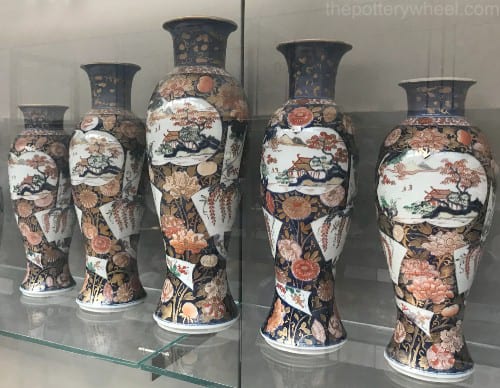
Making Polychrome Delft Pottery
As mentioned earlier on, the Delft potters were not just influenced by Chinese Porcelain. They also took inspiration from Japanese Imari porcelain which was decorated with a range of colors often including gold.
It took the Delft potters a while to work out how the Japanese created such a rich range of colors on their ware.
The problem was that the bright colors and gold lusters would burn out in the high temperature of the glaze firing. It was discovered that the way to achieve the polychrome look was to introduce a third firing stage.
This third stage is done at a lower temperature that the colored enamels can tolerate. Sometimes the factories had their own muffle kiln for firing colored enamels. But often this work was outsourced to local artisans. Local folk would fire the pottery for a third time in a kiln at their own home.
A Move Away from Tin-Glazing
Delft pottery continued to be made using tin-glazing techniques, until the latter half of the 19th Century. At that time Joost Thooft, who had taken over De Porceleyne Fles moved away from the tin-glazing process.
Instead, he adopted a process similar to the way in which Wedgewood pottery was being made at that time. There was a move towards using white firing clays. These were bisque fired and then the decoration was painted directly onto the bisque surface. This was then glazed with a clear glaze and fired for a second time.
This process is closer to the process that is being used at De Porceleyne Fles (or Royal Delft) today.
Final Thoughts
Since the industrial revolution and the growth in tourism, there has been a surge in the mass production of ceramics that are made in the style of Delft pottery. Whilst these might satisfy the tourist demand for inexpensive keepsakes, they are not made with the same level of skill used to produce authentic Delft pottery.
A huge amount of work and craftsmanship has gone into producing Delft pottery over the years. This is one of the reasons why it is still valuable to collectors, dealers, and art enthusiasts.
Antique and vintage delftware can command high prices at auction. If you’d like to know more about how much Delft pottery is worth you can check out my article on that subject here.
The processes by which Delft pottery is made have evolved over time. However, what has not changed is the value attached to the quality and artistry involved.
References:
- Royal Delft: A Guide to De Porceleyne Fles. Erickson, R. 2003. pg 13.
- The V&A Museum London Installation on Firing Delft Pottery 2022.
- Paape, G. De Plateelbakker of Delftsch Aardewerkmaaker, Volledig beschrijving van alle konsten, anbachten, handwerken, fabrieken, trafieken, derzelver werkhuizen, gereedschappen, enz., 24 volumes 1788-1820, volume 12, Dordrecht, 1794.


