Your cart is currently empty!
Can you Stack Greenware in a Bisque Fire? Stacking Greenware
Published:
Last Updated:
Affiliate Disclaimer
As an affiliate, we may earn a commission from qualifying purchases. We get commissions for purchases made through links on this website from Amazon and other third parties.
When I first started firing my own pottery, I was very cautious about how I loaded the kiln. I’d heard that greenware pottery could touch when it was being fired, but I didn’t quite trust this was true. After a while, I wanted to know if I could bisque fire more pottery in one load. I wondered if you could stack greenware in a bisque fire, and if so, how it was done. So, I did some research and this is what I found out…
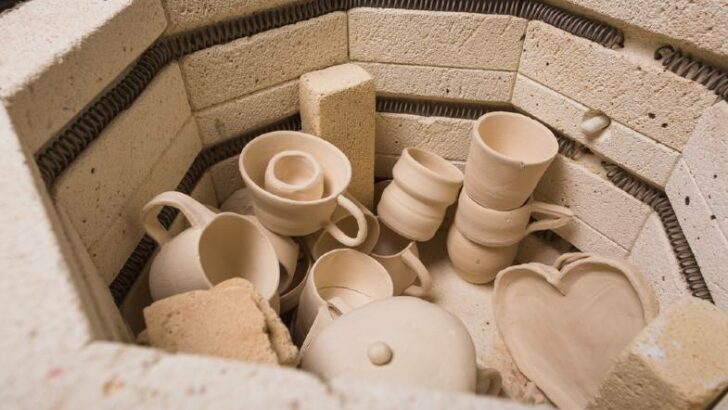
It’s fine for greenware pottery to touch each other in the kiln. And you can stack greenware in a bisque fire. Most potters recommend stacking greenware lip to lip, foot to foot, or nesting smaller pots in larger ones. The key when stacking greenware is to bear in mind weight distribution.
So, let’s take a closer look at some tips for stacking greenware in a bisque fire…
How to Stack Greenware in a Bisque Fire
The first thing to say about loading a bisque kiln is that it’s ok for pieces to touch one another. They won’t stick together and they won’t warp in the kiln.
This is different from a glaze fire. When you are glaze firing, the pieces must not touch. This is because glaze melts when it’s hot. If glazed pieces are touching, the glaze will fuse the pottery together as the glaze cools.
This is not the case with greenware in a bisque fire. The surface of the greenware clay does not become molten and won’t fuse together.
You can also position the greenware quite close to the wall of the kiln. Some potters will rest pottery against the kiln wall. I tend to avoid doing this, kiln brick is very soft.
My feeling is that the less I touch the kiln brick the better. If you do have any pieces touching the kiln wall, be sure that they are not touching the kiln element. Elements are fragile and easily damaged.
Does Greenware Move in a Bisque Fire?
Another reassuring point about stacking greenware is that the pottery doesn’t move about when it’s being fired. It’s often said that when greenware is bisque fired, it will shrink and move about when it’s being fire.
Clay does shrink when it’s being fired, however, this happens most around the time that it’s reaching maturity. Reaching maturity means that the clay has become as dense and strong as it can be.
Stoneware clay reaches maturity at much higher temperatures than the temperature of a bisque fire. So, the amount that stoneware pots shrink in a bisque fire will not cause them to move significantly.
The pots will expand and contract a little as they are being bisque fired. However, the kiln shelves, props, and bricks will also expand a little too. So, everything in the kiln will move just a tiny amount, but not enough for the pots to fall over.
Earthenware clay matures at lower temperatures closer to bisque temperatures of around 1832F (1000C). As a result, you may want to be more mindful of how you position and stack greenware made from earthenware clay. However, even with earthenware clay, provided you arrange the greenware well, you shouldn’t have a problem with the pots moving.
Different Ways to Stack Greenware in a Bisque Fire
Here are some of the different ways that you can stack greenware in a bisque fire:
Lip to Lip / Rim to Rim
You can stack bowls, mugs, and plates lip to lip. This involves positioning one piece on the kiln shelf on its foot. Then lining the lip of this piece with the lip of another which is gently placed on top. This works if the diameter of the piece is the same.
If you are stacking lip to lip, it’s important that the piece on top is not too heavy. Don’t place a delicate pot with a thin lip underneath a chunky heavy pot, even if the lip diameter is the same. The pressure of the chunky heavy pot might cause the more fragile pot underneath to warp or crack.
In general, if the lips of your pottery are very delicate or fragile, it’s best not to put them lip to lip. An alternative would be to nest pots with delicate lips.
Nesting
You can stack greenware in a bisque fire by nesting them inside one another. This means that you are positioning smaller pots inside larger ones, like a Russian doll.
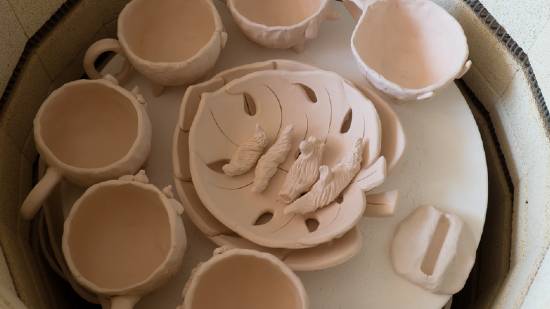
When nesting pots, it’s important that the foot of the smaller pot rests on the inside bottom of the larger pot. Don’t use the rim of the lower pot like a hammock to support the smaller pot. This will put stress on the lip of the larger pot underneath. The weight of the smaller nested pot needs to be on the foot of the smaller pot. You can nest a few pots like this.
Foot to Foot
As an alternative to the above, you can also stack greenware in a bisque fire foot to foot. This involves stacking greenware on the foot ring.
Stacking Plates and Platters
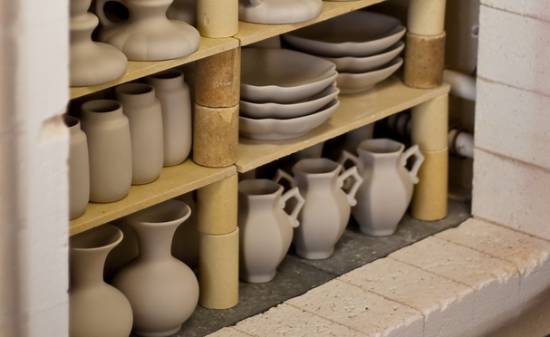
It’s often said that when firing plates, that you should fire them with the foot level with the kiln shelf. The same is said of platters or any large flat pieces of greenware.
The reason for this is that large flat pieces can warp and crack whilst they are being fired. Keeping the plate on a flat level surface is said to reduce the amount of stress the piece is under.
Different potters will recommend different ways of stacking plates. Some will stack them all in the same direction. Stacked this way the foot of the plate above is touching the center of the plate below.
Some stack rim to rim or foot to foot. Others will avoid the lips of plates touching one another to avoid putting the lip of the plate under strain.
There are other potters who reject the whole idea that you have to stack plates level with the kiln shelf. Some potters find that their plates and platters don’t warp in a bisque fire. These potters will stack plates on their side, leaning against one another, propped up by a kiln brick.
If you stack plates on their side, you do save kiln shelf space. It’s worth trying this method so you can fit more in your kiln. You might find that your plates are fine if bisque fired on their side.
However, this method might not work well for the type of clay you are using. In which case you can have a go at firing by stacking greenware plates level with the kiln shelf. When firing pottery, there is usually some experimenting and finding out what works for your kiln and clay.
Leaving an Air Gap
Regardless of how you stack your plates, it’s important to make sure you leave an air gap between pieces. Stacking several flat pieces together without any gaps creates a thick slab of clay in the kiln.
Several pieces butted up against one another with no airflow can create several problems. There needs to be air space between pieces to let any moisture that remains in the pieces to evaporate. And greenware pottery needs space for gases created by the burning off of organic compounds during firing to escape.
If you don’t leave a gap between your large flat spaces, moisture and gas can get trapped. Trapped moisture in a bisque fire can cause pieces to break or explode. And trapped gases in clay can cause problems later on when glaze firing.
Tumble Stacking Greenware in a Bisque Fire
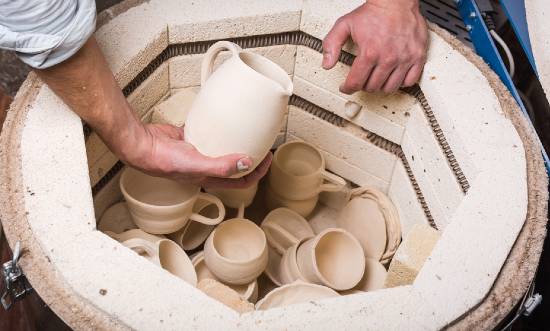
Tumble stacking greenware is the technique of positioning greenware in the kiln in whatever way it will fit. When a kiln is tumble stacked, the greenware will often be at all sorts of angles, positioned directly on top of each other.
The reason it is called tumble stacking is that the greenware literally looks like a tumble of pottery. One of the reasons for tumble stacking is that you can fit much more in your kiln if you load it in this way.
Although a tumble stacked kiln may look haphazard and like a jumble, there are a few suggestions to follow…
Suggestions about Tumble Stacking Greenware
- Even when tumble stacking, you need to consider weight distribution. Position the larger pieces at the bottom and the lighter pieces on top.
- Use shelves to split the tumbled stack into sections. This means that the greenware at the bottom of each pile will not be carrying too much weight.
- Tumble stacking works best with clay that contains fewer impurities. Some darker clay contains more impurities that need to be burned out when it is fired. These clays need more airflow when they are in the kiln.
Tumble stacking a kiln does pack the greenware in more closely together. As a result, it is best reserved for clay, such as porcelain or lighter colored stoneware that has fewer impurities.
If darker clays that need more airflow are packed too tightly in a bisque fire, gases can get trapped in the clay body. You might not be able to notice this after a bisque fire.
However, the trapped gases will try to escape during the glaze fire. This can cause the clay to bloat, or cause pinholes and blisters in your glaze surface. - It’s important to make sure your greenware is thoroughly bone dry. Remaining moisture in clay needs space to evaporate in the early stages of a bisque fire.
If the pottery is too tightly stacked, the moisture will get trapped and may cause the pottery to explode. - If you want to try tumble stacking, you need to be careful that the stack isn’t resting against your thermocouple. Likewise, if you have a kiln sitter, avoid positioning the stack so that it prevents the kiln sitter from falling.
- It’s best not to tumble stack plates or platters as they can warp. Alternatively, you can keep plates on a separate shelf and tumble stack on another shelf.
Final Thoughts
How you stack greenware in a bisque fire will depend on a few factors. It depends on how much greenware you have, how big your kiln is, and what kind of clay you’re using. Firing pottery is a learning curve, and a lot of things are learned by trial and error. You might have to experiment a bit to find out which way of stacking greenware works for you. Whichever method works for you, you can be reassured that the surfaces of your bisqueware can touch.


