Your cart is currently empty!
Pinch Pot Mug – 2 Ways to Make a Mug Without a Wheel
Published:
Last Updated:
Affiliate Disclaimer
As an affiliate, we may earn a commission from qualifying purchases. We get commissions for purchases made through links on this website from Amazon and other third parties.
Making a pinch pot mug is simple, and like anything the more you practice the easier it will become. Once you have mastered the pinching technique you can get creative and find your style.
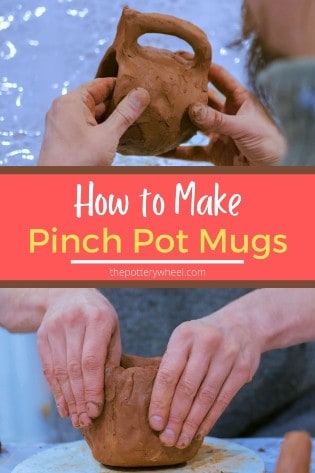
In this article, I will show you my two favorite ways to make a pinch pot mug. This is a step-by-step guide with images of how I made these three mugs. Why not experiment with these techniques and see which one you prefer.
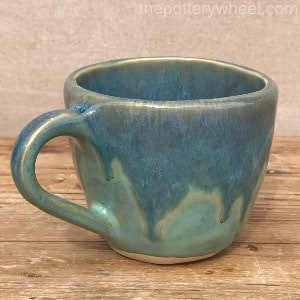
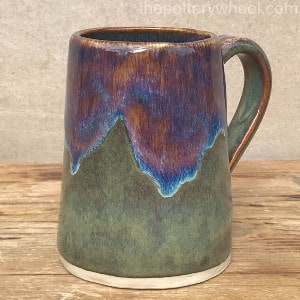
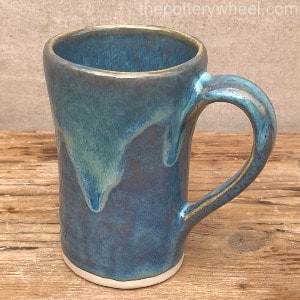
Table of Contents
show
Pinch Pot Mug – Technique 1
With this method, you can make a pinch pot mug, or a cup, depending on what sized vessel you prefer.
Step 1 – Starting off Your Mug
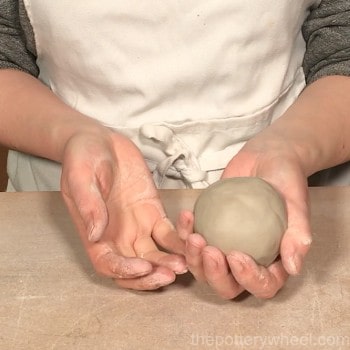
Take a lump of clay about the size of an orange. I find around 13oz of clay is a good weight to start off a pinch pot mug. The clay needs to be soft but not sticky or tacky.
If you’d like to know about the best clay for hand-building pottery, have a look at the post I wrote on exactly that topic right here.
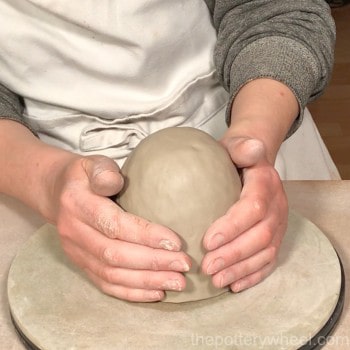
Pat and rotate it into a smooth round ball.
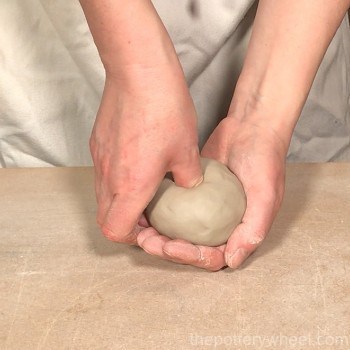
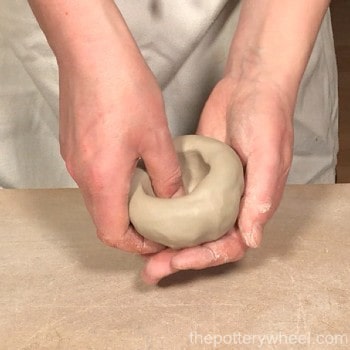
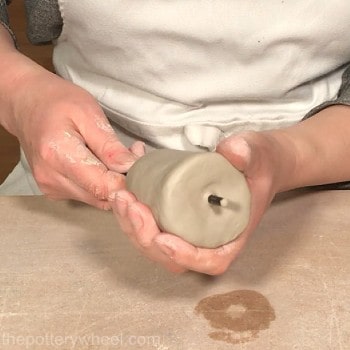
Support with one hand and push your thumb into the center with the other hand.
Push the thumb right into the ball of clay. Be careful not to push it all the way through. Aim to make thickness no more than 1/ 3 of an inch. If you curve your fingers around the base on the outside, you will feel the thickness of the base. It can take a little practice getting the thickness right.
Step 2 – Opening up the Pinch Pot Mug
Keep supporting the cup in one hand. Then with your thumb on the inside and your fingers together on the outside, start to pinch the clay. Your fingers and thumb pinch together like a ducks beak. Rather than nipping away at the clay like a crab claw.
Your fingers will curve around the outside of the pot and pinch together to meet your thumb.
It’s best not to pinch with the tips of your fingers. However, when you’re starting the pot, you are trying to thin out the clay at the bottom of the mug. So, you need to put a bit more pressure on the clay at the base. Like this:
You may find as you pinch the clay, that little cracks appear on the top edge of the pot. Or cracks might open up on the outside surface.
If little cracks do appear, simply smooth them out with your fingertip. It’s best to smooth them out as they appear. If you leave them, then the cracks will become bigger as you work.
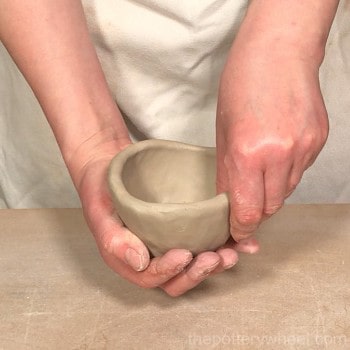
I pinch the clay until it’s about a 1/3 to 1/4 inch thick. Then I start to work my way up the sides of the pot. I pinch the clay then rotate it in my supporting hand and pinch again.
I have found that it is best to use lots of small gentle regular pinches. If you use fewer pinches with lots of pressure, it’s harder to make the pot an even thickness.
Is your Pinch Pot Mug Turning into a Bowl?!
As I work my way pinching up and around the pot, I’m also trying to shape the clay into a mug. When you make a pinch pot, it is easy for the clay to spread out and become a bowl shape.
To prevent my clay from becoming a bowl instead of a mug, I do the following. As I pinch the clay, I also pull it a little. I’m gently pulling the clay upward and inward instead of letting it fan outwards. I also put pressure on the clay with my fingers on the outside too.
If most of the pressure in the pinch is in your thumb, the clay will spread outwards. This is because your thumb is pushing the clay into a wide bowl shape. However, if you put pressure on the outside of the pot with your fingers, the clay will move out a little. But it will also move upwards as well to make a mug shape.
This can take a little practice. But the good thing about clay is that if your mug is becoming too wide, you can start again.
Also, if your mug is getting a bit wide, try the following. Put the rim of the pot on the table so the mug is upside down. Then cup your hands around the outside of the pot and gently squeeze the clay. You can reshape the clay a bit this way, bringing the sides in a little.
Step 3 – Letting the Clay Become Firm
When the clay is about 1/4 inch thick all over, I leave the piece to firm up for a while. The fresh clay will be quite floppy at this point. It would be difficult to keep working on it without the mug shape becoming distorted.
So, I loosely wrap the mug in a plastic back and rest it on its rim overnight. The next day, I will leave it in the open air for an hour or so to firm up. How I leave it in the open depends on how warm and dry the day is. It’s best to check the pot now and then to make sure it isn’t getting too hard.
You want the clay to be firm but not leather hard. If it’s leather hard it will be too rigid to carry on shaping.
What Next?
When the clay is firm, I use a gentle pinching technique to try to even out the clay a little more. You can also reshape the pinch pot mug a bit at this point.
Your clay will now be about the size and shape of a cup rather than a mug. Cups are a bit shorter than mugs. This does depend on how much clay you started out with. But 13 oz of clay that is pinched to 1/4 inches thick will be cup-sized, rather than a mug.
This is an example of a pinch pot cup, perfect for afternoon tea…

It may be that you want to make a cup rather than a mug. If you want to make a cup, then you can jump to the section outlined below. This section covers how to smooth out your form and add a handle.
However, if you want to make a pinch pot mug, with a bit of height, then read on….
Step 4 – Adding Height to the Mug
To make a pinch pot mug with a taller profile, you can add height by adding some extra clay. One way to do this is to add a strip of clay to the top of the cup. The easiest way to do this is to first find out the circumference of the rim.
Measuring the Diameter of the Rim:
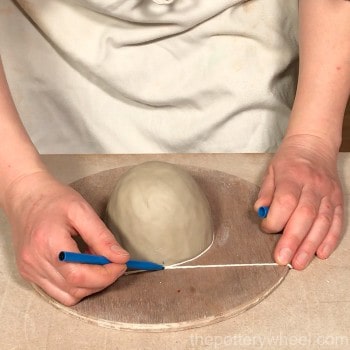
Measure the circumference of the rim of your cup. You can do this by turning the cup upside down so its rim is on the table. Then gently wrap a piece of string around the rim of the cup. Mark on the string with a pen where the two ends meet and then cut it to length. This piece of string is now roughly the same length as the circumference of the rim.
To measure the exact circumference, turn your mug the right way up, so the rim is facing upwards. Place the string on the rim and make a small mark in the clay where one end of the string is resting. Then drape the string gently around the top. Using a pen, mark where the two ends of the string meet and then cut it exactly to length. The string is now the length of the circumference of the rim
Making a Slab Ring to Fit Your Mug:
Roll out a slab of clay with a rolling pin. I roll out the slab on a piece of fabric to stop it from sticking to the table.
You want the slab to be a bit thicker than your mug. This will give you a bit of extra clay to blend with and pinch upwards.
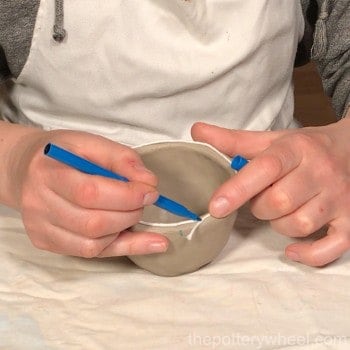
With a needle tool, mark out a strip of clay in the rolled slab. The rectangle needs to be the length of the string, and about 1 inch. Cut the strip out using the needle tool or a craft knife.
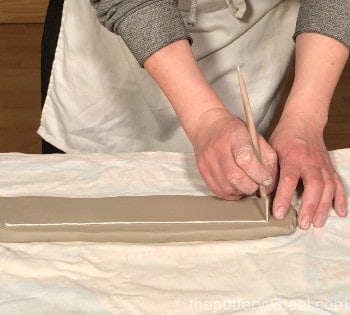
Score the short edges of the clay strip with a serrated rib tool or a fork. Then paint a little clay slip onto the scored edges. This is called the ‘score and slip’ method.
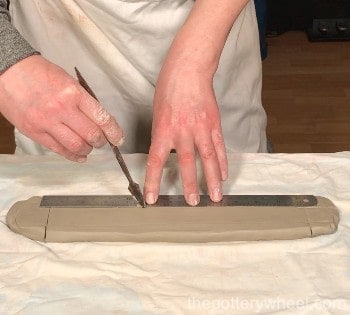
Press the two edges together gently but firmly. Then blend the clay in together with your thumbs to make a clay cylinder.
This cylinder is the same diameter as the rim of your cup. It can now be joined to the cup to add some height and make your piece more mug-like!
Step 5 – Joining the Clay
The clay cylinder will then be joined to the top edge of the pinch pot mug. Score and slip the top edge of the mug and one edge of the cylinder.
Then position the cylinder onto the rim of the mug and gently compress the two pieces together.
Once the two pieces are glued together with slip, use a modeling tool to blend the cylinder onto the mug. You can also use your thumb or finger if that feels more natural to you.
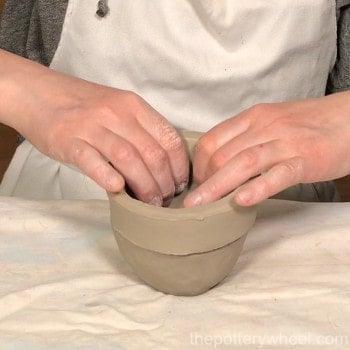

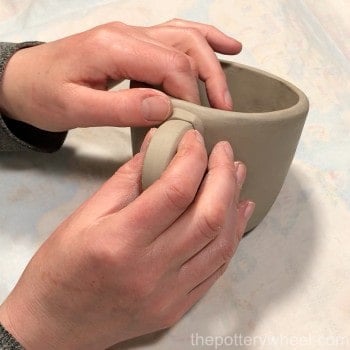
Blend the cylinder onto the mug all the way around. You can add a bit of strength to the join by adding coil of clay. Roll out a coil of clay about the width of your pinky finger. Flatten the coil out a little, then blend the coil onto the joined area on the mug. You can scrape off any excess clay from the coil with a metal rib tool.
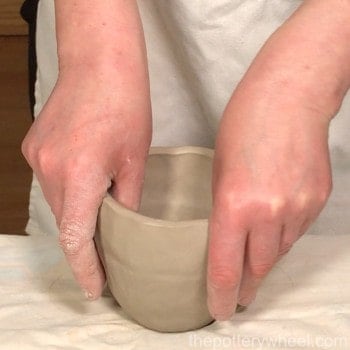
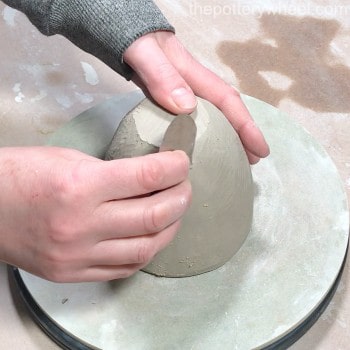
Step 6 – Shaping the Additional Clay
The cylinder of clay is a bit thicker than the rest of the mug. So, you will need to pinch the additional clay to even out the thickness of the mug. This will also add a little more height to the mug.
You might find when you pinch the added clay that your mug starts to flare out at the top. One way to stop this from happening is to pinch the clay with two hands at the same time.
It helps to have your clay on a banding wheel at this point, so you can rotate your mug. But if you don’t have a banding wheel, put the pot on a paper towel. This will help you rotate the clay without it sticking to the table.
Use both hands at once to pinch the clay. As you pinch, move your hands together gently. By doing this, the clay is being pinched thinner, but it is also moving the clay upwards rather than outwards.
Once the added clay has been pinched, you can look at the overall shape of your pinch pot mug. Is it the shape that you want it to be? Perhaps you want the mug to be a bit narrower. If so, then you can put the mug on its rim and gently squeeze the clay with your cupped hands.
Or perhaps you want the mug to have a bit more of a curved shape with a bit of a belly. You can do this by putting your hand in the mug and gently pressing the inside surface with your fingertips. Be gentle when you do this, otherwise, you might cause the clay to split.
Step 7 – A Quick Tidy Up
At this point, I give the pinch pot mug a quick tidy-up. Once your clay is leather hard, it is harder to tidy up the lumps and bumps. So, it’s a good idea to give it a bit of a tidy now. It makes your job easier once the clay is firmer.
You can tidy up the inside of the mug using a combination of tools. I tend to scrape out the cup with a platter tool first. This is a long thin tool made by Mudtools. Run the platter tool around the inside surface of the mug, scraping off any lumps and bumps.

If you don’t have a platter tool, you can improvise with what you have to hand. A dessert spoon can work well as it’s long and thin with a curved end.
You can also tidy up the inside and outside of the pot using a metal rib tool. Once the mug is reasonably smooth, you can run a soft rubber rib over it too.
I also try to level out the rim of the mug too. Again, this doesn’t need to be perfect right now. But it helps to have the rim level. I do this by trimming any uneven sections of the rim off with a craft knife.
Now is the time to decide if you want to add a foot ring or not….
Should I Add a Foot Ring?
When making a pinch pot mug, you can add a foot ring. A foot ring is not essential. A mug can look lovely and perfectly finished without a foot ring. It’s really a matter of personal taste.
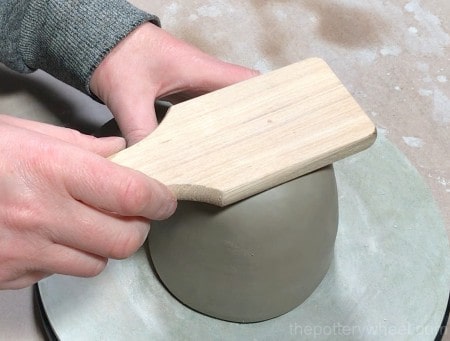
If you don’t want to make a foot ring, you can simply flatten out the base. One way to do this is to use a paddle. Gently tap the base of the mug with the paddle until it is wide enough for the mug to sit steadily on the table.
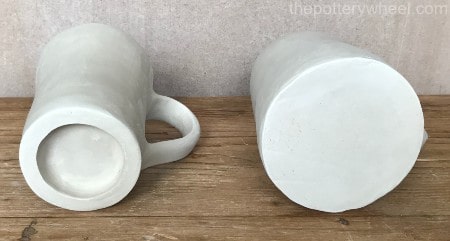
This is the difference between a flush base without a foot ring, and a mug with a foot ring.
However, if you do want to add a foot ring, this is one way to do it….
Step 8 – Making a Foot Ring
Make a coil of clay about the thickness of your pinky finger.
Drape the coil around the base of the inverted pinch pot mug. Place the coil where you want the foot to be positioned. Then cut the coil to the right length.
It’s best to cut the coil on the diagonal, as it is easier to join, and makes a stronger bond.
Remove the coil from the base of the mug.
Score and slip both ends of the coil, then press them together. Blend the joint with your fingers and thumb to make a ring of clay.
Then place the clay ring back on the base of the mug and gently shape it with your fingers. At this point, you aren’t attaching the foot ring. Just pinch it a little into the shape that you want the foot ring to be once added.
Leave the foot ring resting gently on the mug overnight. Wrap the mug and foot ring in plastic to make sure it doesn’t dry out too much. This will ensure that the mug and foot ring has a similar moisture content when you attach them.
Step 9 – Smoothing Out the Pinch Pot Mug
You may prefer your pinch pot mug to have an organic ‘pinched’ texture. This can look really lovely.
It means that the pinch marks from the process of making the mug are left on the surface. Rather than smoothing out the clay perfectly, you leave fingerprints and dents from pinching.
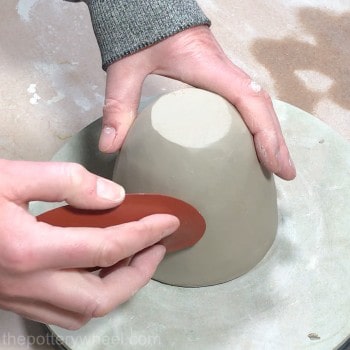
Or, you might want to smooth the surface of the mug instead. This can also look great. The easiest way I have found to do this is to start with a shredding tool. You can buy a shredding tool that is specifically made for ceramics. Or you can pick one up in your local hardware store. These are called Surform tools.
To use your shredder, simply wait until the clay is almost (but not quite) leather hard. Then run the shredder over the surface of the clay. This will remove any uneven bumps on the mug.
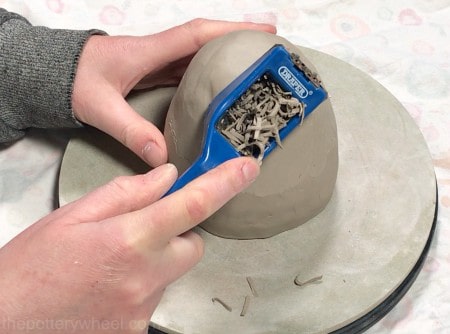
The shredder will leave a texture on your clay. You can remove this texture using a metal rib tool. Finally, you can really smooth out the surface of the mug using a soft rubber rib. The soft rubber rib compresses the clay and gives it a silky surface.
Once you are happy with the surface of your mug, you can add the foot ring, if you want to.
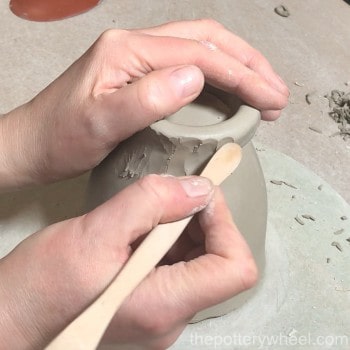
Step 10 – Adding the Foot Ring
Place the foot ring on the base of the mug. Then draw around the inside of the foot ring with a needle tool. This will act as a guide to where you should score the clay.
Remove the foot ring and using the serrated rib tool score base of the mug. Also, score the underside of the foot ring. Paint a little slip onto both scored surfaces. Then place the foot ring on the base of the mug joining the two scored and slipped surfaces.
Firmly attach the foot ring onto the base of the mug by blending the clay together. I find the easiest way to do this is with a modeling tool.
At this point, the foot ring might be a bit chunky. You can level it off and remove some of its bulkiness with a shredding tool. The shredding tool will leave a texture on the clay. But you can remove this, with a metal rib. You can then compress the clay to a smooth surface with a soft rubber rib.
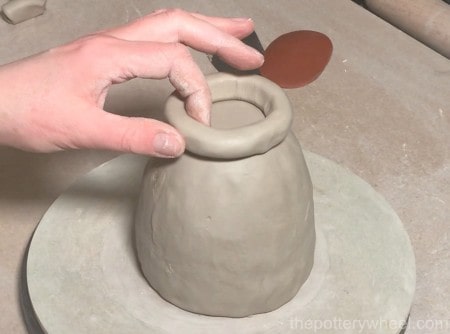
Step 11 – Tidying Up the Rim of the Mug
When you are hand-building pottery, making a level rim can be a challenge! When making a pinch pot mug, I start leveling the rim by slicing off obvious bumps with a craft knife.
Then, I use a shredding tool to get the lip of the mug even. I find the best way to do this is to check the mug at eye level. Drop down, so that your eye is level with the lip of the mug to see if it’s even. If you are checking from above it can be hard to tell.
You might also want to shred a little bit off the sides of the rim. This depends on how thick the walls of your mug are. A very fat walled mug can feel a little chunky to drink from. So, if your walls are bulky, you might want to shred a little off the thickness.
Once I’ve finished with the shredder, I smooth out the rim with a soft rubber rib. It can also help to run a small damp piece of chamois leather over the rim too. This can get rid of any last marks on the clay from your tools.
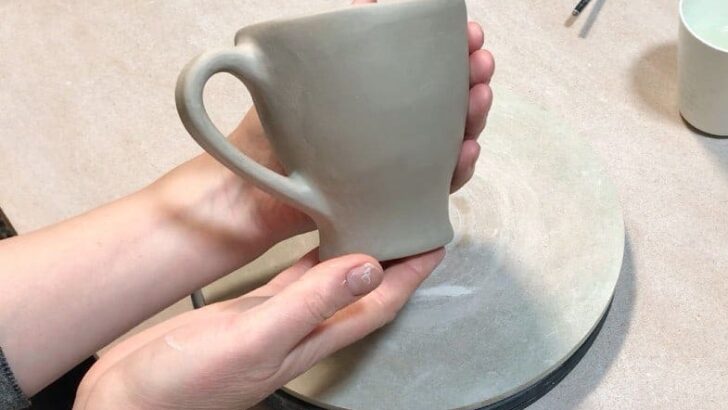
Step 12 – Making a Handle
There are lots of different ways to make a handle for a mug. One of the ways that I like most, is called ‘pulling a handle’, where you literally pull the clay into shape.
This is one of the simplest videos I found on how to pull a handle. It is straight to the point and a good demonstration.
How to Pull a Handle
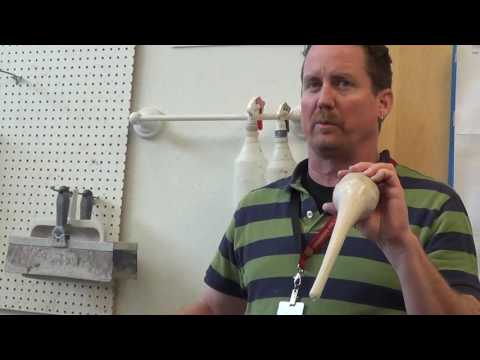
I tend to let the handles set overnight so that the clay is almost leather hard. This makes them easier to handle when attaching.
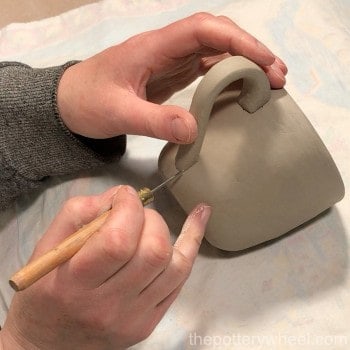
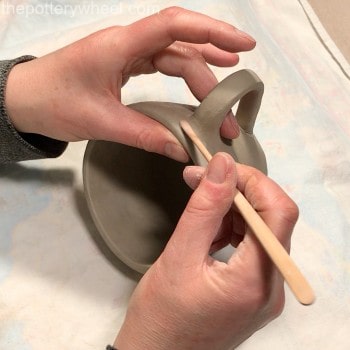
Step 13 – Attaching the Handle
To attach the handle, I hold it up to the mug and gauge long I want it to be. Whilst I’m holding it against the mug, I make a mark with a needle tool where I will cut it.
I place the handle down on the work surface and cut it to length with a craft knife. Then I put the handle back against the mug, and mark on the mug where the handle will be attached.
Once I know where I’m going to attach the handle, I score that area with my serrated rib or fork. Apply some slip to the scored areas. I also score and slip the ends of the handle.
Then position the handle on the mug and gently but firmly press the handle against the mug. You can get a good bond by putting one hand inside the mug to support it. Then put firm pressure on the end of the handle to ensure it is stuck.
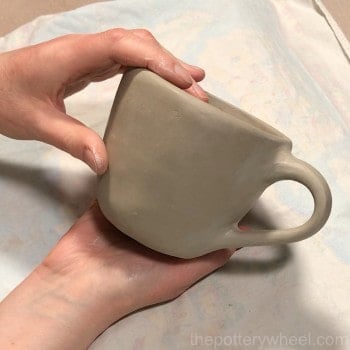
I like to be absolutely certain that the handle won’t come off when someone is drinking out of it. So, I usually make a very thin coil of clay and wrap that around the joint.
I then press this coil into the joint with my thumb. And blend it into the join with a small modeling tool. You can then smooth any marks on the joint with a small piece of damp chamois leather.
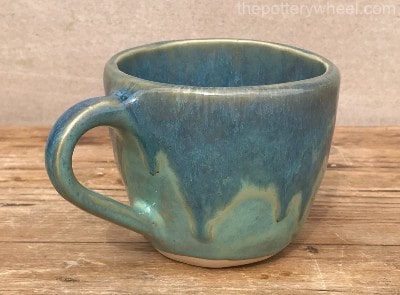
And here is the glazed mug. It was glazed using Amaco Potter’s Choice glazes. The glaze combination was Textured Turquoise, Blue Rutile, and Oatmeal. It was fired to cone 6.
By the way, if you’d like to learn how to make a pinch pot teapot, you can download this free ebook…
Pinch Pot Mug – Technique 2
This is my other favorite way to make a pinch pot mug. With this method, the body of the mug is made out of a cylinder, and the base is attached to the cylinder.
I made these two mugs using the following method:

Step 1 – Making The Cylinder
I start with a soft piece of clay that weighs around 13 ounces. Shape the clay into a slightly tapered solid cylinder with flat ends.
I make this shape using a combination of rolling in my hands and tapping the ends on the table. It’s shaped a little bit like a large cork from a wine bottle.
Then push a paintbrush through the center of the clay, skewering it like a marshmallow. You can use a pencil, paintbrush, chopstick, or a piece of dowel.
Make sure that the paintbrush goes into the center of one end. And that it comes out of the center at the other end. That way you know that the paintbrush has gone through the middle of the clay.
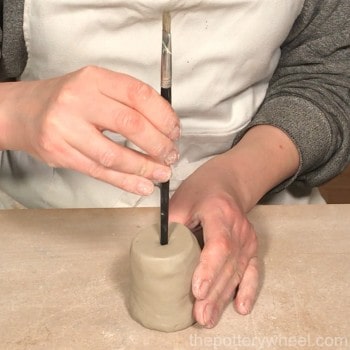
Give the paintbrush a wiggle to open up the hole running through the clay. You need to make the hole big enough to put your thumb into it. I tend to do this in stages.
I start off with my pinky finger in the opening and wiggle that about. Then I use a finger, to open it up further. And finally, the hole is big enough to put my thumb into.
I then start to pinch the clay out into a cylinder shape. Start pinching the center of the cylinder and work your way towards the ends.

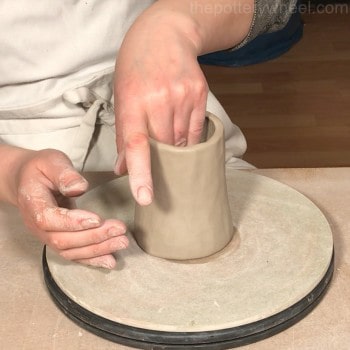
I pinch the clay until it is about 1/3 inch thick. At this point, the cylinder will be soft and floppy. So, I leave it overnight to let it firm up before I carry on working the pinch pot mug.
Step 2 – Smoothing Out the Cylinder
Once the cylinder is firmer, you can tidy up the surface of the mug. I do this by running a shredding tool, or surform, over the surface of the mug.
The pinching technique has normally made little ridges in the clay that run the length of the mug. I find, using the surform in a diagonal movement across the mug will remove these bumps.
Once I have removed any bumps in the clay, I smooth out the texture left by the surform with a metal rib. I then compress the clay into a smooth surface with a soft rubber rib.
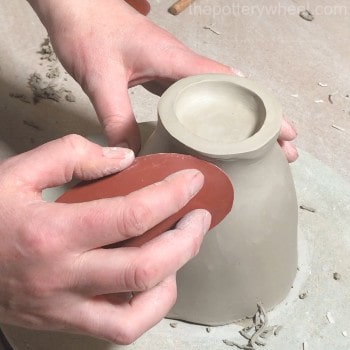
Step 3 – Making a Base for the Pinch Pot Mug
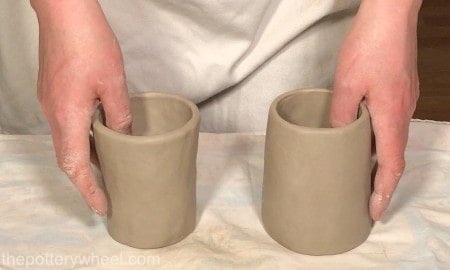
The cylinder will have a tapered shape, with one end wide than the other. You can use either the wider or narrower end as the base.
Using the narrow end as the base will give the mug a classic shape. Whereas, using the wider end at the base will give the pinch pot mug the look of a tankard. As you can see from this image…
To make the base, roll out a slab of clay that is the same thickness as the cylinder. A handy tip is to roll the clay out on a piece of fabric, so it doesn’t stick to your work surface.
Place the end of the cylinder you want to form the base on the slab. Draw around the cylinder with a needle tool or pencil tip. Remove the cylinder and cut the base out with a craft knife.
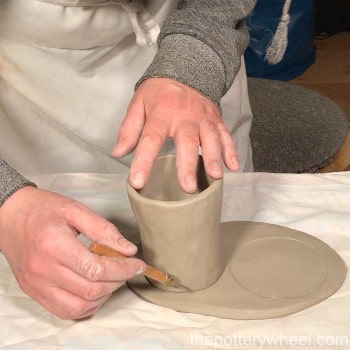

At this point, I transfer the circular base of the clay off the fabric onto a pottery bat. Score and slip the edge of the base, where it will join the cylinder. You should also score and slip the edge of the cylinder too.
Join the two pieces, by pressing them together to form a good bond. Then blend the two pieces together to reinforce the join.

You can strengthen the bond by making a small coil of clay, and flattening it out. Press the flattened coil around the join and blend it in.
To my mind, reinforcing the join on the base is a good idea. As with a handle, you don’t want the base of the pinch pot mug coming off when you’re drinking coffee.
Step 4 – Adding a Foot Ring and Handle
If you are making a tankard shape mug with the cylinder, I think a smaller foot ring looks good. The tankard is quite chunky, so a finer foot ring makes a nice contrast.
I made the foot ring for this mug out of a thin coil of clay. The coil was attached to the base using score and slip. And I blended the clay in on the underside leaving the coil visible on the outside.
You can add a handle to the pinch pot mug in the same way described above. Pulling handles is not the only way to make a handle. You can play around with different designs.
Final Thoughts
I love making mugs using the pinching technique. The two methods described above are my favorite ways of making a pinch pot mug. There are other methods too. I’d recommend just having a go and seeing which one feels best to you. Enjoy experimenting!