Your cart is currently empty!
Easy Tips on How to Clean Your Kiln After Pottery Explodes
Published:
Last Updated:

Affiliate Disclaimer
As an affiliate, we may earn a commission from qualifying purchases. We get commissions for purchases made through links on this website from Amazon and other third parties.
If you are reading this post, most likely some of your pottery has exploded during firing. My condolences…it’s sad when it happens, isn’t it? But it’s not the end of the world, it is possible to clean your kiln after pottery explodes. Here are some tips that I have picked up about cleaning a kiln safely after a pottery explosion.
The best way to clean your kiln after pottery explodes is to lift out the large broken pieces first. Then use a vacuum cleaner with a soft round brush on the end to clean up the smaller debris. It’s best to use a nozzle on a long hose, rather than a hand-held vacuum cleaner.
So, the process is simple, but there are a few things that it’s wise to take into consideration. The following steps and tips will help you avoid damaging your kiln in the process of cleaning it.
Table of Contents
show
How to Clean Your Kiln After Pottery Explodes – The Steps
Cleaning a kiln after pottery explodes isn’t rocket science. But there are some important things to know about the process to make sure you do it safely.
Step 1 – Unplug the Kiln
When you are cleaning the kiln, you will be in contact with the kiln elements. It’s important that there is no electrical supply going into the kiln when you are working on it or cleaning it.
Step 2 – Lifting Out the Wreckage
Pick up any big bits of shattered pottery that you can. Normally when pottery explodes, it breaks into a selection of larger pieces, smaller pieces, and fine dust-like debris. It’s best to just lift out the bits that you can remove by hand.
It can be a good idea to wear a pair of gloves when you are doing this. If you have a pair of cut-resistant gloves, it can help to hear those. These are the sorts of gloves you might wear if you are working with glass or woodworking. It just protects your fingers if the broken pot has any sharp shards or edges.
Step 3 – Vacuuming the Kiln
Once you’ve removed the larger pieces of broken pottery, you can use a vacuum cleaner to vacuum the shelf. You will need to vacuum the surface of the shelf, then remove it and vacuum the rest of the kiln.
Vacuuming the kiln is easy, but there are a few things that it’s important to know before you get cleaning. So read on…
Tips on Vacuuming a Kiln
This is what you need to know to use a vacuum cleaner in your kiln safely:
Tip 1
It’s important to protect your kiln from electrical interference when you use a vacuum to clean it. Electrical charges can affect your kiln circuitry and kiln controller.
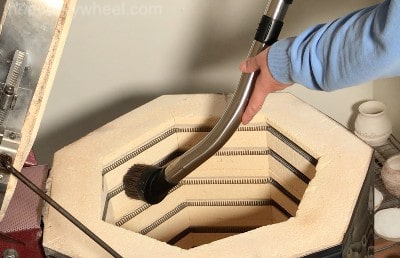
Electrical interference can come from a couple of sources from the vacuum. The first source is the motor itself. It’s best to avoid putting the motor of a vacuum cleaner into the kiln. Instead, it’s better to use a long hose on the vacuum with a soft, round brush on the end.
With a long hose and soft brush nozzle, you avoid putting the vacuum motor into the kiln. Also, the nozzle head is easier to move around the kiln, and you are less likely to bump the soft kiln brick.

Additionally, you want to avoid bumping the thermocouple when you are vacuuming. A hand-held vacuum unit is chunkier than a vacuum nozzle, and you are more likely to bump the thermocouple or bricks.
That being said, static electricity can also build upon the nozzle of a vacuum. You want to avoid any built-up static electricity from discharging into your kiln. In particular, you want to avoid it discharging around the thermocouple. If static electricity discharges onto the thermocouple, it can damage your electric kiln controller.
So, keep the nozzle away from the thermocouple. You can remove debris around the thermocouple with a soft dry paintbrush. Then vacuum that up once it is some distance from the thermocouple.
Another suggestion is to tap the vacuum nozzle on a grounded metal surface nearby now and then whilst you’re vacuuming. I have a metal shelf near the kiln which I tap when I’m vacuuming the kiln. This discharges any build-up of static electricity.
Tip 2
The received wisdom for cleaning a pottery studio is to avoid using a vacuum cleaner to clean up clay dust. This is because vacuum cleaners can actually kick clay dust up into the air.
It’s important to minimize the amount of clay dust in the atmosphere because clay contains silica. Silica is known to be a health hazard and bad for the lungs.
So, how can you clean your kiln with a vacuum cleaner safely? Here are some suggestions that I have encountered whilst researching this question for myself.
- Ideally, use a vacuum cleaner that has a HEPA filter on it. A HEPA filter is a ‘High-Efficiency Particulate Air’ filter. They are said to remove 99.97% of particulates from the atmosphere (source).
- Some vacuums are manufactured with HEPA filters. If your vacuum doesn’t have one, you may be able to buy a ‘universal’ HEPA filter that can be used on your vacuum model. You could check with the manufacturer.
- If you aren’t able to use a HEPA filter, use an extra-long hose on the vacuum cleaner. Leave the vacuum cleaner unit outside, if you have a nearby outside space like a backyard. Take the nozzle into the studio on the long hose, and clean the kiln with the vacuum cleaner outside.
- It’s a good idea to wear a face mask that filters out particulates when you are vacuuming the kiln.
- Keep the room ventilated when you are cleaning the kiln. Open the windows and turn on the extractor fan to get the air moving through your kiln room or studio.
How to Clean Your Kiln
Once you have taken these factors into consideration, the actual cleaning of the kiln is simple.
When you have vacuumed the shelf that the pot exploded on, you can remove that shelf. After any surviving pots and kiln furniture have been removed, you need to run the soft round brush of the vacuum around the kiln. Go over the base and walls of the kiln.
Pay particular attention to the element channels. Bits of debris, dust, and crud can get wedged in the elements. This can destroy your elements when you next fire up the kiln.
Luckily explosions in kilns almost always happen during a bisque firing. That means that the explosion is unlikely to have spread molten glaze over your kiln and elements.
Nevertheless, even small chunks of bisque and bisque powder can damage your elements. This is because debris on the elements traps heat around the elements when the kiln is firing. And the protective layer on the elements becomes corroded. As such, the elements overheat and burn out.
Therefore, as well as vacuuming the base and sides, be sure to run the vacuum gently over the elements. I normally have a good look at the elements after I’ve vacuumed them. If I see any remaining little bits of debris, I use a soft dry paintbrush to dislodge them gently. These bits usually then fall to the base and I can vacuum them up easily.
Final Thoughts
It’s alarming and disappointing when pottery explodes in the kiln. But it happens and it’s not the end of the world. The carnage can be cleaned up. I hope you found these tips on how to clean your kiln after pottery explodes helpful and reassuring.