Your cart is currently empty!
Pottery Kiln for Beginners –12 Tips on Buying a Kiln
Published:
Last Updated:

Affiliate Disclaimer
As an affiliate, we may earn a commission from qualifying purchases. We get commissions for purchases made through links on this website from Amazon and other third parties.
Buying a pottery kiln can feel a little overwhelming. There are lots of models and types of kilns and it can be hard to know where to start. So, what is the best pottery kiln for beginners? This article aims to look at your options and help you decide which kiln will suit you best.
There are lots of makes of kiln, including Skutt, L&L, Paragon, Olympic, Cone Art, Potterycrafts, and Nabertherm to name a few. Many potters, myself included, get very attached to their kilns. So, if you ask a potter, they will probably recommend that you get one like their kiln.
However, buying a kiln is a big decision, so it’s best to make a decision armed with the facts. Here are some of the things to think about when choosing a pottery kiln.
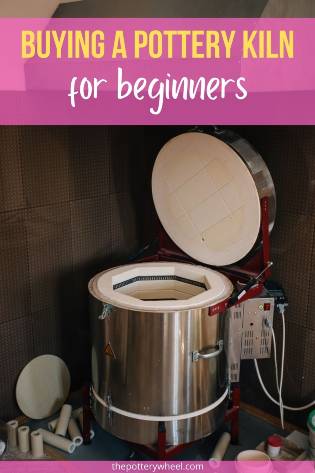
Table of Contents
show
What’s the Best Pottery Kiln for Beginners?
Here are some top tips on choosing the best electric kiln for you.
Tip 1) Deciding on a New or Used Kiln
One of the first things to think about is whether to buy a new or a secondhand kiln. There are pros and cons to either option. So, let’s have a quick look at the benefits and drawbacks of both.
Here are some advantages of buying a new kiln….
It Can Be Easier to Learn on a New Kiln
There are a few reasons learning to fire pottery on a new kiln can be easier.
- You will have an up-to-date user manual to consult step by step.
- Customer support. Usually, if you have questions about how to use the kiln you can call and speak to a kiln technician.
- New kilns work efficiently and well. As a result, it’s easier to predict how they will behave whilst you are firing them.
This last point about efficiency is an important one, so let’s take a closer look at that.
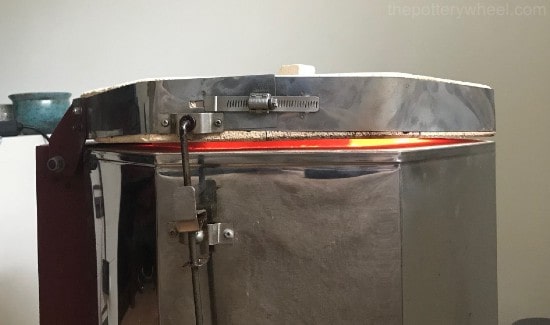
Kiln Efficiency
The parts in a new kiln are pristine and will be working as expected. If the manual says it takes 8 hours to reach temperature, then you can assume this is accurate.
By contrast, the parts on a used kiln will probably be somewhat worn out and less efficient. As a result, how they behave when you fire is less easy to predict. This has important consequences for something called ‘heatwork’. But, what is heatwork?
Heatwork
Heatwork is a combination of the temperature the kiln reaches, and the time it takes to get there. Firing clay is not just about getting to a particular temperature. It is also about how long you fire pottery at higher temperatures.
A simple way to understand heat work is to compare the kiln to an oven baking a cake. Let’s say your recipe book tells you to bake your cake at 350F (180C).
Imagine your oven heats up easily to 300F/150C but then it takes 2 hours to get to 350F/180C. If you bake your cake for 2 hours at 350/180C it will be completely overbaked.
A similar thing happens with kilns. As they get older, they can struggle to reach higher temperatures and it takes longer. The result is that your pots can end up being fired at high temperatures for longer. This can result in pots, and in particular, glazes being overfired and ruined.
Taking longer to reach the required temperature isn’t the end of the world. You can replace parts that wear out and start working less efficiently. And before they are replaced, you can adjust your firing schedule to avoid your pots being overfired.
However, when you are learning how to fire your pots, it’s easier if your kiln is working efficiently. You can simply program the kiln as the manual recommends. For example, you don’t have to worry about adjusting the schedule to make up for the kiln heating up slowly.
New Kilns Have a Warranty
If you buy a new kiln, you have the advantage that it will be under warranty. So, if anything goes wrong with the kiln, you have some cover. Warranties on pottery kilns are normally 2 or 3 years.
Bells and Whistles
Brand new kilns often come with the latest technological bells and whistles. For example, if the kiln has a touchscreen control panel, then it may well come with WIFI. This means that you can control and monitor your kiln remotely using an App on your smartphone.
A Brand New Kiln is Lovely, But….
Though there are obvious advantages to buying a brand new kiln, they are not cheap. Even kilns at the budget end of the spectrum are a big investment.
If you are a beginner at pottery, you might not know if firing clay is ‘your thing’ yet. If that’s the case, then buying a used kiln might make more sense.
Some suggested places that you can search for a second-hand kiln are:
- eBay
- Craigslist
- Facebook Marketplace
It’s also worth just asking about to see if anyone knows of a kiln for sale. A good place to ask would be your local pottery class or the art department of a nearby school.
Advantages of Buying a Used Kiln
Really the main advantage of buying a used kiln is the price tag. Second-hand kilns will vary hugely in the condition that they are in.
Some are very beaten up and will require a lot of maintenance before they can be used. Others will be in good condition and usable straight away. This will be reflected in the price you pay.
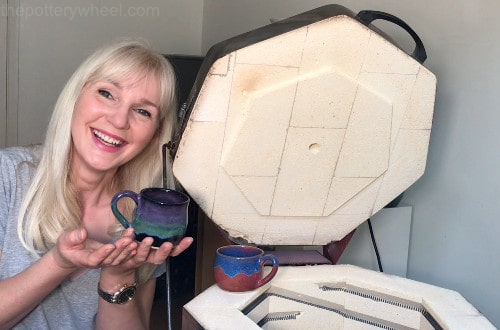
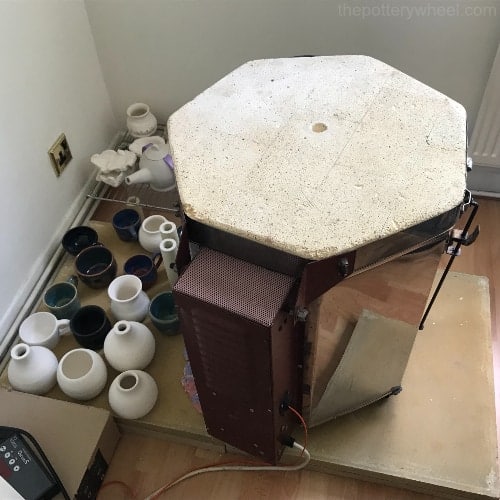
My kiln is a second-hand kiln that I bought on Facebook Marketplace. It was in good condition, and I bought it for about half its original price.
Disadvantages of Buying a Used Kiln
It may take a while before you find the right used kiln for you. You need to be prepared to search second-hand sites for kilns as they come up for sale.
You may also need to replace parts on the kiln before it works well.
If it’s an older kiln, it may not have a user manual. So, setting it up and figuring out how to use it may be a learning curve!
Is a Used Pottery Kiln a Good Choice for Beginners?
Perhaps you have been making pottery for a while and you know that firing clay is your passion. If that’s the case, then investing in a brand new kiln can make sense. Particularly if money is not an issue.
Or maybe, you are just figuring out if firing clay brings you joy. Perhaps your funds are restricted. If so, then buying second-hand can be a good pottery kiln for beginners.
When I bought my used kiln, it did need some work. The model that I have is a Cromartie CTL40 and it needed a new kiln controller. Although I bought mine second-hand, I had to call the manufacturer for advice, and they were very helpful.
I contacted them with questions and the technicians at Cromartie were great. This has been my experience with most pottery manufacturers and suppliers. They are generally very generous with their time and knowledge.
So, provided the manufacturer is still in business you might get some good customer support. Even if you buy second-hand!
For more about buying a second-hand kiln, check out this article.
Regardless of whether you buy new or second-hand, there are some things about kilns you will need to consider. So, let’s turn now to some other tips on choosing a pottery kiln for beginners.
2) What’s the Best Size Pottery Kiln for Beginners?
Kilns come in all sorts of shapes and sizes. They vary from tiny test kilns that are suitable for firing ceramic jewelry and dolls heads. To huge productions kilns that have the capacity to fire plates, platters, jugs, and dinner sets.
When you are deciding on which kiln to buy, it’s important to consider what sized kiln will suit you best.
Kiln size refers to:
- The outside dimensions, ie. how much space it will take up in your room or studio
- The size of the internal kiln chamber used for firing your pottery
Both of these measurements are very important.
External Measurements:
Kilns are made of thick insulating material. It’s generally recommended that the insulation on a kiln should be 3” thick. So, when you are choosing a kiln, try to find one with 3” insulation.
Some older kilns are made of 2.5” insulation, and this is okay. But, ideally, for greater efficiency, it’s best for the insulation to be 3” or more.
All that insulation means that the overall dimensions of the kiln are much larger than the internal firing chamber.
In addition to the insulation, the kiln will have a box on the side that contains some of the kiln electrics. It may also have a digital control panel positioned on this box too.
The box containing the electrics and the control panel increases the overall width of the kiln considerably.
So, even a kiln with a relatively small internal firing chamber will be quite a bulky piece of kit.
This is important when you are considering where to put your kiln.
Internal Measurements:
The internal chamber is the space in your kiln where you place your pots to be fired. The size of the chamber is usually measured by height, width, and cubic capacity.
Depending on where you are in the world, the cubic capacity is measured in feet or liters. In the US it’s generally measured in cubic feet. In Europe and elsewhere, it’s often measured in cubic liters.
It’s important to find out the height, width, and cubic capacity of the internal chamber. This will give you some idea of how many pots you will be able to fire at any given time. For example, a kiln that is 18 inches wide and 22 inches deep has a cubic capacity of 3.2 feet. This is equal to around 90 cubic liters.
You would be able to fire around 15 small to medium bowls in a kiln this size.
Remember that kiln shelves, and shelve props take up space when you’re loading the kiln.
TOP TIP
It can be hard to visualize how large the inside of the kiln is. A good way to do this is to cut out the dimensions in cardboard. Then tape the cardboard piece together to give you a box the same size as the internal chamber.
This will give you a 3D representation of the kiln you’re thinking of buying. You’d be surprised how small some internal chambers are. It’s worth doing this exercise, so you aren’t disappointed when your kiln arrives.
What’s the Best Sized Pottery Kiln for Beginners?
There is no hard and fast rule about the best size pottery kiln for beginners. It depends on a few factors which are….
- How much space do you have at home or in your studio to keep your kiln
- What quantity of pottery work you produce regularly
- The size of the pottery that you make
- Whether you intend to develop your pottery practice and increase the number of pieces that you make with time
Think about the largest piece that you have made. And ensure that you get a kiln that is large enough to accommodate that.
If you are planning to expand your pottery output, buy a kiln that is larger than your current requirements. This will give you something to grow into.
However, this needs to be balanced out with the practicalities of your needs today. You don’t want to be firing a half-empty kiln, as this is a waste of electricity and money.
So, don’t buy a kiln that is a lot larger than you need or are likely to need. Otherwise, it will take you weeks or months to make enough pottery to fill a kiln load.
3) Check The Temperature the Kiln Fires Up To
When you are looking for a kiln, you might find something that is the right price and the right size. But before you get too excited, check the temperature firing range of the kiln.
Kilns are designed to fire up to different temperatures. Some kilns are specifically designed to fire in the lower temperature range, for example around 2100F (1150C). This is around cone 1. Others are designed to fire up to 2372F (1300C) or cone 10.
If you are buying your kiln new, the manufacturer’s spec will state the maximum firing temperature. If you are buying second-hand, check the metal box on the side of the kiln. This contains the kiln electrics and should have a panel or label which indicates the maximum firing temperature.
Have a think about how you want to use the kiln. Are you going to be using it for bisque firing and low fire glazes? If so, then a kiln that fires up to the lower temperature ranges would be adequate.
But if you want to fire up to cone 6 or above, you need a kiln that reaches higher temperatures.
One tip is that it is better to buy a kiln that fires to temperatures a bit beyond your requirements. If you continually fire your kiln at its maximum temperature, the consumables in your kiln will wear out more quickly. For example, if kiln elements are pushed to their maximum time after time, they will need replacing much more quickly.
So, if you plan to regularly fire to cone 6, it’s best to buy a kiln that can reach cone 10 temperatures. This will mean that you aren’t continually pushing the kiln to its limits.
4) Check Your Power Supply
When choosing your kiln, you need to consider its power requirements. Does your home or studio have the electrical capacity to support the kiln when it’s firing?
Most suppliers will specify the following requirements for each type of kiln they sell:
- Voltage
- Amperage
- Single or three-phase power
Kiln suppliers often recommend that you get an electrician to check out your current household supply. Advise the electrician of the kiln you are thinking of buying. The electrician will let you know what adjustments they need to make to your household electrics to support the kiln.
Kiln Voltage Requirements
Some smaller kilns can be plugged into a regular 120V domestic household socket. But these smaller kilns tend to be ideally suited as test kilns or for small ceramics like jewelry or dolls.
Most kilns that are being used for firing pottery require a 240V power supply. These are the sockets types of sockets that are used for heavier duty household items like stoves and washer driers.
An electrician would be able to install a 240V socket at the point where you are intending to locate your kiln.
Kiln Amp Requirements
Most households are supplied with between 100 and 200 amps. The exact amount depends on how old the property is.
Electrical sockets form part of a circuit in a property. An electrical circuit will be able to support a maximum amount of current at any given time. Each circuit should have a breaker switch. The breaker switch will turn the circuit off if too many items are plugged in at once and the circuit becomes overloaded.
The amp requirements of a kiln vary depending on its size. It might need a 30, 40, 50, or 60 amp service depending on the model. The manufacturers will specify how many amps are needed. It’s normally recommended that the breaker switch is 20 or 25% larger than the amps needed by the kiln.
It’s likely that your electrician will recommend installing a separate circuit for your kiln with its own breaker switch.
Single or Three Phase Power
Kilns require either single or three-phase power. Most homes and smaller commercial premises have a single-phase power supply. Some large industrial buildings and schools have three-phase power.
If you are uncertain what power supply you have, you can check with your electrician. This will ensure that you buy the correct phase kiln for your premises. When you are looking at the specifications for a kiln, it will state if it requires single or three-phase electricity.
5) Pottery Kiln for Beginners – Top or Front Loading Kilns?
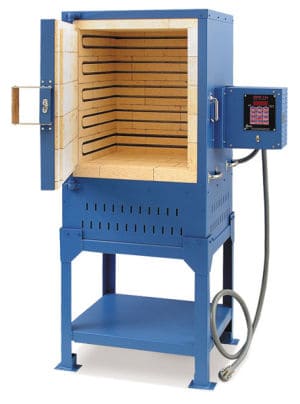
Front-loading kilns have a kiln door on the front that swings open or slides aside. As the name suggests, with a front-loading kiln you stack your pottery at the front of the kiln. In the same way that you access a kitchen cupboard.
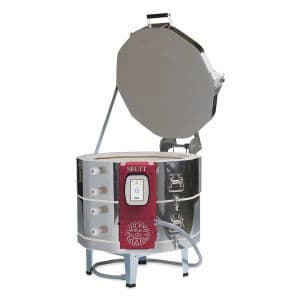
Top loading kilns have a lid that lifts up, and you lean over and load the kiln from the top.
Front-Loading Kilns
Generally, front-loading kilns are more expensive than top-loading kilns. And usually, they are used either by production potters, schools or in another kind of commercial set-up.
With front-loading kilns, the elements run along the side and back walls of the kiln. Some front-loaders have elements in the door too. This is often thought to be preferable, as it helps the kiln heat evenly and faster.
Top Loading Kilns
Top loading electric kilns are more popular amongst hobby potters and smaller scale production potters.
One of the advantages of a top-loading kiln is the price tag. They are also generally lighter and easier to maneuver than front-loading kilns.
However, they aren’t as easy to load as front loaders. Leaning over a top-loading kiln to load and unload it, can be tough on your back.
Nevertheless, top-loading kilns come in different dimensions. Some top-loading kilns are narrow and deep. Others are wider and shallower. If you have back pain, you might consider getting a wider but shallower top-loading kiln. An example would be the Skutt Easy Loader:
6) Pottery Kiln for Beginners – Sectional or One Piece Kilns?
Some top-loading kilns have a main chamber that is made in one piece. Other kilns have something called a ‘sectional’ design. This means that the body of the kiln is made out of sections that can be separated from one another.
The different sections of the kiln latch together with clasps. And each section of the kiln has its own sets of elements. So, the kiln can be taken apart section by section.
This is handy for kiln repair and changing elements. Instead of having to reach down into the lower depths of the kiln, you can take the sections apart for easy access.
It’s also helpful if you want to move from room to room, up and down stairs or through a narrow door. Also, if you do buy your kiln second-hand, you have to consider transportation.
If you are thinking of transporting it in a car, having a sectional kiln helps. My kiln is a one-piece kiln and it was a real squeeze getting it into my car. I still have a dent in the car door from wedging the kiln into the passenger seat.
7) What Type of Controller is Best on a Pottery Kiln for Beginners?
There are different ways of controlling the temperature of an electric kiln. The options are:
- Fully manual controllers
- Semi manual controllers
- Digital controllers
- Touch screen controllers
Fully Manual Controllers
A kiln with fully manual controls will have a set of dials on the side of the kiln. The kiln temperature and firing schedule are managed by setting the dials. One dial is used to select the target temperature you wish to fire up to. Once that temperature is reached, the kiln switches off automatically.
The other dial is used to adjust how quickly you want to reach the top temperature. This dial determines the rate at which the kiln temperature ramps up.
Fully manual kilns are usually older kilns. I’m not sure if anyone manufactures fully manual kilns anymore. But if you buy one second-hand, it’s likely to be 30 years old, or older.
Semi Manual Controllers
Kiln sitters fall into the category of being semi-manual controlled kilns. A kiln sitter is a mechanical device that switches the kiln off once the kiln has reached its target temperature.
With a kiln sitter, a lightweight metal rod sits loosely in a tube that runs through the wall of the kiln. One end of the rod pokes out into the internal chamber of the kiln. The other end of the rod is connected to a switch on the outside of the kiln.
During firing the end of the rod inside the kiln is balanced on a pyrometric cone. As the kiln heats up, the cone bends. When the kiln has reached its target temperature, the cone bends enough to stop supporting the tip of the rod. At this point, the rod activates a switch on the outside of the kiln, which turns the kiln off.
Kiln sitter kilns are still manufactured and sold by pottery suppliers as new today. There are also plenty of kiln sitter kilns for sale second hand too. They are generally less expensive than kilns with digital controllers.
Digital Controllers
With a digital controller, you have a lot of control over the firing schedule. A firing schedule is a combination of the target temperature and the speed or rate at which the temperature is reached.
Firing schedules are made up of different segments. Here is an example of a simple bisque firing schedule:
| Segment | Rate of Increase | Target Temp |
| 1 | 175F (80C) | 1110F (600C) |
| 2 | 300F (150C) | 1832F (1000C) |
In this example, the first segment is the temperature ramp up to 1110F. The second segment is the ramp between 1110F and 1832F.
With a digital controller, you can pre-program the kiln to move through multiple segments in a firing schedule. This gives you much more control over how you fire your clay and glazes.
Having control over the firing schedule is very helpful if you want to fire special glazes like crystalline glazes. Special glazes often need to be fired to a very particular schedule if they are going to look their best.
Touch Screen Controllers
Touch screen kiln controllers are the most recent development in firing your kiln. They have an appearance a bit like a tablet. Like the digital controller, they can be used to program schedules with multiple segments.
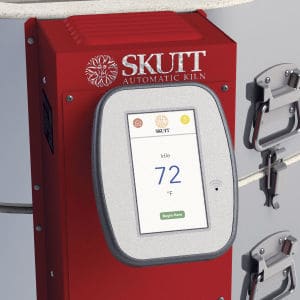
They also have WIFI, so the controller can connect with your smartphone with an app. This means you can monitor how your kiln is doing on your phone. You can also adjust the firing schedule from your phone.
8) Check The Kiln Insulation
A kiln is really an insulated chamber that is heated to high temperatures. The type and thickness of the insulation are important because it determines how efficient the kiln.
Kilns are normally insulated using either kiln bricks or insulating fiber. Or sometimes a combination of both.
Most electric kilns are insulated with kiln bricks.
Top loading kilns will normally be insulated with a layer of brick that is 2.5 or 3 inches thick. Whereas front-loading kilns are normally insulated with 3 inches of brick.
One thing to be aware of is that the kiln brick itself absorbs heat. As a result, some of the energy and heat from the elements is lost into the kiln bricks. Thicker kiln bricks prevent heat loss from the kiln. However, thicker bricks will also absorb more energy during firing.
Therefore, some suppliers recommend choosing a kiln with insulation that is 2.5 inches thick if you fire at lower temperatures. This is because, at bisque and earthenware temperatures of 1832F (1000C), the kiln does not need as much insulation. Using thicker insulation will simply use up more energy as it heats up the fire brick.
3-inch insulation is however generally recommended if you intend to fire at stoneware temperatures or higher.
Nevertheless, there is some debate over whether the difference between 2.5 and 3-inch insulation really makes that much difference. For example, I noticed the following quote on clay-planet.com.
‘An analysis of the energy used for heat storage in the brick….versus the energy lost through the brick shows that unless you plan to soak, or a long firing at very high temperatures… the advantage of the thicker brick and walls is almost negligible’.
9) Where Are You Going to Use Your Pottery Kiln for Beginners?
Kilns can be used in a number of locations including the studio, home, garage, and shed to name a few.
However, wherever you put the kiln, it’s important to be aware of a few things. Here are two key factors you need to consider wherever you decide to use your kiln:
Is There Enough Space?
Suppliers normally recommend leaving 18 inches of space between the outside of the kiln and any walls or other objects. 18 inches clearance all the way around the kiln means that the kiln takes up a lot of space.
This is, in part, because the kiln surface gets hot and you don’t want it to be in contact with anything flammable. But also, you don’t want to get a build-up of intense heat around the kiln. Heat build-up in an enclosed can cause the kiln to over fire.
Is There Enough Ventilation?
During firing, the kiln will generate fumes and gases. These need to be vented away from the kiln and out of the kiln room. These fumes can be irritating to the skin and lungs. They can also be corrosive, and you certainly don’t want them lingering around in the atmosphere.
There are different ways of ventilating a kiln. Some ventilation systems are more sophisticated and expensive than others. One option is to buy a kiln ventilation system specifically made for pottery kilns. These can either be simple extraction hoods, like a cooker hood that goes over the kiln and vents out the wall. Or you might choose a downdraft vent system that draws the fumes out of the bottom of the kiln.
An alternative is to use a cross draft system. This involves using a fan to circulate air and fumes around the room and out the window. This is the least expensive, and also least effective way to get rid of kiln fumes. However, lots of potters do rely on a simple cross draft ventilation setup, at least in the beginning.
10) Plan Forward and Think About Kiln Maintenance
Kilns go through a lot when they fire pottery. The extremes of firing pottery will take their toll on even the best made of kilns. As such, they need regular TLC and maintenance.
Certain parts of the kiln will wear out and need replacing. This includes the kiln elements, thermocouples, and sometimes the kiln relays.
- The elements are the metal coils that heat the kiln.
- The thermocouple is the thermometer that monitors and helps control the kiln temperature. Some kilns have more than one thermocouple.
- The relays are what switch the elements on and off to control the rate of temperature change.
These parts can all be considered as consumables, because, they will inevitably need replacing at some point.
If you are good with gadgets, mechanics, tech, and electrics, you may become adept at fixing your own kiln. But if the thought of wires and circuit boards leaves you cold, you’ll need someone local to maintain your kiln.
If you buy your kiln from a local supplier, they will likely be able to recommend a kiln technician. They will also likely have the parts in stock to maintain or repair your kiln.
Perhaps you have found a kiln that is manufactured and sold in another country. Most big kiln suppliers will ship internationally.
However, there are two things to consider if you want to go down this route. Firstly, the shipping cost can be hefty. Secondly, it’s important to think about getting access to spares and repairs.
Will your local kiln technician be familiar with this make and model of kiln? Will you be able to get the parts easily? Or will you have to wait a month as a part is shipped from the other side of the globe?
11) The Cost of Kiln Consumables
Maintaining your kilns is an unavoidable expense. However, some kiln parts are more expensive than others, and these costs vary between kiln brands too.
For example, it’s worth checking out how much it’s going to cost you to replace a set of elements. You might find that it will cost you a few hundred dollars to replace the elements on one kiln compared to another.
Practical considerations like this aren’t very exciting when you are considering what kiln to buy. However, in the long run, it can make a big difference to the cost of running your pottery studio.
12) Cost V’s Longevity
Generally, larger kilns are more expensive to buy and fire. The ideal-sized pottery kiln for beginners depends on a number of factors…
The main factor is how much pottery you make. If you are making a few bowls or mugs a week, a smaller 2.6 cubic foot kiln should be fine for now. As it would take 3 or 4 weeks to fill.
However, if you plan on expanding your pottery production, it’s best to think ahead. A smaller kiln may be cheaper in the short run. However, it’s good to get something a bit bigger than your current needs. This will give you something to grow into.
I wouldn’t recommend spending a fortune on a kiln if you are a beginner. It makes a lot of sense to buy a used kiln when you are starting out. Especially if you can get one on recommendation from a trusted source.
However, if you buy a used kiln, it will probably cost you more in maintenance over the years. And learning to use it may be a steeper learning curve.
Final Thoughts on Getting a Pottery Kiln for Beginners
Buying a kiln is very exciting. You may have spent months or maybe years transporting your greenware around town to be fired. So, you’re probably keen to start firing your own ware. What is the right pottery kiln for beginners? This depends on your needs and your current circumstances. Hopefully, the above tips will help you find the right one for you. Happy firing!