This is how I make a wide rimmed slab mug, using a printable template.
Making a Wide Rimmed Slab Mug Step-by-Step
When you are making slab pottery, it can help a lot to use a template. I use a template that I designed to make this wide rimmed slab mug. You can download a printable copy of this exact template from my Etsy store here if you’d like to make this mug too.

Get The Template Here
You can get a copy of this template (and my other slab pottery templates) in my online shop here..
I have put a list of tools that you might find handy at the bottom of this article. You can jump to that list now by clicking here.
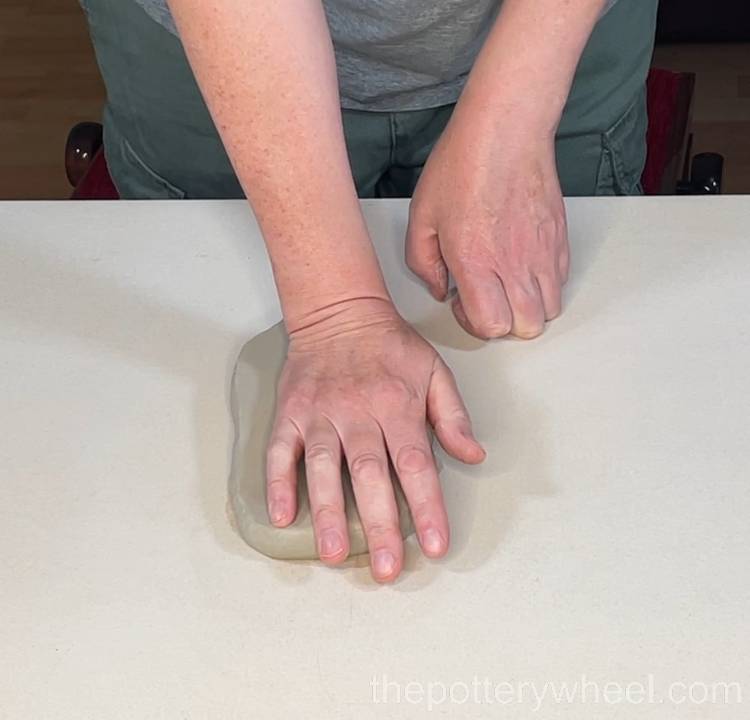
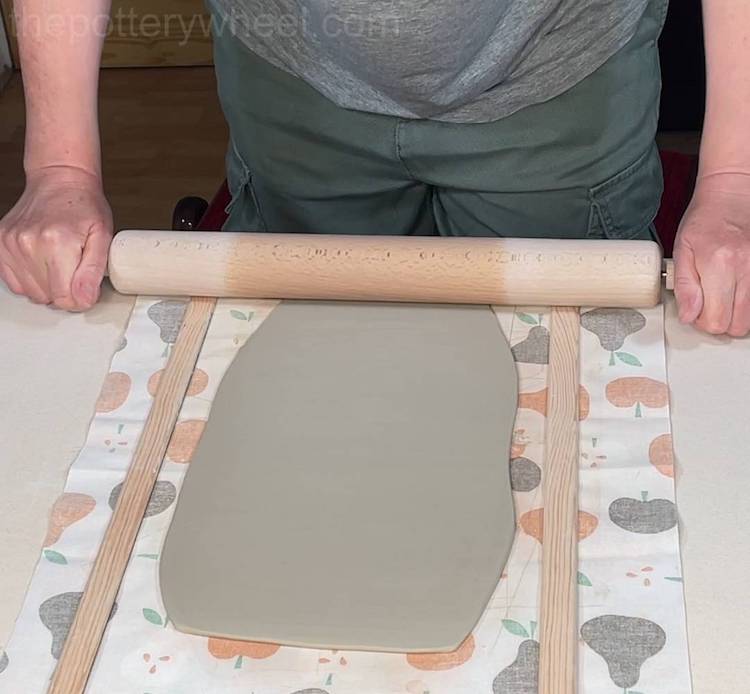
Step 1 – Roll a Slab of Clay
When I’m rolling a slab of clay, the first thing I do is flatten out the clay a little with the heel of my hand. This allows you to mold the clay roughly into the shape that you want the slab to be.
It also makes it a lot easier to start rolling the clay. If you start rolling a big round lump of clay, it will be hard work to make the slab. But if the clay has already been flattened down, it will be much easier to roll out.
When you are rolling the clay it’s important to turn the slab and change the direction that you are rolling in now and then. This helps to roll the clay into the right shape for your template, but also it stops you from stretching the clay in one direction too much. As this can stress the clay.
The work surface I’m using is a piece of wood that has canvas stretched over it. Here are my step-by-step instructions on how to make one if you would like one for yourself.
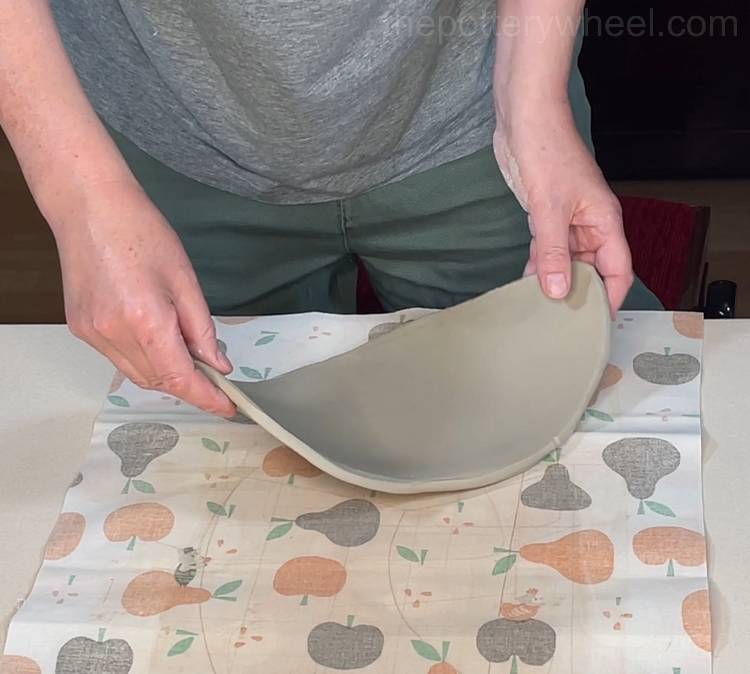
Once the slab has become larger I start rolling it on a loose piece of fabric. This makes it easier to turn the clay without stretching it. I like to roll clay on cotton-backed vinyl tablecloth. The cotton stops the clay from sticking and the vinyl stops the fabric from absorbing moisture.
Rolling an Even Clay Slab
The wooden sticks on either side of the clay are roller guides. They are 3mm thick and they help you roll an even slab of clay that is 3mm thick. You can change the thickness of your slabs by using narrower or deeper roller guides. I like to use 3mm guides for mugs as the slabs are thin and this makes the mug lighter.
Turning The Slab Over
To turn the slab I put another sheet on top, slide my hand under the bottom sheet, and then flip it over. It’s then easy to peel the top sheet of the slab once it’s been turned.
I check the slab to make sure it’s big enough for the template. If the slab gets a bit big, I trim off the ends, flip it over, and roll it a few more times.
Compressing The Clay
Once I’m happy with the size and thickness of the slab, I run a large platter tool over the surface of the clay. This gets rid of any texture on the clay and also helps to align the clay particles.
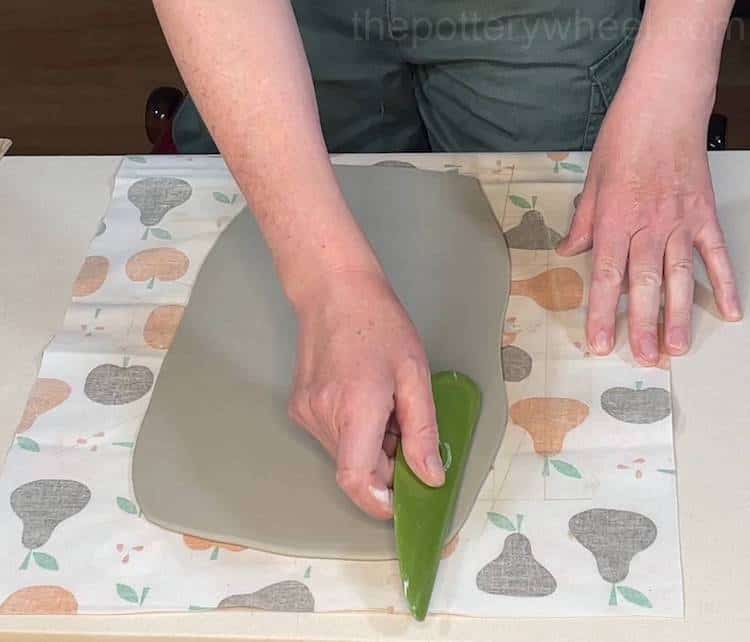
You can use a regular rib tool as well. I just like the platter tool because it’s nice and wide. I turn the slab over and smooth the other side with the platter tool as well.
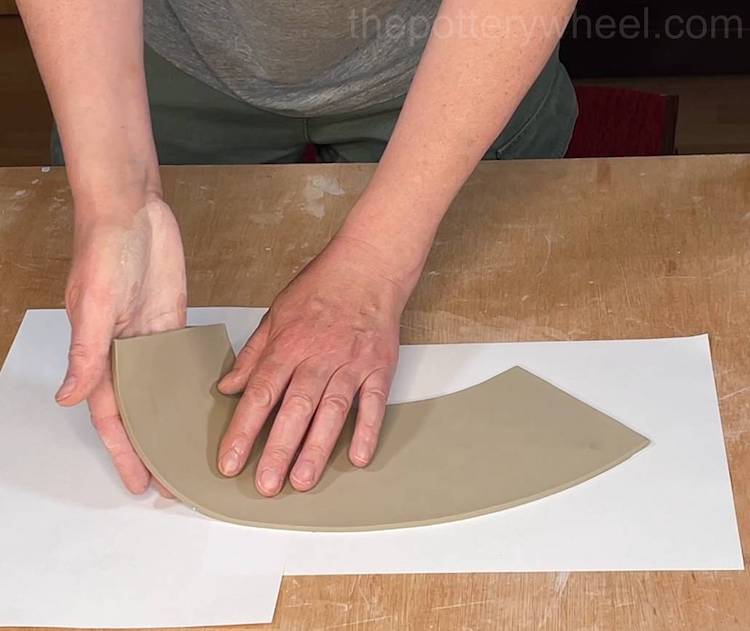
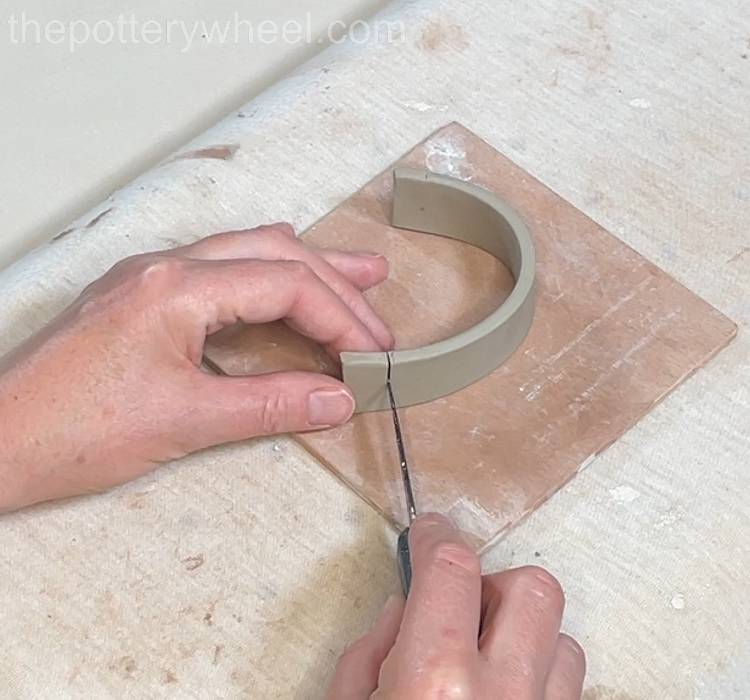
Step 2 – Cutting the Slab Using a Template
This mug is a wide-rimmed cone-shaped mug, and I use an arc-shaped template to make the main body of the mug. If you’d like to download a copy of the printable mug you can find it on my Etsy store here.
Get The Template Here
You can get a copy of this template (and my other slab pottery templates) in my online shop here..
I position the arc-shaped template on the clay slab and cut around it carefully with my clay knife.
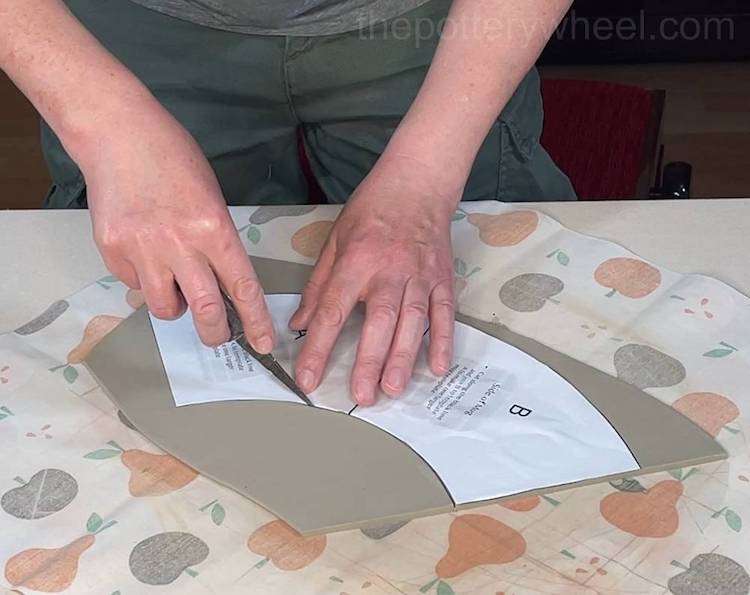
I keep one of the larger off cuts of clay to one side, as I’m going to cut the base of the mug out of that off cut.
Any other smaller pieces can be put to one side and wedged again later to be reused. I tend to run the off cuts under some water and put them in a plastic bag for a few hours. This replaces any moisture the clay lost whilst it was being rolled out and it makes them nice and soft so that you can wedge the clay again easily.
Step 3 – Firming Up the Slab
Immediately after the slab has been cut, the clay is much too soft to handle. It needs to be left to one side for a while to firm up. To lift the slab I use a flexible chopping board which is designed for kitchen use. I slide it under the rolling sheet and this allows me to pick the slab up without stretching it.
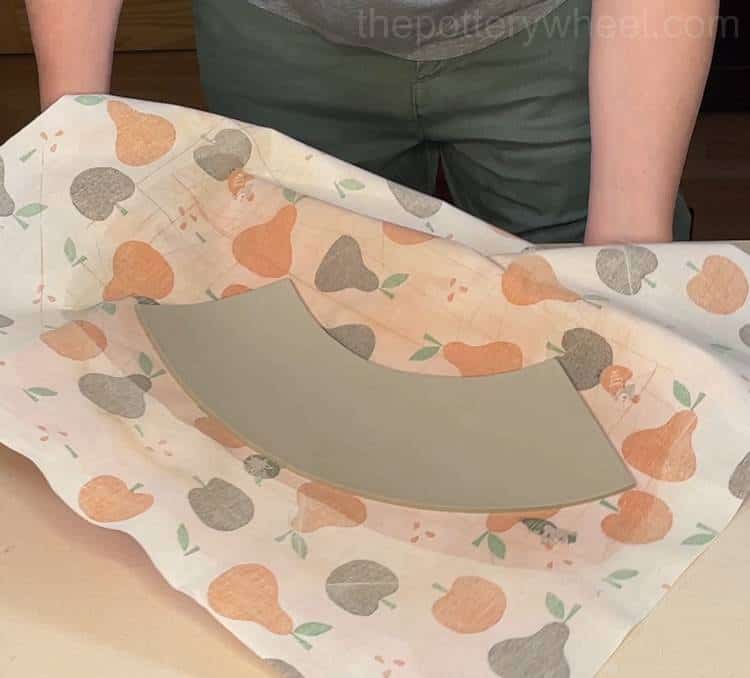
One of the best ways to firm slabs up is to sandwich them between a couple of sheets of wood. I put some paper on the wooden surface and transfer the slab carefully onto the paper.
I then lower another sheet of wood on top. The second bit of wood helps to keep the clay flat as it dries out a little.
It doesn’t take long for clay that is sandwiched like this to firm up. So I’d recommend checking the slabs regularly to make sure they aren’t getting too hard. I find that if I leave them for an hour or so, they are usually ready to use, but it depends a bit on the humidity levels where you are.
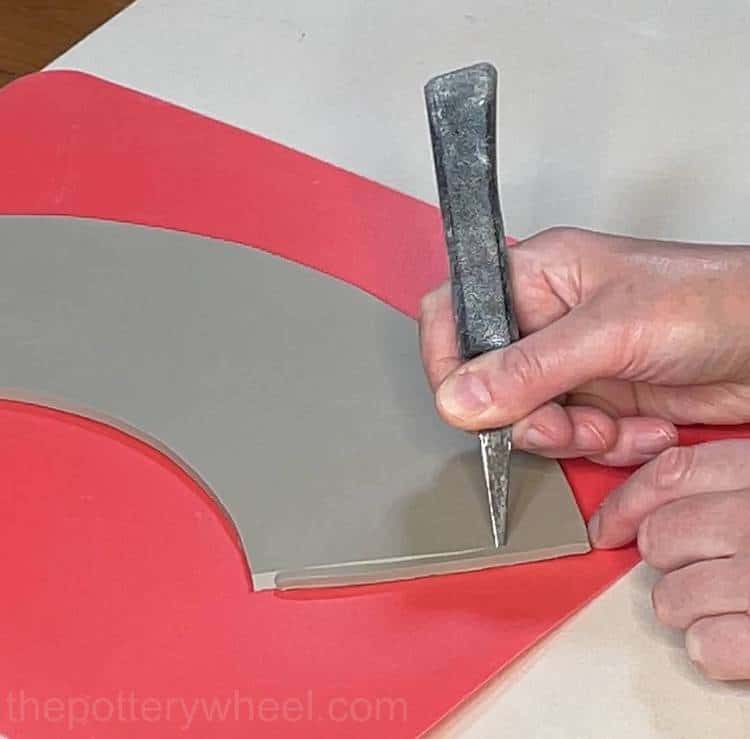
Step 4 – Beveling the Edges of the Clay Slab
I start working with the clay when it’s soft enough to bend without cracking but firm enough to handle without flopping about.
The first thing that I do is bevel the two narrow straight edges of the slab. Beveling means, cutting at an angle. Beveling the edges of the clay gives you an overlap when you are joining the clay and makes an easier better join.
I cut the clay at a 45 degree angle. You can use a tool called a clay bevel cutter, but it’s easy to cut the angle with a clay knife. Position the knife at an angle on the edge of the clay and draw it down the edge of a the slab. Use the thumb or fingers on your free hand to support the bottom edge of the slab and stop it from sliding about as you cut the edge.
Top Tip
It’s important to turn the slab over and bevel the other edge in the same way. If you don’t turn the slab over, you will end up with two beveled edges that don’t overlap.
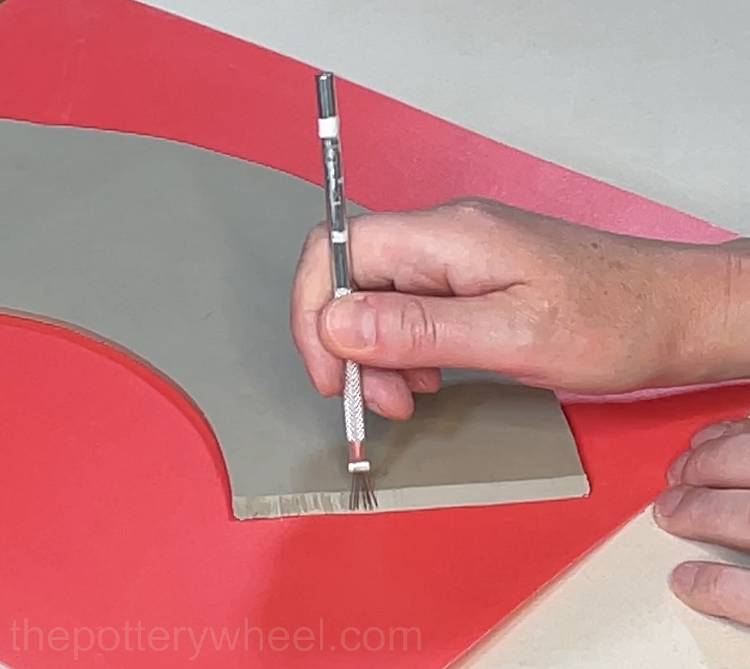
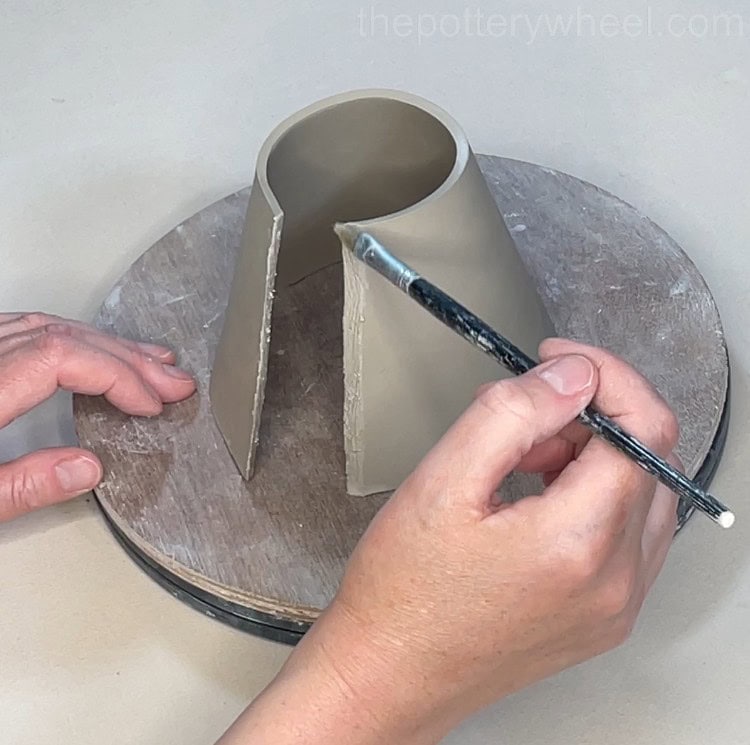
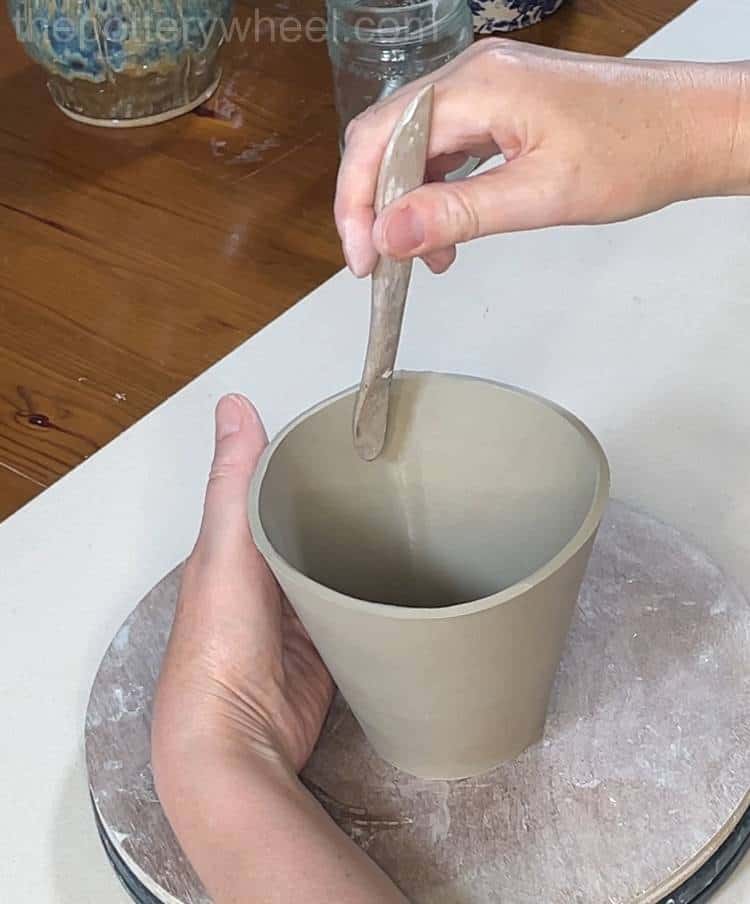
Step 5 – Joining the Seam on the Wide Rimmed Slab Mug
Once I have beveled the edges, I use a clay scoring tool to create a rough texture on the edge of the clay. It’s important to make a rough surface so that the two edges of the clay bond together well when you join them.
I turn the clay and score into both edges, using the scoring tool to cross-hatch into the clay.
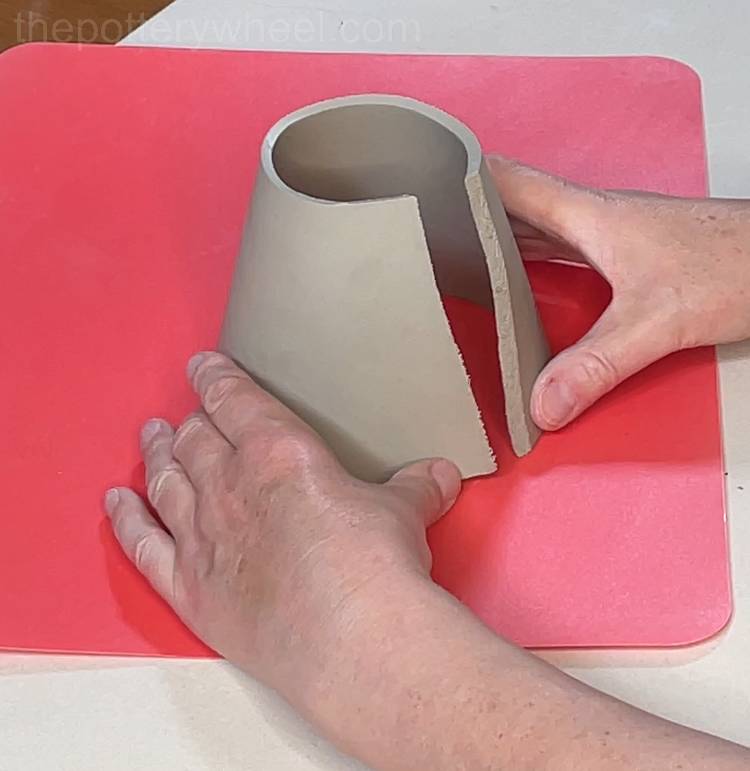
When I’ve scored both edges I lift the slab and rest it on the wider side of the arc. I curve the clay round so that the two scored edges are close to one another.
At this point, it’s helpful to transfer the clay onto a banding wheel. This is a turntable that allows you to move the clay around easily without handling the slab too much. I use a wooden bat on top of the turn table.
What to Use When Joining Clay Slabs
The edges of the clay are too dry to join, so I apply some liquid to both sides. You can wet the clay with water, vinegar, or clay slip.
I like to use something called ‘magic water’ to join my slabs as it makes a strong bond with the clay.
Magic water is a mixture of water, sodium silicate, and soda ash. Here is my step-by-step guide on how to make magic water. But equally, if you want to use water or clay slip that works well too.
I make sure that the edges of the clay are thoroughly wet then I press them together carefully.
It can help to support the inside edge of the seam with a wooden modeling tool and then press onto the clay on the outside of the join.
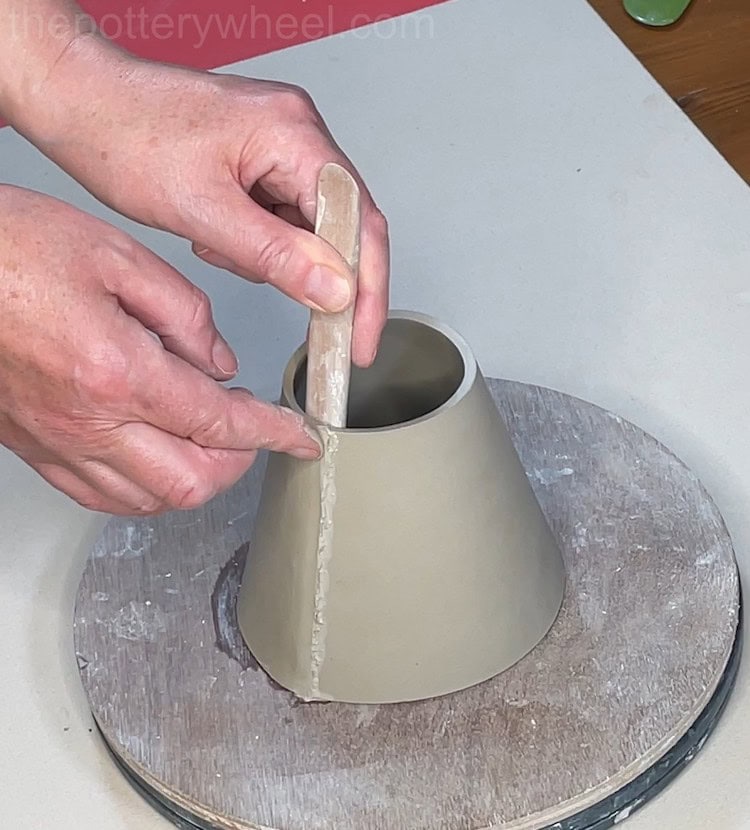
A good way to compress the join together is to run a rubber pottery rib over the outside surface.
If you get a little bump at the end of the seam you can slice it off with your clay knife.
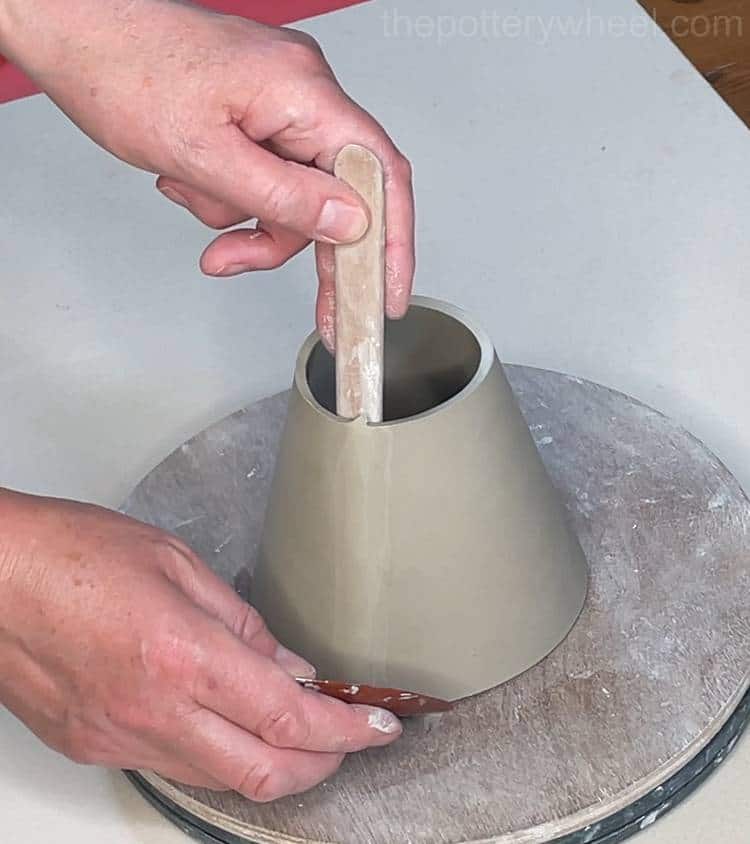
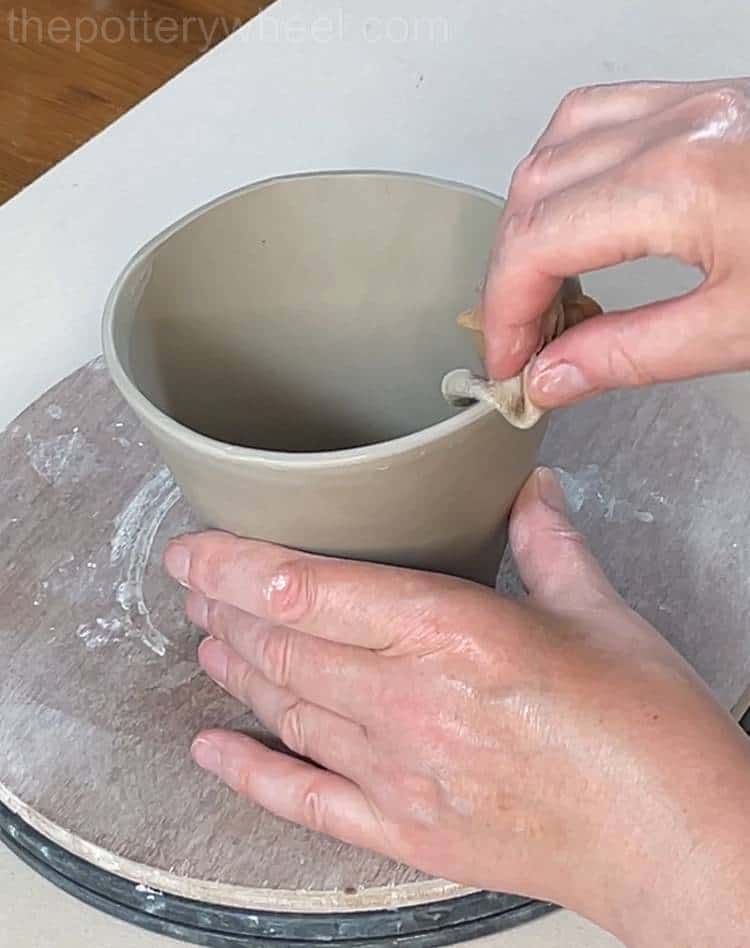
Step 6 – Blending the Join the Clay Slab
Once the outside surface has been blended together I turn the mug over and use my wooden tool to blend the inside surface of the join.
You can turn the mug over again so that you can blend the inside surface at both ends.
I also like to use the platter tool to smooth the join out too.
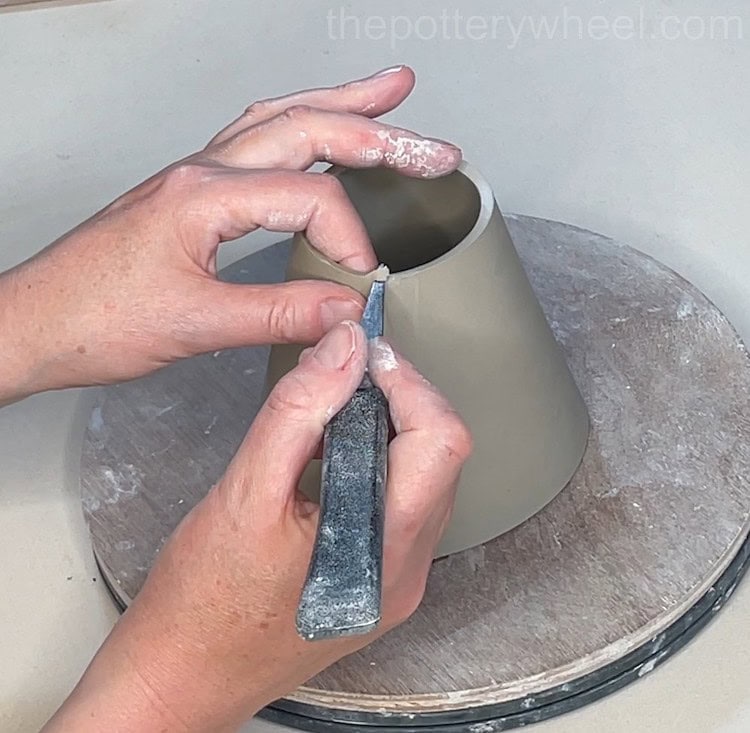
Step 7 – Smoothing the Top of the Wide Rimmed Slab Mug
After the clay has been joined I take a damp chamois leather and run it around the top edge of the mug to smooth away the hard edges of the rim.
Step 8 – Shaping the Mug
I turn an old plastic bowl upside down and place the mug on top of the bowl. This helps make the rim of the mug round as the clay is still relatively soft.
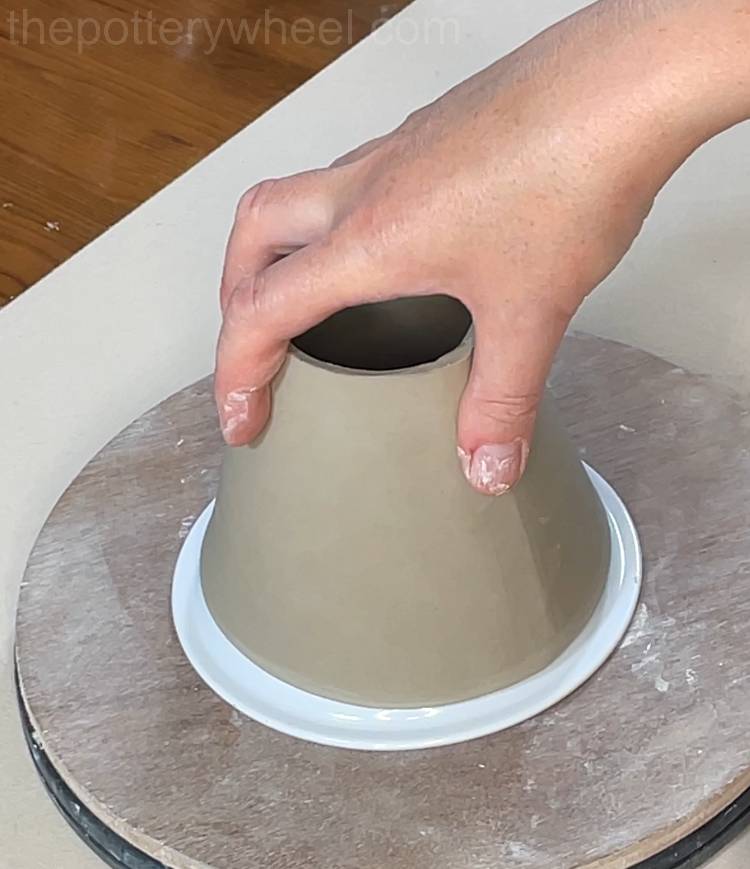
I also slide an old plastic cup into the narrow end to make sure the base is round too.
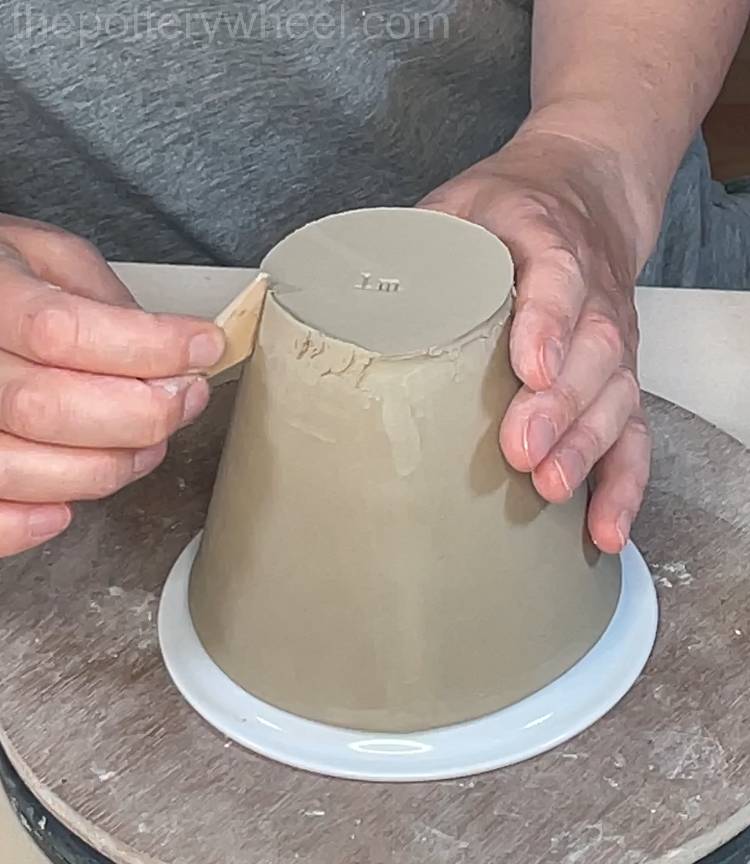
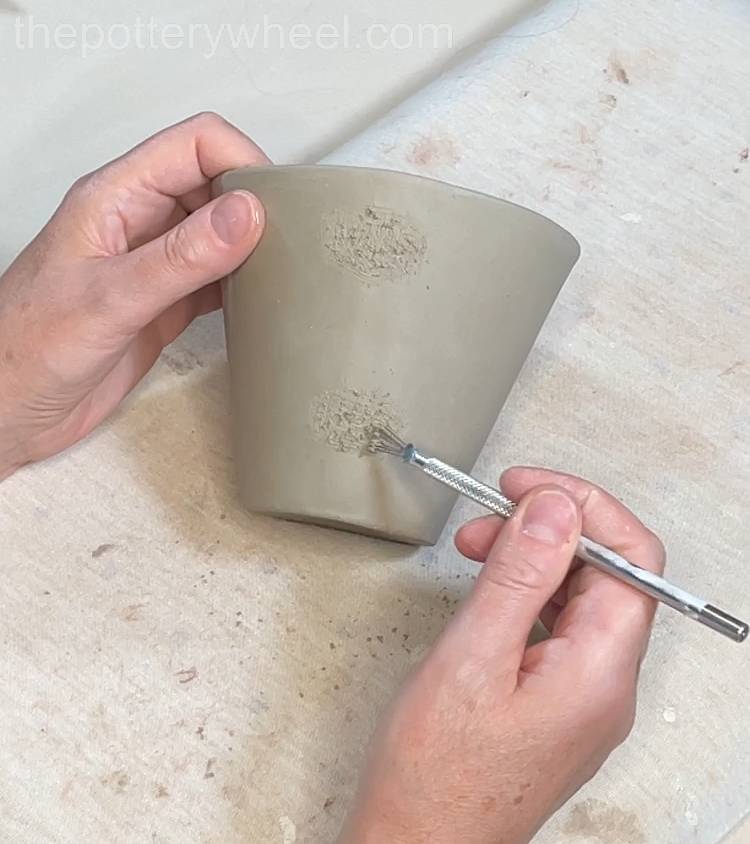
Step 9 – Making the Base of the Slab Mug
Whilst the mug is setting up, I get the base ready. I use a circular template for the base.
Using an off cut from the slab I rolled earlier, I cut the base out with my clay knife.
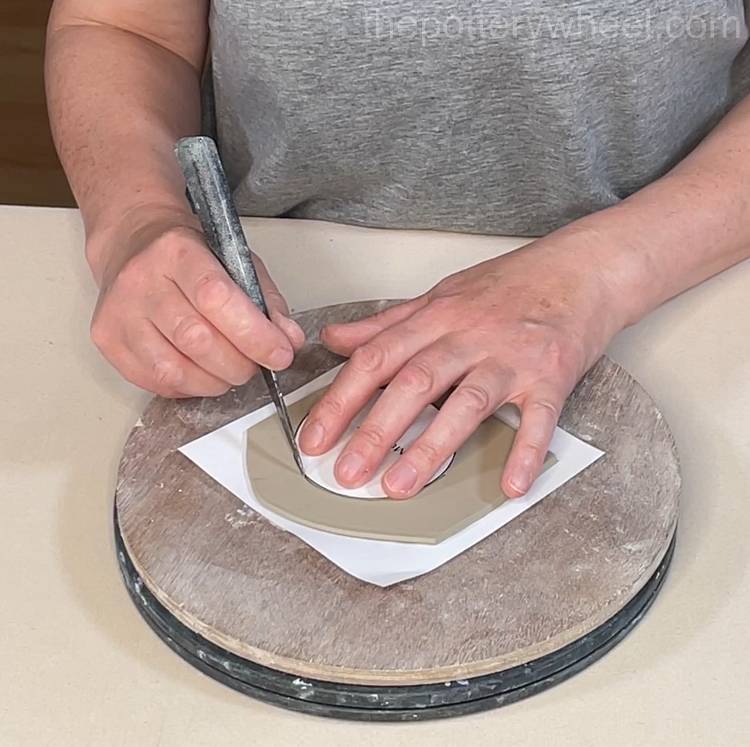
Then I put my makers stamp on one side and turn the slab over so that my mark is on the outside of the base.
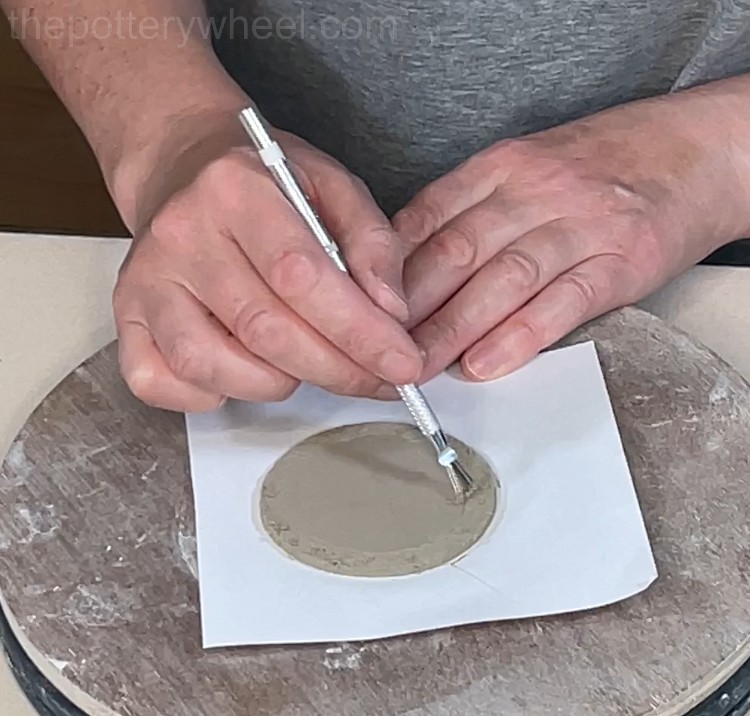
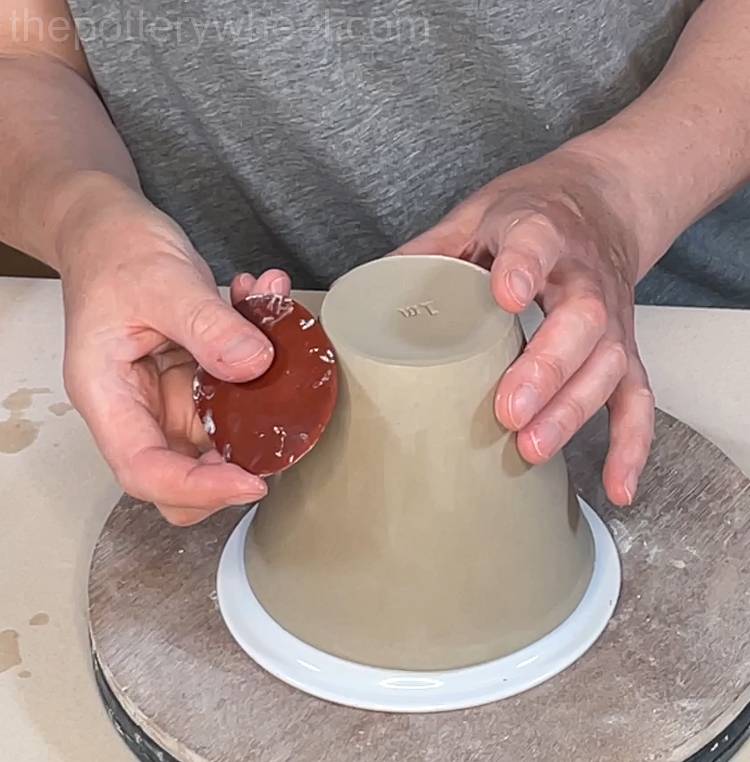
I score around the side of the base using the scoring tool. Then I score around the bottom edge of the mug. I apply magic water to the scored surface on the edge and base. Again, you can use water, slip or vinegar for this too.
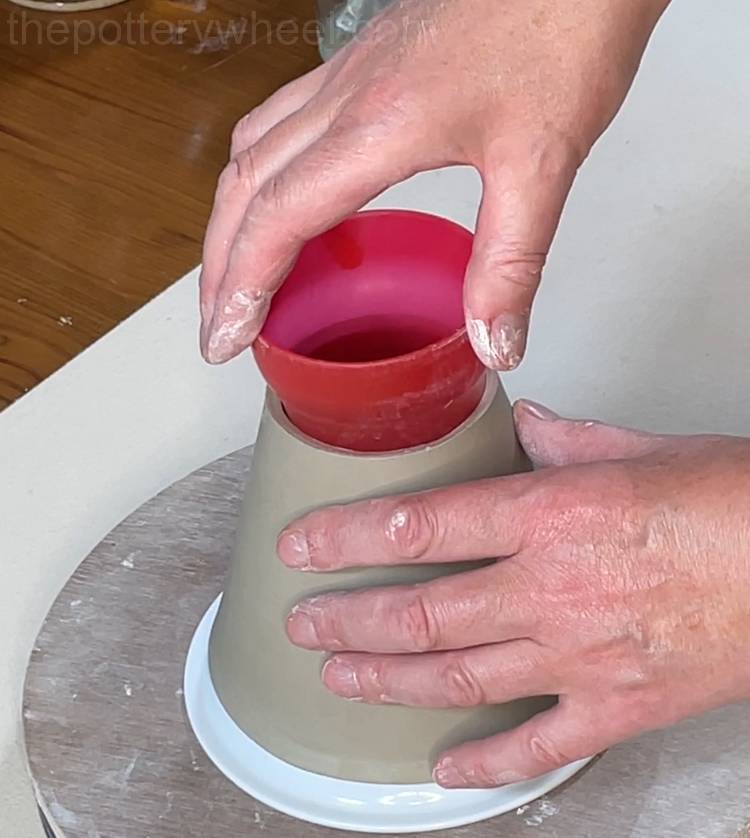
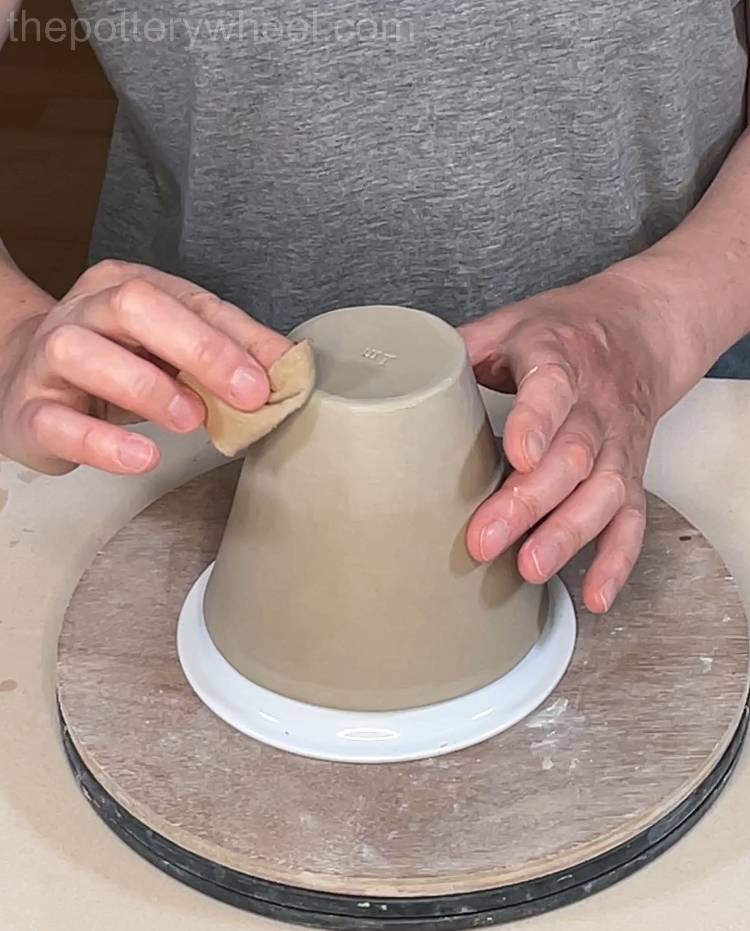
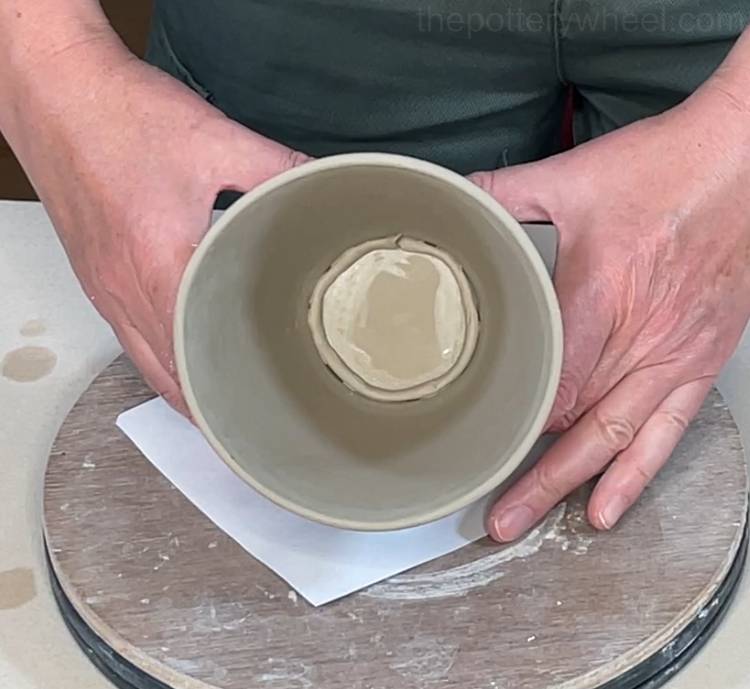
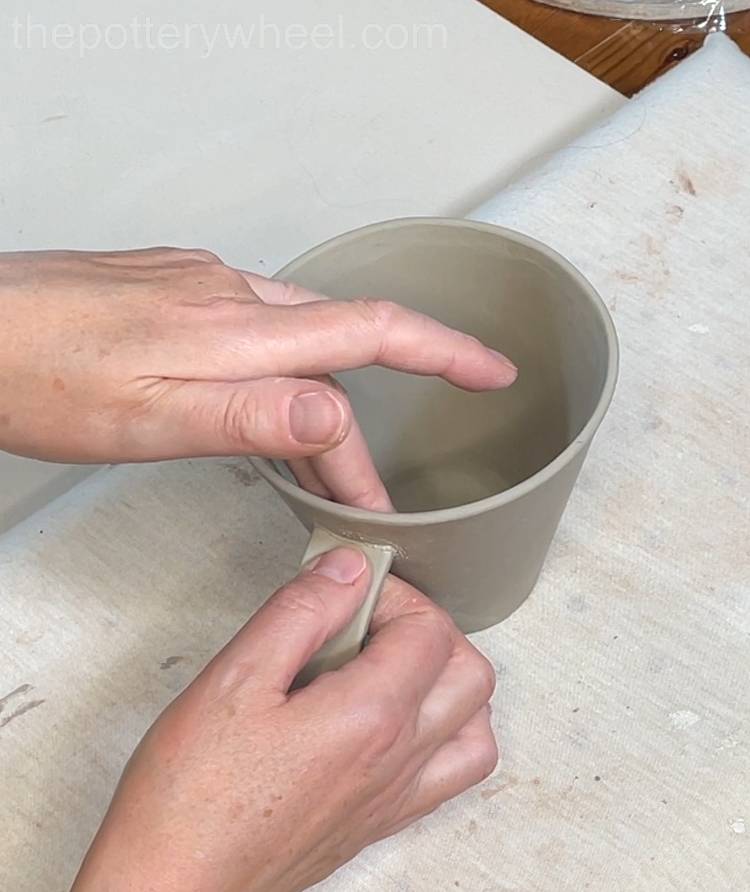
Step 10 – Attaching Base to the Wide Rimmed Slab Mug
Then I lower the mug onto the base. I wiggle the mug around into position on the base to make sure that it’s right in the center.
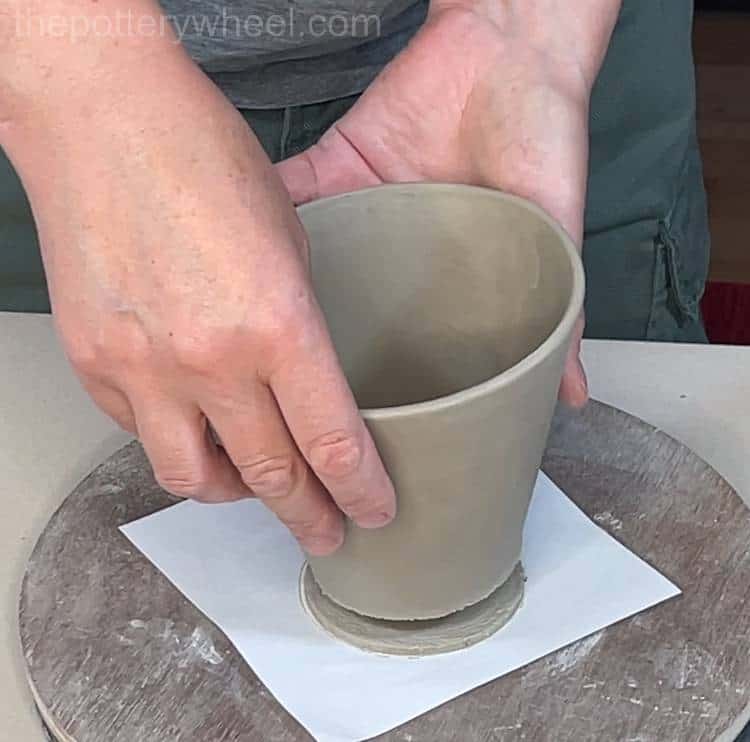
The base is a couple of millimeters wider than the bottom of the mug. This gives me a bit of wiggle room to adjust the base of the mug. I position it in the middle and once it’s in place, I press gently on the top of the mug to bond it into place.
Then I use my clay knife to cut off some of the excess. I leave a margin of about 1mm of extra clay all the way around the bottom. Then I use my modeling tool to blend the excess clay onto the bottom of the mug.
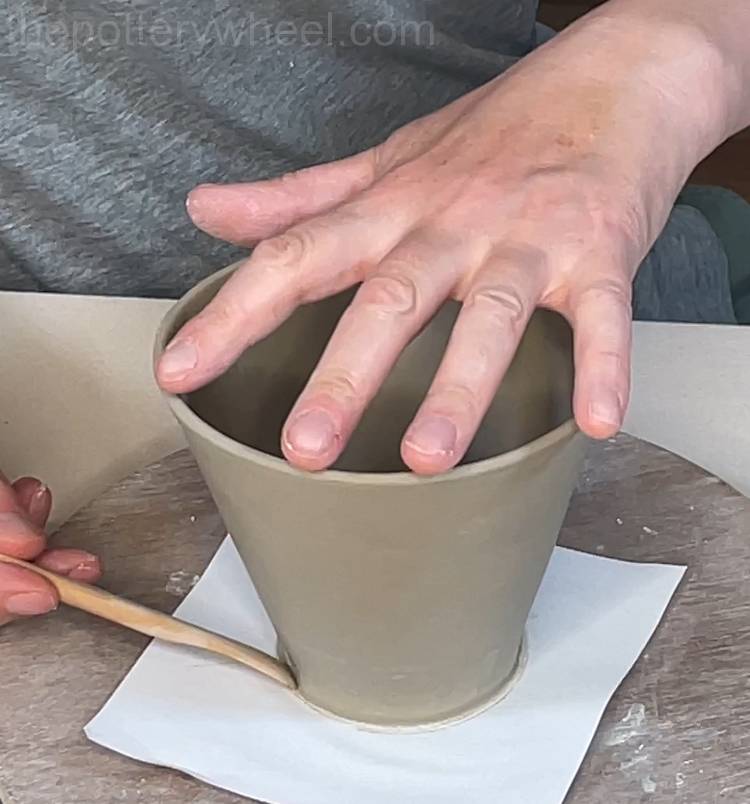
I turn the mug upside down again and then use my modeling tool to scrape away some of the excess clay around the base.
I tidy up the bottom edge of the mug with my clay knife, and then spend a bit of time tidying up the surface of the clay to get rid of any marks made by the modeling tools.
Lastly I wipe it down with a damp chamois leather to give it a nice smooth finish.
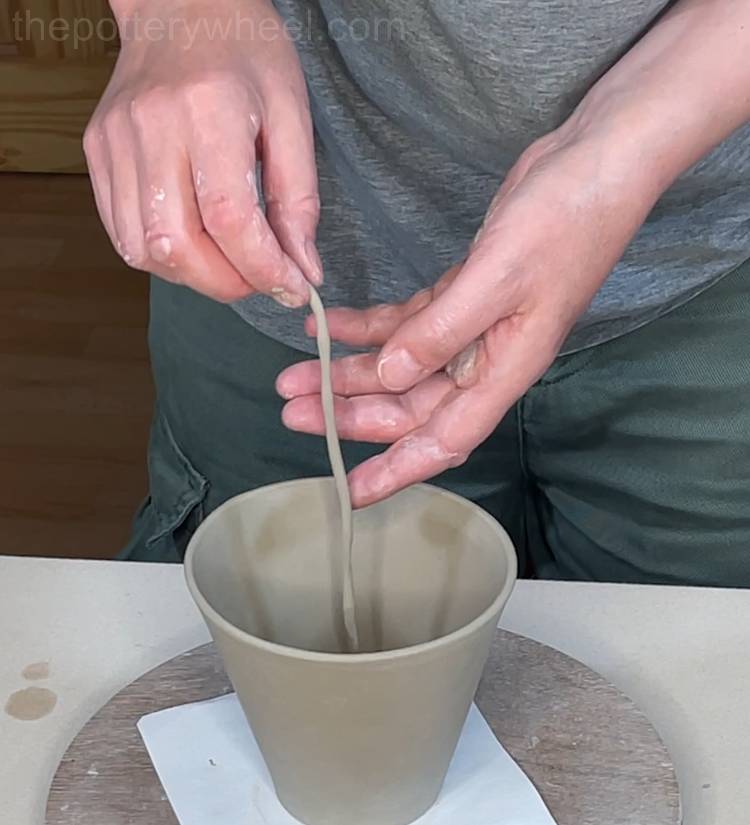
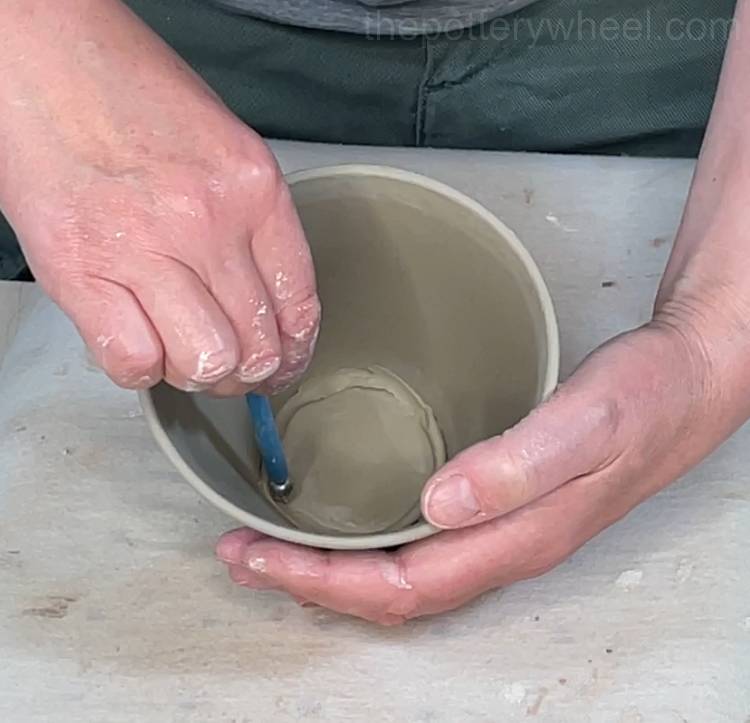
Step 11 – Adding a Coil to the Inside of the Mug
Next, I add a small coil to the inside base of the mug. This will make sure that the bottom of the mug is very securely attached. I roll a small thin coil. You can take a look at my guide to rolling a coil of clay here.
I paint a bit of water into the base of the mug at the join to make sure the clay is moist. Then I dangle the coil into the mug and press it gently into the bottom join with my fingers.
If the coil is too long, you can trim off the excess with your clay knife. Once it’s in place it should look a bit like this.
I put the mug onto a cushioned surface so that the bottom edge doesn’t get crushed. Then I use a tool called a stylus tool to blend the coil into the join at the bottom of the mug.
I run the round end of the stylus tool over the coil and it flattens and blends the clay into a smooth surface. You can also smooth out the clay using the tips of your fingers if you can reach down to the bottom.
Once the coil has been smoothed out, I put the mug back onto the round bowl and cover it with a plastic bag while I make the handle.
Step 12 – Making a Handle for the Wide Rimmed Slab Mug
I use 5mm roller guides for the handle, as a thicker handle can be more comfortable to hold. I roll out a long strip of clay and smooth it out with my platter tool.
Then put the long rectangular handle template on the clay and cut around it using a straight edge.
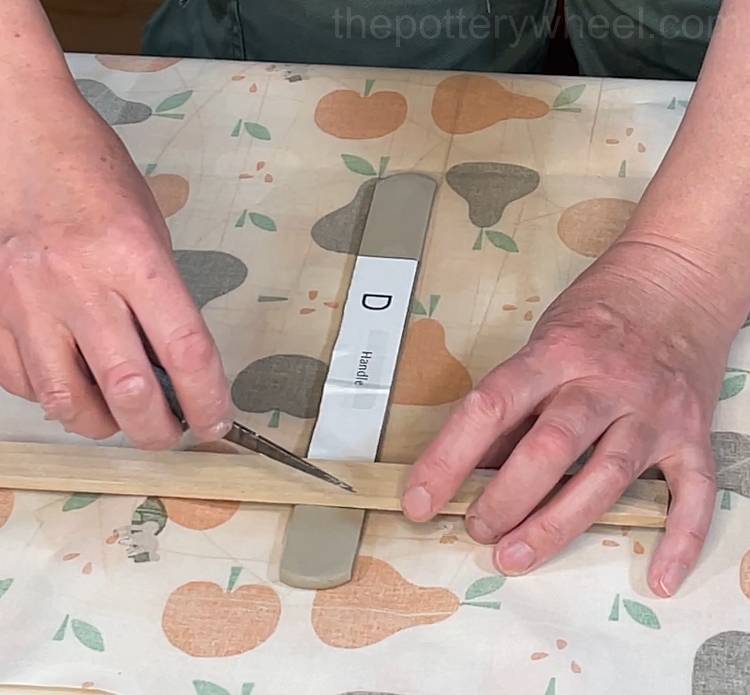
I smooth each edge of the handle with a damp sponge, as it’s much easier to make a soft edge on the handle at this stage.
Then I curve the handle round and put it on a wooden bat to let it firm up for a while.
Visit The Pottery Wheel Store
Fancy treating yourself to some homemade pottery? Looking for a unique gift? Check out my handmade pottery store…
Step 13 – Attaching the Handle to the Mug
Once the handle is firm enough to hold without losing its shape, I’m ready to attach it to the mug.
Before I attach the handle, I trim it to the right length. To gauge the right length, I hold the handle in my fingers as I would if I was holding the mug, then I use my thumbnail on the other hand to make a small mark where I want to cut the clay.
I then trim the ends off the handle where I made the mark with my nail.
After trimming the handle to length, I cut the end of the handle into a slightly curved shape so that it sits neatly against the curved side of the mug. I do this with both ends of the handle.
I tend to attach the handle onto the mug over the join. This helps to disguise any unevenness that might be on the mug at the point of the join.
I hold the handle up against the side of the mug and take some time to make sure that the handle is straight and in a good position.
Then I use my clay knife to make small marks around the handle so I know where I’m going to attach it.
I use my clay scoring tool to score the surface of the clay on the mug and both ends of the handle.
Next I add magic water to the scored surfaces on the mug and the ends of the handle. I put the mug into position and then supporting the inside of the mug, I press the handle into place to make a strong bond.
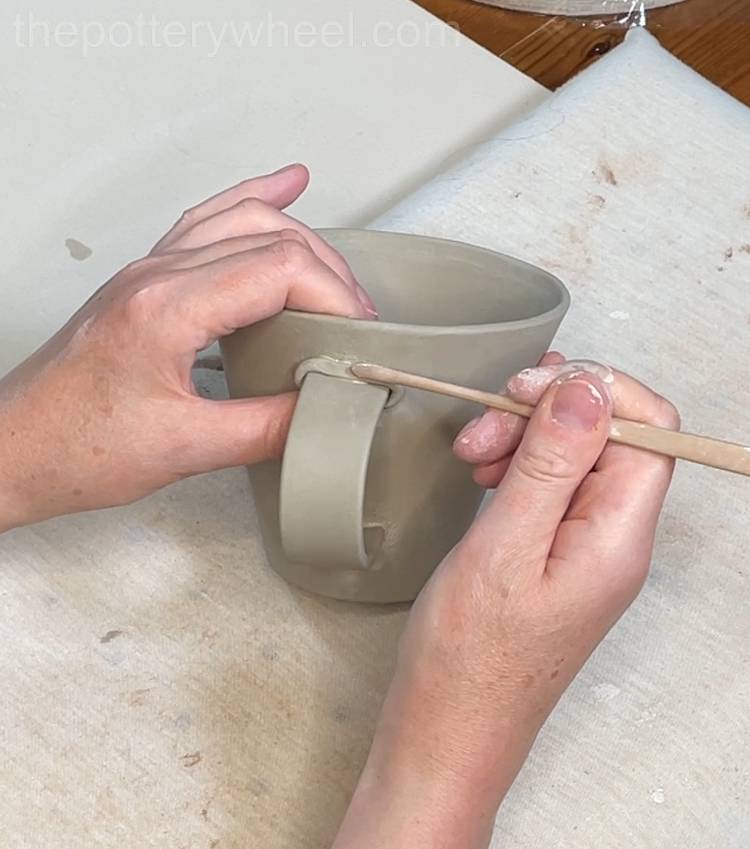
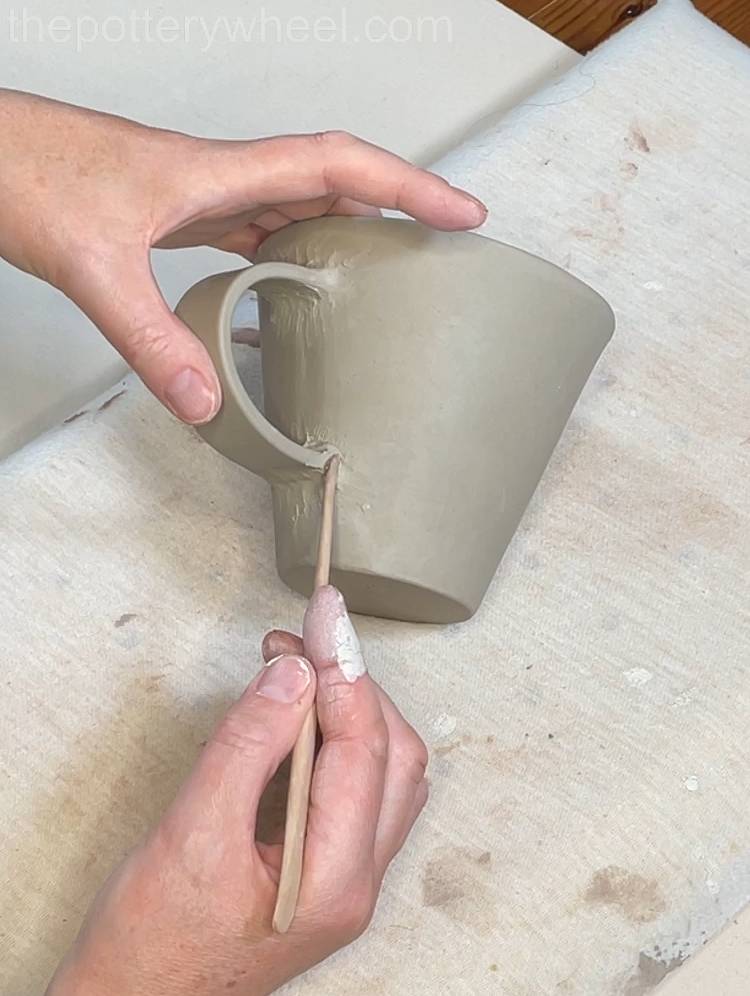
Step 14 – Adding a Clay Coil to the Handle
To ensure that the handle is attached securely I make a small coil of clay and wrap it around the join. I then use a fine modeling tool to push the coil gently into position and blend the coil onto the mug and handle all the way around.
I repeat this process at the bottom of the handle, adding a second coil of clay and blending it in.
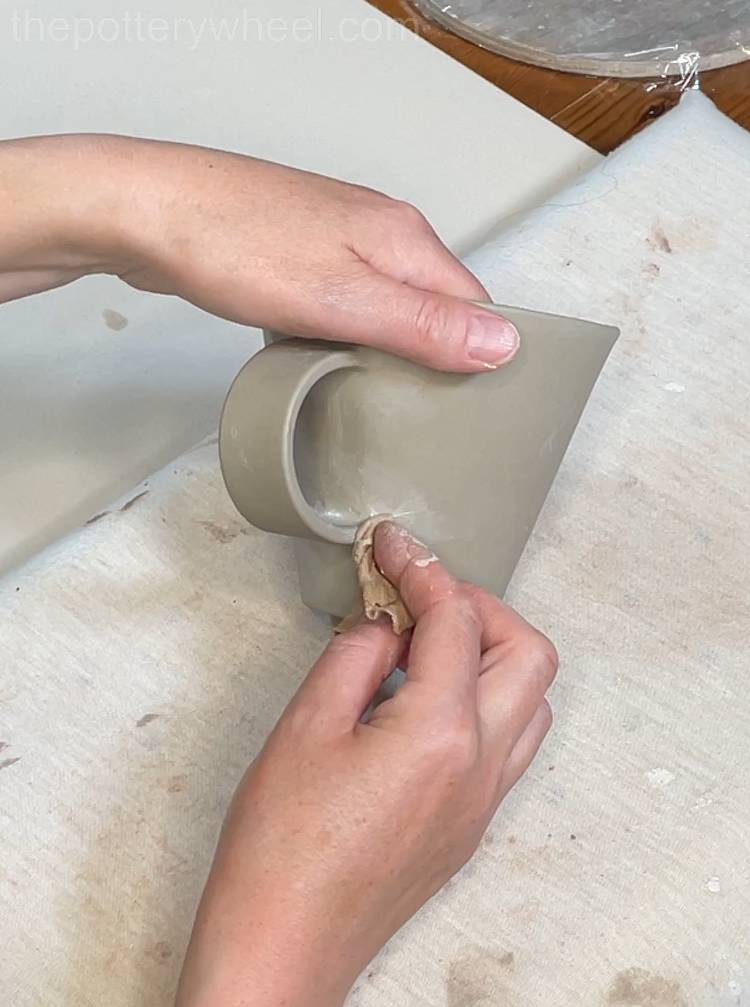
The wooden tool will have left some marks on the clay, so I smooth those out with a damp chamois leather.
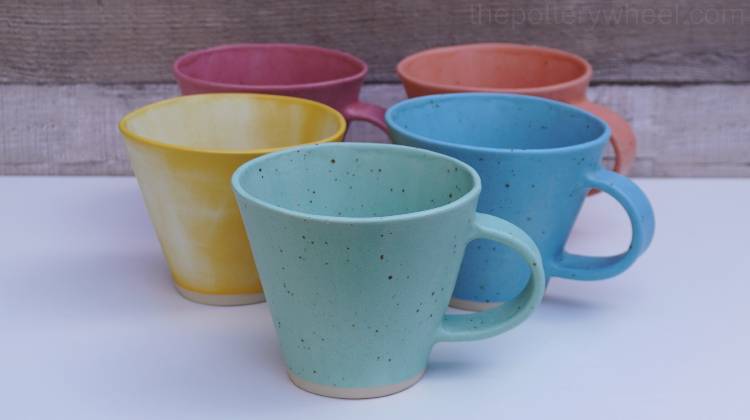
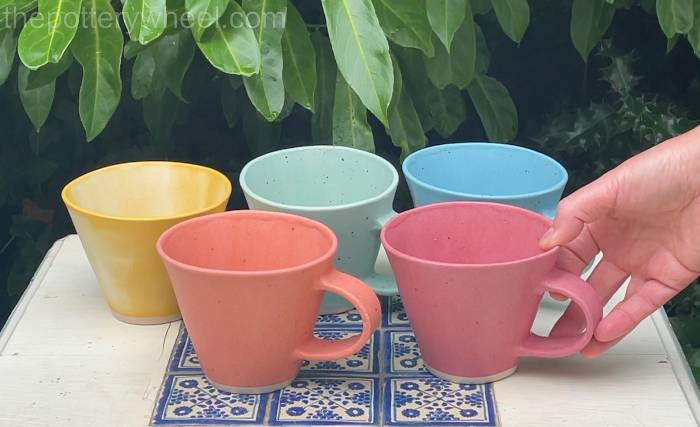
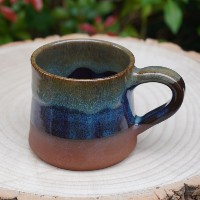
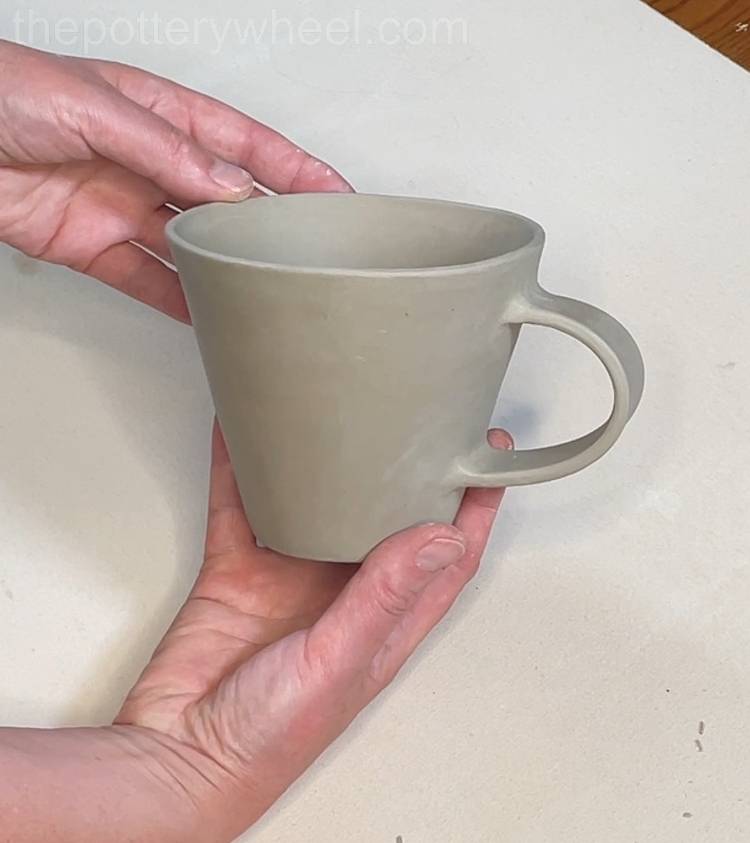
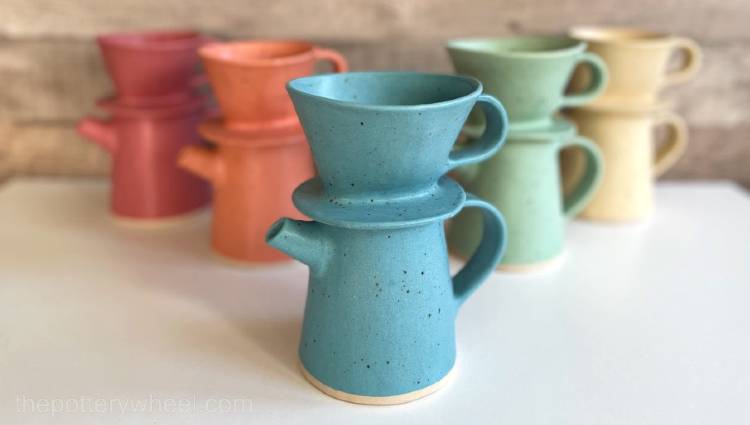
And there you have your finished mug, which needs to be dried slowly and then bisque fired and glazed.
And here is the finished mug, which needs to be dried slowly and fired.
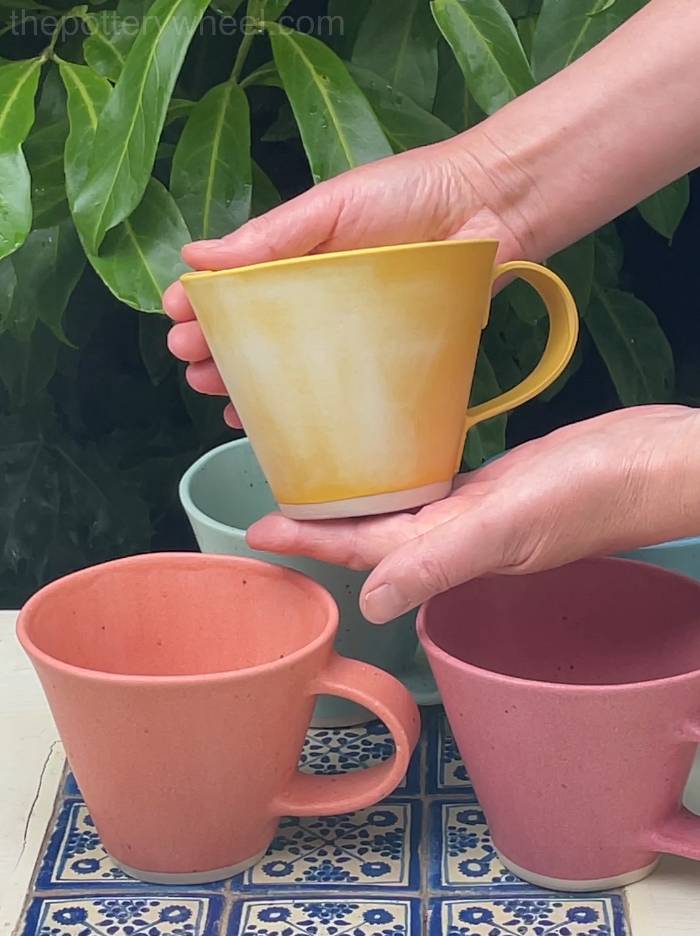
The beauty of these mugs is that they have a nice big flat surface for decoration. You can use this as a canvas for underglaze decoration or glazing. I used a selection of matte glazes on this batch of mugs. The lovely yellow glaze below is Lemon Meringue by Mayco. The other glazes are by Scarva and they are the Season Speckle range.


Leave a Reply