
So, you’ve just thrown your first pot on the wheel and you are feeling proud. But how on earth do you get it off the wheel without squashing it? This post is all about how to remove a pot from the wheel without damaging your pottery.
To remove a pot from the wheel, tidy up the bottom of the pot with a wooden tool. Then remove slip from the surface of the pot. Next, splash some water on the wheel head before sliding a wire under the pot. Then lift your pot onto a wooden bat.
It sounds simple when you put it like that. And it can feel a bit awkward the first few times you use this method. However, there are simple steps you can take to make this technique easy and effective, so read on…
The Problem – How to Remove a Pot from the Wheel
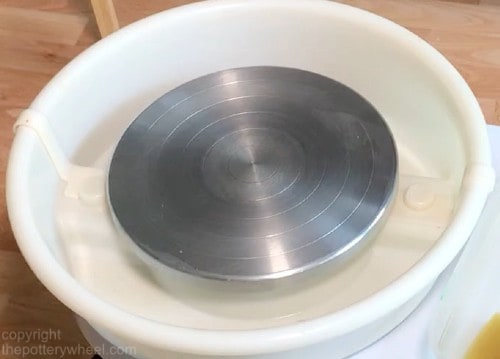
The spinning metal disc on a pottery wheel that you make your pots on is called the wheel head. Some wheel heads have holes drilled into them so that you can attach a wheel bat. This is a piece of plastic or wood that attaches to the wheel and can be removed easily.
If your wheel head has bat holes, then you are in luck. You can throw your pottery onto a bat, and then simply take the bat off when you are finished. The pottery can then be left to dry on the wheel bat.
Usually, potters will slide some wire under a pot on a wheel bat when they have finished a piece. Then they set the bat to one side until the pot is a bit firmer and can be lifted easily.
However, not all pottery wheels have bat holes. Your pottery wheel may look like this:
The problem arises when you have finished throwing your pottery. How do you remove your pot? When it is freshly thrown, the clay is still very soft. But equally, it is firmly stuck to the wheel head. It’s not practical to leave it on the wheel head until your piece is leather hard. This would mean, you’d have to wait a couple of days before you could use your wheel again.
The Solution – How to Remove a Pot from the Wheel
So, what do you do? Well, first, don’t panic, there is an easy fix. Here is a step-by-step description of how to remove a pot from the wheel. First here is a short video demonstration….
Step 1
When you have finished throwing your pot, it will be covered in slip. This is liquid clay. The slip will be on the inside of the pot, on the sides, and on the base. Your first job is to clean the slip off.
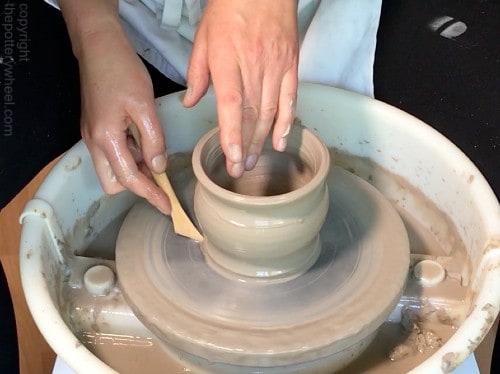
I start by cleaning up the base of the pot first. You can do this by slowly spinning the wheel head and using a wooden tool pressed against the bottom edge.
Step 2
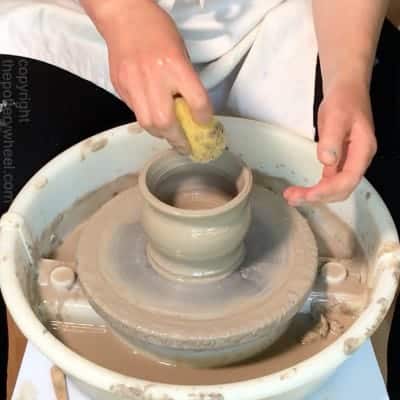
Take a wet pottery sponge and squeeze it out. Carefully use this sponge to soak up liquid slip that is sitting in the inside of the pot. It’s important that you do this. If lots of slip is sitting inside the pot, the base will dry more slowly than the sides. When one part of the pot dries more quickly, it’s more likely that the pot will crack when drying.
You can soak up the slip on the inside by holding the sponge carefully between your fingers. Lower your hand into the pot and dab the slip up using the sponge. Alternatively, you can use a ‘sponge-on-a-stick‘. Personally, I find using a sponge in my hand a bit easier. But if you have larger hands or a pot with a narrow neck, a sponge-on-a-stick will be best.

Step 3
Finally, you need to clean the slip up from the outside of the pot. There are a couple of reasons for doing this. Firstly, it gives the pot a tidier finish so you will have less to do when trimming your pot. Secondly, by removing the slip, you make the surface of the pot drier.
This means that you will be able to lift the pot without your hands sticking to the pot.
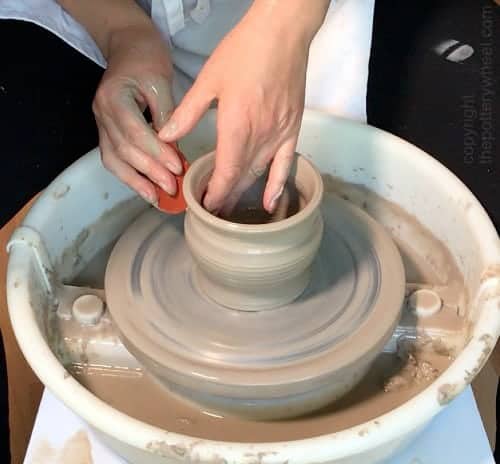
You can clean the slip off the side of the pot with a pottery rib. Pottery ribs come in different shapes and sizes and are usually made from metal, silicone, or rubber. It’s good to have a little selection of ribs. Sometimes you will need harder ribs, other times you will need softer rubber ones.
Generally, when cleaning slip off the side of my pottery I use a rubber rib. Simply hold the rib gently against the side and slowly rotate the wheel head with the foot pedal. The slip will collect on the rib and you can scrape it off easily.
Run the rib up and down the side of the pot until it is clean.
Step 4
Using a sponge or your fingers splash a few drops of water onto the wheel head. I tend to put the drips of water just at the edge of the base of the pot. You don’t need much. Maybe half a teaspoon.
Hold your clay cutting wire firmly between both hands and carefully draw it underneath the pot towards you.
You need to hold the wire taut. Be careful when you are coming to the end of drawing it under the pot. If you let the tension in the wire go, it can dig into the underside of your pot. Clay cutting wires are quite springy, so you need to be careful that you don’t gouge your pottery by accident.
By pulling the wire under your pot, you will drag some of the water you splashed earlier underneath your piece. This makes it easier to remove your pot.
You need to drag the wire under your pot a couple of times. So, when you have done it once, use your fingers to clean the clay slip off the wire. You can do this by simply running your pinched fingers along the wire.
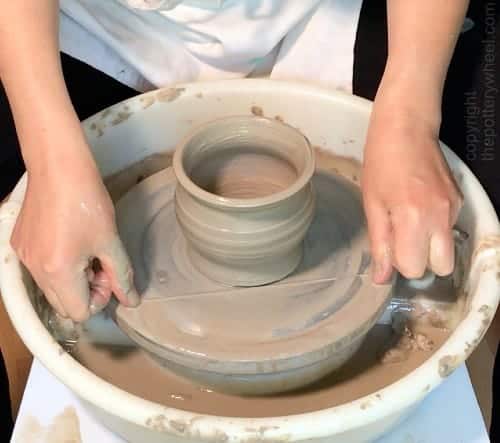
Once again, splash a little water on the wheel head near the base of the pot. Then drag your wire under the pot again. On this second pass, you should feel the pot begin to move just a little. When you feel that movement, you know that the pot can be removed.
Step 5
Position the surface that you are moving your pot onto, near to the splash pan. You are just about to lift the pot, and you want to handle it as little as possible. So, the nearer your drying surface, the less far you will need to lift your pot. I tend to move my pottery onto a wooden bat.
Step 6
Wipe your hands on a towel or rag, so that they are dry and clean. It’s important that your hands are clean and the surface of the pot is free of slip. If either your hands or the pot is sticky it will be harder to move the pot and set it down.
Carefully, using a gentle twisting motion, move your pot toward the edge of the wheel head. Once you get the pot to the edge of the wheel head, you can gently slide it off the metal. Support the side and the base of the pot and carefully but swiftly lift it onto the nearby wooden bat.

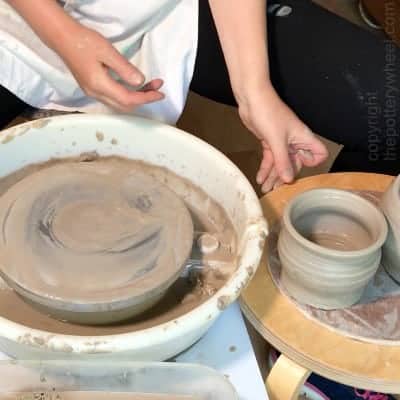
As you lift the pot, it will most likely bend a bit. The round lip is likely to turn into an oval. However, you don’t need to worry about this. When you set the pot down on the drying surface, it will go back into its proper shape.
And there you have it. Your pot is now off the wheel and can be left to go leather hard.
Final Thoughts on How to Remove a Pot from the Wheel
This process can feel a bit awkward and nerve-wracking the first few times you do it. But with practice, it will get easier. And you will become more confident that you can remove a pot from the wheel without destroying it.


