When making smooth coil pots, the coiling method is used to construct the pot. However, the coils themselves are smoothed away, rather than left as part of the decorative design of the pot.
You can make smooth coil pots either with a template or without. This article will give you a step-by-step guide for each approach and consider the benefits of both.
I look first at how to make smooth coil pots without a template. Then I look at using a template. If you would like to jump to either section, click on one of the following links.
Making smooth coil pots:
Otherwise, let’s go straight ahead and dive into how to make smooth coil pots without a template.
Making Smooth Coil Pots – Without a Template
It’s entirely possible to make a nice evenly shaped coil pot without a template. You just need to check the shape of your pot throughout the process. This will help you make sure you are building up each side evenly. Here is a step-by-step account of how I made this coil pot without a template…
Step 1 – Make a Batch of Coils
The first step when making a smooth coil pot is to make a batch of coils before you begin. That way, you will have a stack of coils to work with. And you won’t need to stop coiling your pot to make more.
I usually make about 5 long coils and cover them with a plastic bag to stop them from drying out. These coils are usually about 3 feet long and about half an inch in diameter. This is about the thickness of your pinky finger.
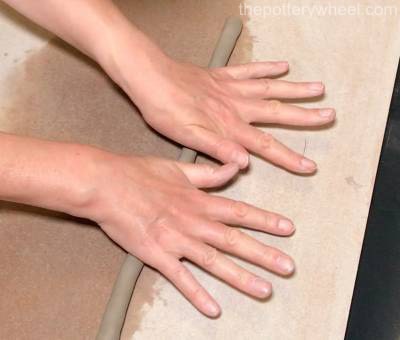
Making a coil of clay sounds like a very simple thing to do. And in some ways it is. You are simply rolling out a long sausage of clay, right? Well, in some respects this is true. Making a clay coil is not complicated, however, if you are new to coiling it can be a bit frustrating.
Some of the things that can go wrong when making a coil are as follows:
- They can become uneven, with some stretches of the coil being much thinner than others.
- The coil can flatten out and become an oval shape rather than having a round diameter.
- Coils can become hollow at the ends so that pockets of air form in the center of the coil.
To avoid some of these pitfalls, you can check out this article on how to make perfect clay coils.
Once you have made your coils, be sure to keep them covered with plastic. Clay coils dry out very quickly and you need the coil to be soft and workable.
Step 2 – Planning the Shape of your Coil Pot
Even when you’re not using a template for your pot, it’s helpful to know the shape you want it to be. This includes having an idea of how big the pot is going to be eventually.
The size and shape of the pot will determine how big a base you need to make.
There are no rules about what size base you should make. This really depends on the kind of shape that appeals to you. For example, you might like pots with a small base that graduates out into a wider body. Or you might prefer pots that have more gradually sloping sides, like a lozenge shape. Alternatively, you may want to make a straight cylinder-shaped smooth coil pot.
All of these considerations will affect the size of the base you use. You need to consider the stability of the pot, balanced out with the shape that you’d like it to be. A very small base with wide sides will be a bit unstable. Functional pieces, like vases, work better with wider steady bases. Though, it is, of course, a balancing act between aesthetics and practicality.
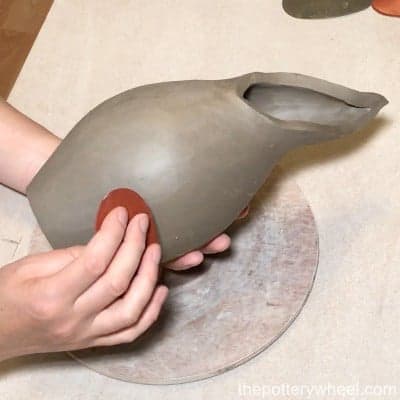
Step 3 – Making the Base of your Coil Pot
For this particular pot, which was 10 inches tall when it was fired, I used a 3.5-inch base. Bearing in mind that clay shrinks when it dries and is fired. So once the clay has been glazed the base measured 3 inches. The pot has gently sloping sides.
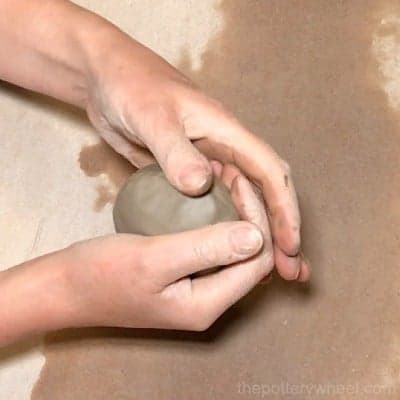
I make a ball of clay about the size of a small orange. Then using the heel of my hand, I press the ball of clay into the work surface
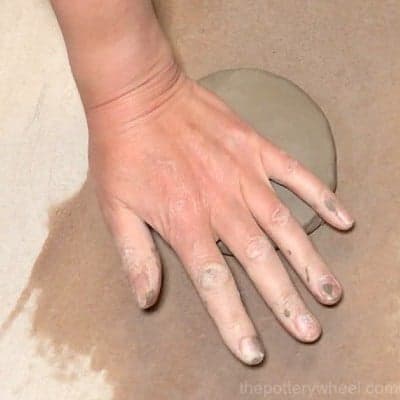
Once the clay ball is flattened, I transfer the slab onto a wooden batt. Putting the pot onto a batt is best, as it means you can cover your work up easily between sessions. You can cover your work with a plastic bag and tuck the bag under the edges of the batt. And you can move it around and store it safely when you are not working on it.
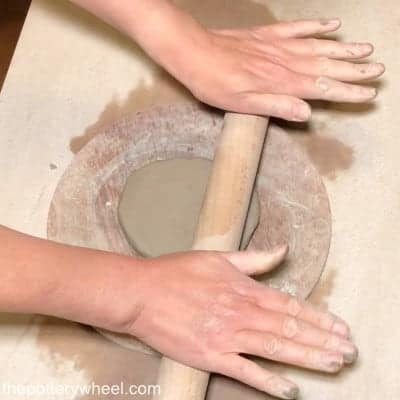
When it is on the batt, I use a roller to ma a base with a nice even thickness. For a pot this size, I aim to make the base about ½ thick. If you’re rolling a large slab, it’s best to use wooden battens on either side of the rolling pin. Alternatively, you can use guide rings on the ends of your rolling pin. This will ensure that the slab is uniformly thick. However, for a small slab of this size, I would gauge it by eye.
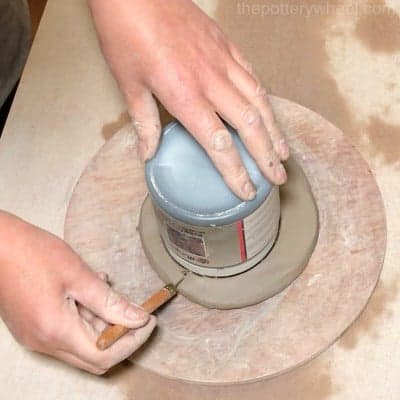
Then I use a circular object to cut out the base with a needle tool. You can use any circular object you like. In fact, you may be making an oval-shaped pot, in which case you can use an oval object. In this picture, I’m using the lid of a glaze pot, because it is the right size for this piece.
Step 4 – Starting to Add your Coils
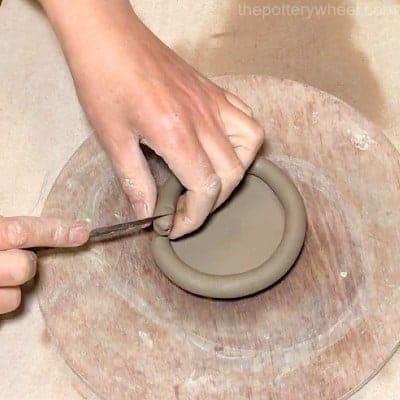
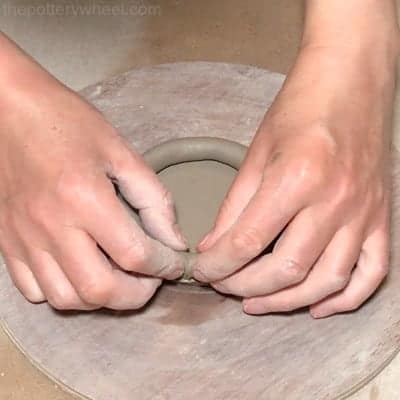
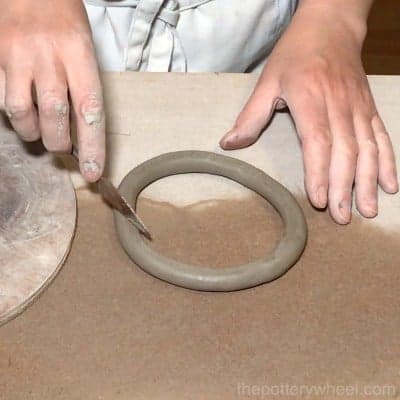
Position one of the coils around the base and measure it out to the right length. Then cut the coil to the right length using a knife or modeling tool.
Cut the coil on the diagonal. Cutting the coil diagonally will help the ends of the coils join more securely. If they are securely joined, they are less likely to separate as the clay shrinks when it dries out.
Once the coil is cut to length, score the ends of the coil using a needle tool or the serrated edge of a modeling tool. This creates a rough surface so that the ends of the clay will join together well.
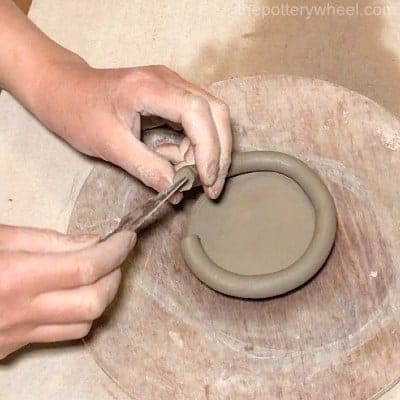
Take the coil off the base and score the edge of the base and one edge of the clay coil too. Once you have scored the surfaces, paint a little slip onto the scuffed-up clay. If the clay is nice and moist, you may only need to paint it with water rather than slip. The water will mingle with the scored clay and create slip.
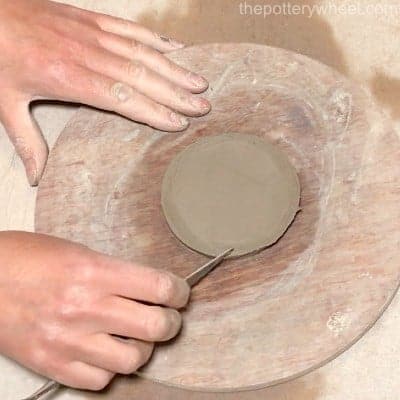
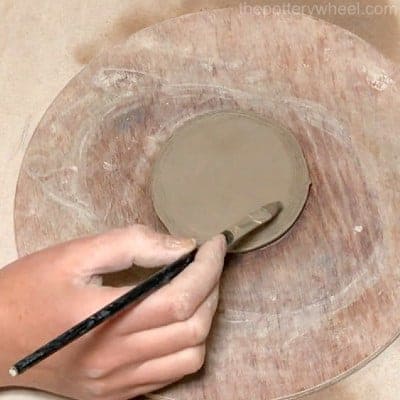
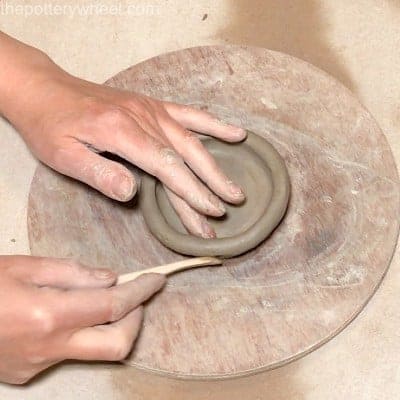
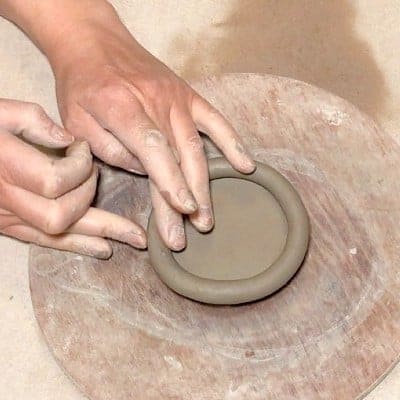
Put the coil back in position on the base, and press it firmly so that it starts to bond to the base. Don’t press so firmly that the coil is squashed, simply ensure that it feels securely attached. Once the coil is in place, blend the ends of the coil together. Then using a wooden tool, blend the inside of the pot onto the base. I use a mixture of the wooden tool and the tip of my finger.
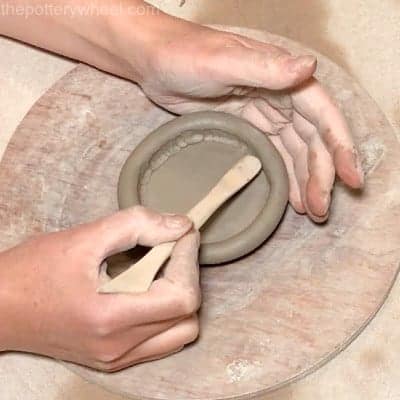
Then blend the coil into the base on the outside of the pot too. I use a wooden tool to do this first, then blend in with the tip of my finger. Blending does two things, firstly it gives you the smooth surface finish you are aiming for. And secondly, it ensures that the clay coils are thoroughly bonded together. If your coils are not properly blended, on at least one side, they may come apart when the clay dries.
Step 5 – Building the Walls of the Smooth Coil Pot
The process of building up the walls of the coil pot involves repeating the previous step and adding successive coils.
To make a cylinder pot with straight edges, add each next coil directly on top of the one below. However, you can make your pot curve outwards so that your pot widens from the base. To do this, you need to position the next coil slightly to the edge of the coil beneath.
Another tip is to blend the ends of the coil together before you put it on the coil below. That way you make a clay ring, which is a bit easier to put into position. Once you have made the clay ring, slip, and score the surfaces that are going to touch.
Then put the coil in position, pressing it firmly so that it adheres. Then using a wooden tool, blend the inside edge, supporting the outside wall with your free hand.
As I’m building the walls I try to ensure that the inside surface of the pot is smooth and tidy. When the pot gets taller and the neck gets narrower, it’s harder to get your hand in to tidy up.
So, it’s a good idea to keep it tidy as you go along. Besides, it’s easier to smooth it out when the clay is fresh and softer.
2 Top Tips!
- Make sure that the section where the ends of your coil meet is positioned at different points in the pot. If the ends of the coil meet at the same point, you will get a weak spot on the pot.
- It’s good to have patience when you are making coil pottery. I usually add a few coils, perhaps 4 or 5, and then let the pot settle overnight. This is especially helpful when you are working on the lower part of the pot that is getting wider.
Letting the clay settle and firm up will make the pot stronger. This will enable you to keep building the pot without it losing shape. When the pot is beginning to get narrower, it’s not as necessary to let it settle and firm up. But at the start when the clay is supporting a lot of weight, it’s good practice.
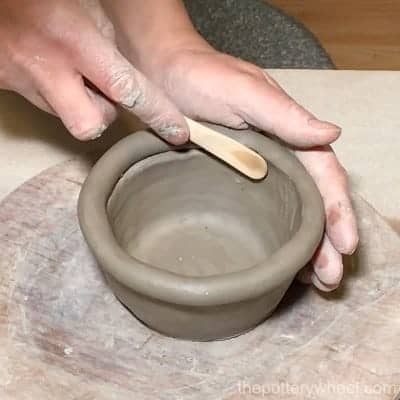
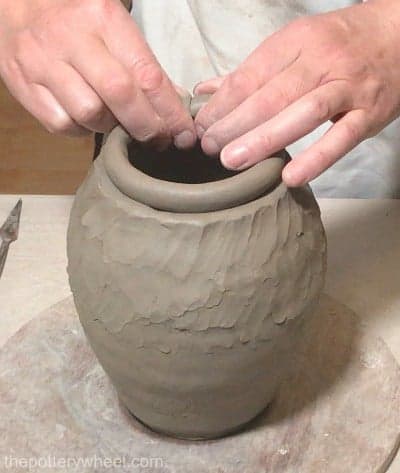
Step 6 – Smoothing the Walls of the Coil Pot
When the inside surface is smooth, I blend and smooth the outside of the coil. To smooth the outside, I start off using a wooden tool to blend the coils together.
Then when the coils are well attached, I use a rib tool to smooth down the outside surface. I use a combination of a metal rib tool followed by a rubber rib.
If the clay is quite soft, I will sometimes add and blend a few coils before I smooth the outside. But sometimes I smooth each coil as I go along.
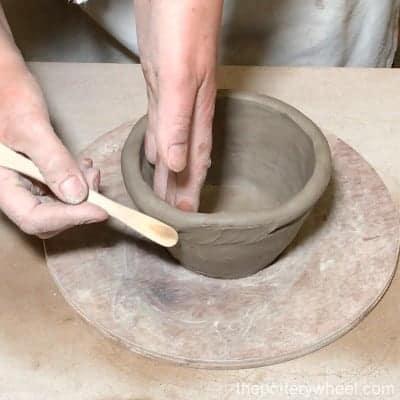
Another tip is to blend each successive coil in a different direction. If you blend to the right on one coil, then blend to the next on your next coil. This adds strength to the wall of the pot. You can see on the picture, that on the coil beneath I blended to my bottom left. Then on the next coil up, I blended to my bottom right.
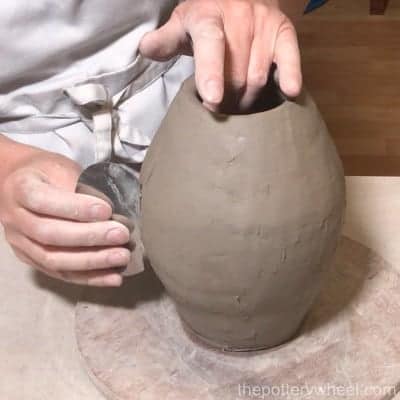
Step 7 – Narrowing the Sides of the Coil Pot
The shoulder of the pot is the widest part of the vessel. You need to keep checking the proportions of the pot to gauge when you feel you’ve reached the shoulder. Once you feel the pot is as wide as it needs to be, you can start building the walls inward.
To do this, you simply position the coils slightly to the inside of the coil below. This is the reverse of what you do when you are bringing the walls of the pot outward. Continue to blend the inside and outside of the pot in the way described above as you build the walls.
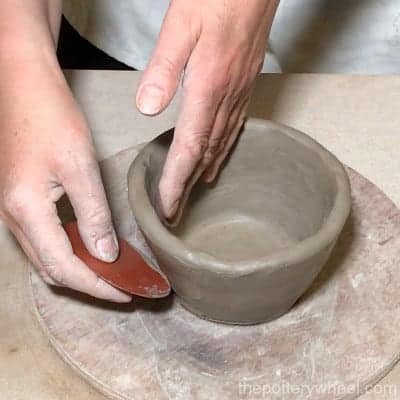
Once I have completed the body of the pot, I run a metal rib over the entire piece. This will smooth out any major lumps and bumps of clay. Then I smooth the surface with a rubber rib to compress the clay further.
At this point, I am smoothing mainly to check the shape of the pot. More smoothing will take place later. But a nice smooth surface at this point helps me see if I’m happy with the overall shape.
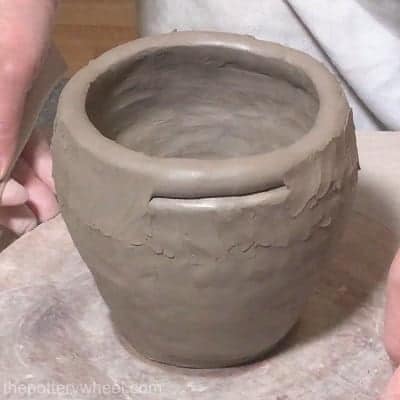
Step 8 – Making the Neck of the Pot
You have different options with the neck of the pot. Here are some suggestions:
- Simply finish the neck of the pot off with a clean line. Tidy up the edge of the top coil and make the neck flush with the rest of the pot.
- Build a neck fluted neck that curves outwards by adding a few more coils.
- Or build a sculpted fancy neck shape, to add a bit of character to the pot.
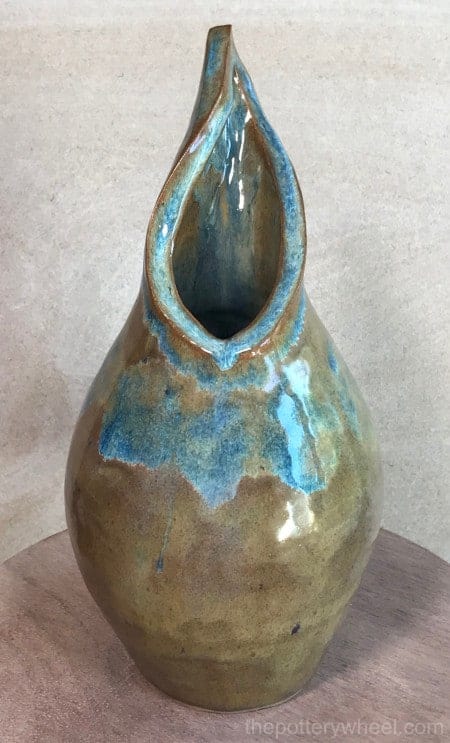
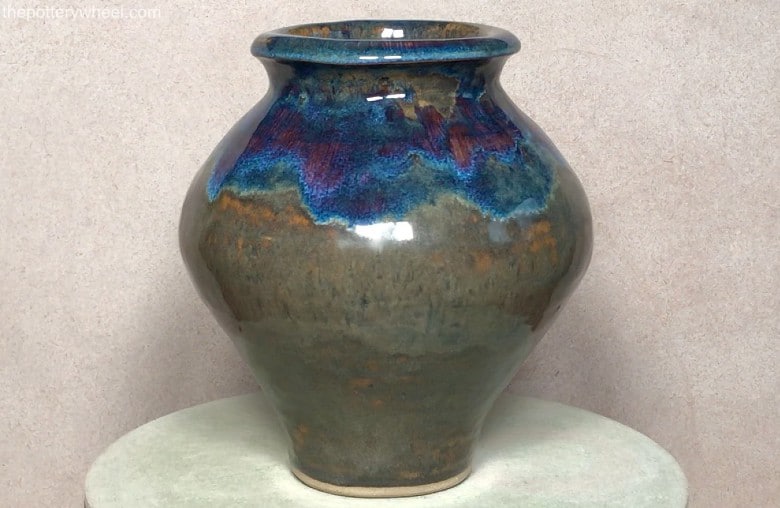
With this particular pot, I decided to take the third option and make the neck into a sculpted feature. However, you don’t have to do this. Smooth coil pots can be just as nice with a simple classic-shaped neck.
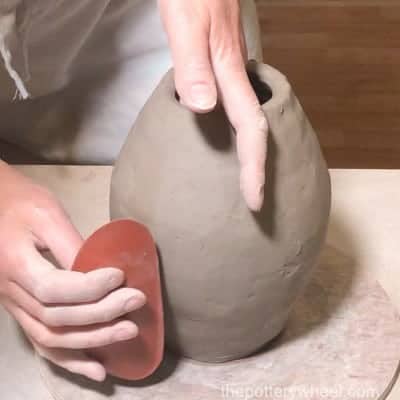
Step 9 – Finishing the Surface of your Smooth Coil Pots
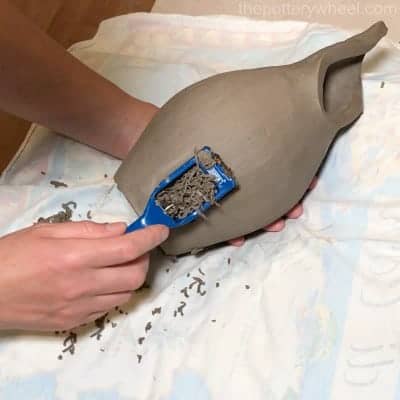
Once you have finished building your pot, let it go leather hard. Then draw a shredding tool across the pot to remove any areas that have an uneven surface.
This will leave your pot with a serrated surface that needs to be smoothed down again. You can do this using a combination of the metal rib and the rubber rib. First, run the metal rib across the rough serrated surface. Then compress the clay to a super smooth surface using the rubber rib.
The rubber rib does a good job of making the surface smooth. However, if you want the pot to have a shiny reflective surface, you can burnish it before it is bisque fired. Burnishing is a wonderful way of finishing pottery that you are going to low fire in a raku kiln or a pit fire. Either way, your pot is now ready to be fired. If you’d like to watch a step-by-step video of the above pot being made, check out my YouTube Video.

Handy Starter Kit for Pottery Tools – View on Blick
Making Smooth Coil Pots – With a Template
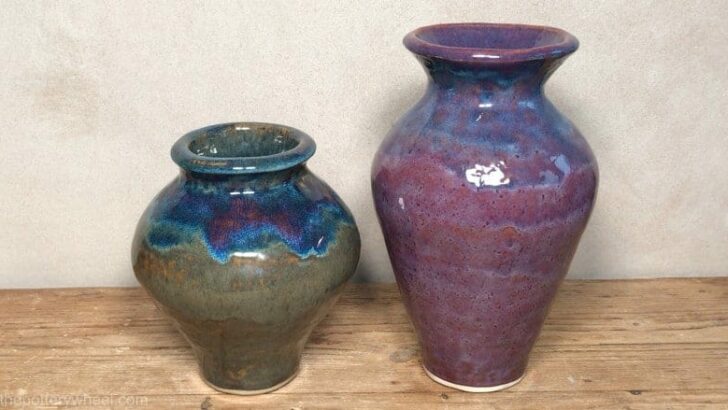
It’s possible to make nicely proportioned smooth coil pots using the above approach. However, if you want to ensure accuracy and evenness in the shape, you might want to try using a template. Making smooth coil pots with a template is easy. In the next section, I cover how I made the two following smooth coil pots using a template.
Drawing the Shape of Your Smooth Coiled Pot
I wanted this pot to be around 8 inches tall, so I used a piece of A4 paper to make the template. Here are the steps to making the template for your smooth coil pots:
Fold the piece of paper in half so that you have a fold line down the middle of the paper. Decide how wide you want the base of your pot to be.
In this example, I want my base to be 3 inches wide. So, measure and mark half the diameter of the base on either side of the folded line. This gives me two marks on the bottom of the piece of paper equal to the diameter of the pot.
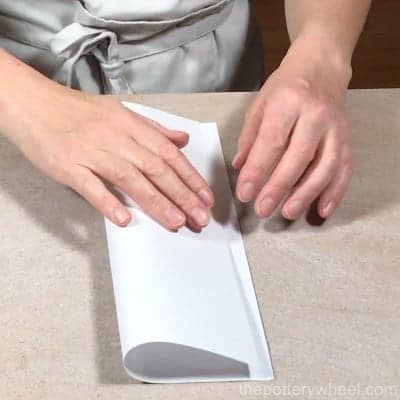
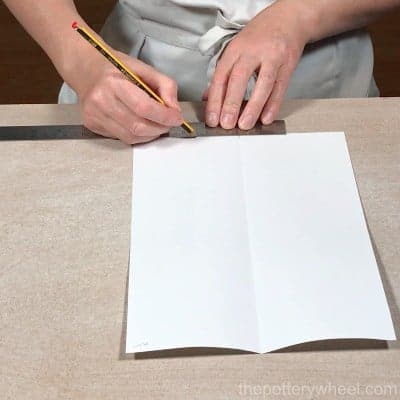
I then make marks in the same place on the top edge of the paper. This enables me to draw a line from the bottom to the top of the piece of paper. I draw a line on either side of the middle fold line. These lines run parallel to the fold line along the middle of the paper.
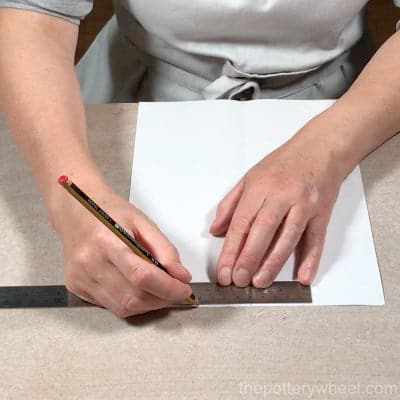
Then fold the piece of paper in half again, so that the drawn lines are on the outside and visible. You are then ready to sketch the shape that you want the pot to be.
I usually put a mark on the pencil guideline where I want the neck of the pot to be. Then I draw a curve from the bottom edge of the paper to the neck.
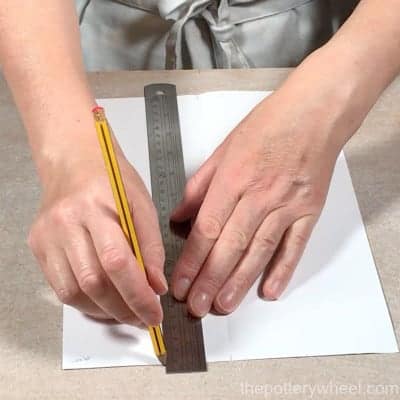
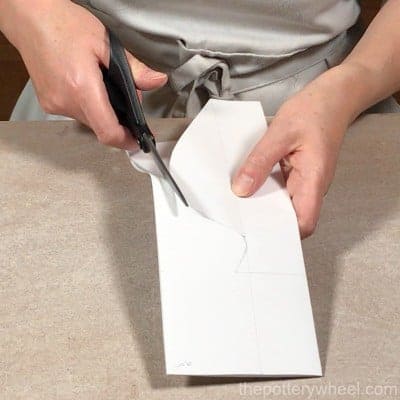
When I’m happy with the shape of the bottom of the pot, I draw the neck of the pot. Then, draw a line across the top of the rim and cut the pot shape out with scissors.
Making the Template for Smooth Coil Pots
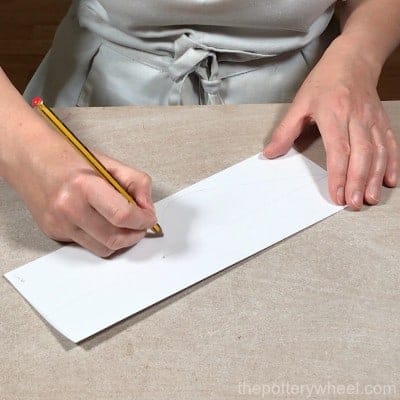
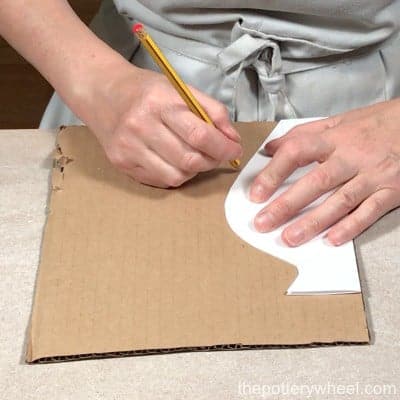
Unfold the pot-shaped piece of paper and make sure you are happy with the shape and size. You can reshape it if you are not completely happy with it.
Once it looks right, place the cut-out piece of paper on the edge of a piece of stiff cardboard. Draw around the edge of the paper pot shape onto the cardboard.
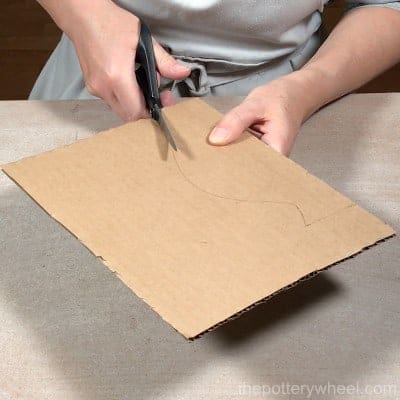
Cut out the pot shape into the side of the cardboard.
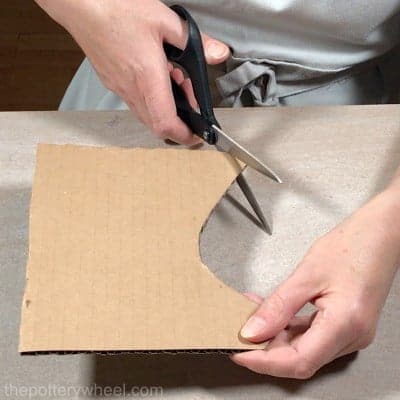
Snip the bottom edge of the template off. This stops the template from gouging into the base of the pot before the walls start to slope outwards.
Put some packing tape around the edge of the board. This will create a nice smooth edge. It also stops the cardboard from absorbing moisture from the clay. If you use small sections of tape you can follow the curve of the template.
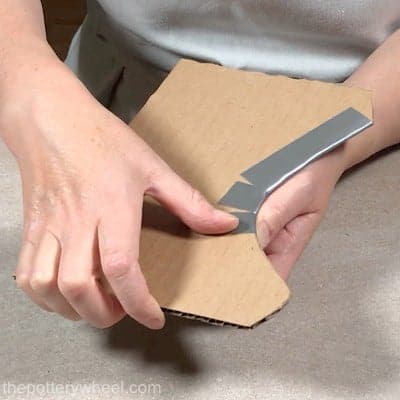
Your template is now ready to use.
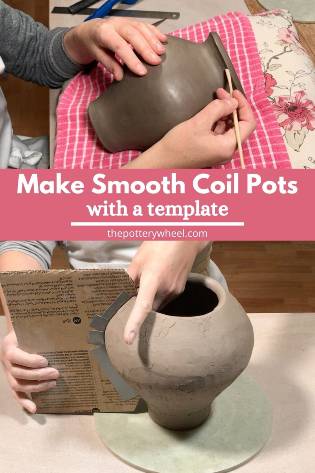
Building Smooth Coil Pots with Your Template
The process of making a base and adding coils to your pot is the same as the steps outlined above. However, as you add coils you use the template to make sure the walls are being built up evenly. And to ensure that the pot is taking the shape you envisioned as you build it.
To make smooth coil pots with a template, you use the following steps:
Step 1 – Making your Base
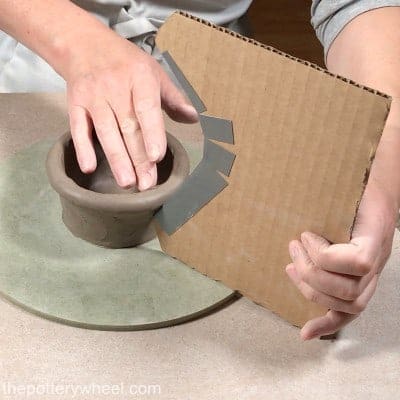
Make your base and add your first one or two coils as per usual. Then once you have the base established, hold the template up against the base. Using the template to guide you, drape the next coil on top of the previous coil.
The new coil needs to butt up against the edge of the template. Once you have gauged where the next coil needs to go, you can add the coil in the usual way.
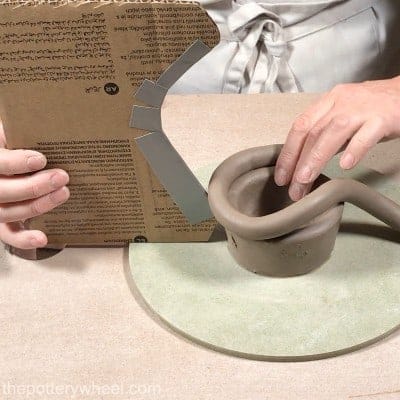
Secure the new coil to the pot using slip and score. And then blend it with a wooden tool and your fingers. Then tidy up the outside surface of the pot using a metal rib.
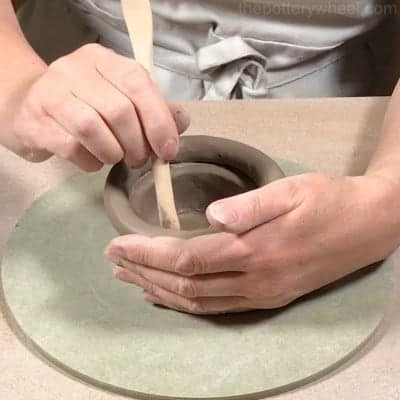
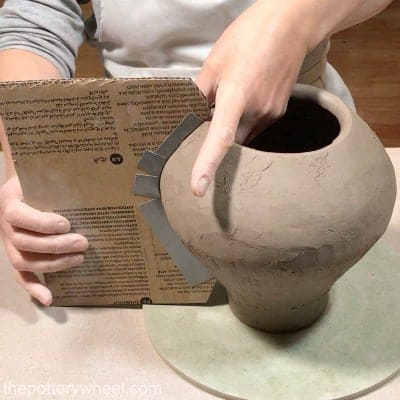
Step 2 – Using your Template
Once the coil is secured, hold the template up against it to check that it is the right shape. Use the template at different points around the pot to check that it is the correct shape at all angles.
If the shape of the new coil isn’t quite right, you can mold it with your fingers. Keep molding the coil until it fits snuggly up against the template.
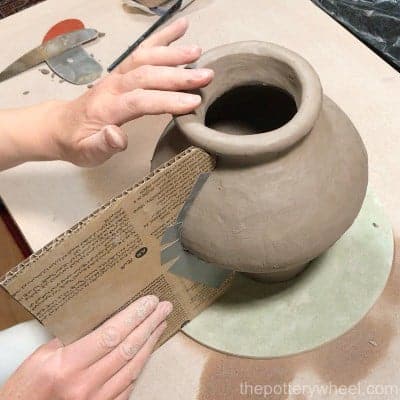
When you’re positioning your coil, you can use a pointed tool to mark where the coil needs to be added. This will help guide you when you have made the coil into a ring and are securing it in place.
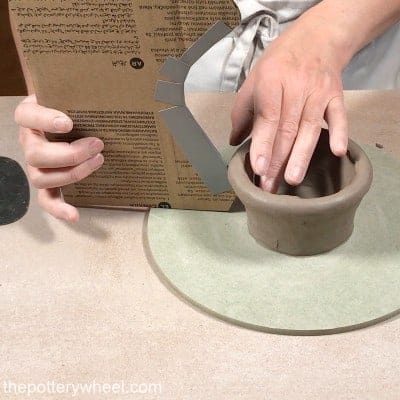
Keep building the sides of the pot upward in this manner. As you build continue to use the template to guide where you position the coils. And to check that the sides of the pot are shaping up nicely. Continue in this manner as you build up the neck and collar of the pot.
Step 3 – Finishing Touches
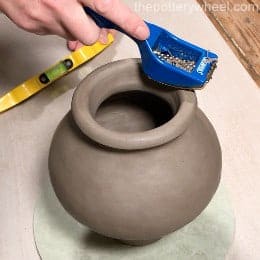
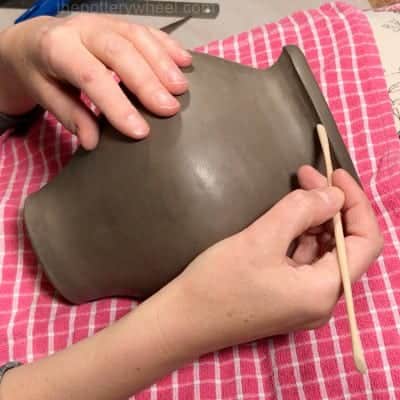
Once I have built up the sides of the pot, I check that the collar is straight. You can do this by eye, but sometimes I use a spirit level, just to be accurate.
If the collar is a bit wonky, I use a scraper to remove a little bit of clay. This is normally just a matter of a couple of scrapes. But it can make a big difference to the overall finish of the pot.
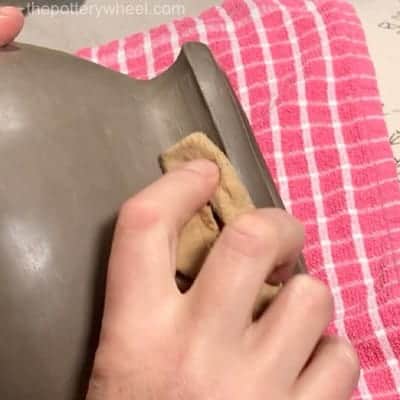
The scraper will leave a roughened surface, so I smooth this down with a rubber rib.

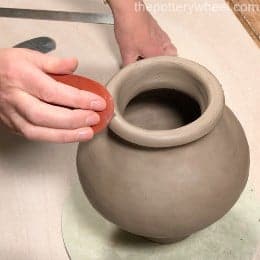
I then tidy up the edge of the neck with a modeling tool. And use a damp chamois leather to remove any uneven texture around the neck and collar too.
Once you have finished tidying up your pot, it’s ready to be dried and fired in whatever way you like. If you want to watch a full step-by-step video of the above vase being made, check out my YouTube video here.
Final Thoughts
I love making smooth coil pots. I find the look of hand-built pottery warm and full of life. Once you have gotten the hang of the process, you can adapt the approach to suit whatever style you like.
My preference is to keep the body of the pot simple and add an elaborate neck. But it is really a matter of taste. If you are using a busy glaze, then it’s often not necessary to add a lot of detail to the clay. When you get on a roll making smooth coil pots, it can be quite meditative. I hope you enjoy it!


