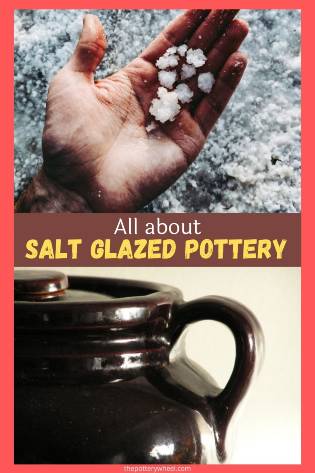
Salt glazing has been around since the 14th century. And though it’s no longer used as an industrial way of making pottery, it is still popular amongst individual potters. Small craft potteries still produce beautiful salt glazed pottery.
In this article, I dive into how exactly salt glaze pottery is made. I’ll also look at the different methods used by potters past and present.
Here are some of the questions that we will look at….
- What is Salt Glazed Pottery?
- What Does Salt Glazed Pottery Look Like?
- Types of Kiln Used for Salt Glazing
- How is the Salt Added?
- How Much Salt is Used?
- Measuring the Temperature in the Kiln?
- What type of Salt is Used for Salt Glazing?
- Is Salt Glazed Pottery Bisque Fired First?
- What is the Best Clay for Salt Glazed Pottery?
- How Long Does a Salt Glazing Take?
What is Salt Glazed Pottery?
There are a number of different ways of salt glazing pottery. However, what they have in common is that salt is introduced to the kiln when it’s at a high temperature.
Broadly speaking salt is deposited in the kiln at around 2200F (1204C). Though some potters start salting the kiln at higher temperatures than that.
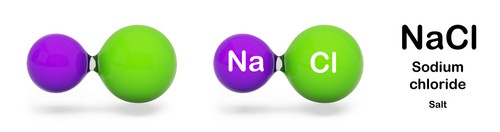
When the salt enters the high temperature of the kiln it decomposes. This means that the elements that it is made of come apart.
Salt is sodium chloride, which means that it’s made up of sodium and chlorine. When these two elements separate the salt vaporizes and becomes a gas. The sodium becomes sodium oxide and the chlorine becomes hydrogen chloride.
The hydrogen chloride gas leaves the kiln out of the chimney or flue atmosphere outside. The sodium oxide stays in the kiln and clings to the surface of the pots. It also attaches itself to the surface of the kiln and the kiln shelves.
Salt glazing occurs when the vaporized salt interacts with the silica and alumina oxide in the hot clay pots. The sodium oxide coats the pots and enters into the pores on the clay surface.
Because the silica and alumina oxide in the clay are hot, they combine with the sodium oxide. The silica in the clay is fluxed (or melted) by the sodium oxide. The mixture of sodium oxide, silica, and alumina oxide produces the salt glaze that covers the pots.
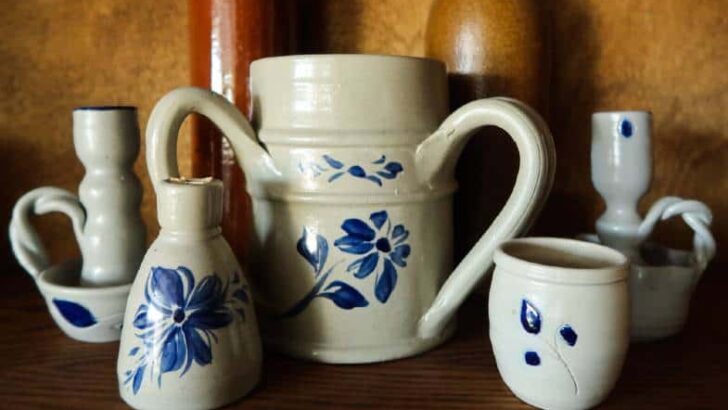
What Does Salt Glaze Pottery Look Like?
Traditional salt glazed pottery is usually grey, buff, or brown stoneware. The glaze itself usually has an orange peel texture, which has lots of small craters that look like pinpricks.
This mottled texture is caused when the hot molten glaze is unable to become smooth during the firing. The craters are caused by alumina oxide particles and pores in the clay that the glaze is unable to flow over. This effect is also sometimes called Tiger Skin glaze.
Salt glazing is often said to have originated in Germany in the 14th century. Typically, traditional German salt glazed pottery is reddish-brown. The brown color is due to the presence of iron oxide or rust, in the clay.
By contrast, Dutch salt ware was normally grey and often had blue painted decorations. The blue color comes from the decorations being painted in cobalt oxide.
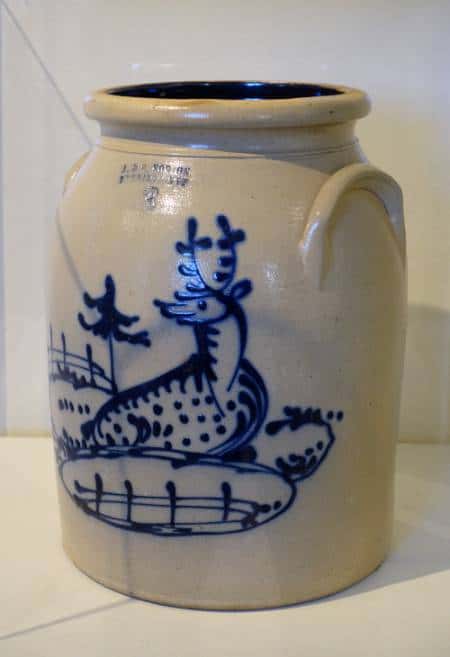
This cobalt oxide blue is the only color to be found on older historical salt glazed pots. The reason for this is that cobalt combined well with the glaze during the glazing process.
Other oxides and stains did not take the salt glazing process well. And iron oxide and other colors tended to prevent a good salt glaze from forming. Hence they were avoided.
Modern Salt Glazing
A lot of salt glazed pottery made today is similar in style and appearance to the ware made centuries ago. However, potters today also experiment with different colors and glaze effects.
One way to achieve a wider range of colors is to mix colored stains with other glazes. These glazes are then applied to the pots before they go into the salt glaze kiln.
The stains are fused into the additional glazes, and the salt glaze is applied over these extra glazes.
Dramatic patterns can also be achieved in salt glaze pottery by applying alumina oxide slip to the piece. The alumina oxide takes less glaze than areas of clay with higher silica content. So, applying an alumina oxide slip will create a flashing pattern over the pot.
The exact appearance of the pot will depend a lot on the type of kiln it is fired in. For example, pots fired in a wood fire kiln will be marked by wood flames and wood ash. And, the side of a pot that is facing a flame will look different from the side that looks away.
So, let’s look now at the types of kiln that can be used to make salt glazed pottery.
Types of Kiln Used for Salt Glazing
Salt glaze pottery is made in wood fired kilns or gas fired kilns.
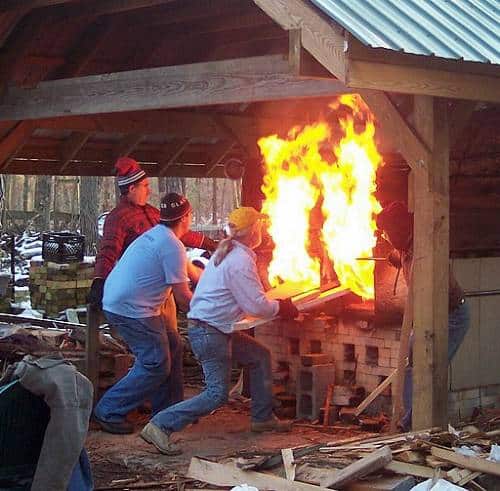
Wood Fired Kilns
Wood fired kilns have various different designs and range in size and complexity. However, all of them rely on the draw created by the chimney.
A wood fired kiln will normally have a firebox located at the base of the kiln. As the name suggests, the firebox is where the fire burns in the kiln.
The potter begins to heat the kiln by lighting a fire in the firebox. Gradually over time the fire is fed and stoked and gets larger and hotter.
As the fire builds up, the heat in the kiln increases. The flames from the fire will enter the kiln from the firebox and be drawn towards the chimney.
For salt glazing, a wood firing kiln is often has a cross draft design. This means that the firebox is on one side of the kiln. And the chimney is on the other.
As a result, salt vapor, along with the flames, heat, smoke, and ash are drawn through the pottery chamber. This will leave the pottery with distinctive patterns on the glaze. These patterns are a record of the direction of the flame and draft in the kiln.
Wood fired kilns vary in size, and will range from firing 50 to 350 pieces of pottery at a time. Some wood fired kilns are so large that you need to climb into the kiln to load them.
Gas Fired Kilns
Different kinds of gas fired kilns can be used for salt glazing pottery.
Natural Gas Kilns
Larger gas kilns tend to be natural gas kilns. These can have various different designs. One such design is the ‘car kiln’. With a car kiln, the base of the kiln is on wheels or casters. To load and unload the kiln, the base is wheeled out of the kiln.
Once loaded, the base is pushed back into place, the door is closed and the gas is switched on to heat the kiln. A large gas kiln can take 2 days to gradually get to the right temperature to begin salting the ware.
Propane Gas Kilns
Wood fired and natural gas kilns are both large and take days to fire and cool down. Propane gas kilns are an alternative way to salt glaze pottery in a relatively short period of time.
There is an industry of individual potters (including myself!) who have built their own DIY propane kilns.
There are a number of ways of making a propane kiln. However, a popular design is to build a frame for the kiln out of steel mesh. The frame is then lined with ceramic fiber.
A hole is cut in the ceramic fiber at the base and used as a burner port. A propane torch is directed in the burner port to heat the chamber. The kiln flu is on the top of the ceramic fiber chamber.
These kilns are small and simply designed. As such they are updraft kilns. The salt is introduced to the chamber by a hole in the ceramic fiber on the side of the kiln.
The salt vapors then disperse around the kiln and the waste gases exhaust out of the flue on the top. Or out of gaps in the lid on the kiln.
Because these kilns are small, they will typically hold around 10-20 pieces of pottery at a time.
During salt glazing, the sodium oxide vapors in the chamber coat all the surfaces in the kiln. This is true regardless of what kind of kiln is being used.
As a result, all salt glazing processes will have at least a couple of things in common. These things are….
- Before a pot is put on the kiln shelf, 3 or 4 balls of wadding are pressed onto the foot of the pot.
Wadding is a refractory material that doesn’t melt in the kiln. It stops the glaze on the pot and shelf from welding to one another. Therefore, stopping the pots from getting stuck to the kiln.
There are different recipes for wadding. Many of them include the key ingredient of alumina hydrate, which has a very high melting point. - Wadding can also be used between lids and pots. If you salt glaze pottery with the lid in place, the lid will become welded in place.
However, if you remove the lid and put it in a different part of the kiln, two things can happen. The lid might warp a little and not fit correctly once fired.
Also, the conditions in the kiln vary a lot when salt glazing pottery. So, the lid might have quite a different looking glaze to the pot if it’s not in situ during the glazing.
- The shelves of the kiln will need to be cleaned after the glazing. This is because the sodium oxide will also have attached to the kiln shelves.
Potters sometimes recommend using silicon carbide kiln shelves because they have low absorbency. And also coating the shelves with a kiln wash made up of alumina and kaolin.
This helps the cleaning process, as debris can be scraped off the shelves quite easily after firing.
What About Electric Kilns and Salt Glazing Pottery?
Because the sodium oxide coats everything in the kiln, it’s not practical to salt glaze in an electric kiln. Doing this would coat the electrical elements that heat the kiln. The sodium coating would stop the elements from radiating heat and would corrode them too.
Another difficulty with salt glazing in an electric kiln is how to add salt to the kiln. Most of the time salt is added to a salt glaze firing through openings at the base of the kiln.
Most electric kilns have peepholes, to gauge the temperature of the kiln. But these quite narrow and it’s hard to imagine how they’d be used for salting.
On that note, let’s take a look at how salt is added when salt glazing pottery.
How is The Salt Added?
Adding salt to the kiln is sometimes called ‘charging with salt’. There are different ways of adding salt to the kiln, and they depend on the design of the kiln.
Some salt glazing kilns are designed so that the salt is sprinkled through holes in the top of the kiln.
However, it’s more common for the salt to be introduced at the side of the kiln. Generally, a removable brick is taken away from the side of the kiln when the kiln is hot enough.
A scoop containing the salt, on a long metal pole, is passed through the hole in the bricks. Once the scoop is inside, the salt is tipped out of the scoop into the heat to vaporize.
The process is similar with self-made propane kilns, though on a smaller scale. An opening is cut into the ceramic fiber on the lower portion of the side of the kiln. The salt scoop is then passed through the opening in the insulating material.
When firing with a wood burning kiln, the salt is sometimes added directly to the fire itself. In fact, some potters will tape paper parcels containing salt onto pieces of wood. This wood is then used to stoke the fired.
Other potters make parcels of salt in paper packages and throw these into the kiln or the fire.
How Much Salt is Used?
The process of adding salt to the kiln is called ‘salting’. Traditionally, 3-6 saltings were used when firing.
Part of the reason for multiple saltings was to build up a good layer of glaze on the pots. The more salt that vaporizes in the kiln, the thicker the glaze.
However, there is another reason for salting more than once. That is that when salt is added to the kiln, the kiln cools down somewhat.
So, after the salt is added, it’s best to allow the temperature in the kiln to build up again. Once the temperature is built up again, more salt is added.
This ensures that the salt is hot enough to vaporize. If the kiln isn’t hot enough, the pots will come out of the kiln looking dry. This is because there is insufficient salt glaze on them.
Though some individual potters will salt 2 or 3 times, others will salt many more times. In fact, UK potter Kevin Akhurst describes salting his kiln 14 times during a firing in this following video.

So, what weight of salt does this amount to. Well, potters using larger kilns can use between 30-50lb of salt per firing.
The exact weight depends on the size of the kiln and the glaze effect that they want to achieve.
US potter Robert Compton states that you need to use 1lb of salt per cubic foot of your kiln. Particularly if you want to get a good textured orange peel effect on the salt glaze.
How Is the Temperature Measured in the Salt Glazing Kiln?
The salt fumes in the kiln can affect how pyrometric cones and pyrometers work. So, whilst lots of potters do still use these ways of reading temperature, it’s also helpful to have another gauge.
Another way to monitor the kiln temperature is to use trial clay rings. These are small bars or rings of clay that are placed in the kiln near to a spy hole. A spy hole is generally a brick that can be removed easily from the side of the kiln during firing.
During the glazing process, the trial ring is removed from the kiln with a metal rod at around 2200F. Once removed, it is quenched in a bucket of water.
The quenched clay ring is then inspected to see how well the glaze has developed in the kiln.
What Type of Salt is Used in Salt Glazing?
Most often, the salt used when salt glazing pottery is common salt.
Sometimes potters will experiment with different combinations of material. For example, using a 50/50 mixture of rock salt and sawdust to enhance the orange peel texture. Others will add a percentage of borax frit to the salt to create a smoother finish to the glaze (Hamer and Hamer 2015, p 317).
The salt is usually added to the kiln when it has been made slightly damp. Sometimes dry salt granules can simply fall to the bottom of the kiln without vaporizing.
Making the salt a little damp can help prevent this from happening. Though it’s important that only a little moisture is added to the salt. Too much water could cause an excessive amount of steam, which can lead to an explosion in the kiln.
Some potters use a combination of salt and soda when firing. Soda firing is similar to salt firing. However, there are differences.
In soda firing, sodium carbonate is mixed with water to produce a soda mix. This is then sprayed into the kiln at high temperatures.
Salt and soda firing result in pottery that has different colors and textures. Another difference is that soda firing is said to be less harmful to the environment. So, let’s take a look at some of the concerns that are raised around salt firing.
Environmental Concerns:
As mentioned earlier, when salt decomposes in the kiln two main separate elements are produced. They are sodium oxide and hydrogen chloride gas.
The chloride gas leaves the kiln out of the chimney and is exhausted into the surrounding environment.
When hydrogen chloride gas comes into contact with moisture, it creates hydrochloric acid vapor. This vapor is corrosive and damaging to the environment.
In addition to this, some sodium oxide may also leave the kiln out of the chimney vent too. When sodium oxide comes into contact with water, it forms a corrosive acid too.
It is because of these environmental concerns that salt glazed pottery on an industrial scale has now been banned.
Is Salt Glaze Pottery Bisque Fired First?
Some potters who follow a very traditional salt firing schedule will raw fire their pottery. This means that they don’t bisque fire their pots first.
However, most commonly today potters will bisque fire their pots before salt glazing them. One reason for this is that bisque ware is stronger than greenware.
As such it’s less likely to break when it’s being loaded into the kiln. It also has the advantage that the glaze firing is shorter too because the pots have already been bisque fired.
However, whether the pots are bisque fired or not, depends on the type of kiln being used. The firing schedule on a very large wood or gas fired kiln will be long.
A gradual increase in temperature over a long period of time allows raw greenware to dry out slowly. As such, pots that have not been bisque fired are less likely to explode in the kiln.
By contrast, if you are salt glazing in a self-made propane kiln, your firing schedule will likely be much shorter. As such, bisque firing the pots first is more or less essential.
What is the Best Clay for Salt Glazed Pottery?
Clay that is being used for salt glazing needs to have a high silica content. This is because, as described above, the sodium oxide fluxes, or melts that silica in the clay. And it is this fluxing process that creates the salt glaze.
Some types of clay, for example, ball clay and china clay contain insufficient silica to be suitable for salt glazing. By contrast, fire clays, which are high in silica, are a good option.
However, silica is not the only important ingredient in the clay for salt glazing. The clay also needs to contain aluminum oxide, if the glaze is going to form properly.
Nevertheless, there needs to be a higher percentage of silica than aluminum oxide. In fact, Hamer and Hamer state that the ideal ratio of silica to alumina oxide is 1:5.
Some potters will experiment with different combinations of clay to find their ideal clay body. For example, potter Ben Owen mixes 3 or 4 clay bodies to find the right mix for salt glazing.
How Long Does It Take to Salt Glaze Pottery?
The time it takes to salt glaze pottery depends on the kind of kiln you are using. It also depends on the design of that particular kiln.
For example, some wood burning kilns can take several days to complete a firing schedule. This contrasts with a phoenix type wood burning kiln. The phoenix type kiln is designed to work very efficiently and get heat from the fuel to the pots quickly.
A phoenix kiln can be hot enough to start salting after it has been burning for around 8 hours. And it can reach its final temperature of around 2372F (1300C) in about 12 hours.
By contrast, a large gas kiln can take around 2 days to get up to temperature slowly. And after two days it’s possible to start the salting process.
Whereas a self-made DIY propane kiln can reach its top temperature in around 3 hours.
Cooling the Salt Glazing Kiln
Similarly, cooling the kiln depends on the type of kiln being used, and how tightly the kiln has been packed.
A large kiln that takes about 50 pots can take a couple of days to cool. Whereas a very large kiln that takes around 300 pots can take around 4-5 days to cool.
Again, by contrast, a small propane kiln can be cool enough to unload in a couple of hours. This is sometimes called ‘crash cooling’.
Final Thoughts
There is something amazing about being able to turn common salt into a beautiful and functional piece of ceramic ware. Salt glazed pottery uses the simple ingredient of common salt to make pots that can be admired and used. If that isn’t alchemy, I don’t know what is!


