This article is a step-by-step guide on how to make a raku kiln. I had made raku pottery in workshops and under the guidance of other potters. But I had yet to take the plunge on my own if you’ll pardon the pun. I decided it was time to take that step, so I only went and built my own raku kiln! Here is how I went about it…
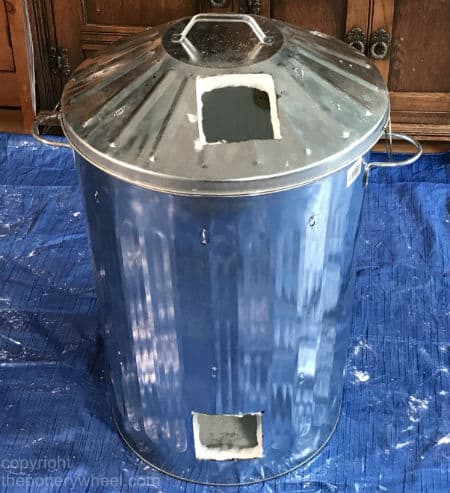
To make a raku kiln, cut out a square a couple of inches from the base of a steel trash can. This is your burner port. It needs to be 4” by 4”. Cut a vent in the can lid of the same size. Lastly, line the can with ceramic fiber.
This process sounds simple and actually, it is. However, there are some details that it is important to get right in order for your kiln to work effectively.
In this article, I will describe how to prepare your trash can to be lined with insulating fiber. How to add a burner port and a vent hole to the kiln. I will also cover how to line the trash can with ceramic fiber, using nichrome wire and ceramic buttons.
Disclaimer: Raku firing can be dangerous. This article is not advice, rather it is for informational purposes only. I am not a kiln technician. I am just a potter, who wanted to share the information I gathered on how to make a raku kiln. These are the steps that I took. Please check out the safety of your setup with an appropriate professional before using it.
What You Need to Make a Raku Kiln
Before I start with the step-by-step process, here is a list of things that you will need:
Materials
- A galvanized steel trash can (I used a 90ltr / 24 gallon can – though you can use a larger one)
- 1” thick, 128gk/m3 Body soluble ceramic fiber. I bought a 24-foot roll, and there was plenty left to spare.
- Nichrome Wire 1.6mm, 14 AWG. I used around 10 ft.
- Ceramic Buttons – you can make or buy these.
Tools
- Wire cutters
- Stanley cutting knife
- Drill
- Aviation snips or an angle grinder
Safety Gear For You
- A respirator.
- Protective gloves – I used rubber gloves to protect myself from the ceramic fiber, but on reflection, I probably should have worn something tougher like gardening or builders’ gloves. Something close-fitting like gardening/construction gloves would be best. This will let you do fiddly detail work.
How to Make a Raku Kiln
This video is a brief overview of the process. For a full step-by-step video on how to make a raku kiln, check out my YouTube channel.
Step 1
Drilling
You are going to line your trash can with insulating ceramic fiber. You will be securing the ceramic fiber to the inside of the can with ceramic buttons and wire. In order to do this, you need to drill some holes in the lid and side of the can.
Drill pairs of holes at regular intervals around the lid and body of the trash can. The pairs of holes should be about an inch apart.
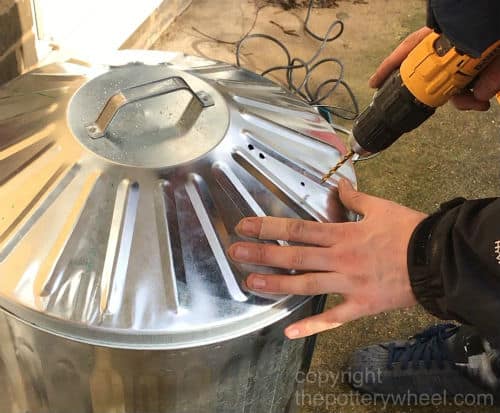
I drilled more pairs of holes than I needed. Ultimately, I only needed to use 5 ceramic buttons on the lid. And I used 8 ceramic buttons around the top half of the trash can. It doesn’t matter if you drill too many as the surplus ones will be covered by the ceramic fiber. And a little extra ventilation is not a bad thing!
Step 2
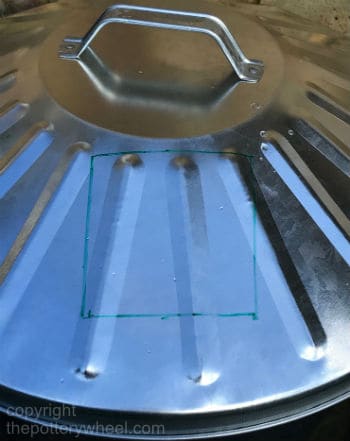
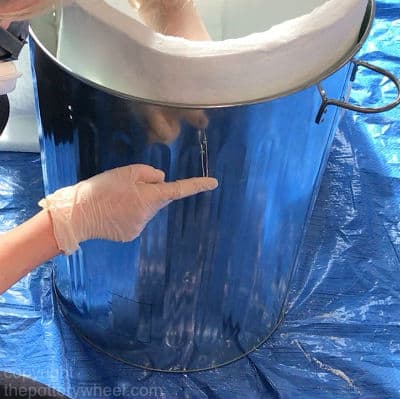
Cutting your Burner Port and Ventilation Hole
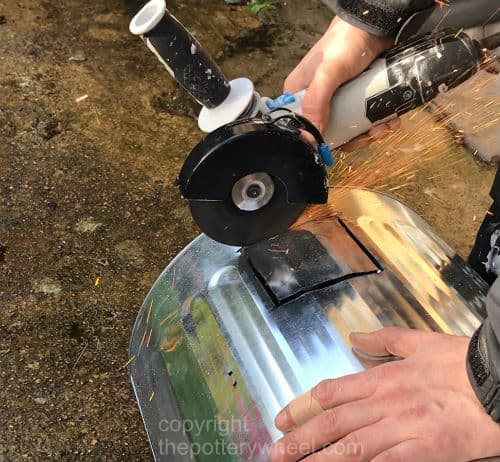
You need to cut two 4 x 4” squares out of the steel can. One of these needs to be cut out of the lid. Measure 2” away from the edge of the lid, then draw the square on with a marker.
You can cut this out with metal cutters like aviation snips. Or you can use an angle grinder. An angle grinder makes the cutting process very simple. It’s like cutting through butter and a simple angle grinder is all you need and relatively inexpensive.
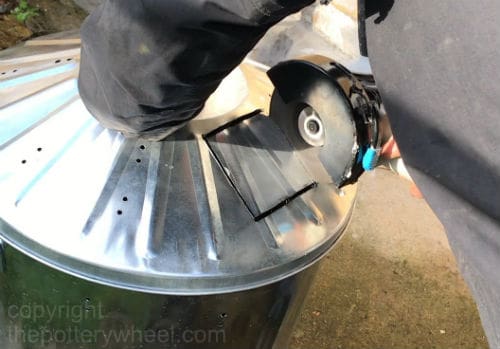
Once you have cut out the ventilation hole in the lid, you need to cut out your burner port. Again, measure 2” from the base of the can, and draw a 4 x 4” square with a marker pen. Cut this out with either aviation snips or an angle grinder.
Step 3
Drilling a Hole for Your Thermocouple
Drill a hole about halfway up the side of the trash can. This needs to be about ½” in diameter.
This will be for your thermocouple probe if you are choosing to use one.

Step 4
Cutting Your Ceramic Fiber
Wearing your respirator, roll out the ceramic fiber. You don’t have to use body-soluble ceramic fiber. The regular ceramic fiber is cheaper, however, the body soluble fiber is safer.
If body soluble fiber gets into your lungs or under your skin, it will dissolve. Whereas the non-body soluble fiber will stay in your body. Though it’s a bit more expensive, buying the body-soluble ceramic fiber was a no-brainer for me.
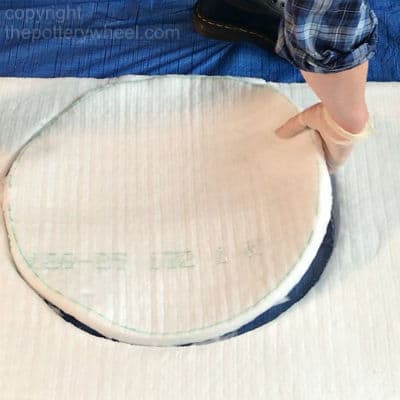
Once you have rolled it onto the floor, place the trash can on the fiber and draw around the base. Cut around this circle using a sharp blade or Stanley knife. Then place the circle of ceramic fiber to one side.
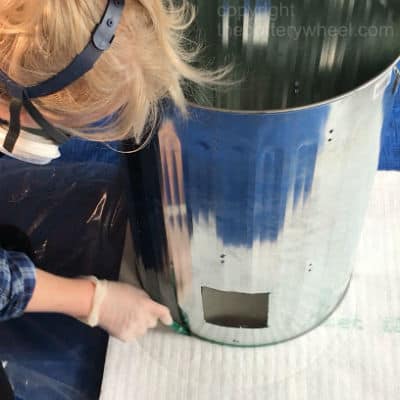
Then draw a circle around the lid of the trash can, and cut this out. I cut about a ¼ “ extra around the outside of the circle, to compensate for the curve of the lid.
Step 5
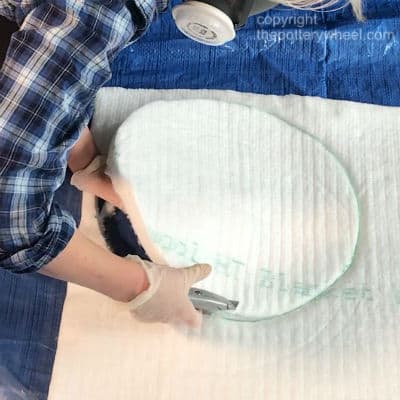
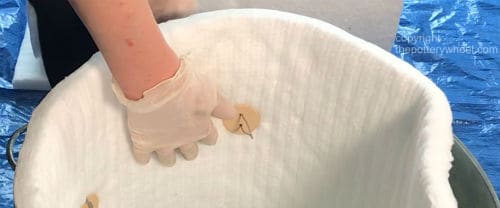
Place the ceramic fiber in the base of the can.
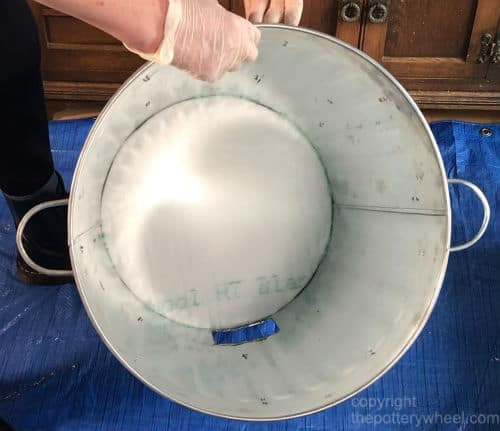
Next, fit the ceramic fiber into the inside of the can lid. You need to press the ceramic fiber firmly enough to make sure it is positioned correctly.
However, it’s important not to press it so hard that you compress the fibers. Crushing the fibers down will compromise their insulating capacity.

Step 6
Lining Your Trash Can
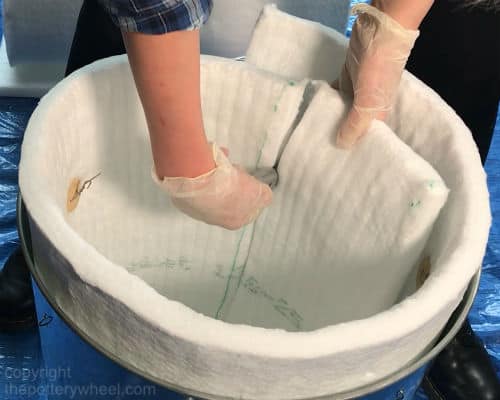
Measure the circumference of the trash can, at its widest point. Cut out a section of ceramic fiber that is a few inches longer than the circumference. It’s important that the section is a bit longer than the circumference. This is because you want the edges of the ceramic fiber to align tightly together and form a good seal.
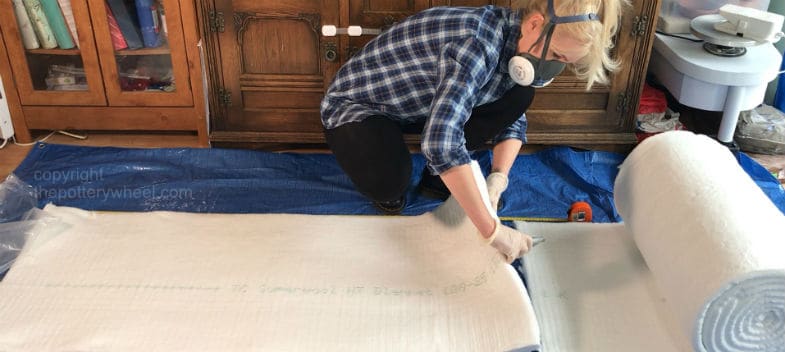
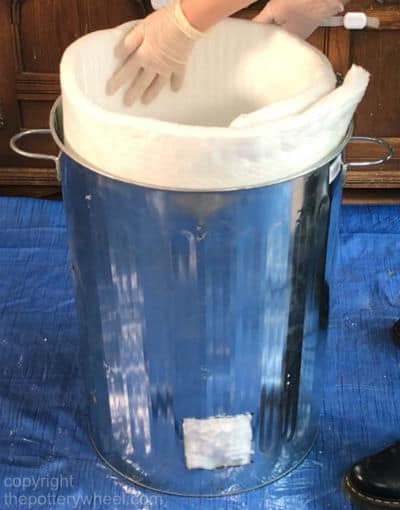
When you have cut out the section, slide it into the trash can, so that it lines the can. Make sure that the bottom edge is up against the fiber that’s lining the base.
Step 7
Securing the Ceramic Fiber
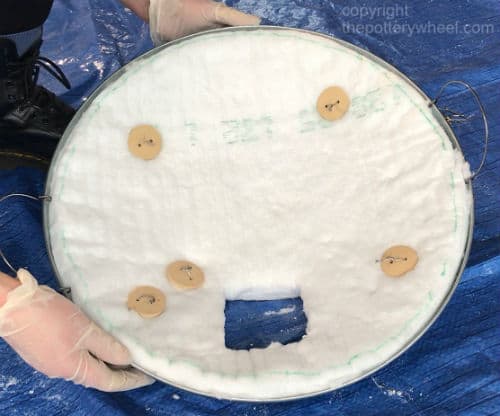
Cut your nichrome wire1 into lengths of about 7 inches. Bend the wire into a U-shape. Then insert the U-shaped wire into holes drilled into the side of the can. The ends of the wire should be pointing into the can.

Slide one of the ceramic buttons over the ends of the wire and twist the wire to secure it. Again, the wire needs to be twisted enough the fix the button on, without crushing the ceramic fiber.
Once the button is secured, bend over the ends of the twisted wire and snip the excess off.
Repeat this process with as many buttons as you need to feel that the ceramic fiber is secure. Because my trash can was only 24 gallons, I didn’t need to put any buttons around the bottom half. The ceramic fiber is stiff, and once I’d put some buttons around the top, the bottom held itself in place.
Step 8
Cutting Off the Excess Fiber and Aligning the Edges
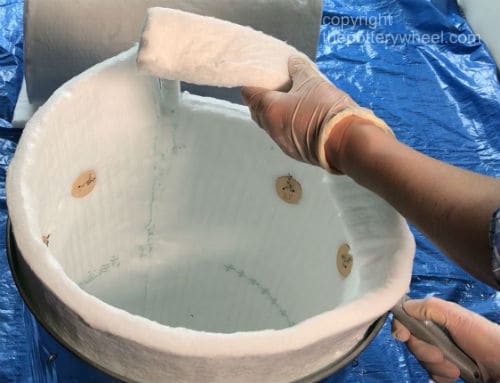
Using a marker pen, make a mark on the ceramic fiber where you are going to cut off the excess. You can do this by holding the two edges together and seeing where they overlap. Then mark the top and bottom and draw a line between the two points. Leave some overlap between the two edges. This is so that when you fit the two edges together, the fit is snug. Once you have drawn your line, cut the excess off with your sharp knife.
Then carefully push the edges of the ceramic fiber together, so that they create a tight join.
Step 9
Slice of any excess ceramic fiber from around the top edge of the trash can. Leave about 1/3 inch of ceramic fiber sitting outside the top edge. This ensures that there is a snug insulated fit with the kiln lid.
Step 10
Secure the fiber onto the lid using the ceramic buttons and wire, in the same way.
Step 11
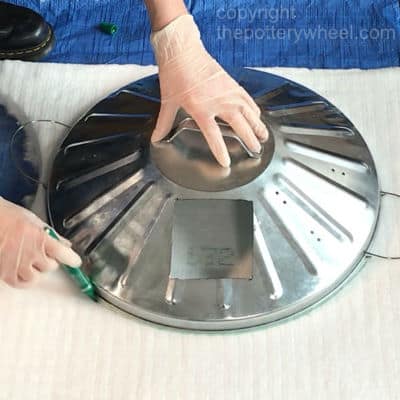
Using your sharp knife, cut out the ceramic fiber from the burner port and vent holes. Also, make a hole in the fiber by the hole for the thermocouple.
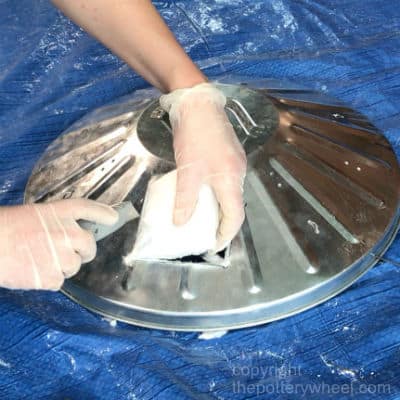
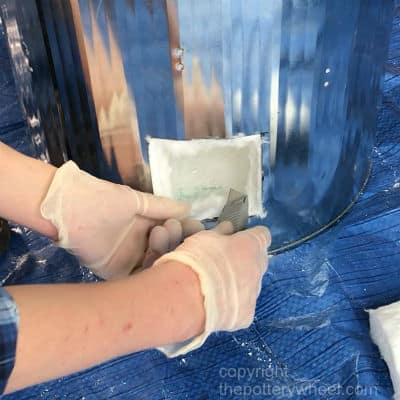
Press the ceramic fiber back at the edges so that it is flush with the holes. It’s important that the fiber doesn’t restrict the size of the squares. This is because the size of the port and vent determine whether your kiln is in oxidation or reduction when firing.
Step 12
Feel pleased with yourself – you have just made a raku kiln!
What You Need Once You Have Made The Raku Kiln
You will need to purchase some very simple kiln furniture. Essentially, you need a kiln shelf resting on 3 props. The props need to position the shelf above the top edge of the burner port.
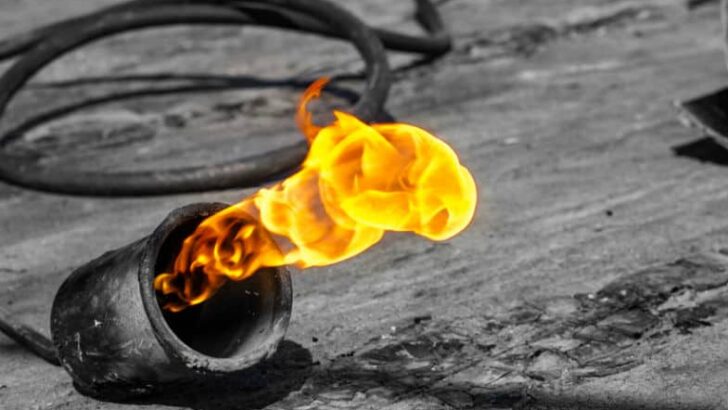
The reason for this is that the flame of the burner needs to go underneath the shelf. This enables you to fire the pottery from below. Like this…
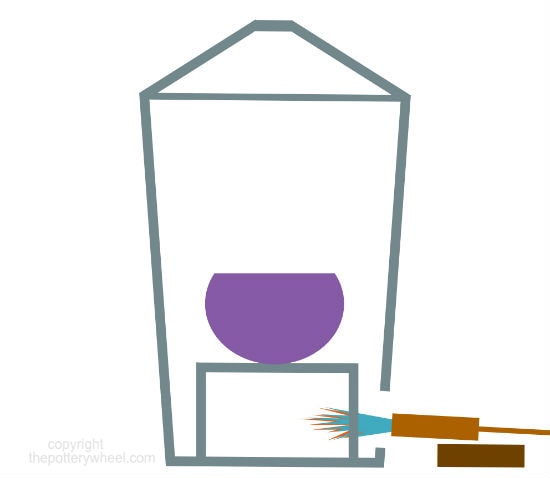
Raku Kiln Furniture
A 12” circular shelf should be a good size if you are using a trash can the same size as mine.
But if you use a larger trash can, then the circumference of your kiln will be larger. That means you can use a larger shelf and fire more pieces at one time.
You can either use kiln posts or fire bricks to hold up your kiln shelf. The advantage of using kiln posts is that you can buy different lengths. So, once you make your raku kiln, measure the distance between the base and the top of the burner port. This will indicate what length of the posts you need to buy to support the shelf.
What to Put Your Raku Kiln on?
Once you make your raku kiln you need to find a safe spot to use it. One idea is to put your kiln on top of a layer of builder’s bricks.
If you put it directly on grass, it will burn a circular patch on your lawn. I have seen videos of raku kilns cracking concrete slabs they were placed on. I also put a layer of ceramic fiber between the kiln and the bricks to prevent the bricks from overheating.
Alternatively, you could put it on fire bricks, but these are quite soft and damage easily. Also, they are expensive. You are better off just getting regular bricks and using a layer of leftover ceramic fiber.
Your Raku Kiln Burner
You will also need to get a burner torch and propane bottle. It is possible to buy specialist raku burner torches. But they are relatively expensive, and when you are starting out, it’s fine to use a standard weed burner.
A 20lb propane gas tank
And a regulator for your gas tank.
If you want to know how to link all these up together, check out my video here:

Firing Your Raku Kiln
When you are firing your raku ware, you will need to monitor whether the glaze has matured. Once it is mature, it is ready to take out and put in reduction. You lift the pottery out of the kiln with raku tongs and put it on combustible material like sawdust. Then you cover the smoldering or flaming material with a steel bucket.
Potters have different ways of gauging if their kiln has reached a high enough temperature. Some rely on looking at the glaze to see if it has become smooth and glossy. This is hard to do with a trash can kiln. The only way you could look in is through the vent on the lid. If you value your eyeballs, eyebrows, and hair, I wouldn’t recommend this.
Alternatively, you can use a thermocouple in the hole that you drilled in the side. This will enable you to monitor the temperature accurately.
Other potters also use pyrometric cones in the kiln. I use a combination of a thermocouple to monitor the temperature and some 06 cones. The cones allow me to double-check that the kiln got hot enough.
Safety Considerations When You Make a Raku Kiln
As I stated right at the start of this article, raku firing is fun but can be dangerous. There are some very alarming videos online of people raku firing in shorts and sandals. If you do decide to make a raku kiln, you need to take safety considerations into account.
I know that being safety conscious isn’t especially cool. However, I always have a fire extinguisher to hand, in case things get out of hand. Also, I wear safety goggles, a respirator, gauntlets, and a fire-resistant apron. I also keep my hair tied securely back.
I’d like to say that I’m the relaxed type, who is happy to raku fire in a bikini. But I value my skin and sight too much. It is good to have a healthy respect for the amount of heat you are generating in a raku kiln. That is why I always cover-up, and protect my eyes and lungs.
Final Thoughts on How to Make a Raku Kiln
Learning to make a raku kiln is empowering. If you have limited space and resources, it is the perfect solution. Electric kilns are expensive and bulky, and not ideal for raku firing. Gas kilns are out of the question for many hobby potters. But a DIY kiln can be kept easily in your garage or shed and used to make amazing pottery. What else could you ask for? Be safe and enjoy!


