Since I started using my DIY raku kiln, I have picked up some tips on the raku firing process. It took me a few tries at firing a raku kiln to use it successfully. And I imagine that the same is true for other people starting out. So, I thought I’d write an article and share what I have learned about how to raku fire. Hopefully, this step-by-step article on how to fire a DIY raku kiln will save you some time.
Like many potters, I was intrigued by the excitement of the raku firing process. And I love the look of raku pottery. So, I decided to build a raku kiln.
Building the kiln was relatively straightforward, but once it was built, I needed to learn how to raku fire. I had attended raku workshops before, but I had never flown solo before, and it was a little nerve-wracking.
It took me 3 attempts at firing a DIY raku kiln on my own before I had a successful outcome. I wanted to write this article to outline some of the issues I encountered and how I resolved them. Hopefully, this will help you avoid the same pitfalls in the raku firing process.
Disclaimer – I want to stress that I am not a gas engineer and I’m not a health and safety expert. I’m simply a potter who loves to raku. As such, this article is for informational purposes and not advice. If you have concerns about the safety of this process, please consult an appropriate professional.

My DIY Raku Kiln
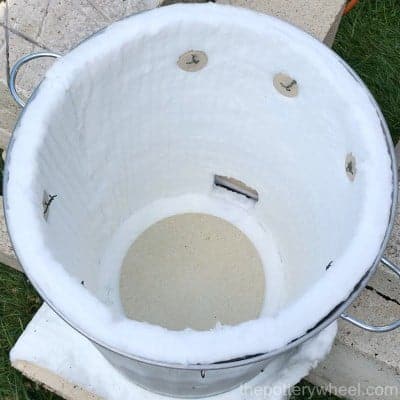
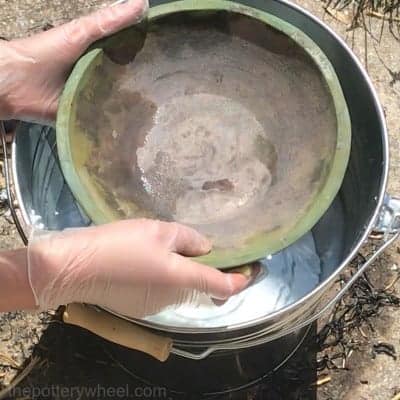
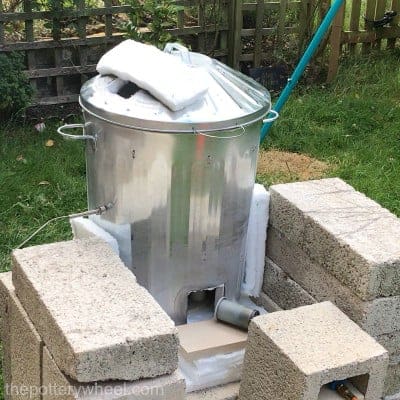
I built my raku kiln using a galvanized steel trash can. The trash can is around 24 gallons (90 liters) in size. So, it’s relatively small.
The kiln is lined with a layer of body-soluble ceramic fiber for insulation. The lining covers the entire inner surface of the can and the lid. I attached the insulating fiber using ceramic buttons.
I also cut a burner port in the base into which the propane burner would be angled. And I cut a flue in the lid of the can for ventilation and airflow.
Here is a step-by-step guide on how I built my DIY raku kiln.
How to Raku Fire – 1st Firing
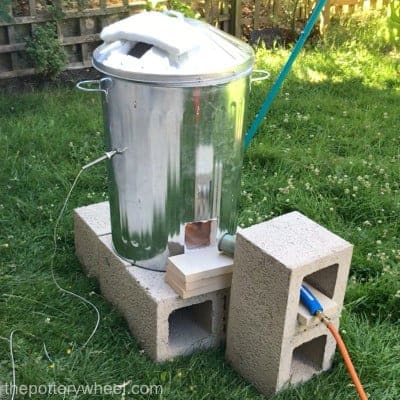
The first time I fired the raku kiln, I set it up like this:
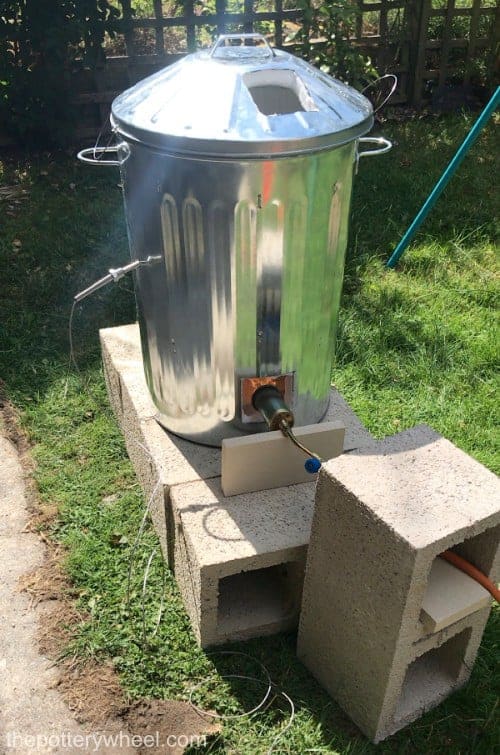
These are some of the steps I took to set my kiln up the first time:
- You will see that I mounted the kiln on hollow concrete blocks. This was to keep the raku kiln directly off the ground. Also, hollow bricks would allow for some airflow underneath.
- I also rested the burner torch through the holes in one of the hollow bricks to secure it. I didn’t want a gust of wind to knock the burner over whilst it was firing. So, this seemed like a good solution.
- Additionally, I used a fire brick to support the burner head torch. This enabled me to raise the burner up a little so that it was pointing into the burner port.
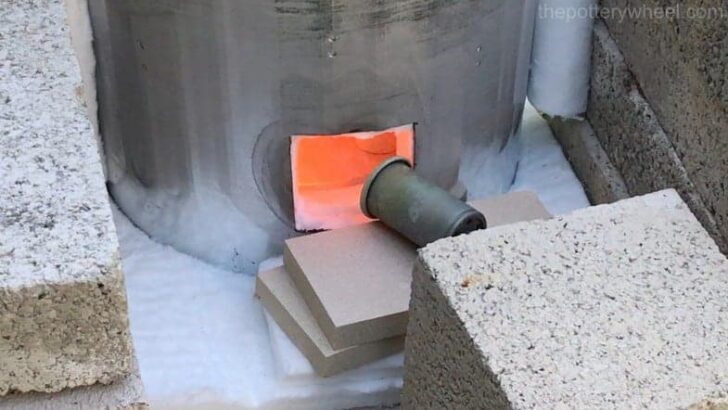
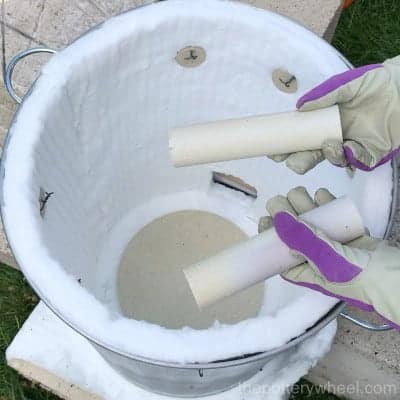
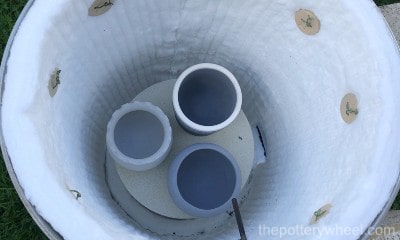
Raku Kiln Furniture
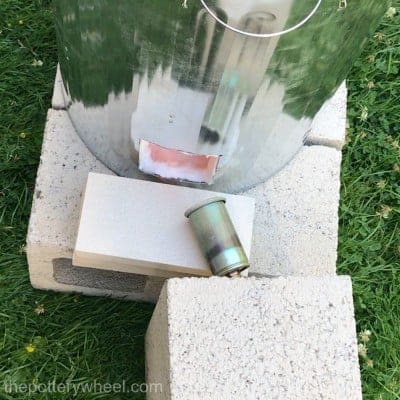
On the inside of the kiln, I used a 10-inch diameter circular kiln shelf. This rested on three 7-inch kiln posts.
The kiln shelf needed to be positioned above the top edge of the burner port. This allows the flame from the burner to enter the kiln and be directed under the kiln shelf. Like this:
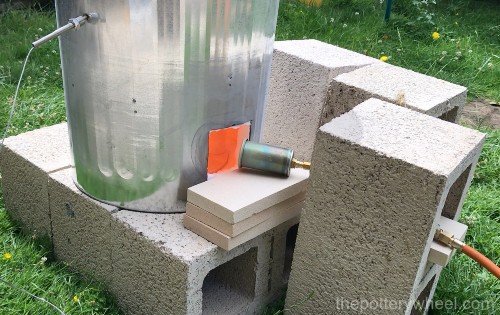
My intention was to rest the kiln posts directly onto the ceramic fiber.
In practice, I found that the fiber was quite soft. As a result, the kiln posts felt wobbly and unstable resting directly on it. Imagine trying to get a rolling pin to stand upright on a bed of cotton wool. It was not solid enough.
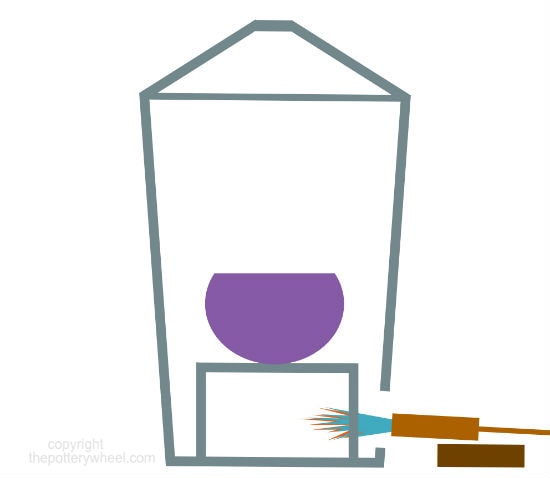
The solution to this problem was simply to put another circular kiln shelf directly onto the base of the kiln. I then positioned the props on the bottom kiln shelf and put another shelf on top of the props. Like this:
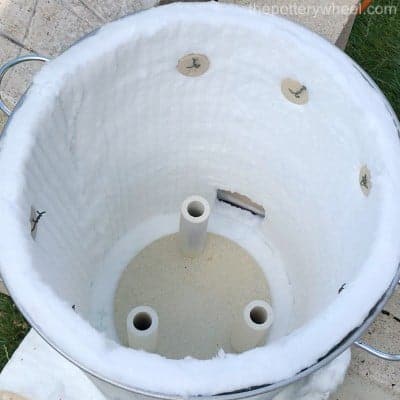
This arrangement felt solid, and it seemed unlikely the kiln furniture would fall when I was firing the kiln.
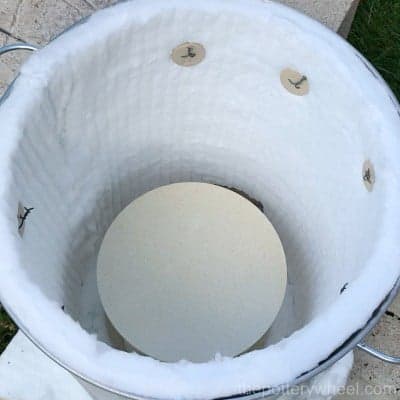
I then placed the glazed, bisque fired pottery onto the kiln shelf, and placed the lid on the raku kiln.
Using the Propane Burner
I feel an urge to re-state my disclaimer above that I am not a gas engineer. In fact, in learning how to raku fire, I have also had to learn how to use a propane torch. And I’m not going to lie, it was a bit nerve-wracking using the propane burner the first few times.
Because I hadn’t used a propane burner before, I decided to consult with a gas plumber on a couple of things. Firstly, I wanted to know how to attach the burner torch to the propane tank. But I also wanted some general advice about how to use the torch.
I found this consultation invaluable. In fact, a very nice local gas engineer came around and gave me some free advice. But, even if he had charged his hourly rate, it would definitely have been worth the investment and reassurance.
I made a video about how to attach the propane burner to the tank based on my conversation with him. Here is the video on YouTube. I hope you find it helpful. But you may also want to have a similar conversation with a gas professional too.
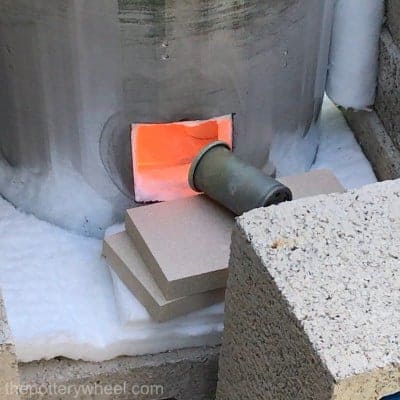
Generally, I light the burner so it’s on a small flame. Then I position the burner torch through the concrete block at the burner port opening.
Once the lighted burner torch is in place, then I increase the size of the flame. I do this by adjusting the control knob on the burner head, rather than on the tank or regulator.
Using a Thermocouple and Pyrometer
I inserted a thermocouple probe into the side of the kiln. When I was building the raku kiln, I drilled a hole halfway up the side of the kiln. The hole is about ½ inch in diameter, which is large enough for a thermocouple probe.
The wire on the thermocouple is then plugged into a pyrometer to monitor the temperature in the kiln.
This is the pyrometer I use. I’ve found it to be very reliable so far.
I don’t actually remember it coming with the two probes that are included in the package. If it came with them, I don’t have them anymore.
Either way, you will need a thermocouple probe suitable for a kiln.

I know some potters don’t use a pyrometer and thermocouple when they raku. They base their timings on experience and looking at the condition of the glaze.
I prefer to use a pyrometer for accuracy. Also, once this particular type of raku kiln gets hot, it would be uncomfortable to look inside the flue.
Firing the Raku Kiln
My first experience of firing the kiln was not 100% successful. Although the temperature did climb, the kiln got to 1320F (715C) and then it hung there.
The pyrometer is measuring the temperature in Celsius rather than Fahrenheit in these pictures.
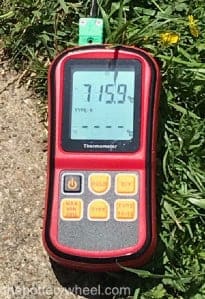
My aim was to get the kiln up to 1850F (1010C). However, I could not get the temperature above 1320F.
After a little while of trying to boost the temperature, I decided that something was not quite working. So, I turned the burner off and did some investigation. This is what I learned….
Lessons from Raku Firing Number 1
After this first attempt, I did some investigation online. And I spoke with an experienced raku potter to see what might have gone wrong. He gave me some invaluable tips on how to raku fire.
Through this research, I found a couple of possible solutions to the issue I had encountered. These suggestions were:
- Adjust the distance of the head of the burner torch from the burner port. Moving the torch away from the burner port will allow more oxygen in and potentially boost the temperature.
- Direct the burner torch into the burner port at a 45-degree angle, rather than at 90 degrees. By doing this the flame scoops around the inside of the kiln, rather than roaring into the center of the kiln.
- Adjust the size of the flue on the top of the kiln. I was advised to partly cover the flue whilst firing to see if that helped boost the temperature. It was possible that I was losing too much heat through the flue.
It’s worth mentioning that the adjustments suggested above also affect if the kiln is in oxidation or reduction. Reducing the amount of oxygen in the kiln will put it into reduction.
During the raku firing, you want the kiln to be in oxidation. You need enough oxygen to be going in to create an oxidation atmosphere. However, you also need to tweak your burner port and flue to keep enough heat in. I have found that it’s a balancing act.
How to Raku Fire – 2nd Firing
The second time I tried firing a DIY raku kiln I adapted my approach and made the above adjustments. To summarize these changes:
- I had the burner at a 45-degree angle to the kiln
- The burner was positioned a little further from the kiln
- I covered part of the flue on the lid
Covering the Flue
I chose to cover part of the flue with a spare piece of ceramic fiber. The reason I chose this, is that it is soft and light, and easy to move about during firing.
I did think about using a spare fire brick but it felt a bit precarious balanced on the lid of the kiln. Also, if a fire brick fell off during firing, it would break, unlike a piece of ceramic fiber.
My intention was to cover part of the flue and adjust the position of the ceramic fiber when firing. I wanted to see if I could boost the temperature of the kiln by doing this.

The 2nd Firing
On the whole, these adjustments did make a difference. Unlike the first firing, I was able to get the kiln all the way up to 1832F (1000C). The kiln did climb past the 1382F (750C) point, which is where it hung and stalled on the first occasion.
However, it took a long time for the temperature to reach 1382F. In fact, it took over an hour. And the direction of the temperature fluctuated up and down throughout.
I found I was continually adjusting the burner and the flue. It felt like the kiln was struggling to get hot enough and I was trying to coax it up to temperature.
Fighting the Breeze
On the second firing, there was a gentle breeze in the air. I wouldn’t have thought it would make much of a difference.
However, I noticed when the breeze picked up a little, the flame struggled and the temperature in the kiln dropped. So, I placed some concrete blocks on the side that the wind was coming from to shield the kiln.
This seems to improve things a little. When I was making the kiln, I’d seen some designs where potters had welded metal flaps around the burner port.
These flaps look a bit like metal barn doors by the burner port entrance. They are designed to protect the flame from wind. And they now seem like a very good idea. When I make my next raku kiln, I will include some of these in the design.
What Temperature Did the Raku Kiln Reach This Time?
Eventually, after a lot of tweaking and coaxing, the raku kiln did reach 1832F (1000C). However, it stayed there only momentarily, and then the temperature slipped down again.
I decided that once more I needed to do some further investigation and find out why the kiln was struggling.
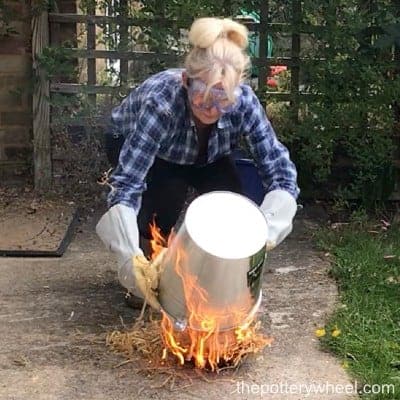
I turned the burner off, and using my raku tongs I lifted the kiln lid off. Then I carefully took the pottery out and placed it on the ground. I quickly covered the pottery with a metal bucket containing straw. The straw ignited immediately and thick smoke seeped out from under the bucket rim.
After 60 minutes I had a look at the pottery. As I had anticipated, the glaze was underfired and looked dull and unexciting. I was disappointed and I wondered what I could do differently next time. In the next section, I will look at the final adjustments I made that led to a successful raku firing. So, read on…
How to Raku Fire – 3rd Firing
During the third raku firing, I made just a few more adjustments that seemed to make a huge difference for the better.
I had wondered during the 2nd firing, if the kiln was losing heat out of its base. I had used a second circular kiln shelf to make the kiln props a bit steadier. And I wondered if this was compressing the ceramic fiber and making it less insulating.
When I took the kiln off the concrete blocks after the second firing, I noticed the blocks were quite hot. Even though the kiln was cool, the bricks were hot. I wondered if this was because the kiln was losing a lot of heat through the base.
So, I made a few more changes. They were:
- I put another layer of ceramic fiber insulation in the base of the kiln. I simply cut out another circle of the fiber to the right size. Then I placed this at the bottom of the inside of the kiln. Fortunately, the burner port was high enough from the base, so that the extra layer didn’t block the port.
- Also, I put a layer of ceramic fiber on the concrete blocks, before I put the kiln on the blocks.
- In addition to this, before the 3rd firing got going, I made a shield for the kiln from the wind. I did this by stacking some spare concrete blocks on either side of the kiln.
- I also blocked gaps between the kiln and the windshield with ceramic fiber. The idea was to protect the kiln from as much of the breeze as I could.
Split Hose
I wanted to mention that before I tried my 3rd firing attempt, I checked the propane burner over. I noticed that when I turned the propane tank on, the burner torch was making a very faint hissing noise. This noise was coming from the torch, even though the dial on the torch was fully closed.
I wasn’t sure why it was making this noise. And I assumed that I had failed to tighten one of the nuts sufficiently. Anyway, it made me apprehensive, so I arranged for a gas engineer to check it out.
He confirmed that there was indeed a very small split in the gas hose near the burner head. He said that this was very unusual as the hoses were generally very hardy. However, it was a good thing that I had decided to go with my instincts and delay the 3rd firing.
In fact, I simply bought a new hose and attached that to the burner. This got rid of the problem. However, I think this highlights the value of getting gas professional to check out your kiln set up.
The 3rd Firing
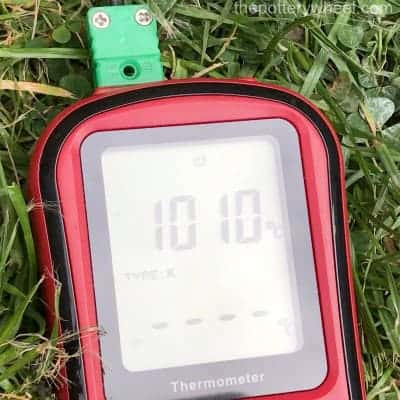
After each of the adjustments I had made, the third raku firing went very well. The temperature of the kiln rose quickly, and it was at 1850F (1010C) in around 20-25 minutes.
It was orange hot. At one point during the firing, I noticed some orange flames licking out of the flue on the kiln. This was an indication that the kiln was in reduction, so I opened the flue a little. I did this by simply moving the ceramic fiber off the flue a little, so less of it was covered.
The glaze I have used is Raku glaze, and the instructions are to fire to 1850F quickly. Then hold for 5 minutes before removing the pottery and putting it in a reduction chamber.
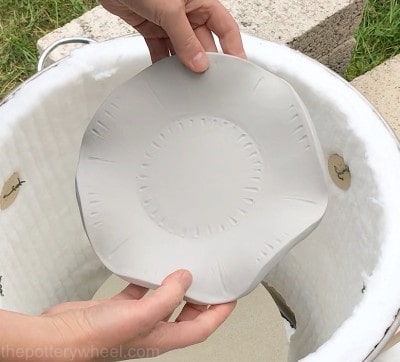
Here is what the raku glaze looked like before it was fired:
I followed the advised firing schedule. Once the kiln reached 1850F, I tweaked the dial on the burner head to hold the temperature there. After 5 minutes I turned the burner off.
Wearing goggles and heat-resistant gloves, I lifted the lid off the kiln with tongs. I placed the lid to one side, and then lifted the pottery out of the kiln with the tongs.
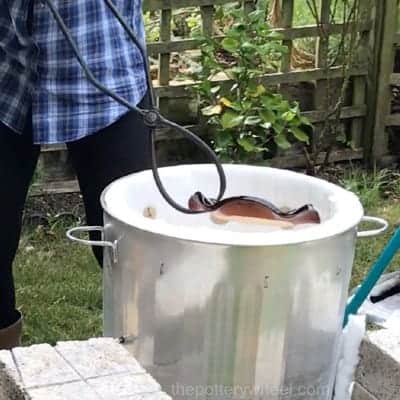
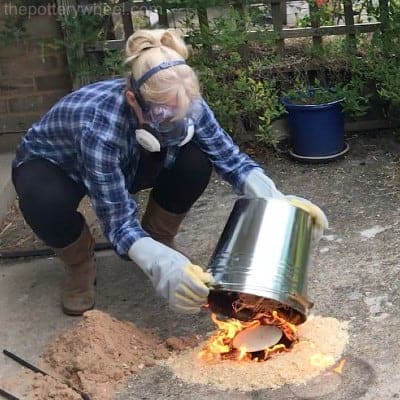
I then placed the pottery onto a bed of sawdust on the ground and covered it quickly with the bucket.
I sealed the gap between the bucket and the sawdust using sand. And let the pottery sit in the reduction chamber of the bucket for 60 minutes.

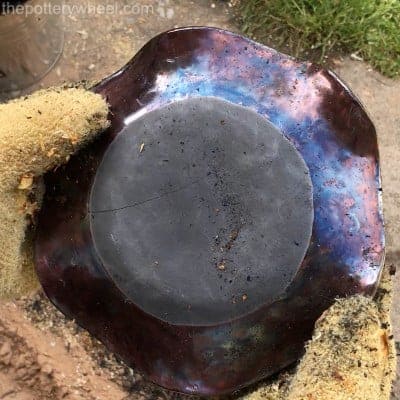
After 60 minutes the pottery has cooled down enough to uncover and inspect.
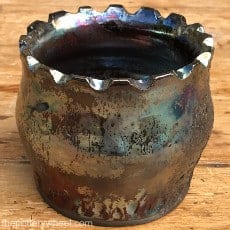
My initial response to this firing was that I was happy with how the glaze looked. However, on closer inspection, I realized that the plate had cracked. You can clearly see the crack in the picture below.
Lessons from Raku Firing Number 3
After some thought and research, I realized that the plate may have cracked for two possible reasons.
These possibilities were as follows:
- Firstly, the plate was a large flat shape. Plate shapes are more prone to cracking especially with sharp changes in temperature.
- Secondly, it occurred to me that the temperature in the kiln had simply climbed too quickly. At 1063 F (573C) pottery goes through the quartz inversion during firing.
During the inversion, the ceramics expand sharply. If you race through this temperature window it can cause pottery to crack.
So I decided to adjust my firing schedule to see if that helped. I’m happy to say that with a couple of adjustments, I made some lovely raku pottery with my DIY raku kiln. And that’s what I will cover in this next section…
How to Raku Fire – 4th Firing
To try to avoid further cracks in my raku pottery, I made a couple of adjustments. These adjustments were as follows:
- The next pottery that I fired was pot shaped rather than flat.
- I adjusted the speed at which I fired the pottery. In particular, I slowed the temperature increase of the kiln until it had reached 1112F (600C).
Instead of racing through to 1850F (1010C), I slowed the first section of the raku firing down. I kept the flame on the propane burner a little smaller until the kiln had reached 1112F.
During this raku firing, it took 30 minutes to get to 1112F. Once the pottery was past the quartz inversion window, I increased the fuel being burned. So, after 1112F I let the temperature climb more quickly. But until that point, I kept the rate of increase slow and steady.
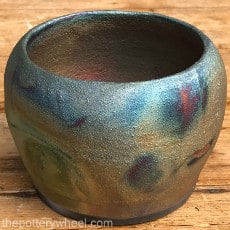
One benefit of firing pot shapes rather than larger flat shapes is that I could fit more in the kiln. This meant I could raku fire 3 pieces at a time. So, I could try out a couple of glazes at one. And experiment with different combustible materials.
These are the pots that I produced in the fourth firing, with the above adjustments. The glossy pot is a Mayco Copper Metallic raku glaze. And the matte pots are Mayco Peacock Matte raku glaze.
Experimenting with Combustible Materials
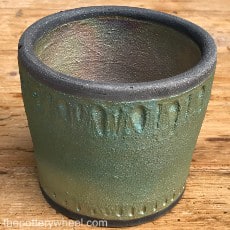
Learning how to raku fire is a process of trial, error, and experimentation. For example, by adding a bit more combustible material to the post-reduction chamber, I produced this raku piece.
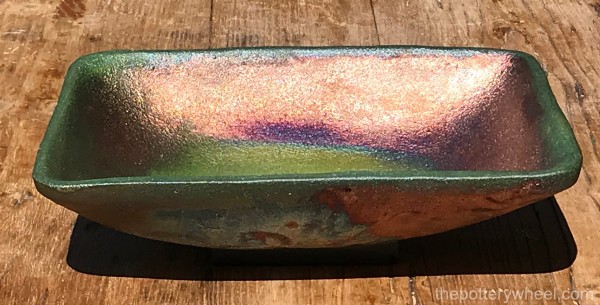
The glaze on this piece of pottery is also the Peacock Matte glaze. However, using more combustible material really brought out the iridescent quality of the glaze.
Different combustible materials also create a different finish on raku fired pieces. So, there is plenty of scope for ongoing experimentation. Learning how to raku fire is an ongoing process.
Raku Glazes
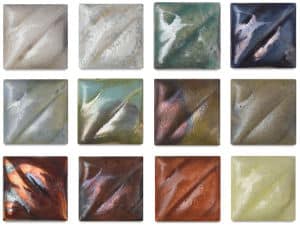
There is a range of really lovely raku glazes. The ones to the left are by Amaco and are available at Blick.
You can use most low-fire glazes for raku. However, the glazes made especially for raku firing often have a great iridescent quality after reduction.
To watch a video of how to raku fire pottery, check out my step-by-step video…

Is Quenching Necessary?
Sometimes quenching is used as part of the raku firing process. Quenching involves removing the hot pottery from the reduction chamber after a few minutes and putting it in water.
The thinking behind quenching is that it preserves metallic lusters on the pottery. However, I don’t quench my raku. I have found that the lusters on my raku are nice enough. And I’ve heard enough accounts from experienced raku potters who state that quenching is not really necessary.
What’s more, the rapid temperature change involved in quenching means the pottery is more likely to crack.
I have also heard accounts of narrow-necked pottery shooting out of the water like a rocket when it’s quenched.
This seems like an unnecessary risk to me. And I’m happy with the way my raku looks without quenching. I am going to stick to letting it cool in a reduction chamber.
How to Raku Fire – The Verdict
On the whole, I’m really happy with the way my DIY raku kiln is working. I’ve produced some pieces with glazes that I love. It seems like a simple, economical, exciting way of firing your pottery.
A Summary of the Adjustments I Made Learning How to Raku Fire
You may find that you have to make adjustments too. This is a summary of some of the things I did to help the kiln reach temperature.
- Position the propane burner at about a 45-degree angle as it goes into the kiln.
- Adjust the size of the flu on top of the kiln during firing
- Adjust the distance of the propane burner from the burner port during firing
- Shield the kiln from the wind/breeze
- Put another layer of insulation in the inside of the kiln
- Place some ceramic fiber between the kiln and the concrete blocks to avoid heat loss
What Would I do Differently when Making a Raku Kiln?
There are a couple of things I will change when making my next raku kiln. These changes are:
- To weld/screw metal pieces of steel to the sides of the burner port to act as a windshield.
- I would make the kiln larger. The trash can that I used was 24 gallons (90 liters). Once you have lined this kiln with ceramic fiber the internal cavity is quite small.
This means that if you are firing larger flatter items, you can only fire one piece at a time. I can fit up to 3 pieces in at one time if I’m making taller narrower objects, like vases.
But it’s nice to have the versatility of being able to fire more than one flatter item at a time. For that reason, I would use a larger trash can.
Raku Firing and Safety
When I’m firing raku, I take the following safety precautions:
- Wear protective goggles
- I wear a respirator when I take the pottery out of the kiln and put it in the reduction chamber. The pottery will create thick, quite stinky smoke when it’s in reduction. It’s best not to breathe it in.
- I wear heat-resistant gloves when I’m handling the tongs.
- My hair is tied back
- I stand away from the kiln as much as I can whilst it’s hot and the burner is on.
- I wear a long-sleeved top, trousers, and footwear that covers my foot and ankles. No sandals!
As stated above, this is not safety advice about raku firing. Rather, I’m sharing with you how I raku fire my pottery. You need to do your own health and safety risk assessment. Then you can make an informed decision for yourself about how to manage the risks of raku firing.
Final Thoughts on How to Raku Fire
If you’ve made a DIY raku kiln and you’re preparing to fire it, I hope this article has been useful. My intention was to share some of the challenges I’ve encountered with the raku firing process.
Learning how to raku fire is very exciting. And also, I have found it quite addictive. You may well encounter challenges of your own whilst learning about the raku firing process. Finding an experienced raku potter to talk through issues that arise is helpful. And I’ve found that potters are in general a generous bunch, who want to share their experience and help out. I hope you have fun and happy rakuing!


